Instruction Manual
Page 2
... wireless devices are designed to copyright laws. 2 FCC/IC NOTICE HD Camcorder, VIXIA HF G30 systems This device complies with Industry Canada license-exempt RSS standard(s). This transmitter must...experienced radio/TV technician for help. These are associated with FCC/IC radiation exposure limits set forth for a class B digital device, pursuant to radio communications. If such changes... direct sunlight, fire, etc. Several special packets are attached. Frequecncy Tolerance: 25 ppm Canon U.S.A., Inc. Important Introduction Usage Instructions WARNING TO REDUCE THE RISK OF FIRE OR ELECTRIC ...
... wireless devices are designed to copyright laws. 2 FCC/IC NOTICE HD Camcorder, VIXIA HF G30 systems This device complies with Industry Canada license-exempt RSS standard(s). This transmitter must...experienced radio/TV technician for help. These are associated with FCC/IC radiation exposure limits set forth for a class B digital device, pursuant to radio communications. If such changes... direct sunlight, fire, etc. Several special packets are attached. Frequecncy Tolerance: 25 ppm Canon U.S.A., Inc. Important Introduction Usage Instructions WARNING TO REDUCE THE RISK OF FIRE OR ELECTRIC ...
Instruction Manual
Page 4
... or implied for any other use for a personal and noncommercial purpose or (2) by a video provider licensed under the AT&T patents to Canon camcorders compliant with high-definition video composed of Panasonic Corporation and Sony Corporation. • Manufactured under AT&T patents for the MPEG-4 standard ...and may be used on the camcorder's settings, onscreen displays and in this manual signifies Wi-Fi Protected Setup. • The Wi-Fi Protected Setup Identifier Mark is a mark ...
... or implied for any other use for a personal and noncommercial purpose or (2) by a video provider licensed under the AT&T patents to Canon camcorders compliant with high-definition video composed of Panasonic Corporation and Sony Corporation. • Manufactured under AT&T patents for the MPEG-4 standard ...and may be used on the camcorder's settings, onscreen displays and in this manual signifies Wi-Fi Protected Setup. • The Wi-Fi Protected Setup Identifier Mark is a mark ...
Instruction Manual
Page 6
...range and versatility while you can make dark areas in the picture appear brighter (A 66). You get spectacular recordings every time without worrying about settings. Touch AE By simply touching the screen, you shoot. This operation is simple yet allows you want them. 6 Other Features Audio scene ...select With the audio scene select function (A 79), you can optimize the audio settings of those important shots. Smart AUTO Smart AUTO (A 40) automatically selects the best scene mode for the scene you to shoot. The OLED ...
...range and versatility while you can make dark areas in the picture appear brighter (A 66). You get spectacular recordings every time without worrying about settings. Touch AE By simply touching the screen, you shoot. This operation is simple yet allows you want them. 6 Other Features Audio scene ...select With the audio scene select function (A 79), you can optimize the audio settings of those important shots. Smart AUTO Smart AUTO (A 40) automatically selects the best scene mode for the scene you to shoot. The OLED ...
Instruction Manual
Page 8
... Shooting Mode 29 Using the Touch Screen 29 Using the FUNC. Button and Joystick 30 Using the Menus 31 First Time Settings 33 Setting the Date and Time 33 Changing the Language 34 Changing the Time Zone 34 Using a Memory Card 35 Memory Cards Compatible for Use with the ... Using the Mini Advanced Shoe 76 Using an External Video Light 77 Recording Audio 78 Using an External Microphone 78 Audio Scenes and Other Audio Settings 79 Audio Recording Level 81 Wind Screen (Built-in Microphone) 81 Microphone Attenuator 82 Audio Equalizer (Built-in Microphone) 82 Microphone Directionality (Built-in this...
... Shooting Mode 29 Using the Touch Screen 29 Using the FUNC. Button and Joystick 30 Using the Menus 31 First Time Settings 33 Setting the Date and Time 33 Changing the Language 34 Changing the Time Zone 34 Using a Memory Card 35 Memory Cards Compatible for Use with the ... Using the Mini Advanced Shoe 76 Using an External Video Light 77 Recording Audio 78 Using an External Microphone 78 Audio Scenes and Other Audio Settings 79 Audio Recording Level 81 Wind Screen (Built-in Microphone) 81 Microphone Attenuator 82 Audio Equalizer (Built-in Microphone) 82 Microphone Directionality (Built-in this...
Instruction Manual
Page 9
... Button 91 Assignable Buttons 92 Changing the Assigned Function 92 Using an Assignable Button 93 Saving and Loading Menu Settings 94 Saving Menu Settings to a Memory Card 94 Loading Menu Settings from a Memory Card 94 5 Playback 95 Playing Back Video 95 Adjusting the volume 96 Displaying scene information ...115 In Standard Definition 115 9 Wi-Fi Functions 117 Introduction to Wi-Fi 117 Remote Operation Via the Wi-Fi Remote Application 120 Setting the Camcorder's Password 120 Operating the Camcorder Remotely 121 Wi-Fi Remote Onscreen Controls and Displays 121 Remote Operation Using Wi-Fi Remote ...
... Button 91 Assignable Buttons 92 Changing the Assigned Function 92 Using an Assignable Button 93 Saving and Loading Menu Settings 94 Saving Menu Settings to a Memory Card 94 Loading Menu Settings from a Memory Card 94 5 Playback 95 Playing Back Video 95 Adjusting the volume 96 Displaying scene information ...115 In Standard Definition 115 9 Wi-Fi Functions 117 Introduction to Wi-Fi 117 Remote Operation Via the Wi-Fi Remote Application 120 Setting the Camcorder's Password 120 Operating the Camcorder Remotely 121 Wi-Fi Remote Onscreen Controls and Displays 121 Remote Operation Using Wi-Fi Remote ...
Instruction Manual
Page 10
Sharing Recordings with CANON iMAGE GATEWAY 133 Setting the Desired Web Services in Rechargeable Lithium Battery 171 Lithium Button Battery 172 Disposal 172 Maintenance/Others 173 Cleaning 173 Condensation 173 Using the Camcorder ... Connection Using an Access Point 138 Wi-Fi Protected Setup (WPS) 138 Searching for Access Points 139 Manual Setup 140 Viewing and Changing Wi-Fi Settings 141 10 Additional Information 143 Appendix: Menu Options Lists 143 FUNC.
Sharing Recordings with CANON iMAGE GATEWAY 133 Setting the Desired Web Services in Rechargeable Lithium Battery 171 Lithium Button Battery 172 Disposal 172 Maintenance/Others 173 Cleaning 173 Condensation 173 Using the Camcorder ... Connection Using an Access Point 138 Wi-Fi Protected Setup (WPS) 138 Searching for Access Points 139 Manual Setup 140 Viewing and Changing Wi-Fi Settings 141 10 Additional Information 143 Appendix: Menu Options Lists 143 FUNC.
Instruction Manual
Page 12
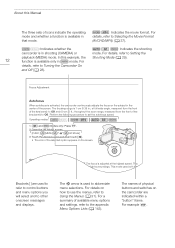
..., the camcorder continuously adjusts the focus on the screen. For details on the camcorder are used to abbreviate menu selections. In this Manual The three sets of the lens barrel) to Selecting the Movie Format (AVCHD/MP4) (A 37). : Indicates whether the : Indicates the shooting camcorder is available only ..., refer to G and 60 cm (2 ft.; The names of the lens barrel) to Using the Menus (A 31). Perform the following procedure to Setting the playback (MEDIA) mode. For a summary of the screen. The focus is used to refer to control buttons and menu options you will select ...
..., the camcorder continuously adjusts the focus on the screen. For details on the camcorder are used to abbreviate menu selections. In this Manual The three sets of the lens barrel) to Selecting the Movie Format (AVCHD/MP4) (A 37). : Indicates whether the : Indicates the shooting camcorder is available only ..., refer to G and 60 cm (2 ft.; The names of the lens barrel) to Using the Menus (A 31). Perform the following procedure to Setting the playback (MEDIA) mode. For a summary of the screen. The focus is used to refer to control buttons and menu options you will select ...
Instruction Manual
Page 17
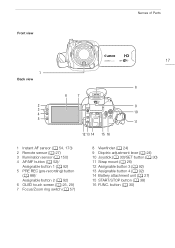
...-recording) button (A 88)/ Assignable button 2 (A 92) 6 OLED touch screen (A 25, 29) 7 Focus/Zoom ring switch (A 57) 8 Viewfinder (A 24) 9 Dioptric adjustment lever (A 24) 10 Joystick (A 30)/SET button (A 30) 11 Strap mount (A 26) 12 Assignable button 3 (A 92) 13 Assignable button 4 (A 92) 14 Battery attachment unit (A 21) 15 START/STOP button (A 38) 16...
...-recording) button (A 88)/ Assignable button 2 (A 92) 6 OLED touch screen (A 25, 29) 7 Focus/Zoom ring switch (A 57) 8 Viewfinder (A 24) 9 Dioptric adjustment lever (A 24) 10 Joystick (A 30)/SET button (A 30) 11 Strap mount (A 26) 12 Assignable button 3 (A 92) 13 Assignable button 4 (A 92) 14 Battery attachment unit (A 21) 15 START/STOP button (A 38) 16...
Instruction Manual
Page 20
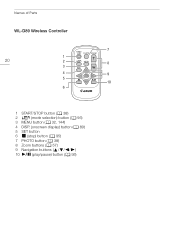
Names of Parts WL-D89 Wireless Controller 7 1 20 2 8 3 4 9 5 10 6 1 START/STOP button (A 38) 2 G (mode selection) button (A 95) 3 MENU button (A 32, 144) 4 DISP. (onscreen display) button (A 89) 5 SET button 6 Ñ (stop) button (A 95) 7 PHOTO button (A 38) 8 Zoom buttons (A 57) 9 Navigation buttons 10 Ò (play/pause) button (A 95)
Names of Parts WL-D89 Wireless Controller 7 1 20 2 8 3 4 9 5 10 6 1 START/STOP button (A 38) 2 G (mode selection) button (A 95) 3 MENU button (A 32, 144) 4 DISP. (onscreen display) button (A 89) 5 SET button 6 Ñ (stop) button (A 95) 7 PHOTO button (A 38) 8 Zoom buttons (A 57) 9 Navigation buttons 10 Ò (play/pause) button (A 95)

Instruction Manual
Page 25
To allow the camcorder to Handling Precautions (A 169), Cleaning (A 173). precision manufacturing techniques, with the q > [OLED Brightness] setting or by holding D pressed down for more than 0.01% of the touch screen, refer to specification. This has no effect on the ... the panel 90 degrees downward. • You can be operated with the q > [VF Brightness] setting. • Adjusting the brightness does not affect the brightness of the recordings. • Using a brighter setting will shorten the effective usage time of the battery pack. • For details about how to take ...
To allow the camcorder to Handling Precautions (A 169), Cleaning (A 173). precision manufacturing techniques, with the q > [OLED Brightness] setting or by holding D pressed down for more than 0.01% of the touch screen, refer to specification. This has no effect on the ... the panel 90 degrees downward. • You can be operated with the q > [VF Brightness] setting. • Adjusting the brightness does not affect the brightness of the recordings. • Using a brighter setting will shorten the effective usage time of the battery pack. • For details about how to take ...

Instruction Manual
Page 28
mode mode To turn off the camcorder Set the power switch to CAMERA for mode (A 38) or MEDIA for playing back recordings. Select the mode using the power switch. 28 To turn on in CAMERA ( ) mode for making recordings or MEDIA ( ) mode for mode (A 95). Basic Operation of the Camcorder Basic Operation of the Camcorder Turning the Camcorder On and Off You can choose to turn the camcorder on the camcorder Set the power switch to OFF.
mode mode To turn off the camcorder Set the power switch to CAMERA for mode (A 38) or MEDIA for playing back recordings. Select the mode using the power switch. 28 To turn on in CAMERA ( ) mode for making recordings or MEDIA ( ) mode for mode (A 95). Basic Operation of the Camcorder Basic Operation of the Camcorder Turning the Camcorder On and Off You can choose to turn the camcorder on the camcorder Set the power switch to OFF.
Instruction Manual
Page 29
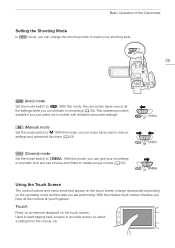
...With the intuitive touch screen interface you concentrate on recording (A 39). With this mode, you can enjoy full access to menus, settings and advanced functions (A 43). (Cinema) mode Set the mode switch to E. Touch Press on an element displayed on the operating mode and the task you are performing. With this... on the touch screen change the shooting mode to match your shooting style. 29 (Auto) mode Set the mode switch to select a setting from the menus, etc. Basic Operation of all the settings while you have all the controls at your fingertips. Used to start playing back a scene in ...
...With the intuitive touch screen interface you concentrate on recording (A 39). With this mode, you can enjoy full access to menus, settings and advanced functions (A 43). (Cinema) mode Set the mode switch to E. Touch Press on an element displayed on the operating mode and the task you are performing. With this... on the touch screen change the shooting mode to match your shooting style. 29 (Auto) mode Set the mode switch to select a setting from the menus, etc. Basic Operation of all the settings while you have all the controls at your fingertips. Used to start playing back a scene in ...

Instruction Manual
Page 30
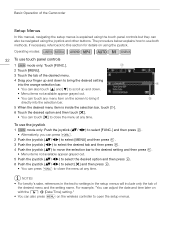
... slider controls like the volume. Used to scroll menus, to browse through index screen pages or to close the menu after adjusting desired settings. On some screens, you may not be able to select the menu item indicated by touching the triangle control buttons. 30 IMPORTANT •...; The camcorder features a capacitive touch screen. Operating the touch screen with wet or gloved hands. - Using the FUNC. Joystick/SET button When making a menu selection, push the joystick to open the FUNC. Button and Joystick You can achieve the same effect by the orange selection...
... slider controls like the volume. Used to scroll menus, to browse through index screen pages or to close the menu after adjusting desired settings. On some screens, you may not be able to select the menu item indicated by touching the triangle control buttons. 30 IMPORTANT •...; The camcorder features a capacitive touch screen. Operating the touch screen with wet or gloved hands. - Using the FUNC. Joystick/SET button When making a menu selection, push the joystick to open the FUNC. Button and Joystick You can achieve the same effect by the orange selection...

Instruction Manual
Page 31
... [FUNC.] and then pressing S. panel is open, select the function you can be adjusted from the FUNC. For details about the available menu options and settings, refer to use . panel in mode Touch the control button of the desired operation panel in mode Touch the control button of the desired function...
... [FUNC.] and then pressing S. panel is open, select the function you can be adjusted from the FUNC. For details about the available menu options and settings, refer to use . panel in mode Touch the control button of the desired operation panel in mode Touch the control button of the desired function...
Instruction Manual
Page 32
...can touch [X] to close the menu at any time. Basic Operation of the desired menu. 4 Drag your finger up and down to bring the desired setting into the orange selection bar. • You can also touch [Í] and [Î] to scroll up and down. • Menu items not available... S. 3 Push the joystick (Þ) to select the desired tab and then press S. 4 Push the joystick (Ý) to move the selection bar to the desired setting and then press S. • Menu items not available appear grayed out. 5 Push the joystick (Ý/Þ) to select the desired option and then press S. 6...
...can touch [X] to close the menu at any time. Basic Operation of the desired menu. 4 Drag your finger up and down to bring the desired setting into the orange selection bar. • You can also touch [Í] and [Î] to scroll up and down. • Menu items not available... S. 3 Push the joystick (Þ) to select the desired tab and then press S. 4 Push the joystick (Ý) to move the selection bar to the desired setting and then press S. • Menu items not available appear grayed out. 5 Push the joystick (Ý/Þ) to select the desired option and then press S. 6...

Instruction Manual
Page 33
...3 Touch [Í] or [Î] to change the field as necessary. • You can adjust the date and time later on with the q > [Date/Time] setting. • When you do not use 12-hour clock (AM/PM). 7 Touch [OK] to use the camcorder for about 3 months, the built-in rechargeable lithium... battery may discharge completely and the date and time setting may be displayed in the same way. 5 Touch [Y.M.D], [M.D,Y] or [D.M.Y] to select the date format you selected. 6 Touch [24H] to use 24-hour clock ...
...3 Touch [Í] or [Î] to change the field as necessary. • You can adjust the date and time later on with the q > [Date/Time] setting. • When you do not use 12-hour clock (AM/PM). 7 Touch [OK] to use the camcorder for about 3 months, the built-in rechargeable lithium... battery may discharge completely and the date and time setting may be displayed in the same way. 5 Touch [Y.M.D], [M.D,Y] or [D.M.Y] to select the date format you selected. 6 Touch [24H] to use 24-hour clock ...

Instruction Manual
Page 34
... [ZOOM], [FUNC.] and [MENU], will appear in 2 Touch the desired language and then touch [OK]. 3 Touch [X] to set the time zone of your location. The default setting is English. If necessary, touch [$] to adjust for daylight saving time. 4 Touch [X] to retain the date and time of an... the menu. mode. In addition, the camcorder is necessary only when performing the procedure in mode. 2 Touch ["] to set the home time zone, or [#] to set the desired time zone. This is necessary only when performing the procedure in English regardless of the language selected. Changing the ...
... [ZOOM], [FUNC.] and [MENU], will appear in 2 Touch the desired language and then touch [OK]. 3 Touch [X] to set the time zone of your location. The default setting is English. If necessary, touch [$] to adjust for daylight saving time. 4 Touch [X] to retain the date and time of an... the menu. mode. In addition, the camcorder is necessary only when performing the procedure in mode. 2 Touch ["] to set the home time zone, or [#] to set the desired time zone. This is necessary only when performing the procedure in English regardless of the language selected. Changing the ...

Instruction Manual
Page 38
... a memory card slot. • To use relay recording or dual recording (A 47), insert memory cards into both memory card slots. 3 Open the lens barrier. • Set the lens barrier switch to OPEN. 4 If you begin recording, make a test recording first to check that will be used to the camcorder (A 21).
... a memory card slot. • To use relay recording or dual recording (A 47), insert memory cards into both memory card slots. 3 Open the lens barrier. • Set the lens barrier switch to OPEN. 4 If you begin recording, make a test recording first to check that will be used to the camcorder (A 21).
Instruction Manual
Page 39
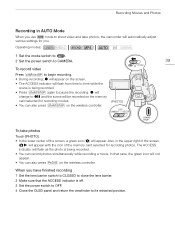
...; During recording, Ü will appear on the screen. • The ACCESS indicator will flash from time to time while the scene is off. 3 Set the power switch to OFF. 4 Close the OLED panel and return the viewfinder to its retracted position. In that the ACCESS indicator is being recorded.... • You can also press Z on the wireless controller. [PHOTO] To take photos, the camcorder will appear. When you have finished recording 1 Set the lens barrier switch to CLOSED to close the lens barrier. 2 Make sure that case, the green icon will not appear. • You can record...
...; During recording, Ü will appear on the screen. • The ACCESS indicator will flash from time to time while the scene is off. 3 Set the power switch to OFF. 4 Close the OLED panel and return the viewfinder to its retracted position. In that the ACCESS indicator is being recorded.... • You can also press Z on the wireless controller. [PHOTO] To take photos, the camcorder will appear. When you have finished recording 1 Set the lens barrier switch to CLOSED to close the lens barrier. 2 Make sure that case, the green icon will not appear. • You can record...

Instruction Manual
Page 40
..., exposure, color, image stabilization, image quality, among others), selecting the best settings for the scene you want to the background, so the subject not only looks larger but also stands out more. Background (color of the subject, ...
..., exposure, color, image stabilization, image quality, among others), selecting the best settings for the scene you want to the background, so the subject not only looks larger but also stands out more. Background (color of the subject, ...


