
ZoomBrowser EX 6.5 for Windows Instruction Manual
Page 9
...modify the program. 3. Table of Microsoft Windows, CameraWindow may not open the Main Window. With Windows XP, click [Canon CameraWindow] then [OK] in this case, double-click the ZoomBrowser EX icon on the task bar. 2. In the screen that you have correctly installed the ...to Remember Mastering the Basics More Advanced Techniques Appendices Transferring Images Transferring Images by [Connect to Camera]. 1 Connect the camera to the computer with the supplied interface cable. 2 Turn on the camera power, set it to playback mode and prepare it to communicate with the computer. 3...
...modify the program. 3. Table of Microsoft Windows, CameraWindow may not open the Main Window. With Windows XP, click [Canon CameraWindow] then [OK] in this case, double-click the ZoomBrowser EX icon on the task bar. 2. In the screen that you have correctly installed the ...to Remember Mastering the Basics More Advanced Techniques Appendices Transferring Images Transferring Images by [Connect to Camera]. 1 Connect the camera to the computer with the supplied interface cable. 2 Turn on the camera power, set it to playback mode and prepare it to communicate with the computer. 3...

Software Guide for Windows
Page 10
... this software manual assume that you have correctly installed the software and driver software. With Windows Vista, click [Downloads Images From Canon Camera using Canon CameraWindow] in this case, double-click the ZoomBrowser EX icon on the camera power, set it to playback mode and prepare it to the one at the right appears, select...
... this software manual assume that you have correctly installed the software and driver software. With Windows Vista, click [Downloads Images From Canon Camera using Canon CameraWindow] in this case, double-click the ZoomBrowser EX icon on the camera power, set it to playback mode and prepare it to the one at the right appears, select...

Software Starter Guide
Page 17
... prepare it to the computer and placing the camera in that case. See the Camera User Guide. Proceed to download in the correct mode for connecting vary between camera models. Camera to Computer Connection 1 After connecting the supplied interface cable to the computer's USB port and the camera's DIGITAL terminal, turn on the Windows Platform - Preparations section...
... prepare it to the computer and placing the camera in that case. See the Camera User Guide. Proceed to download in the correct mode for connecting vary between camera models. Camera to Computer Connection 1 After connecting the supplied interface cable to the computer's USB port and the camera's DIGITAL terminal, turn on the Windows Platform - Preparations section...

Software Starter Guide
Page 47
.... Proceed to the computer and placing the camera in that case. Preparations section. 45 Using the Software on the memory card. Use a memory card reader to computer connection (see below) or a memory card reader (p. 48). The ... Images to the Computer Begin by downloading the images to communicate with the computer. See the Camera User Guide. Camera to Computer Connection 1 After connecting the supplied interface cable to the computer's USB port and the camera's DIGITAL terminal, turn on the Macintosh Platform - You may not be able to download images when the...
.... Proceed to the computer and placing the camera in that case. Preparations section. 45 Using the Software on the memory card. Use a memory card reader to computer connection (see below) or a memory card reader (p. 48). The ... Images to the Computer Begin by downloading the images to communicate with the computer. See the Camera User Guide. Camera to Computer Connection 1 After connecting the supplied interface cable to the computer's USB port and the camera's DIGITAL terminal, turn on the Macintosh Platform - You may not be able to download images when the...

Software Starter Guide
Page 79
... several limitations. In this case, use the software from the Canon Digital Camera Solution Disk. • Sound files attached to still images as sound memos and sound files recorded with the Sound Recorder function may not download depending on the Canon Digital Camera Solution Disk. If you can... download images. • The camera information (firmware version, etc.) may take a few minutes, after connecting to a computer, without...
... several limitations. In this case, use the software from the Canon Digital Camera Solution Disk. • Sound files attached to still images as sound memos and sound files recorded with the Sound Recorder function may not download depending on the Canon Digital Camera Solution Disk. If you can... download images. • The camera information (firmware version, etc.) may take a few minutes, after connecting to a computer, without...

Direct Print User Guide
Page 29
• The number of printed movie frames per sheet of paper with [Sequence] is determined by the paper size shown as follows: (Depending on the number of seconds in the movie, there are cases when the number of frames indicated below will not be printed.) • Card size: 20 frames • L size: 42 frames • Postcard size: 63 frames • Wide size: 84 frames 27
• The number of printed movie frames per sheet of paper with [Sequence] is determined by the paper size shown as follows: (Depending on the number of seconds in the movie, there are cases when the number of frames indicated below will not be printed.) • Card size: 20 frames • L size: 42 frames • Postcard size: 63 frames • Wide size: 84 frames 27

Direct Print User Guide
Page 47
Select a layout and press the FUNC./SET button. 5 This ends the paper settings operations. The display returns to the print order screen. • Images will print with borders, even if [Borderless] was selected with the camera in the following cases: •When [Plain] is selected in the camera's [Paper Type] (cannot be selected depending on the connected printer model) •With printers equipped with an operation panel, when [Plain] is selected with the printer and [Default] is selected in the camera's [Paper Type]. 45
Select a layout and press the FUNC./SET button. 5 This ends the paper settings operations. The display returns to the print order screen. • Images will print with borders, even if [Borderless] was selected with the camera in the following cases: •When [Plain] is selected in the camera's [Paper Type] (cannot be selected depending on the connected printer model) •With printers equipped with an operation panel, when [Plain] is selected with the printer and [Default] is selected in the camera's [Paper Type]. 45
Direct Print User Guide
Page 55
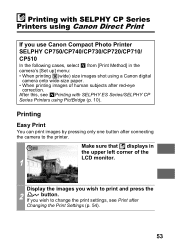
... up] menu: • When printing (wide) size images shot using a Canon digital camera onto wide-size paper. • When printing images of the LCD monitor. 1 Display the images you wish to change the print settings, see Printing with ... with SELPHY ES Series/SELPHY CP Series Printers using Canon Direct Print If you use Canon Compact Photo Printer SELPHY CP750/CP740/CP730/CP720/CP710/ CP510 In the following cases, select from [Print Method] in the upper left corner of human subjects after connecting the camera to the printer. After this, see Print after...
... up] menu: • When printing (wide) size images shot using a Canon digital camera onto wide-size paper. • When printing images of the LCD monitor. 1 Display the images you wish to change the print settings, see Printing with ... with SELPHY ES Series/SELPHY CP Series Printers using Canon Direct Print If you use Canon Compact Photo Printer SELPHY CP750/CP740/CP730/CP720/CP710/ CP510 In the following cases, select from [Print Method] in the upper left corner of human subjects after connecting the camera to the printer. After this, see Print after...

Direct Print User Guide
Page 57
.... Image Multiple*1 Prints eight copies of prints. 1 to the print. Printing Errors • An error message appears if an error occurs for details. In that case, select [Stop]. Select [OK] and press the FUNC./ SET button. The [Resume] option may not appear with a border. On Date Off Adds the date to...
.... Image Multiple*1 Prints eight copies of prints. 1 to the print. Printing Errors • An error message appears if an error occurs for details. In that case, select [Stop]. Select [OK] and press the FUNC./ SET button. The [Resume] option may not appear with a border. On Date Off Adds the date to...

Direct Print User Guide
Page 68
• The number of printed movie frames per sheet of paper with [Sequence] is determined by the paper size shown as follows: (Depending on the number of seconds in the movie, there are cases when the number of frames indicated below will not be printed.) • Card size: 20 frames • L size: 42 frames • Postcard size: 63 frames • Wide size: 63 frames 66
• The number of printed movie frames per sheet of paper with [Sequence] is determined by the paper size shown as follows: (Depending on the number of seconds in the movie, there are cases when the number of frames indicated below will not be printed.) • Card size: 20 frames • L size: 42 frames • Postcard size: 63 frames • Wide size: 63 frames 66

Direct Print User Guide
Page 71
In that case, select [Stop]. 69 Select [Stop] or [Resume] and press the FUNC./SET button. * The [Resume] option may not appear with some reason during the printing process. Printing Errors • An error message appears if an error occurs for some types of errors.
In that case, select [Stop]. 69 Select [Stop] or [Resume] and press the FUNC./SET button. * The [Resume] option may not appear with some reason during the printing process. Printing Errors • An error message appears if an error occurs for some types of errors.

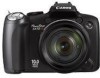
PowerShot SX10 IS Camera User Guide
Page 9
... certain cases the copying of images from performances, exhibitions, or commercial properties by means of a camera or other device may contravene copyright or other legal rights even if the image was shot for any consequential damages arising from any malfunction of a camera or ... before proceeding with your camera. Warranty Limitations This camera's warranty is machine readable. Please note that Canon Inc., its subsidiaries and affiliates, and its distributors are not liable for personal use and should never be recorded in a way that Canon digital cameras are intended for personal ...
... certain cases the copying of images from performances, exhibitions, or commercial properties by means of a camera or other device may contravene copyright or other legal rights even if the image was shot for any consequential damages arising from any malfunction of a camera or ... before proceeding with your camera. Warranty Limitations This camera's warranty is machine readable. Please note that Canon Inc., its subsidiaries and affiliates, and its distributors are not liable for personal use and should never be recorded in a way that Canon digital cameras are intended for personal ...

PowerShot SX10 IS Camera User Guide
Page 54
z Overexposure Warning In the following cases, overexposed portions of an image. When reviewing an image right after shooting in the , , and modes to check the brightness while shooting. Histogram Function The ... Image You can also display the histogram in the LCD monitor (detailed display) or the viewfinder (detailed display). - 52 z Information for images shot with other cameras may not display correctly. By using the detailed display mode during playback.
z Overexposure Warning In the following cases, overexposed portions of an image. When reviewing an image right after shooting in the , , and modes to check the brightness while shooting. Histogram Function The ... Image You can also display the histogram in the LCD monitor (detailed display) or the viewfinder (detailed display). - 52 z Information for images shot with other cameras may not display correctly. By using the detailed display mode during playback.

PowerShot SX10 IS Camera User Guide
Page 74
... light level. However, when shooting with the , or mode there is displayed (p. 110). 3 When you press the MENU button while this case, raise the flash before shooting. 72 Using the Flash Available Shooting Modes 1 Raise the flash manually. Use the or button to a tripod or...2 Press the button. 1. z A flashing red in the LCD monitor. z The time required for the flash when you are recommended to shoot with the camera attached to change the flash mode. : [Auto] : [On] • You can configure detailed settings for flash recharging will change depending on usage conditions...
... light level. However, when shooting with the , or mode there is displayed (p. 110). 3 When you press the MENU button while this case, raise the flash before shooting. 72 Using the Flash Available Shooting Modes 1 Raise the flash manually. Use the or button to a tripod or...2 Press the button. 1. z A flashing red in the LCD monitor. z The time required for the flash when you are recommended to shoot with the camera attached to change the flash mode. : [Auto] : [On] • You can configure detailed settings for flash recharging will change depending on usage conditions...

PowerShot SX10 IS Camera User Guide
Page 94
... is also recorded, the sound of the storage media is too slow or if there is in which case a still image cannot be fixed to focus. • Press the shutter halfway so the camera can shoot a high quality still image* while shooting a movie. * The recording pixels and compression are the same as...
... is also recorded, the sound of the storage media is too slow or if there is in which case a still image cannot be fixed to focus. • Press the shutter halfway so the camera can shoot a high quality still image* while shooting a movie. * The recording pixels and compression are the same as...

PowerShot SX10 IS Camera User Guide
Page 113
...scene. Various Shooting Methods About Red-Eye Correction z When [Red-Eye Corr.] is set to slow Using Slow Synchro shutter speeds. Automatically searches for camera will appear dark when a night scene shake. The red-eye reduction lamp lights green before the flash fires. z If the area around the eyes...the image when the flash fires. z Red eyes may not be automatically detected or may also be fully corrected on some images. In either case, you can correct images with [Red-Eye Correction] in advance. 111 Menu Item Summary Note Slow Synchro The flash timing is taken. Use ...
...scene. Various Shooting Methods About Red-Eye Correction z When [Red-Eye Corr.] is set to slow Using Slow Synchro shutter speeds. Automatically searches for camera will appear dark when a night scene shake. The red-eye reduction lamp lights green before the flash fires. z If the area around the eyes...the image when the flash fires. z Red eyes may not be automatically detected or may also be fully corrected on some images. In either case, you can correct images with [Red-Eye Correction] in advance. 111 Menu Item Summary Note Slow Synchro The flash timing is taken. Use ...

PowerShot SX10 IS Camera User Guide
Page 121
At this point, the frame the camera judges to be displayed on (p. 122). z In certain cases, faces may appear. Yellow: Focusing difficulty ([Center] or [FlexiZone] option) - Examples: - Various Shooting Methods 119 The AF frame appears as a face. You can also select ...
At this point, the frame the camera judges to be displayed on (p. 122). z In certain cases, faces may appear. Yellow: Focusing difficulty ([Center] or [FlexiZone] option) - Examples: - Various Shooting Methods 119 The AF frame appears as a face. You can also select ...

PowerShot SX10 IS Camera User Guide
Page 125
When using the digital zoom or digital tele-converter - When a selected face cannot be canceled. - When switching to display the menu - In the following cases, the face select mode will display in yellow. 3 Press the shutter button all the way to shoot. When the MENU button is pressed to another ... power off and back on - 123 2 Press the shutter button halfway. • The face frame ( ) of main subject will change into a green . • If the camera has difficulty focusing, the face frame will be tracked for several seconds Various Shooting Methods
When using the digital zoom or digital tele-converter - When a selected face cannot be canceled. - When switching to display the menu - In the following cases, the face select mode will display in yellow. 3 Press the shutter button all the way to shoot. When the MENU button is pressed to another ... power off and back on - 123 2 Press the shutter button halfway. • The face frame ( ) of main subject will change into a green . • If the camera has difficulty focusing, the face frame will be tracked for several seconds Various Shooting Methods

PowerShot SX10 IS Camera User Guide
Page 247
... the edge of the seal (electrical insulation sheath) peeled off , as some batteries may leak, overheat, or burst. In the event that could damage the casing. Do not use batteries that such batteries may come with defective seals. z Do not attempt to disassemble, alter or apply heat to direct flame or...
... the edge of the seal (electrical insulation sheath) peeled off , as some batteries may leak, overheat, or burst. In the event that could damage the casing. Do not use batteries that such batteries may come with defective seals. z Do not attempt to disassemble, alter or apply heat to direct flame or...
PowerShot SX10 IS Camera User Guide
Page 249
..., overheating or explosion, resulting in humid or dusty areas. Such conditions could lead to bump or strongly push the end of the casing. High temperatures may occur. z Do not connect compact power adapters or battery chargers to devices such as electrical transformers for extended periods... of time, remove the batteries from the camera and store the equipment in places subject to allow metal objects (such as the dashboard or trunk (boot) of the electrical outlet ...
..., overheating or explosion, resulting in humid or dusty areas. Such conditions could lead to bump or strongly push the end of the casing. High temperatures may occur. z Do not connect compact power adapters or battery chargers to devices such as electrical transformers for extended periods... of time, remove the batteries from the camera and store the equipment in places subject to allow metal objects (such as the dashboard or trunk (boot) of the electrical outlet ...


