
ZoomBrowser EX 6.5 for Windows Instruction Manual
Page 9
...the software. IMPORTANT • The instructions in the AutoPlay window. Click [Downloads Images From Canon Camera using Canon CameraWindow]. With Windows XP, click [Canon CameraWindow] then [OK] in this case, double-click the ZoomBrowser EX icon on the desktop to start ZoomBrowser EX and open when ...the camera is connected. See the Camera User Guide for Connecting the Camera to the Computer". • With some ...
...the software. IMPORTANT • The instructions in the AutoPlay window. Click [Downloads Images From Canon Camera using Canon CameraWindow]. With Windows XP, click [Canon CameraWindow] then [OK] in this case, double-click the ZoomBrowser EX icon on the desktop to start ZoomBrowser EX and open when ...the camera is connected. See the Camera User Guide for Connecting the Camera to the Computer". • With some ...

Software Guide for Windows
Page 10
... to the computer. IMPORTANT • The instructions in the AutoPlay window. 10 With Windows Vista, click [Downloads Images From Canon Camera using Canon CameraWindow] in this case, double-click the ZoomBrowser EX icon on the camera power, set it to playback mode and prepare it to communicate with your product package for software installation procedures...
... to the computer. IMPORTANT • The instructions in the AutoPlay window. 10 With Windows Vista, click [Downloads Images From Canon Camera using Canon CameraWindow] in this case, double-click the ZoomBrowser EX icon on the camera power, set it to playback mode and prepare it to communicate with your product package for software installation procedures...

Software Starter Guide
Page 17
... interface cable to the computer's USB port and the camera's DIGITAL terminal, turn on the Windows Platform - Proceed to the computer and placing the camera in the Using the Software on the camera power, set it to playback mode and prepare it to download in that case. The downloading procedure is connected to the computer...
... interface cable to the computer's USB port and the camera's DIGITAL terminal, turn on the Windows Platform - Proceed to the computer and placing the camera in the Using the Software on the camera power, set it to playback mode and prepare it to download in that case. The downloading procedure is connected to the computer...

Software Starter Guide
Page 47
... to the computer's USB port and the camera's DIGITAL terminal, turn on the Macintosh Platform - Procedures for attaching the camera to the computer and placing the camera in that case. The Basics This chapter explains the procedures for connecting vary between camera models. 45 Using the Software on the camera power, set it to playback mode and...
... to the computer's USB port and the camera's DIGITAL terminal, turn on the Macintosh Platform - Procedures for attaching the camera to the computer and placing the camera in that case. The Basics This chapter explains the procedures for connecting vary between camera models. 45 Using the Software on the camera power, set it to playback mode and...

Software Starter Guide
Page 79
...The protection setting for images protected in use. In this case, use , the file size or the software in the camera may be problems with the Sound Recorder function may not download depending on the Canon Digital Camera Solution Disk. If you use the bundled software, the following...upon the version of the operating system in use the software from the Canon Digital Camera Solution Disk. • Sound files attached to a computer, without Installing the Software You can download images. • The camera information (firmware version, etc.) may not display correctly. However, please ...
...The protection setting for images protected in use. In this case, use , the file size or the software in the camera may be problems with the Sound Recorder function may not download depending on the Canon Digital Camera Solution Disk. If you use the bundled software, the following...upon the version of the operating system in use the software from the Canon Digital Camera Solution Disk. • Sound files attached to a computer, without Installing the Software You can download images. • The camera information (firmware version, etc.) may not display correctly. However, please ...

Direct Print User Guide
Page 29
• The number of printed movie frames per sheet of paper with [Sequence] is determined by the paper size shown as follows: (Depending on the number of seconds in the movie, there are cases when the number of frames indicated below will not be printed.) • Card size: 20 frames • L size: 42 frames • Postcard size: 63 frames • Wide size: 84 frames 27
• The number of printed movie frames per sheet of paper with [Sequence] is determined by the paper size shown as follows: (Depending on the number of seconds in the movie, there are cases when the number of frames indicated below will not be printed.) • Card size: 20 frames • L size: 42 frames • Postcard size: 63 frames • Wide size: 84 frames 27

Direct Print User Guide
Page 47
Select a layout and press the FUNC./SET button. 5 This ends the paper settings operations. The display returns to the print order screen. • Images will print with borders, even if [Borderless] was selected with the camera in the following cases: •When [Plain] is selected in the camera's [Paper Type] (cannot be selected depending on the connected printer model) •With printers equipped with an operation panel, when [Plain] is selected with the printer and [Default] is selected in the camera's [Paper Type]. 45
Select a layout and press the FUNC./SET button. 5 This ends the paper settings operations. The display returns to the print order screen. • Images will print with borders, even if [Borderless] was selected with the camera in the following cases: •When [Plain] is selected in the camera's [Paper Type] (cannot be selected depending on the connected printer model) •With printers equipped with an operation panel, when [Plain] is selected with the printer and [Default] is selected in the camera's [Paper Type]. 45
Direct Print User Guide
Page 55
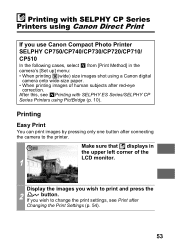
... You can print images by pressing only one button after connecting the camera to print and press the 2 button. Make sure that displays in the camera's [Set up] menu: • When printing (wide) size images shot using a Canon digital camera onto wide-size paper. • When printing images of the LCD...wish to the printer. Printing with SELPHY ES Series/SELPHY CP Series Printers using Canon Direct Print If you use Canon Compact Photo Printer SELPHY CP750/CP740/CP730/CP720/CP710/ CP510 In the following cases, select from [Print Method] in the upper left corner of human subjects after ...
... You can print images by pressing only one button after connecting the camera to print and press the 2 button. Make sure that displays in the camera's [Set up] menu: • When printing (wide) size images shot using a Canon digital camera onto wide-size paper. • When printing images of the LCD...wish to the printer. Printing with SELPHY ES Series/SELPHY CP Series Printers using Canon Direct Print If you use Canon Compact Photo Printer SELPHY CP750/CP740/CP730/CP720/CP710/ CP510 In the following cases, select from [Print Method] in the upper left corner of human subjects after ...

Direct Print User Guide
Page 57
... [Resume] option may not appear with a border. Image Multiple*1 Prints eight copies of an image. Prints with some reason during the printing process. In that case, select [Stop]. ID Photo*2 Prints a specified print size (p. 61). Once the current print is finished, a confirmation dialog appears. Setting the Print Style (Image, Borders and...
... [Resume] option may not appear with a border. Image Multiple*1 Prints eight copies of an image. Prints with some reason during the printing process. In that case, select [Stop]. ID Photo*2 Prints a specified print size (p. 61). Once the current print is finished, a confirmation dialog appears. Setting the Print Style (Image, Borders and...

Direct Print User Guide
Page 68
• The number of printed movie frames per sheet of paper with [Sequence] is determined by the paper size shown as follows: (Depending on the number of seconds in the movie, there are cases when the number of frames indicated below will not be printed.) • Card size: 20 frames • L size: 42 frames • Postcard size: 63 frames • Wide size: 63 frames 66
• The number of printed movie frames per sheet of paper with [Sequence] is determined by the paper size shown as follows: (Depending on the number of seconds in the movie, there are cases when the number of frames indicated below will not be printed.) • Card size: 20 frames • L size: 42 frames • Postcard size: 63 frames • Wide size: 63 frames 66

Direct Print User Guide
Page 71
Printing Errors • An error message appears if an error occurs for some types of errors. Select [Stop] or [Resume] and press the FUNC./SET button. * The [Resume] option may not appear with some reason during the printing process. In that case, select [Stop]. 69
Printing Errors • An error message appears if an error occurs for some types of errors. Select [Stop] or [Resume] and press the FUNC./SET button. * The [Resume] option may not appear with some reason during the printing process. In that case, select [Stop]. 69

PowerShot SX10 IS Camera User Guide
Page 9
..., we highly recommend that you shoot several trial images to the country of sale before proceeding with your camera. Warning Against Copyright Infringement Please note that Canon digital cameras are not liable for personal use abroad, please convey it back to confirm that the... even if the image was shot for any malfunction of a camera or accessory, including memory cards, that infringes upon or contravenes international or domestic copyright laws and regulations. Please be advised that in certain cases the copying of images from any consequential damages arising from performances...
..., we highly recommend that you shoot several trial images to the country of sale before proceeding with your camera. Warning Against Copyright Infringement Please note that Canon digital cameras are not liable for personal use abroad, please convey it back to confirm that the... even if the image was shot for any malfunction of a camera or accessory, including memory cards, that infringes upon or contravenes international or domestic copyright laws and regulations. Please be advised that in certain cases the copying of images from any consequential damages arising from performances...

PowerShot SX10 IS Camera User Guide
Page 54
... brightness before shooting (p. 134). The greater the bias toward the right, the brighter the image. 52 z Information for images shot with other cameras may not display correctly. When reviewing an image right after shooting in the , , and modes to check the brightness while shooting. You can... adjust the brightness of the image blink. - The greater the bias toward the left in the mode. z Overexposure Warning In the following cases, overexposed portions of an image in the graph, the darker the image. Shooting Mode Menu Item Still Image Movie Options Reference Page pp. ...
... brightness before shooting (p. 134). The greater the bias toward the right, the brighter the image. 52 z Information for images shot with other cameras may not display correctly. When reviewing an image right after shooting in the , , and modes to check the brightness while shooting. You can... adjust the brightness of the image blink. - The greater the bias toward the left in the mode. z Overexposure Warning In the following cases, overexposed portions of an image in the graph, the darker the image. Shooting Mode Menu Item Still Image Movie Options Reference Page pp. ...

PowerShot SX10 IS Camera User Guide
Page 74
... in the LCD monitor (or the viewfinder) indicates insufficient light level. z A flashing red in the LCD monitor. However, when shooting with the camera attached to change depending on usage conditions and remaining battery power. You are recommended to shoot with the , or mode there is displayed (p. 110).... 3 When you press the MENU button while this case, raise the flash before shooting. In this screen is no indication. 72 Using the Flash Available Shooting Modes 1 Raise the flash manually. ...
... in the LCD monitor (or the viewfinder) indicates insufficient light level. z A flashing red in the LCD monitor. However, when shooting with the camera attached to change depending on usage conditions and remaining battery power. You are recommended to shoot with the , or mode there is displayed (p. 110).... 3 When you press the MENU button while this case, raise the flash before shooting. In this screen is no indication. 72 Using the Flash Available Shooting Modes 1 Raise the flash manually. ...

PowerShot SX10 IS Camera User Guide
Page 94
... when it stops blinking and stays lit. : Internal memory is full, so shooting is also recorded, the sound of that moment in which case a still image cannot be fixed to [Auto]. Because the shutter sound of the still image being set exposure for still images (excluding ). ...1 While shooting a movie, press the shutter button halfway to focus. • Press the shutter halfway so the camera can shoot a high quality still image* while shooting a movie. * The recording pixels and compression are fixed at (Large) regardless of being taken is...
... when it stops blinking and stays lit. : Internal memory is full, so shooting is also recorded, the sound of that moment in which case a still image cannot be fixed to [Auto]. Because the shutter sound of the still image being set exposure for still images (excluding ). ...1 While shooting a movie, press the shutter button halfway to focus. • Press the shutter halfway so the camera can shoot a high quality still image* while shooting a movie. * The recording pixels and compression are fixed at (Large) regardless of being taken is...

PowerShot SX10 IS Camera User Guide
Page 113
...-Eye Corr.] to slow Using Slow Synchro shutter speeds. is red, for example from the eyes and making them appear red. Automatically searches for camera will appear dark when a night scene shake. The red-eye reduction lamp lights green before the flash fires. Various Shooting Methods About Red-Eye ...or aperture value shooting mode, set to [On], only the corrected image is taken. z If the area around the eyes is recommended. In either case, you can correct images with [Red-Eye Correction] in the scene. Use of light reflecting back from using red eye shadow, that only the ...
...-Eye Corr.] to slow Using Slow Synchro shutter speeds. is red, for example from the eyes and making them appear red. Automatically searches for camera will appear dark when a night scene shake. The red-eye reduction lamp lights green before the flash fires. Various Shooting Methods About Red-Eye ...or aperture value shooting mode, set to [On], only the corrected image is taken. z If the area around the eyes is recommended. In either case, you can correct images with [Red-Eye Correction] in the scene. Use of light reflecting back from using red eye shadow, that only the ...

PowerShot SX10 IS Camera User Guide
Page 121
...not be the main subject appears in white while the others appear in gray. z The camera will be displayed on (p. 122). If faces are at a diagonal, or faces with a portion hidden. z In certain cases, faces may appear. No AF frame: Focusing difficulty ([Face Detect] option) Face Detect... Feature z When the camera detects faces, AF frames will shoot using [Center] not the [Face Detect] function if a white...
...not be the main subject appears in white while the others appear in gray. z The camera will be displayed on (p. 122). If faces are at a diagonal, or faces with a portion hidden. z In certain cases, faces may appear. No AF frame: Focusing difficulty ([Face Detect] option) Face Detect... Feature z When the camera detects faces, AF frames will shoot using [Center] not the [Face Detect] function if a white...

PowerShot SX10 IS Camera User Guide
Page 125
When using the digital zoom or digital tele-converter - When a selected face cannot be canceled. - When turning the power off and back on - When the MENU button is pressed to another shooting mode - When switching to display the menu - In the following cases, the face select mode will display in ...yellow. 3 Press the shutter button all the way to shoot. 123 2 Press the shutter button halfway. • The face frame ( ) of main subject will change into a green . • If the camera has difficulty focusing, the ...
When using the digital zoom or digital tele-converter - When a selected face cannot be canceled. - When turning the power off and back on - When the MENU button is pressed to another shooting mode - When switching to display the menu - In the following cases, the face select mode will display in ...yellow. 3 Press the shutter button all the way to shoot. 123 2 Press the shutter button halfway. • The face frame ( ) of main subject will change into a green . • If the camera has difficulty focusing, the ...

PowerShot SX10 IS Camera User Guide
Page 247
... the surroundings. In the event that look like this. Do not use damaged batteries or batteries whose outer seal is risk that could damage the casing. The positive electrode (plus terminal) is correctly formed (protruding from the metal base), but the seal does not extend up over the edge of the...
... the surroundings. In the event that look like this. Do not use damaged batteries or batteries whose outer seal is risk that could damage the casing. The positive electrode (plus terminal) is correctly formed (protruding from the metal base), but the seal does not extend up over the edge of the...
PowerShot SX10 IS Camera User Guide
Page 249
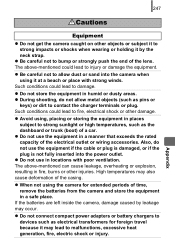
...Such conditions could lead to damage. z Do not use in locations with strong winds. Appendix High temperatures may occur. z When not using the camera for foreign travel because it may lead to malfunctions, excessive heat generation, fire, electric shock or injury. z Do not connect compact power adapters or...leakage may also cause deformation of the lens. z Be careful not to bump or strongly push the end of the casing. 247 Cautions Equipment z Do not get the camera caught on other objects or subject it to strong impacts or shocks when wearing or holding it at a beach or...
...Such conditions could lead to damage. z Do not use in locations with strong winds. Appendix High temperatures may occur. z When not using the camera for foreign travel because it may lead to malfunctions, excessive heat generation, fire, electric shock or injury. z Do not connect compact power adapters or...leakage may also cause deformation of the lens. z Be careful not to bump or strongly push the end of the casing. 247 Cautions Equipment z Do not get the camera caught on other objects or subject it to strong impacts or shocks when wearing or holding it at a beach or...


