

S800_spec.pdf
Page 1
The S800 photo printer outputs high-resolution photos on plain and specialty paper at impressive speeds without compromising quality. Brilliant features. It utilizes new, advanced inks to help produce incredibly vibrant colors and images that uses individual ink tanks for each color. Its built-in Photo Optimizer Pro improves color accuracy, and has the ability to reproduce up to 49 gradation levels for more natural colors The Professional Photo Printer You...
The S800 photo printer outputs high-resolution photos on plain and specialty paper at impressive speeds without compromising quality. Brilliant features. It utilizes new, advanced inks to help produce incredibly vibrant colors and images that uses individual ink tanks for each color. Its built-in Photo Optimizer Pro improves color accuracy, and has the ability to reproduce up to 49 gradation levels for more natural colors The Professional Photo Printer You...
S800_spec.pdf
Page 2
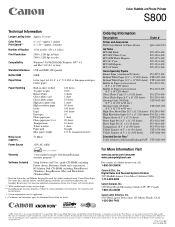
... on system configuration, software, document complexity, print mode and page coverage. Color Bubble Jet Photo Printer S800 Technical Information Longer Lasting Color Approx. 25 years* Color Photo Print Speed** 4" x 6"-approx. 1 minute 8" x 10"-approx. 2 minutes Number of Nozzles 1,536 nozzles (256 x 6 colors) Print Resolution 2400 x 1200 dpi in black 2400 x 1200 dpi in color Compatibility Windows® 95/98/2000/Me,Windows NT® 4.0 and Mac® OS (8.1 or later) Standard Interfaces USB and IEEE...
... on system configuration, software, document complexity, print mode and page coverage. Color Bubble Jet Photo Printer S800 Technical Information Longer Lasting Color Approx. 25 years* Color Photo Print Speed** 4" x 6"-approx. 1 minute 8" x 10"-approx. 2 minutes Number of Nozzles 1,536 nozzles (256 x 6 colors) Print Resolution 2400 x 1200 dpi in black 2400 x 1200 dpi in color Compatibility Windows® 95/98/2000/Me,Windows NT® 4.0 and Mac® OS (8.1 or later) Standard Interfaces USB and IEEE...
Setup instructions for the S800 printer
Page 1
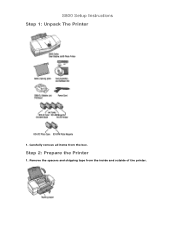
S800 Setup Instructions Step 1: Unpack The Printer 1. Step 2: Prepare the Printer 1. Remove the spacers and shipping tape from the box. Carefully remove all items from the inside and outside of the printer.
S800 Setup Instructions Step 1: Unpack The Printer 1. Step 2: Prepare the Printer 1. Remove the spacers and shipping tape from the box. Carefully remove all items from the inside and outside of the printer.
Setup instructions for the S800 printer
Page 2
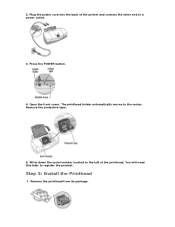
Open the front cover. Remove the printhead from its package. 2. Write down the serial number located to the left of the printer and connect the other end to a power outlet. 3. The printhead holder automatically moves to register the product. Remove the protective tape. 5. Step 3: Install the Printhead 1. You will need this later to the center. Plug the power cord into the back of the printhead. Press the POWER button. 4.
Open the front cover. Remove the printhead from its package. 2. Write down the serial number located to the left of the printer and connect the other end to a power outlet. 3. The printhead holder automatically moves to register the product. Remove the protective tape. 5. Step 3: Install the Printhead 1. You will need this later to the center. Plug the power cord into the back of the printhead. Press the POWER button. 4.
Setup instructions for the S800 printer
Page 3
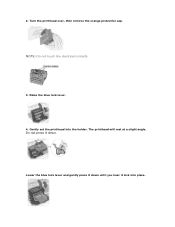
Do not press it lock into the holder. Lower the blue lock lever and gently press it down until you hear it down. The printhead will rest at a slight angle. Raise the blue lock lever. 4. Turn the printhead over, then remove the orange protective cap. Gently set the printhead into place. 2. NOTE: Do not touch the electrical contacts. 3.
Do not press it lock into the holder. Lower the blue lock lever and gently press it down until you hear it down. The printhead will rest at a slight angle. Raise the blue lock lever. 4. Turn the printhead over, then remove the orange protective cap. Gently set the printhead into place. 2. NOTE: Do not touch the electrical contacts. 3.
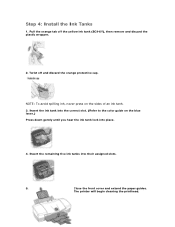
Setup instructions for the S800 printer
Page 4
Twist off the yellow ink tank (BCI-6Y), then remove and discard the plastic wrapper. 2. Pull the orange tab off and discard the orange protective cap. NOTE: To avoid spilling ink, never press on the blue lever.) Press down gently until you hear the ink tank lock into place. 4. Insert the ink tank into their assigned slots. 5. The printer will begin cleaning the printhead. Close the front cover and extend the paper guides. Insert the remaining five ink tanks into the correct slot. (Refer to the color guide on the sides of an ink tank. 3. Step 4: Install the Ink Tanks 1.
Twist off the yellow ink tank (BCI-6Y), then remove and discard the plastic wrapper. 2. Pull the orange tab off and discard the orange protective cap. NOTE: To avoid spilling ink, never press on the blue lever.) Press down gently until you hear the ink tank lock into place. 4. Insert the ink tank into their assigned slots. 5. The printer will begin cleaning the printhead. Close the front cover and extend the paper guides. Insert the remaining five ink tanks into the correct slot. (Refer to the color guide on the sides of an ink tank. 3. Step 4: Install the Ink Tanks 1.
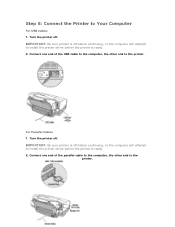
Setup instructions for the S800 printer
Page 5
Turn the printer off . Step 5: Connect the Printer to install the printer driver before the printer is ready. 2. Connect one end of the USB cable to the computer, the other end to the printer. IMPORTANT: Be sure printer is off before continuing, or the computer will attempt to Your Computer For USB Cables 1. Turn the printer off . IMPORTANT: Be sure printer is off before continuing, or the computer will...
Turn the printer off . Step 5: Connect the Printer to install the printer driver before the printer is ready. 2. Connect one end of the USB cable to the computer, the other end to the printer. IMPORTANT: Be sure printer is off before continuing, or the computer will attempt to Your Computer For USB Cables 1. Turn the printer off . IMPORTANT: Be sure printer is off before continuing, or the computer will...
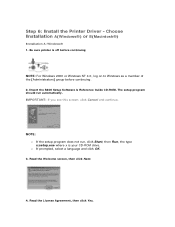
Setup instructions for the S800 printer
Page 6
... the S800 Setup Software & Reference Guide CD-ROM. NOTE: o If the setup program does not run automatically. o If prompted, select a language and click OK. 3. Read the Welcome screen, then click Next. 4. Step 6: Install the Printer Driver - IMPORTANT: If you see this screen. The setup program should run , click Start, then Run, the type x:setup.exe where x is off before continuing NOTE: For Windows...
... the S800 Setup Software & Reference Guide CD-ROM. NOTE: o If the setup program does not run automatically. o If prompted, select a language and click OK. 3. Read the Welcome screen, then click Next. 4. Step 6: Install the Printer Driver - IMPORTANT: If you see this screen. The setup program should run , click Start, then Run, the type x:setup.exe where x is off before continuing NOTE: For Windows...
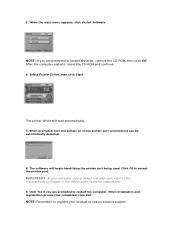
Setup instructions for the S800 printer
Page 7
... the Troubleshooting chapter in the S800 User's Guide for instructions. 9. NOTE: If you are prompted to ensure product support. IMPORTANT: If your product to restart Windows, remove the CD-ROM, then click OK. When installation and registration process has completed, click Exit. When prompted, turn the printer on so the printer port (connection) can be automatically detected. 8. The printer driver will begin identifying the printer port being used. 5. Click...
... the Troubleshooting chapter in the S800 User's Guide for instructions. 9. NOTE: If you are prompted to ensure product support. IMPORTANT: If your product to restart Windows, remove the CD-ROM, then click OK. When installation and registration process has completed, click Exit. When prompted, turn the printer on so the printer port (connection) can be automatically detected. 8. The printer driver will begin identifying the printer port being used. 5. Click...
Setup instructions for the S800 printer
Page 8
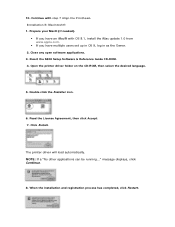
Close any open software applications. 3. Insert the S800 Setup Software & Reference Guide CD-ROM. 4. Read the License Agreement, then click Accept. 7. Click Install. Installation B: Macintosh® 1. Double click the Installer icon. 6. Prepare your Mac® (if needed). • If you have multiple users set up in OS 9, log in as the Owner. 2. The printer driver will load automatically. When the installation and registration process has completed, click Restart. Open the printer driver folder on...
Close any open software applications. 3. Insert the S800 Setup Software & Reference Guide CD-ROM. 4. Read the License Agreement, then click Accept. 7. Click Install. Installation B: Macintosh® 1. Double click the Installer icon. 6. Prepare your Mac® (if needed). • If you have multiple users set up in OS 9, log in as the Owner. 2. The printer driver will load automatically. When the installation and registration process has completed, click Restart. Open the printer driver folder on...
Setup instructions for the S800 printer
Page 9
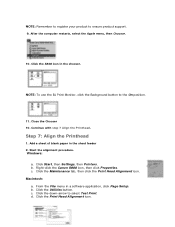
... with step 7 Align the Printhead. From the File menu in the chooser. Click the down-arrow to the On position. 11. Click Start, then Settings, then Printers. Close the Chooser 10. Click the Maintenance tab, then click the Print Head Alignment icon. Add a sheet of blank paper in the sheet feeder 2. Start the alignment procedure. b. NOTE: To use the BJ Print Monitor, click the Background button to select Test Print. b. Click the...
... with step 7 Align the Printhead. From the File menu in the chooser. Click the down-arrow to the On position. 11. Click Start, then Settings, then Printers. Close the Chooser 10. Click the Maintenance tab, then click the Print Head Alignment icon. Add a sheet of blank paper in the sheet feeder 2. Start the alignment procedure. b. NOTE: To use the BJ Print Monitor, click the Background button to select Test Print. b. Click the...
Setup instructions for the S800 printer
Page 10
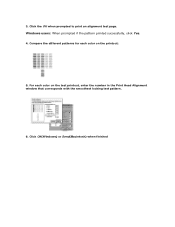
Click the OK when prompted to print an alignment test page. For each color on the test printout, enter the number in the Print Head Alignment window that corresponds with the smoothest looking test pattern. 6. Windows users: When prompted if the pattern printed successfully, click Yes. 4. Click OK(Windows) or Send(Macintosh) when finished Compare the different patterns for each color on the printout: 5. 3.
Click the OK when prompted to print an alignment test page. For each color on the test printout, enter the number in the Print Head Alignment window that corresponds with the smoothest looking test pattern. 6. Windows users: When prompted if the pattern printed successfully, click Yes. 4. Click OK(Windows) or Send(Macintosh) when finished Compare the different patterns for each color on the printout: 5. 3.


