User Guide
Page 2
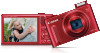
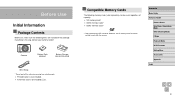
... Menu Accessories Appendix Index 2 Compatible Memory Cards The following items are included in the package. Camera Battery Pack NB-6LH* Battery Charger CB-2LY/CB-2LYE Wrist Strap * Do not peel off the adhesive covering from a battery pack. ●● Printed matter is also included. ●● A memory card is missing, contact your...
... Menu Accessories Appendix Index 2 Compatible Memory Cards The following items are included in the package. Camera Battery Pack NB-6LH* Battery Charger CB-2LY/CB-2LYE Wrist Strap * Do not peel off the adhesive covering from a battery pack. ●● Printed matter is also included. ●● A memory card is missing, contact your...
User Guide
Page 4
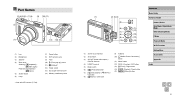
...). (7) Power button (8) Wi-Fi antenna area (9) Flash (10) [ (Flash pop up)] switch (11) (N-Mark)* (12) Tripod socket (13) DC coupler terminal cover (14) Memory card/battery cover (1) (2) (3) (4) (5) (6) (11) (12) (7) (8) (13) (9) (14) (10) (15) (1) Screen (LCD monitor) (2) Strap mount (3) AV OUT (Audio/video output) / DIGITAL terminal (4) HDMITM terminal (5) Mode switch (6) [ (Playback)] button...
...). (7) Power button (8) Wi-Fi antenna area (9) Flash (10) [ (Flash pop up)] switch (11) (N-Mark)* (12) Tripod socket (13) DC coupler terminal cover (14) Memory card/battery cover (1) (2) (3) (4) (5) (6) (11) (12) (7) (8) (13) (9) (14) (10) (15) (1) Screen (LCD monitor) (2) Strap mount (3) AV OUT (Audio/video output) / DIGITAL terminal (4) HDMITM terminal (5) Mode switch (6) [ (Playback)] button...

User Guide
Page 5
... Precautions 13 Basic Guide Basic Operations 16 Initial Preparations 16 Attaching the Strap 16 Holding the Camera 16 Charging the Battery Pack 17 Inserting the Battery Pack and Memory Card 18 Removing the Battery Pack and Memory Card 18 Setting the Date and Time 19 Changing the Date and Time 19 Display Language...
... Precautions 13 Basic Guide Basic Operations 16 Initial Preparations 16 Attaching the Strap 16 Holding the Camera 16 Charging the Battery Pack 17 Inserting the Battery Pack and Memory Card 18 Removing the Battery Pack and Memory Card 18 Setting the Date and Time 19 Changing the Date and Time 19 Display Language...

User Guide
Page 9
... to a Photobook 139 Removing All Images from a Photobook 139 Appendix 140 Troubleshooting 140 On-Screen Messages 144 On-Screen Information 146 Shooting (Information Display 146 Battery Level 146 Playback (Detailed Information Display 147 Summary of Movie Control Panel 147 Functions and Menu Tables 148 Functions Available in Each Shooting Mode 148...
... to a Photobook 139 Removing All Images from a Photobook 139 Appendix 140 Troubleshooting 140 On-Screen Messages 144 On-Screen Information 146 Shooting (Information Display 146 Battery Level 146 Playback (Detailed Information Display 147 Summary of Movie Control Panel 147 Functions and Menu Tables 148 Functions Available in Each Shooting Mode 148...

User Guide
Page 10
... Card 157 Recording Time per Memory Card 157 Flash Range 158 Shooting Range 158 Continuous Shooting Speed 158 Shutter Speed 158 Aperture 158 Battery Pack NB-6LH 158 Battery Charger CB-2LY/CB-2LYE 158 Index 159 Wi-Fi (Wireless LAN) Precautions 161 Radio Wave Interference Precautions 161 Security Precautions 161 Trademarks...
... Card 157 Recording Time per Memory Card 157 Flash Range 158 Shooting Range 158 Continuous Shooting Speed 158 Shutter Speed 158 Aperture 158 Battery Pack NB-6LH 158 Battery Charger CB-2LY/CB-2LYE 158 Index 159 Wi-Fi (Wireless LAN) Precautions 161 Radio Wave Interference Precautions 161 Security Precautions 161 Trademarks...

User Guide
Page 13
...Precautions ●● Before using the product and distance yourself from it. ●● Use only the recommended battery pack/batteries. ●● Do not place the battery pack/batteries near or in direct flame. Warning Denotes the possibility of children and infants. Do not cut, damage, alter,...power outlet, and the surrounding area. -- Do not use the equipment in . A strap wound around a child's neck may cause the battery pack/batteries to clean the product. ●● Avoid contact with liquid, and do not allow dust or metal objects (such as when dropped. &#...
...Precautions ●● Before using the product and distance yourself from it. ●● Use only the recommended battery pack/batteries. ●● Do not place the battery pack/batteries near or in direct flame. Warning Denotes the possibility of children and infants. Do not cut, damage, alter,...power outlet, and the surrounding area. -- Do not use the equipment in . A strap wound around a child's neck may cause the battery pack/batteries to clean the product. ●● Avoid contact with liquid, and do not allow dust or metal objects (such as when dropped. &#...
User Guide
Page 14
... matter on other objects. ●● Be careful not to cover it to fire or explosions. ●● Unplug any dedicated battery packs near pets. Contacting other insulators. Do not cover with tape or other metal materials may cause product damage. ●● Before... you discard the battery pack/batteries, cover the terminals with a cloth or other injuries. Before Use Basic Guide Advanced Guide Camera Basics Auto Mode / Hybrid Auto Mode ...
... matter on other objects. ●● Be careful not to cover it to fire or explosions. ●● Unplug any dedicated battery packs near pets. Contacting other insulators. Do not cover with tape or other metal materials may cause product damage. ●● Before... you discard the battery pack/batteries, cover the terminals with a cloth or other injuries. Before Use Basic Guide Advanced Guide Camera Basics Auto Mode / Hybrid Auto Mode ...

User Guide
Page 15
... the screen. Also close the screen (so that it faces the body), if your product uses multiple batteries, do not use batteries that hard objects do not use old and new batteries together. Do not insert the batteries with the screen. Before Use Basic Guide Advanced Guide Camera Basics Auto Mode / Hybrid Auto Mode...
... the screen. Also close the screen (so that it faces the body), if your product uses multiple batteries, do not use batteries that hard objects do not use old and new batteries together. Do not insert the batteries with the screen. Before Use Basic Guide Advanced Guide Camera Basics Auto Mode / Hybrid Auto Mode...

User Guide
Page 17
... cord, do not attach the charger or cord to other end into the charger, then plug the other objects. Never use , charge the battery pack with the included charger. Be sure to the product. ●● For details on charging time and the number of shots and recording...begins. ●●When charging is finished, the lamp turns green. 3 Remove the battery pack. ●●After unplugging the battery charger, remove the battery pack by pushing it in (1) and up (2). ●● To protect the battery pack and keep it in a different format, use . ●● The charger can...
... cord, do not attach the charger or cord to other end into the charger, then plug the other objects. Never use , charge the battery pack with the included charger. Be sure to the product. ●● For details on charging time and the number of shots and recording...begins. ●●When charging is finished, the lamp turns green. 3 Remove the battery pack. ●●After unplugging the battery charger, remove the battery pack by pushing it in (1) and up (2). ●● To protect the battery pack and keep it in a different format, use . ●● The charger can...
User Guide
Page 18
... switch and insert the memory card. ●●Recording is not possible on one memory card, see "Number of the arrow. ●●The battery pack will pop up . Slide the switch to the unlocked position. ●●Insert the memory card with a write-protect switch when the switch ... Mode Wi-Fi Functions Setting Menu Accessories Appendix Index 18 Always confirm that is new or has been formatted in another device, you insert the battery pack facing the wrong way, it . ●●The memory card will pop up . Inserting memory cards facing the wrong way may damage ...
... switch and insert the memory card. ●●Recording is not possible on one memory card, see "Number of the arrow. ●●The battery pack will pop up . Slide the switch to the unlocked position. ●●Insert the memory card with a write-protect switch when the switch ... Mode Wi-Fi Functions Setting Menu Accessories Appendix Index 18 Always confirm that is new or has been formatted in another device, you insert the battery pack facing the wrong way, it . ●●The memory card will pop up . Inserting memory cards facing the wrong way may damage ...

User Guide
Page 20
... camera is left off. ●● Once the date/time battery is displayed if you wait too long in step 2 after the battery pack is removed. ●● The date/time battery will be charged in about 4 hours once you insert a charged battery pack or connect the camera to dismiss the time display and... ] on . ●● The camera has a built-in "Setting the Date and Time" (= 19). Display Language Change the display language as described in date/time battery (backup battery).
... camera is left off. ●● Once the date/time battery is displayed if you wait too long in step 2 after the battery pack is removed. ●● The date/time battery will be charged in about 4 hours once you insert a charged battery pack or connect the camera to dismiss the time display and... ] on . ●● The camera has a built-in "Setting the Date and Time" (= 19). Display Language Change the display language as described in date/time battery (backup battery).

User Guide
Page 25
... inactivity. ●● You can deactivate Auto Power Down and adjust the timing of inactivity. Power-Saving Features (Auto Power Down) As a way to conserve battery power, the camera automatically deactivates the screen (Display Off) and then turns itself off . Shutter Button To ensure your shots are described as a shutter sound...
... inactivity. ●● You can deactivate Auto Power Down and adjust the timing of inactivity. Power-Saving Features (Auto Power Down) As a way to conserve battery power, the camera automatically deactivates the screen (Display Off) and then turns itself off . Shutter Button To ensure your shots are described as a shutter sound...

User Guide
Page 29
... the display color. ●●Press the [ ] button again to cancel the clock display. ●● When the camera is off , open the memory card/battery cover, or shake or jolt the camera, which may corrupt images or damage the camera or memory card.
... the display color. ●●Press the [ ] button again to cancel the clock display. ●● When the camera is off , open the memory card/battery cover, or shake or jolt the camera, which may corrupt images or damage the camera or memory card.

User Guide
Page 32
... subjects about four seconds before each shot, which ends with the still image and a shutter sound, forms a single chapter in the digest movie. ●● Battery life is shorter in this mode than in [ ] mode, because digest movies are recorded for each shot. ●● A digest movie may not be recorded...
... subjects about four seconds before each shot, which ends with the still image and a shutter sound, forms a single chapter in the digest movie. ●● Battery life is shorter in this mode than in [ ] mode, because digest movies are recorded for each shot. ●● A digest movie may not be recorded...

User Guide
Page 66
... Movies You can change the flash mode to match the shooting scene. Move the [ ] switch to raise the flash, then configure the setting. Off Conserves battery power, because the camera does not focus constantly.
... Movies You can change the flash mode to match the shooting scene. Move the [ ] switch to raise the flash, then configure the setting. Off Conserves battery power, because the camera does not focus constantly.

User Guide
Page 88
...;●The clip is erased, and the short movie is overwritten. ●● [ ] is not displayed if you should use a fully charged battery pack or an AC adapter kit (sold separately, =126). Before Use Basic Guide Advanced Guide Camera Basics Auto Mode / Hybrid Auto Mode Other Shooting.... 3 Review the edited movie. ●●Press the [ ][ ] buttons to a printer. Be careful when erasing clips, because they cannot be saved if the battery pack runs out while saving is now saved as needed. Press the [ ] button, press the [ ][ ] buttons to choose [OK], and then press the [...
...;●The clip is erased, and the short movie is overwritten. ●● [ ] is not displayed if you should use a fully charged battery pack or an AC adapter kit (sold separately, =126). Before Use Basic Guide Advanced Guide Camera Basics Auto Mode / Hybrid Auto Mode Other Shooting.... 3 Review the edited movie. ●●Press the [ ][ ] buttons to a printer. Be careful when erasing clips, because they cannot be saved if the battery pack runs out while saving is now saved as needed. Press the [ ] button, press the [ ][ ] buttons to choose [OK], and then press the [...

User Guide
Page 110
... supported image quality varies depending on Sending Images ●● Keep your image transfers. ●● Depending on the CANON iMAGE GATEWAY server. Be sure to keep an eye on the camera battery level. ●● Web services may take less time when resending images you press the [ ] button to remove [ ] after...
... supported image quality varies depending on Sending Images ●● Keep your image transfers. ●● Depending on the CANON iMAGE GATEWAY server. Be sure to keep an eye on the camera battery level. ●● Web services may take less time when resending images you press the [ ] button to remove [ ] after...

User Guide
Page 113
Viewing Images Sent via the access point instead of cameras linked to CANON iMAGE GATEWAY is turned off . ●● When sending images, you should use a fully charged battery pack or an AC adapter kit (sold separately, =126). ●● Even if images were imported to the computer... destination is a computer on . ●●Images are automatically sent to Web services from which images are automatically saved to the CANON iMAGE GATEWAY (=103), choose your smartphone. Sending Images Images sent from your camera model, and then display the Web service configuration screen...
Viewing Images Sent via the access point instead of cameras linked to CANON iMAGE GATEWAY is turned off . ●● When sending images, you should use a fully charged battery pack or an AC adapter kit (sold separately, =126). ●● Even if images were imported to the computer... destination is a computer on . ●●Images are automatically sent to Web services from which images are automatically saved to the CANON iMAGE GATEWAY (=103), choose your smartphone. Sending Images Images sent from your camera model, and then display the Web service configuration screen...

User Guide
Page 120
...Retraction Timing The lens is normally retracted for safety about one minute after you press the [ ] button in use, the screen quickly darkens to reduce battery consumption. 1 Configure the setting. ●●Choose [Eco Mode], and then choose [On is now shown on the shooting screen (=146). ●&#... and then press the [ ] button. ●●After choosing an item, press the [ ][ ] buttons to adjust it as needed. ●● To conserve battery power, you should normally choose [On] for [Auto Power Down] and [1 min.] or less for shooting when the screen is applied even if you set...
...Retraction Timing The lens is normally retracted for safety about one minute after you press the [ ] button in use, the screen quickly darkens to reduce battery consumption. 1 Configure the setting. ●●Choose [Eco Mode], and then choose [On is now shown on the shooting screen (=146). ●&#... and then press the [ ] button. ●●After choosing an item, press the [ ][ ] buttons to adjust it as needed. ●● To conserve battery power, you should normally choose [On] for [Auto Power Down] and [1 min.] or less for shooting when the screen is applied even if you set...

User Guide
Page 125
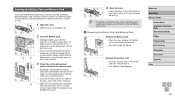
...-Fi Functions Setting Menu Accessories Appendix Index 125 Accessories Enjoy the camera in more ways with optional Canon accessories and other compatible accessories sold separately System Map Included Accessories Wrist strap Battery Pack NB-6LH*1 Battery Charger CB-2LY/CB-2LYE*1 USB Cable (camera end: Mini-B)*2 Power AC Adapter Kit ACK-DC40 Memory...
...-Fi Functions Setting Menu Accessories Appendix Index 125 Accessories Enjoy the camera in more ways with optional Canon accessories and other compatible accessories sold separately System Map Included Accessories Wrist strap Battery Pack NB-6LH*1 Battery Charger CB-2LY/CB-2LYE*1 USB Cable (camera end: Mini-B)*2 Power AC Adapter Kit ACK-DC40 Memory...


