
User Guide
Page 3
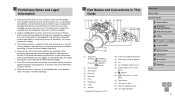
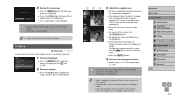
...9679; Although the LCD monitor and viewfinder are not liable for any malfunction of a camera or accessory, including memory cards, that Canon Inc., its subsidiaries and affiliates, and its distributors are produced under extremely high-precision manufacturing conditions and more than 99.99% of...that even for protection against scratches during shipment. This does not indicate damage. Preliminary Notes and Legal Information ●● Take and review some commercial settings. ●● The camera warranty is used over an extended period, it may become warm. Refrain from any...
...9679; Although the LCD monitor and viewfinder are not liable for any malfunction of a camera or accessory, including memory cards, that Canon Inc., its subsidiaries and affiliates, and its distributors are produced under extremely high-precision manufacturing conditions and more than 99.99% of...that even for protection against scratches during shipment. This does not indicate damage. Preliminary Notes and Legal Information ●● Take and review some commercial settings. ●● The camera warranty is used over an extended period, it may become warm. Refrain from any...
User Guide
Page 56
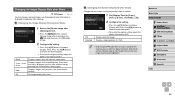
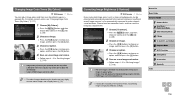
... Screen Displayed after Shots Change the way images are not changed. Changing the Image Display Period after Shots 1 Access the [Review image after shooting] screen. ●●Press the [ ] button, choose [Review image after shots as follows. 1 Set [Display Time] to choose the desired option. ●●To restore the original setting...
... Screen Displayed after Shots Change the way images are not changed. Changing the Image Display Period after Shots 1 Access the [Review image after shooting] screen. ●●Press the [ ] button, choose [Review image after shots as follows. 1 Set [Display Time] to choose the desired option. ●●To restore the original setting...
User Guide
Page 101
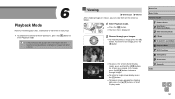
... Shooting Modes 4 P Mode 5 Tv, Av, M, C1, and C2 Mode 6 Playback Mode 7 Wi-Fi Functions 8 Setting Menu 9 Accessories 10 Appendix Index 101 6 Playback Mode Have fun reviewing your images. ●●To view the previous image, press the [ ] button. In this screen (Scroll Display mode), press and hold the [ ][ ] buttons for these...
... Shooting Modes 4 P Mode 5 Tv, Av, M, C1, and C2 Mode 6 Playback Mode 7 Wi-Fi Functions 8 Setting Menu 9 Accessories 10 Appendix Index 101 6 Playback Mode Have fun reviewing your images. ●●To view the previous image, press the [ ] button. In this screen (Scroll Display mode), press and hold the [ ][ ] buttons for these...
User Guide
Page 103
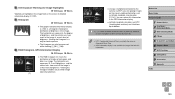
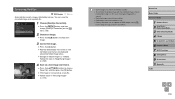
... Mode 3 Other Shooting Modes 4 P Mode 5 Tv, Av, M, C1, and C2 Mode 6 Playback Mode 7 Wi-Fi Functions 8 Setting Menu 9 Accessories 10 Appendix Index 103 You can review this histogram enables you to check image color characteristics. (1) ●●Using a smartphone connected to check exposure. ●●The histogram can geotag images on...
... Mode 3 Other Shooting Modes 4 P Mode 5 Tv, Av, M, C1, and C2 Mode 6 Playback Mode 7 Wi-Fi Functions 8 Setting Menu 9 Accessories 10 Appendix Index 103 You can review this histogram enables you to check image color characteristics. (1) ●●Using a smartphone connected to check exposure. ●●The histogram can geotag images on...
User Guide
Page 117
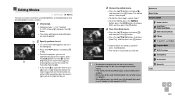
... the image to be cropped (1). ●●The original image is shown in the upper left, and a preview of the image as a new image and review. ●●Follow steps 4 - 5 in "Resizing Images" (= 116). ●● Editing is not possible for images shot at a resolution of [ ] (=52) or ... uncropped images. ●● If you crop still images shot using Face ID (=47), only the names of the people left in the lower right. 5 Review the new image. ●●Press the [ ] button. [Display new image?] is displayed. ●●Press the [ ][ ] buttons to choose [...
... the image to be cropped (1). ●●The original image is shown in the upper left, and a preview of the image as a new image and review. ●●Follow steps 4 - 5 in "Resizing Images" (= 116). ●● Editing is not possible for images shot at a resolution of [ ] (=52) or ... uncropped images. ●● If you crop still images shot using Face ID (=47), only the names of the people left in the lower right. 5 Review the new image. ●●Press the [ ] button. [Display new image?] is displayed. ●●Press the [ ][ ] buttons to choose [...
User Guide
Page 118
... press the [ ] button. 4 Save as a separate file. Choose from four correction levels, and then save the edited image as a new image and review. ●●Follow steps 4 - 5 in "Resizing Images" (= 116). ●● For some images, correction may be inaccurate or may cause images...3 Choose an option. ●●Press the [ ][ ] buttons to choose an option, and then press the [ ] button. 4 Save as a new image and review. ●●Follow steps 4 - 5 in "Resizing Images" (= 116). ●● Image quality of pictures you repeatedly edit this way will be a little lower ...
... press the [ ] button. 4 Save as a separate file. Choose from four correction levels, and then save the edited image as a new image and review. ●●Follow steps 4 - 5 in "Resizing Images" (= 116). ●● For some images, correction may be inaccurate or may cause images...3 Choose an option. ●●Press the [ ][ ] buttons to choose an option, and then press the [ ] button. 4 Save as a new image and review. ●●Follow steps 4 - 5 in "Resizing Images" (= 116). ●● Image quality of pictures you repeatedly edit this way will be a little lower ...
User Guide
Page 119
... the corrected image, choose [Overwrite] in [ ], but the original image cannot be overwritten. Follow the steps in "Magnifying Images" (= 108). 4 Save as a new image and review. ●●Press the buttons to choose an image. 3 Correct the image. ●●Press the [ ] button. ●●Red-eye detected by red-eye.
... the corrected image, choose [Overwrite] in [ ], but the original image cannot be overwritten. Follow the steps in "Magnifying Images" (= 108). 4 Save as a new image and review. ●●Press the buttons to choose an image. 3 Correct the image. ●●Press the [ ] button. ●●Red-eye detected by red-eye.
User Guide
Page 120
... left will be cut, while in [ ] the portion after the nearest [ ] mark on the right will be available. ●● Movies may not be cut. 3 Review the edited movie. ●●Press the [ ][ ] buttons to choose [ ], and then press the [ ] button. In this case, the original movie will be erased. ●...
... left will be cut, while in [ ] the portion after the nearest [ ] mark on the right will be available. ●● Movies may not be cut. 3 Review the edited movie. ●●Press the [ ][ ] buttons to choose [ ], and then press the [ ] button. In this case, the original movie will be erased. ●...
User Guide
Page 191
Wind filter/Attenuator Wind Filter: Auto *2 / *2 / / / // / ////// / / / / / Wind Filter: Off *2 / *2 / / / // / ////// / / / / / Attenuator: Off *2 / *2 / / / // / ////// / / / / / Attenuator: On *2 / *2 / / / // / ////// / / / / / Review image after shooting (=56) Display Time Off *2 / *2 / / / // / ////// / / / / / Quick *2 / *2 / / / // / ////// / / / / / 2 sec./4 sec./8 sec./Hold *2 / *2 / / / // / ////// / / / / / Display Info Off *2 / *2 Detailed *2 / *2 Blink Detection (=55) On *2 / *2 Off *2 / *2 Custom Display (=...
Wind filter/Attenuator Wind Filter: Auto *2 / *2 / / / // / ////// / / / / / Wind Filter: Off *2 / *2 / / / // / ////// / / / / / Attenuator: Off *2 / *2 / / / // / ////// / / / / / Attenuator: On *2 / *2 / / / // / ////// / / / / / Review image after shooting (=56) Display Time Off *2 / *2 / / / // / ////// / / / / / Quick *2 / *2 / / / // / ////// / / / / / 2 sec./4 sec./8 sec./Hold *2 / *2 / / / // / ////// / / / / / Display Info Off *2 / *2 Detailed *2 / *2 Blink Detection (=55) On *2 / *2 Off *2 / *2 Custom Display (=...


