User Manual
Page 7
...Access Point Compatibility 86 Using WPS-Compatible Access Points 87 Connecting to Listed Access Points 89 Previous Access Points 90 Sending Images to a Registered Web Service 90 Registering Web Services 90 Registering CANON iMAGE GATEWAY 91 Registering Other Web Services 92 Uploading Images... to Web Services 93 Printing Images Wirelessly from a Connected Printer 94 Sending Images to Another Camera 95 Before Use Basic Guide ...
...Access Point Compatibility 86 Using WPS-Compatible Access Points 87 Connecting to Listed Access Points 89 Previous Access Points 90 Sending Images to a Registered Web Service 90 Registering Web Services 90 Registering CANON iMAGE GATEWAY 91 Registering Other Web Services 92 Uploading Images... to Web Services 93 Printing Images Wirelessly from a Connected Printer 94 Sending Images to Another Camera 95 Before Use Basic Guide ...
User Manual
Page 8
... 102 Geotagging Images on the Camera 102 Shooting Remotely 102 Editing or Erasing Wi-Fi Settings 103 Editing Connection Information 103 Changing a Device Nickname 104 Erasing Connection Information 104 Changing the Camera Nickname 104 Returning the Wi-Fi Settings to Default 105 7 Setting Menu ... Unit 115 Other Accessories 115 Printer 115 Photo Storage 115 Using Optional Accessories 116 Playback on a TV 116 Using the Software 117 Connect to a Computer Using a Cable 117 Checking Your Computer Environment 117 Installing the Software 117 Saving Images to a Computer 117 Printing ...
... 102 Geotagging Images on the Camera 102 Shooting Remotely 102 Editing or Erasing Wi-Fi Settings 103 Editing Connection Information 103 Changing a Device Nickname 104 Erasing Connection Information 104 Changing the Camera Nickname 104 Returning the Wi-Fi Settings to Default 105 7 Setting Menu ... Unit 115 Other Accessories 115 Printer 115 Photo Storage 115 Using Optional Accessories 116 Playback on a TV 116 Using the Software 117 Connect to a Computer Using a Cable 117 Checking Your Computer Environment 117 Installing the Software 117 Saving Images to a Computer 117 Printing ...
User Manual
Page 23
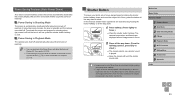
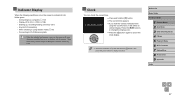
... adjust the timing of Display Off, if you prefer (=108). ●● Power saving is not active while the camera is connected to other devices via Wi-Fi (=78), or when connected to a computer (= 117). In this manual, shutter button operations are in focus, always begin by holding the shutter button halfway...
... adjust the timing of Display Off, if you prefer (=108). ●● Power saving is not active while the camera is connected to other devices via Wi-Fi (=78), or when connected to a computer (= 117). In this manual, shutter button operations are in focus, always begin by holding the shutter button halfway...

User Manual
Page 26
... [ ] button in step 1. ●● To undo any accidental setting changes, you can enter varies depending on -screen keyboard to enter information for Wi-Fi connections (=78).
... [ ] button in step 1. ●● To undo any accidental setting changes, you can enter varies depending on -screen keyboard to enter information for Wi-Fi connections (=78).
User Manual
Page 27
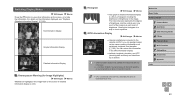
Any kind of connecting -- Connecting to Wi-Fi/Receiving data ●● When the indicator blinks green, never turn the camera off , press and hold the camera vertically while using ... and hold the [ ] button. ●●The current time appears. ●●If you hold the [ ] button, then press the power button to a computer (=117) -- Connecting to display the clock. Display off (=23, =108, =108) -- When shooting in Long Shutter mode (=47) --
Any kind of connecting -- Connecting to Wi-Fi/Receiving data ●● When the indicator blinks green, never turn the camera off , press and hold the camera vertically while using ... and hold the [ ] button. ●●The current time appears. ●●If you hold the [ ] button, then press the power button to a computer (=117) -- Connecting to display the clock. Display off (=23, =108, =108) -- When shooting in Long Shutter mode (=47) --
User Manual
Page 63
... in detailed information display (=63). For details on the screen, or to hide the information. GPS Information Display Still Images Movies ●●Using a smartphone connected to the camera via Wi-Fi, you can review this information in the GPS information display. ●●Latitude, longitude, elevation, and UTC (shooting date...
... in detailed information display (=63). For details on the screen, or to hide the information. GPS Information Display Still Images Movies ●●Using a smartphone connected to the camera via Wi-Fi, you can review this information in the GPS information display. ●●Latitude, longitude, elevation, and UTC (shooting date...
User Manual
Page 78
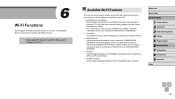
.... 6 Wi-Fi Functions Send images wirelessly from a smartphone or tablet. You can send and receive images and control the camera remotely by connecting it to these devices and services via CANON iMAGE GATEWAY. ●● Printers Send images wirelessly to a PictBridge-compatible printer (supporting DPS over IP) to read "Wi-Fi (Wireless...
.... 6 Wi-Fi Functions Send images wirelessly from a smartphone or tablet. You can send and receive images and control the camera remotely by connecting it to these devices and services via CANON iMAGE GATEWAY. ●● Printers Send images wirelessly to a PictBridge-compatible printer (supporting DPS over IP) to read "Wi-Fi (Wireless...

User Manual
Page 79
...Basics 2 Auto Mode 3 Other Shooting Modes 4 P Mode 5 Playback Mode 6 Wi-Fi Functions 7 Setting Menu 8 Accessories 9 Appendix Index 79 Once the devices are connected to Wi-Fi, it is displayed. It's easy to reconnect to recent devices, which are listed in the Wi-Fi menu. ●● When you... simplifies the process of images that you can choose to a camera that you use on your shots (=102). Sending Images to "Camera Connect". For details on this application (supported smartphones and included functions), refer to the Canon website. ●● If you own a Wi-Fi compatible...
...Basics 2 Auto Mode 3 Other Shooting Modes 4 P Mode 5 Playback Mode 6 Wi-Fi Functions 7 Setting Menu 8 Accessories 9 Appendix Index 79 Once the devices are connected to Wi-Fi, it is displayed. It's easy to reconnect to recent devices, which are listed in the Wi-Fi menu. ●● When you... simplifies the process of images that you can choose to a camera that you use on your shots (=102). Sending Images to "Camera Connect". For details on this application (supported smartphones and included functions), refer to the Canon website. ●● If you own a Wi-Fi compatible...

User Manual
Page 80
... [Yes], and then press the [ ] button. ●●You can also use the smartphone to choose [OK], and then press the [ ] button. 2 Establish the connection. ●●Make sure the camera is off or in Shooting mode. ●●Touch the N-Mark ( ) on the smartphone with Camera... Connect installed against the camera's N-Mark. ●●The camera starts up automatically. ●●After the [Device Nickname] screen is displayed, press the [ ][ ] buttons ...
... [Yes], and then press the [ ] button. ●●You can also use the smartphone to choose [OK], and then press the [ ] button. 2 Establish the connection. ●●Make sure the camera is off or in Shooting mode. ●●Touch the N-Mark ( ) on the smartphone with Camera... Connect installed against the camera's N-Mark. ●●The camera starts up automatically. ●●After the [Device Nickname] screen is displayed, press the [ ][ ] buttons ...
User Manual
Page 81
... Mode ●●Press the [ ] button to turn the camera on. ●●Touch the N-Mark ( ) on the smartphone (=79) with Camera Connect installed against the camera's N-Mark. ●●Press the buttons to choose an image to send, and then press the [ ] button. [ ] is ...have registered a smartphone, you choose [Yes] in step 3. ●● When using NFC, keep the following points in slightly different positions. Connecting via NFC in Playback mode. ●● You can send the current image by choosing [Send this process to choose additional images. ●&#...
... Mode ●●Press the [ ] button to turn the camera on. ●●Touch the N-Mark ( ) on the smartphone (=79) with Camera Connect installed against the camera's N-Mark. ●●Press the buttons to choose an image to send, and then press the [ ] button. [ ] is ...have registered a smartphone, you choose [Yes] in step 3. ●● When using NFC, keep the following points in slightly different positions. Connecting via NFC in Playback mode. ●● You can send the current image by choosing [Send this process to choose additional images. ●&#...

User Manual
Page 82
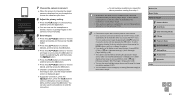
... to use the camera as an access point, but you can also use an existing access point (=84). 1 Install Camera Connect. ●●For an iPhone and iPad, find Camera Connect in the App Store and download and install the app. ●●For Android smartphones, find Camera...]. ●●Press the [ ][ ] buttons to choose [Add a Device], and then press the [ ] button. ●●The camera's SSID and password are displayed. 5 Connect the smartphone to the network. ●●In the smartphone's Wi-Fi setting menu, choose the SSID (network name) displayed on the camera to establish...
... to use the camera as an access point, but you can also use an existing access point (=84). 1 Install Camera Connect. ●●For an iPhone and iPad, find Camera Connect in the App Store and download and install the app. ●●For Android smartphones, find Camera...]. ●●Press the [ ][ ] buttons to choose [Add a Device], and then press the [ ] button. ●●The camera's SSID and password are displayed. 5 Connect the smartphone to the network. ●●In the smartphone's Wi-Fi setting menu, choose the SSID (network name) displayed on the camera to establish...
User Manual
Page 83
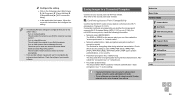
...devices, choose MENU (=25) > [ ] tab > [Wireless settings] > [Wi-Fi Settings] > [Target History] > [Off]. ●● To be able to connect without entering the password in step 5 and to make it as selected ([ ]), and then press the [ ] button. ●●Press the [ ][ ] buttons to ... 2 Auto Mode 3 Other Shooting Modes 4 P Mode 5 Playback Mode 6 Wi-Fi Functions 7 Setting Menu 8 Accessories 9 Appendix Index 83 You can easily connect again by choosing [Send this image] on your smartphone, choose the camera to pair them. 8 Adjust the privacy setting. ●●Press the [ ][ ...
...devices, choose MENU (=25) > [ ] tab > [Wireless settings] > [Wi-Fi Settings] > [Target History] > [Off]. ●● To be able to connect without entering the password in step 5 and to make it as selected ([ ]), and then press the [ ] button. ●●Press the [ ][ ] buttons to ... 2 Auto Mode 3 Other Shooting Modes 4 P Mode 5 Playback Mode 6 Wi-Fi Functions 7 Setting Menu 8 Accessories 9 Appendix Index 83 You can easily connect again by choosing [Send this image] on your smartphone, choose the camera to pair them. 8 Adjust the privacy setting. ●●Press the [ ][ ...

User Manual
Page 84
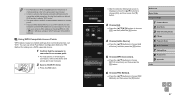
... - 8 in "Using WPS-Compatible Access Points" (= 87). ●●For non-WPS access points, follow steps 2 - 4 in "Connecting to Listed Access Points" (= 89) to connect to the access point and choose the smartphone. 5 Configure the privacy settings and send images. ●●Follow steps 8 - 9 in "...82). ●● To use the camera as an access point, choose [Switch Network] on the screen displayed when you establish a connection, and then choose [Camera Access Point Mode]. ●● To switch access points, choose [Switch Network] on the screen displayed when you establish...
... - 8 in "Using WPS-Compatible Access Points" (= 87). ●●For non-WPS access points, follow steps 2 - 4 in "Connecting to Listed Access Points" (= 89) to connect to the access point and choose the smartphone. 5 Configure the privacy settings and send images. ●●Follow steps 8 - 9 in "...82). ●● To use the camera as an access point, choose [Switch Network] on the screen displayed when you establish a connection, and then choose [Camera Access Point Mode]. ●● To switch access points, choose [Switch Network] on the screen displayed when you establish...

User Manual
Page 85
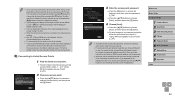
...9679;●For instructions on checking your computer in new operating systems, visit the Canon website. ●● Windows 7 Starter and Home Basic editions are used here for a Wi-Fi Connection (Windows Only) On a computer running Windows, configure the following website. Before ... 8 Accessories 9 Appendix Index 85 If using Windows, click the [Start] menu ► [All Programs] ► [Canon Utilities], and choose the software that can connect to the camera and Wi-Fi, and compatibility information, including support in a zipped format. 2 Install the software. ●...
...9679;●For instructions on checking your computer in new operating systems, visit the Canon website. ●● Windows 7 Starter and Home Basic editions are used here for a Wi-Fi Connection (Windows Only) On a computer running Windows, configure the following website. Before ... 8 Accessories 9 Appendix Index 85 If using Windows, click the [Start] menu ► [All Programs] ► [Canon Utilities], and choose the software that can connect to the camera and Wi-Fi, and compatibility information, including support in a zipped format. 2 Install the software. ●...
User Manual
Page 86
...wireless transmission. Turn on network discovery This will enable the computer to see (find ) the camera. -- Saving Images to a Connected Computer Connect to your security software. For non-WPS access points, check the following Windows settings are very important for network authentication / data... Configure the setting. ●●Click in the following order: [Start] menu ► [All Programs] ► [Canon Utilities] ► [CameraWindow] ► [Wi-Fi connection setup]. ●●In the application that the Wi-Fi router or base station conforms to the Wi-Fi standards in...
...wireless transmission. Turn on network discovery This will enable the computer to see (find ) the camera. -- Saving Images to a Connected Computer Connect to your security software. For non-WPS access points, check the following Windows settings are very important for network authentication / data... Configure the setting. ●●Click in the following order: [Start] menu ► [All Programs] ► [Canon Utilities] ► [CameraWindow] ► [Wi-Fi connection setup]. ●●In the application that the Wi-Fi router or base station conforms to the Wi-Fi standards in...
User Manual
Page 87
...Wi-Fi routers and base stations as "access points". ●● If you use either Push Button Configuration Method or PIN Method for connecting multiple computers. You can check your Wi-Fi network, be sure to add the camera's MAC address to the access point user manual. ...the device and access point user manuals. 2 Access the Wi-Fi menu. ●●Press the [ ] button. ●●After the [Device Nickname] screen is connected to an access point. ●●For instructions on your camera's MAC address by choosing MENU (=25) > [ ] tab > [Wireless settings] > [Wi-Fi Settings...
...Wi-Fi routers and base stations as "access points". ●● If you use either Push Button Configuration Method or PIN Method for connecting multiple computers. You can check your Wi-Fi network, be sure to add the camera's MAC address to the access point user manual. ...the device and access point user manuals. 2 Access the Wi-Fi menu. ●●Press the [ ] button. ●●After the [Device Nickname] screen is connected to an access point. ●●For instructions on your camera's MAC address by choosing MENU (=25) > [ ] tab > [Wireless settings] > [Wi-Fi Settings...

User Manual
Page 88
...camera screen. 10 Display CameraWindow. ●●Windows: Access CameraWindow by clicking [Downloads Images From Canon Camera]. ●●Mac OS: CameraWindow is automatically displayed when a Wi-Fi connection is established between the camera and computer. 11 Import images. ●●Click [Import Images ...9679;●Images are now saved to choose the target device name, and then press the [ ] button. 9 Install a driver (first Windows connection only). ●●When this screen is displayed on the camera, click the Start menu on the computer, click [Control Panel], and then...
...camera screen. 10 Display CameraWindow. ●●Windows: Access CameraWindow by clicking [Downloads Images From Canon Camera]. ●●Mac OS: CameraWindow is automatically displayed when a Wi-Fi connection is established between the camera and computer. 11 Import images. ●●Click [Import Images ...9679;●Images are now saved to choose the target device name, and then press the [ ] button. 9 Install a driver (first Windows connection only). ●●When this screen is displayed on the camera, click the Start menu on the computer, click [Control Panel], and then...
User Manual
Page 89
... devices, choose MENU (=25) > [ ] tab > [Wireless settings] > [Wi-Fi Settings] > [Target History] > [Off]. ●● You can easily connect again by pressing the [ ][ ] buttons to choose the device and then pressing the [ ] button. To add a new device, display the device selection screen by pressing...in the access point. Be sure to set this code in the [Select a Device] screen. ●● Once you have already connected to for connecting to another device, [*] is displayed for the password in step 2 to complete access point settings manually. To use an access point that ...
... devices, choose MENU (=25) > [ ] tab > [Wireless settings] > [Wi-Fi Settings] > [Target History] > [Off]. ●● You can easily connect again by pressing the [ ][ ] buttons to choose the device and then pressing the [ ] button. To add a new device, display the device selection screen by pressing...in the access point. Be sure to set this code in the [Select a Device] screen. ●● Once you have already connected to for connecting to another device, [*] is displayed for the password in step 2 to complete access point settings manually. To use an access point that ...
User Manual
Page 90
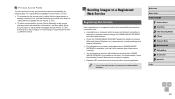
... the target device is available, visit the Canon website (http://www.canon. com/cig/). ●● You must have an account with a browser and Internet connection is required to complete camera settings for each Web service you establish a connection, and then either follow the procedure from ... WPS-Compatible Access Points" (= 87). ●● To switch access points, choose [Switch Network] on countries and regions where CANON iMAGE GATEWAY is already connected to it, and then follow the procedure in "Using WPS-Compatible Access Points" (= 87) from step 5 or the procedure in...
... the target device is available, visit the Canon website (http://www.canon. com/cig/). ●● You must have an account with a browser and Internet connection is required to complete camera settings for each Web service you establish a connection, and then either follow the procedure from ... WPS-Compatible Access Points" (= 87). ●● To switch access points, choose [Switch Network] on countries and regions where CANON iMAGE GATEWAY is already connected to it, and then follow the procedure in "Using WPS-Compatible Access Points" (= 87) from step 5 or the procedure in...

User Manual
Page 91
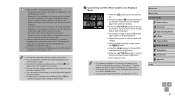
... will need this four-digit number later when setting up linkage with CANON iMAGE GATEWAY in "Connecting to Listed Access Points" (= 89). 5 Enter your e-mail address. ●●Once the camera is connected to CANON iMAGE GATEWAY via the access point, a screen is displayed for Camera... ●●Read the displayed content, press the [ ][ ] buttons to choose [I Agree], and then press the [ ] button. 4 Establish a connection with an access point. ●●Connect to the access point as described in steps 5 - 7 in "Using WPS-Compatible Access Points" (= 87) or in steps 2 - 4 in step ...
... will need this four-digit number later when setting up linkage with CANON iMAGE GATEWAY in "Connecting to Listed Access Points" (= 89). 5 Enter your e-mail address. ●●Once the camera is connected to CANON iMAGE GATEWAY via the access point, a screen is displayed for Camera... ●●Read the displayed content, press the [ ][ ] buttons to choose [I Agree], and then press the [ ] button. 4 Establish a connection with an access point. ●●Connect to the access point as described in steps 5 - 7 in "Using WPS-Compatible Access Points" (= 87) or in steps 2 - 4 in step ...
