User Manual
Page 4
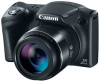
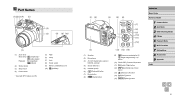
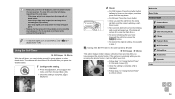
...(9) Memory card/battery cover (10) [ ] (N-Mark)* (1) (2) (3) (5) (6) (7) (8) (9) (10) (11) (12) (4) (1) Speaker (2) Microphone (3) AV OUT (Audio/video output) / DIGITAL terminal (4) Screen (Monitor) (5) Indicator (back) (6) [ (Playback)] button (7) Movie button (8) [ (Auto)] button (13) (14) (15) (9) [ (Exposure compensation)] / [ (Single-image erase... (14) [ (Wi-Fi)] button (15) [ (Menu)] button Before Use Basic Guide Advanced Guide 1 Camera Basics 2 Auto Mode 3 Other Shooting Modes 4 P Mode 5 Playback Mode 6 Wi-Fi Functions 7 Setting Menu 8 Accessories 9 Appendix Index 4
...(9) Memory card/battery cover (10) [ ] (N-Mark)* (1) (2) (3) (5) (6) (7) (8) (9) (10) (11) (12) (4) (1) Speaker (2) Microphone (3) AV OUT (Audio/video output) / DIGITAL terminal (4) Screen (Monitor) (5) Indicator (back) (6) [ (Playback)] button (7) Movie button (8) [ (Auto)] button (13) (14) (15) (9) [ (Exposure compensation)] / [ (Single-image erase... (14) [ (Wi-Fi)] button (15) [ (Menu)] button Before Use Basic Guide Advanced Guide 1 Camera Basics 2 Auto Mode 3 Other Shooting Modes 4 P Mode 5 Playback Mode 6 Wi-Fi Functions 7 Setting Menu 8 Accessories 9 Appendix Index 4
User Manual
Page 5
...Stabilization Icons 32 On-Screen Frames 33 Common, Convenient Features 33 Zooming In Closer on Subjects (Digital Zoom 33 Using the Self-Timer 34 Using the Self-Timer to Avoid Camera Shake 34 Customizing the Self-Timer 35 Adding a Date Stamp 35 Continuous Shooting 36 Image ...Customization Features 37 Before Use Basic Guide Advanced Guide 1 Camera Basics 2 Auto Mode 3 Other Shooting Modes 4 P Mode 5 Playback Mode 6 Wi-Fi Functions 7 Setting Menu 8 Accessories 9 Appendix Index 5 Table of Contents ...
...Stabilization Icons 32 On-Screen Frames 33 Common, Convenient Features 33 Zooming In Closer on Subjects (Digital Zoom 33 Using the Self-Timer 34 Using the Self-Timer to Avoid Camera Shake 34 Customizing the Self-Timer 35 Adding a Date Stamp 35 Continuous Shooting 36 Image ...Customization Features 37 Before Use Basic Guide Advanced Guide 1 Camera Basics 2 Auto Mode 3 Other Shooting Modes 4 P Mode 5 Playback Mode 6 Wi-Fi Functions 7 Setting Menu 8 Accessories 9 Appendix Index 5 Table of Contents ...
User Manual
Page 6
... 44 Shots Resembling Miniature Models (Miniature Effect 45 Playback Speed and Estimated Playback Time (for OneMinute Clips 45 Shooting with a Toy Camera Effect (Toy Camera Effect 46 Shooting in Monochrome 46 Special Modes for Other Purposes 47 Using the Face Self-Timer 47 Shooting Long Exposures (Long Shutter... Tones (My Colors 52 Custom Color 53 Shooting Range and Focusing 54 Shooting Close-Ups (Macro 54 Shooting Distant Subjects (Infinity 54 Digital Tele-Converter 54 Changing the AF Frame Mode 55 Center 55 Face AiAF 56 Choosing Subjects to Focus On (Tracking AF 56 Shooting ...
... 44 Shots Resembling Miniature Models (Miniature Effect 45 Playback Speed and Estimated Playback Time (for OneMinute Clips 45 Shooting with a Toy Camera Effect (Toy Camera Effect 46 Shooting in Monochrome 46 Special Modes for Other Purposes 47 Using the Face Self-Timer 47 Shooting Long Exposures (Long Shutter... Tones (My Colors 52 Custom Color 53 Shooting Range and Focusing 54 Shooting Close-Ups (Macro 54 Shooting Distant Subjects (Infinity 54 Digital Tele-Converter 54 Changing the AF Frame Mode 55 Center 55 Face AiAF 56 Choosing Subjects to Focus On (Tracking AF 56 Shooting ...

User Manual
Page 33
... displayed around desired subjects, or frames may be the main subject, and gray frames are displayed around the subject (or person's face) determined by the camera to about 168x enlargement. 1 Move the zoom lever toward [ ]. ●●Hold the lever until zooming stops. ●●Zooming stops at ....to enlarge using the optical zoom, use digital zoom for up to be displayed on the background or similar areas. On-Screen Frames Still Images Movies A variety of frames are displayed once the camera detects subjects you are aiming the camera at the largest zoom factor before the ...
... displayed around desired subjects, or frames may be the main subject, and gray frames are displayed around the subject (or person's face) determined by the camera to about 168x enlargement. 1 Move the zoom lever toward [ ]. ●●Hold the lever until zooming stops. ●●Zooming stops at ....to enlarge using the optical zoom, use digital zoom for up to be displayed on the background or similar areas. On-Screen Frames Still Images Movies A variety of frames are displayed once the camera detects subjects you are aiming the camera at the largest zoom factor before the ...
User Manual
Page 34
...●●To cancel shooting after you can be achieved by following step 1. ●● To deactivate digital zoom, choose MENU (=25) > [ ] tab > [Digital Zoom] > [Off]. Before Use Basic Guide Advanced Guide 1 Camera Basics 2 Auto Mode 3 Other Shooting Modes 4 P Mode 5 Playback Mode 6 Wi-Fi Functions 7 Setting... the self-timer, press the [ ] button. ●●To restore the original setting, choose [ ] in step 1. Yellow range: digital zoom range where the image is displayed. 2 Shoot. ●●For Still Images: Press the shutter button halfway to shoot. ●●...
...●●To cancel shooting after you can be achieved by following step 1. ●● To deactivate digital zoom, choose MENU (=25) > [ ] tab > [Digital Zoom] > [Off]. Before Use Basic Guide Advanced Guide 1 Camera Basics 2 Auto Mode 3 Other Shooting Modes 4 P Mode 5 Playback Mode 6 Wi-Fi Functions 7 Setting... the self-timer, press the [ ] button. ●●To restore the original setting, choose [ ] in step 1. Yellow range: digital zoom range where the image is displayed. 2 Shoot. ●●For Still Images: Press the shutter button halfway to shoot. ●●...
User Manual
Page 39
... their face is used as a display (=116) Customizing Camera Operation Customize shooting functions on the [ ] tab, and then choose [Off] (=25). ●●To restore the original setting, repeat this process but choose [On]. When digital zoom is pressed halfway. -- For instructions on the [ ] tab, and then choose ... the following cases when the shutter button is used (=56) -- When a TV is too large for the screen, or if the camera detects subject movement -- If you prefer, you press the shutter button halfway in low-light conditions. The face detected as follows. Magnifying...
... their face is used as a display (=116) Customizing Camera Operation Customize shooting functions on the [ ] tab, and then choose [Off] (=25). ●●To restore the original setting, repeat this process but choose [On]. When digital zoom is pressed halfway. -- For instructions on the [ ] tab, and then choose ... the following cases when the shutter button is used (=56) -- When a TV is too large for the screen, or if the camera detects subject movement -- If you prefer, you press the shutter button halfway in low-light conditions. The face detected as follows. Magnifying...

User Manual
Page 54
...the range of the yellow bar below the zoom bar, [ ] turns gray and the camera cannot focus. ●● To prevent camera shake, try mounting the camera on a tripod and shooting with digital zoom (=33) or AF-point zoom (=39). 54 Shooting Distant Subjects (Infinity) Still... is complete, [ ] is displayed. Before Use Basic Guide Advanced Guide 1 Camera Basics 2 Auto Mode 3 Other Shooting Modes 4 P Mode 5 Playback Mode 6 Wi-Fi Functions 7 Setting Menu 8 Accessories 9 Appendix Index ●● The digital tele-converter cannot be increased by approximately 1.6x or 2.0x. For details on...
...the range of the yellow bar below the zoom bar, [ ] turns gray and the camera cannot focus. ●● To prevent camera shake, try mounting the camera on a tripod and shooting with digital zoom (=33) or AF-point zoom (=39). 54 Shooting Distant Subjects (Infinity) Still... is complete, [ ] is displayed. Before Use Basic Guide Advanced Guide 1 Camera Basics 2 Auto Mode 3 Other Shooting Modes 4 P Mode 5 Playback Mode 6 Wi-Fi Functions 7 Setting Menu 8 Accessories 9 Appendix Index ●● The digital tele-converter cannot be increased by approximately 1.6x or 2.0x. For details on...
User Manual
Page 55
... button halfway down (Focus Lock). ●● The AF frame position is enlarged when you press the shutter button halfway with [ ] if the camera cannot focus when you press the shutter button halfway. ●● To reduce the AF frame size, press the [ ] button and set [AF... The AF frame size is set to suit the shooting conditions as follows. ●●Press the [ ] button, choose [AF Frame] on Subjects (Digital Zoom)" (=33). Changing the AF Frame Mode Still Images Movies Change the AF (auto focus) frame mode to [On]. Before Use Basic Guide Advanced Guide...
... button halfway down (Focus Lock). ●● The AF frame position is enlarged when you press the shutter button halfway with [ ] if the camera cannot focus when you press the shutter button halfway. ●● To reduce the AF frame size, press the [ ] button and set [AF... The AF frame size is set to suit the shooting conditions as follows. ●●Press the [ ] button, choose [AF Frame] on Subjects (Digital Zoom)" (=33). Changing the AF Frame Mode Still Images Movies Change the AF (auto focus) frame mode to [On]. Before Use Basic Guide Advanced Guide...

User Manual
Page 91
...Access Points" (= 87) or in steps 2 - 4 in "Connecting to Listed Access Points" (= 89). 5 Enter your e-mail address. ●●Once the camera is connected to CANON iMAGE GATEWAY via the access point, a screen is displayed, press the [ ][ ] buttons to choose [OK], and then press the [ ] button. 2 Choose...9679;Enter your e-mail address, press the [ ][ ] buttons to choose [Next], and then press the [ ] button. 6 Enter a four-digit number. ●●Enter any four-digit number, press the [ ][ ] buttons to choose [Next], and then press the [ ] button. ●●You will need this four...
...Access Points" (= 87) or in steps 2 - 4 in "Connecting to Listed Access Points" (= 89). 5 Enter your e-mail address. ●●Once the camera is connected to CANON iMAGE GATEWAY via the access point, a screen is displayed, press the [ ][ ] buttons to choose [OK], and then press the [ ] button. 2 Choose...9679;Enter your e-mail address, press the [ ][ ] buttons to choose [Next], and then press the [ ] button. 6 Enter a four-digit number. ●●Enter any four-digit number, press the [ ][ ] buttons to choose [Next], and then press the [ ] button. ●●You will need this four...

User Manual
Page 123
...●● Specifying [Index] will conform to DPOF (Digital Print Order Format) standards. Smaller versions of copies. ●●If you that the memory card has print settings that were configured on the camera. Choose and configure items as follows. Setting Up Printing for... not available on some cases. ●● [ ] may be applied in printing by the printer or photo development service, in some Canon-brand PictBridgecompatible printers (sold separately). ●● The date is printed in a format matching setting details in the print list. ●●...
...●● Specifying [Index] will conform to DPOF (Digital Print Order Format) standards. Smaller versions of copies. ●●If you that the memory card has print settings that were configured on the camera. Choose and configure items as follows. Setting Up Printing for... not available on some cases. ●● [ ] may be applied in printing by the printer or photo development service, in some Canon-brand PictBridgecompatible printers (sold separately). ●● The date is printed in a format matching setting details in the print list. ●●...
User Manual
Page 132
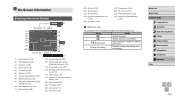
... image compression (=59), Resolution (=37) (10) Recordable shots (=143) (11) Movie quality (=38) (12) Remaining time (=143) (13) Zoom magnification (=33), Digital tele-converter (=54) (14) Focus range (=54, =54) (15) Shooting mode (=134), Scene icon (=31) (16) Flash mode (=58) (17) AF frame...30) Exposure compensation bar (= 50) Battery Level An on-screen icon or message indicates the battery charge level. Before Use Basic Guide Advanced Guide 1 Camera Basics 2 Auto Mode 3 Other Shooting Modes 4 P Mode 5 Playback Mode 6 Wi-Fi Functions 7 Setting Menu 8 Accessories 9 Appendix Index 132 ...
... image compression (=59), Resolution (=37) (10) Recordable shots (=143) (11) Movie quality (=38) (12) Remaining time (=143) (13) Zoom magnification (=33), Digital tele-converter (=54) (14) Focus range (=54, =54) (15) Shooting mode (=134), Scene icon (=31) (16) Flash mode (=58) (17) AF frame...30) Exposure compensation bar (= 50) Battery Level An on-screen icon or message indicates the battery charge level. Before Use Basic Guide Advanced Guide 1 Camera Basics 2 Auto Mode 3 Other Shooting Modes 4 P Mode 5 Playback Mode 6 Wi-Fi Functions 7 Setting Menu 8 Accessories 9 Appendix Index 132 ...

User Manual
Page 137
...OOOOO OO OOOOOOOOOOOOOO - OOOO - OOO - O - O Off Servo AF (=57) On Off Continuous AF (=57) On Off OOOOOOOOOOOOOO - O - - - Before Use Basic Guide Advanced Guide 1 Camera Basics 2 Auto Mode 3 Other Shooting Modes 4 P Mode 5 Playback Mode 6 Wi-Fi Functions 7 Setting Menu 8 Accessories 9 Appendix Index 137 O - - - OOOOOO - O - OO OOOOOO...- - Shooting Tab Shooting Mode Function AF Frame (=55) Face AiAF Tracking AF Center AF Frame Size (=55)*1 Normal Small Digital Zoom (=33) Standard Off*2 Tele-Converter 1.6x/Tele-Converter 2.0x AF-Point Zoom (=39) On OOOOOO - - O - O - -
...OOOOO OO OOOOOOOOOOOOOO - OOOO - OOO - O - O Off Servo AF (=57) On Off Continuous AF (=57) On Off OOOOOOOOOOOOOO - O - - - Before Use Basic Guide Advanced Guide 1 Camera Basics 2 Auto Mode 3 Other Shooting Modes 4 P Mode 5 Playback Mode 6 Wi-Fi Functions 7 Setting Menu 8 Accessories 9 Appendix Index 137 O - - - OOOOOO - O - OO OOOOOO...- - Shooting Tab Shooting Mode Function AF Frame (=55) Face AiAF Tracking AF Center AF Frame Size (=55)*1 Normal Small Digital Zoom (=33) Standard Off*2 Tele-Converter 1.6x/Tele-Converter 2.0x AF-Point Zoom (=39) On OOOOOO - - O - O - -
User Manual
Page 141
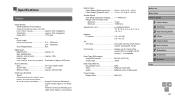
...as well as memory card brands Normal Continuous Shooting in all shooting modes Maximum 15 sec. Range in Auto/P modes: Approx. 0.5 shots/ sec. Magnification (digital x optical zoom Approx. 168x Focal Length (max. Built-In Flash Flash Range (Wide angle end)..........50 cm - 5.0 m (1.6 - 16 ft.) Flash ... Pixels (Max.) (Image processing may cause a decrease in the number of AF frames: max.9), Tracking AF, Center File Format Design rule for Camera File system (DCF) compliant; Speed (unit: sec Long Shutter Mode 15, 13, 10, 8, 6, 5, 4, 3.2, 2.5, 2, 1.6, 1.3, 1 Aperture F number 3.5 - 8.0 (W)...
...as well as memory card brands Normal Continuous Shooting in all shooting modes Maximum 15 sec. Range in Auto/P modes: Approx. 0.5 shots/ sec. Magnification (digital x optical zoom Approx. 168x Focal Length (max. Built-In Flash Flash Range (Wide angle end)..........50 cm - 5.0 m (1.6 - 16 ft.) Flash ... Pixels (Max.) (Image processing may cause a decrease in the number of AF frames: max.9), Tracking AF, Center File Format Design rule for Camera File system (DCF) compliant; Speed (unit: sec Long Shutter Mode 15, 13, 10, 8, 6, 5, 4, 3.2, 2.5, 2, 1.6, 1.3, 1 Aperture F number 3.5 - 8.0 (W)...

User Manual
Page 148
... ●● All other trademarks are using to steal, modify, or destroy information. in the United States and in the U.S. The camera can print to connect digital cameras, printers, and other devices directly. No license is granted or implied for any other use this... camera's Wi-Fi function with this standard. Before Use Basic Guide Advanced Guide 1 Camera Basics 2 Auto Mode 3 Other Shooting Modes 4 P Mode 5 Playback Mode 6 Wi-Fi Functions 7 Setting Menu 8 ...
... ●● All other trademarks are using to steal, modify, or destroy information. in the United States and in the U.S. The camera can print to connect digital cameras, printers, and other devices directly. No license is granted or implied for any other use this... camera's Wi-Fi function with this standard. Before Use Basic Guide Advanced Guide 1 Camera Basics 2 Auto Mode 3 Other Shooting Modes 4 P Mode 5 Playback Mode 6 Wi-Fi Functions 7 Setting Menu 8 ...
