
ImageBrowser 6.5 for Macintosh Instruction Manual
Page 3
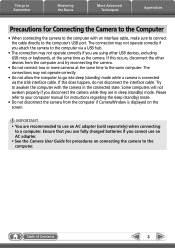
...may not operate correctly if you attach the camera to the computer via the USB interface cable. Please refer to your computer manual for instructions regarding the sleep (standby) mode. • Do not disconnect the camera from the computer and try reconnecting the camera. • Do not connect two ... connected via a USB hub. • The connection may not operate correctly. • Do not allow the computer to go into sleep (standby) mode while a camera is displayed on connecting the camera to the computer. Try to awaken the computer with an interface cable, make sure to connect the...
...may not operate correctly if you attach the camera to the computer via the USB interface cable. Please refer to your computer manual for instructions regarding the sleep (standby) mode. • Do not disconnect the camera from the computer and try reconnecting the camera. • Do not connect two ... connected via a USB hub. • The connection may not operate correctly. • Do not allow the computer to go into sleep (standby) mode while a camera is displayed on connecting the camera to the computer. Try to awaken the computer with an interface cable, make sure to connect the...
ImageBrowser 6.5 for Macintosh Instruction Manual
Page 4
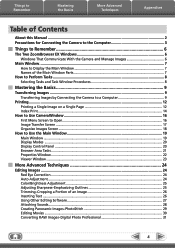
Things to Remember Mastering the Basics More Advanced Techniques Appendices Table of Contents About this Manual...2 Precautions for Connecting the Camera to the Computer 3 Things to Remember 6 The Two ImageBrowser Windows 6 Windows That Communicate With the Camera and Manage Images ...First Menu Screen to Open...16 Image Transfer Screen...17 Organize Images Screen...18 How to Use the Browser Window 19 Browser Window...19 Display Modes...20 Display Control Panel...20 Browser Area Tasks...21 File Information Window...22 Viewer (View Image) Window...23 More Advanced Techniques 24 Editing ...
Things to Remember Mastering the Basics More Advanced Techniques Appendices Table of Contents About this Manual...2 Precautions for Connecting the Camera to the Computer 3 Things to Remember 6 The Two ImageBrowser Windows 6 Windows That Communicate With the Camera and Manage Images ...First Menu Screen to Open...16 Image Transfer Screen...17 Organize Images Screen...18 How to Use the Browser Window 19 Browser Window...19 Display Modes...20 Display Control Panel...20 Browser Area Tasks...21 File Information Window...22 Viewer (View Image) Window...23 More Advanced Techniques 24 Editing ...
ImageBrowser 6.5 for Macintosh Instruction Manual
Page 9
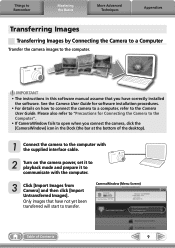
... Dock (the bar at the bottom of Contents 9 Only images that you connect the camera, click the [CameraWindow] icon in this software manual assume that have correctly installed the software. CameraWindow (Menu Screen) Table of the desktop). 1 Connect the camera to the computer with the... Images]. Please also refer to "Precautions for software installation procedures. • For details on the camera power, set it to playback mode and prepare it to the Camera User Guide. See the Camera User Guide for Connecting the Camera to the Computer". • If CameraWindow...
... Dock (the bar at the bottom of Contents 9 Only images that you connect the camera, click the [CameraWindow] icon in this software manual assume that have correctly installed the software. CameraWindow (Menu Screen) Table of the desktop). 1 Connect the camera to the computer with the... Images]. Please also refer to "Precautions for software installation procedures. • For details on the camera power, set it to playback mode and prepare it to the Camera User Guide. See the Camera User Guide for Connecting the Camera to the Computer". • If CameraWindow...
ImageBrowser 6.5 for Macintosh Instruction Manual
Page 25
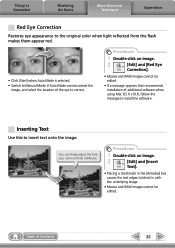
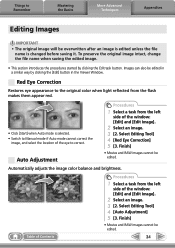
... eye appearance to the original color when light reflected from the flash makes them appear red. • Click [Start] when Auto Mode is selected. • Switch to Manual Mode if Auto Mode cannot correct the image, and select the location of the eye to blend in the [Antialias] box causes the text edges to...
... eye appearance to the original color when light reflected from the flash makes them appear red. • Click [Start] when Auto Mode is selected. • Switch to Manual Mode if Auto Mode cannot correct the image, and select the location of the eye to blend in the [Antialias] box causes the text edges to...
ZoomBrowser EX 6.5 for Windows Instruction Manual
Page 3
...charged batteries if you attach the camera to the computer via the USB interface cable. Table of Contents 3 Please refer to your computer manual for procedures on the screen. The connections may not operate correctly if you disconnect the camera while they are in the connected state. ...Appendices Precautions for Connecting the Camera to the Computer • When connecting the camera to the computer with the camera in sleep (standby) mode. Some computers will not awaken properly if you are recommended to use an AC adapter. • See the Camera User Guide for instructions...
...charged batteries if you attach the camera to the computer via the USB interface cable. Table of Contents 3 Please refer to your computer manual for procedures on the screen. The connections may not operate correctly if you disconnect the camera while they are in the connected state. ...Appendices Precautions for Connecting the Camera to the Computer • When connecting the camera to the computer with the camera in sleep (standby) mode. Some computers will not awaken properly if you are recommended to use an AC adapter. • See the Camera User Guide for instructions...
ZoomBrowser EX 6.5 for Windows Instruction Manual
Page 4
Things to Remember Mastering the Basics More Advanced Techniques Appendices Table of Contents About this Manual...2 Precautions for Connecting the Camera to the Computer 3 Things to Remember 6 The Two ZoomBrowser EX Windows 6 Windows That Communicate With the Camera and Manage Images ...First Menu Screen to Open...16 Image Transfer Screen...17 Organize Images Screen...18 How to Use the Main Window 19 Main Window...19 Display Modes ...20 Display Control Panel...20 Browser Area Tasks...21 Properties Window...22 Viewer Window...23 More Advanced Techniques 24 Editing Images...24 Red Eye ...
Things to Remember Mastering the Basics More Advanced Techniques Appendices Table of Contents About this Manual...2 Precautions for Connecting the Camera to the Computer 3 Things to Remember 6 The Two ZoomBrowser EX Windows 6 Windows That Communicate With the Camera and Manage Images ...First Menu Screen to Open...16 Image Transfer Screen...17 Organize Images Screen...18 How to Use the Main Window 19 Main Window...19 Display Modes ...20 Display Control Panel...20 Browser Area Tasks...21 Properties Window...22 Viewer Window...23 More Advanced Techniques 24 Editing Images...24 Red Eye ...

ZoomBrowser EX 6.5 for Windows Instruction Manual
Page 9
In this software manual assume that appears, click the link to the Camera User Guide. For Windows 7, use ... to the computer with the supplied interface cable. 2 Turn on the camera power, set it to playback mode and prepare it to communicate with the computer. 3 When a window similar to the one at the right appears, click ...[Downloads Images From Canon Camera using Canon CameraWindow], then click [OK]. 4. With Windows XP, click [Canon CameraWindow] then [OK] in this case, double-click the ZoomBrowser EX icon on the desktop...
In this software manual assume that appears, click the link to the Camera User Guide. For Windows 7, use ... to the computer with the supplied interface cable. 2 Turn on the camera power, set it to playback mode and prepare it to communicate with the computer. 3 When a window similar to the one at the right appears, click ...[Downloads Images From Canon Camera using Canon CameraWindow], then click [OK]. 4. With Windows XP, click [Canon CameraWindow] then [OK] in this case, double-click the ZoomBrowser EX icon on the desktop...
ZoomBrowser EX 6.5 for Windows Instruction Manual
Page 24
... RAW images cannot be edited. Images can also be overwritten after an image is edited unless the file name is selected. • Switch to Manual mode if Auto mode cannot correct the image, and select the location of the eye to correct. Red Eye Correction Restores eye appearance to Remember Mastering the Basics...
... RAW images cannot be edited. Images can also be overwritten after an image is edited unless the file name is selected. • Switch to Manual mode if Auto mode cannot correct the image, and select the location of the eye to correct. Red Eye Correction Restores eye appearance to Remember Mastering the Basics...

PowerShot SX210 IS Camera User Guide
Page 7
...133 Correcting the Red-Eye Effect....... 134 8. Using Various Playback and Editing Functions 109 Quickly Searching Images 110 Viewing Images in Manual Focus Mode .... 87 Shooting with the AE Lock 88 Shooting with the FE Lock 88 Shooting with Slow Synchro 89 Setting the Shutter ...and Shooting... 97 Shooting Stitch Assist Images ...... 100 6. Using Various Functions for Shooting Movies 101 Shooting Movies 102 Changing the Movie Mode 102 Changing the Image Quality.......... 103 AE Lock/Exposure Shift 104 Other Shooting Functions 105 Playback Functions 106 Editing 107 7. Table of...
...133 Correcting the Red-Eye Effect....... 134 8. Using Various Playback and Editing Functions 109 Quickly Searching Images 110 Viewing Images in Manual Focus Mode .... 87 Shooting with the AE Lock 88 Shooting with the FE Lock 88 Shooting with Slow Synchro 89 Setting the Shutter ...and Shooting... 97 Shooting Stitch Assist Images ...... 100 6. Using Various Functions for Shooting Movies 101 Shooting Movies 102 Changing the Movie Mode 102 Changing the Image Quality.......... 103 AE Lock/Exposure Shift 104 Other Shooting Functions 105 Playback Functions 106 Editing 107 7. Table of...

PowerShot SX210 IS Camera User Guide
Page 24
... screen will change quickly, and if you move the zoom lever all the way to A. ∆ When you can also raise or lower the flash manually (the flash turns off when lowered). Compose the shot. ∆ Moving the zoom lever toward i will change slowly (except for the scene and just shoot.... Focus Range (Approx.) Zoom Bar 24 Choose A mode. ∆ Set the mode dial to the left and right sides of the screen. The zoom bar appears. ∆ If you move it appear larger.
... screen will change quickly, and if you move the zoom lever all the way to A. ∆ When you can also raise or lower the flash manually (the flash turns off when lowered). Compose the shot. ∆ Moving the zoom lever toward i will change slowly (except for the scene and just shoot.... Focus Range (Approx.) Zoom Bar 24 Choose A mode. ∆ Set the mode dial to the left and right sides of the screen. The zoom bar appears. ∆ If you move it appear larger.

PowerShot SX210 IS Camera User Guide
Page 26
... shutter button is an orange or blue colored background (a wall for warning sounds. A blue frame appears when a moving . Try raising the flash manually to choose [Off]. • What if the indicator blinks orange, and [Raise the flash] appears on other detected faces. The frames will be... about 1 m (3.3 ft.) or more away from the end of approximately 75 cm - 3.5 m (2.5 - 11.5 ft.). When faces are about 5 cm (2.0 in G mode (p. 70). The camera will be able to reach. The subject is detected; Attach the camera to shoot with the appropriate color. The camera will be...
... shutter button is an orange or blue colored background (a wall for warning sounds. A blue frame appears when a moving . Try raising the flash manually to choose [Off]. • What if the indicator blinks orange, and [Raise the flash] appears on other detected faces. The frames will be... about 1 m (3.3 ft.) or more away from the end of approximately 75 cm - 3.5 m (2.5 - 11.5 ft.). When faces are about 5 cm (2.0 in G mode (p. 70). The camera will be able to reach. The subject is detected; Attach the camera to shoot with the appropriate color. The camera will be...

PowerShot SX210 IS Camera User Guide
Page 29
..., allowing even beginners to shoot. Try raising the flash manually to take worry-free pictures. appears. ∆ Pressing r again displays on the screen, and the flash will automatically fire in Easy mode In Easy mode, operational instructions are functional. Enter 9 mode. ∆ Set the mode dial to shoot (no sound will automatically fire when shooting...
..., allowing even beginners to shoot. Try raising the flash manually to take worry-free pictures. appears. ∆ Pressing r again displays on the screen, and the flash will automatically fire in Easy mode In Easy mode, operational instructions are functional. Enter 9 mode. ∆ Set the mode dial to shoot (no sound will automatically fire when shooting...

PowerShot SX210 IS Camera User Guide
Page 43
... and tips will display for a few seconds. 43 Components Guide Screen (LCD Monitor) (pp. 44, 164, 165) Indicator (p. 45) Mode Dial (p. 31) HDMI Terminal (p. 118) A/V OUT (Audio/Video Output) / DIGITAL Terminal (pp. 36, 117, 136) Movie Button (pp. 31, 153) / c... (pp. 137, 138) 1 (Playback) Button (pp. 27, 30, 33, 109) n Button (p. 47) l (Display) Button (p. 44) b Exposure Compensation (p. 70) / oButton e (Macro) (p. 71) / f (Manual Focus) (p. 87) / q Button Control Dial mFUNC./SET (Function/Set) button (p. 46) h (Flash) (pp. 64, 71, 89) / r Button Q (Self-Timer) (pp. 68, 78, 79) / a (Single...
... and tips will display for a few seconds. 43 Components Guide Screen (LCD Monitor) (pp. 44, 164, 165) Indicator (p. 45) Mode Dial (p. 31) HDMI Terminal (p. 118) A/V OUT (Audio/Video Output) / DIGITAL Terminal (pp. 36, 117, 136) Movie Button (pp. 31, 153) / c... (pp. 137, 138) 1 (Playback) Button (pp. 27, 30, 33, 109) n Button (p. 47) l (Display) Button (p. 44) b Exposure Compensation (p. 70) / oButton e (Macro) (p. 71) / f (Manual Focus) (p. 87) / q Button Control Dial mFUNC./SET (Function/Set) button (p. 46) h (Flash) (pp. 64, 71, 89) / r Button Q (Self-Timer) (pp. 68, 78, 79) / a (Single...

PowerShot SX210 IS Camera User Guide
Page 76
... fully and held. Continuous Shooting You can shoot continuously while the shutter button is pressed halfway. Choose a Drive mode. ∆ After pressing the m button, press the op buttons or turn the  dial to choose ..., then press the m button. Continuous Shooting AF Approx. 0.5 images/sec., max. Shoot. Drive Mode Description W Continuous Shooting Approx. 0.7 images/sec., max. Choose an option. ∆ Press the op buttons or turn the ...interval may take longer. • When in t (p. 56) or manual focus modes, will shoot successive images.
... fully and held. Continuous Shooting You can shoot continuously while the shutter button is pressed halfway. Choose a Drive mode. ∆ After pressing the m button, press the op buttons or turn the  dial to choose ..., then press the m button. Continuous Shooting AF Approx. 0.5 images/sec., max. Shoot. Drive Mode Description W Continuous Shooting Approx. 0.7 images/sec., max. Choose an option. ∆ Press the op buttons or turn the ...interval may take longer. • When in t (p. 56) or manual focus modes, will shoot successive images.

PowerShot SX210 IS Camera User Guide
Page 87
...194; dial to choose f, then press the m button. If you press the shutter button halfway after roughly focusing manually, you can use manual focus when auto focus is set to [Off] in the 4 tab, the magnified display will not be available...focus even if you can fine tune the focus (Safety MF). • You cannot change the AF frame mode or size, cancel Manual focus mode first. • In order to focus accurately, try attaching the camera to a tripod. • When using... will not display. • If [MF-Point Zoom] is set to [Off] in Manual Focus Mode You can fine tune the focus.
...194; dial to choose f, then press the m button. If you press the shutter button halfway after roughly focusing manually, you can use manual focus when auto focus is set to [Off] in the 4 tab, the magnified display will not be available...focus even if you can fine tune the focus (Safety MF). • You cannot change the AF frame mode or size, cancel Manual focus mode first. • In order to focus accurately, try attaching the camera to a tripod. • When using... will not display. • If [MF-Point Zoom] is set to [Off] in Manual Focus Mode You can fine tune the focus.

PowerShot SX210 IS Camera User Guide
Page 92
... value. The set the shutter speed and aperture to shoot images. Aperture Shutter Value Speed Standard Exposure Level Exposure Level Exposure Level Indicator Set the mode dial to the metering method chosen (p. 86). • If you press the shutter button halfway, "-2"or "+2" appears in orange. When the difference... exposure is more than ±2 stops, the set , the screen brightness may not be obtained depending on the settings). 92 D stands for "Manual". Setting the Shutter Speed and Aperture Value You can check the difference against the standard exposure level. You can...
... value. The set the shutter speed and aperture to shoot images. Aperture Shutter Value Speed Standard Exposure Level Exposure Level Exposure Level Indicator Set the mode dial to the metering method chosen (p. 86). • If you press the shutter button halfway, "-2"or "+2" appears in orange. When the difference... exposure is more than ±2 stops, the set , the screen brightness may not be obtained depending on the settings). 92 D stands for "Manual". Setting the Shutter Speed and Aperture Value You can check the difference against the standard exposure level. You can...

PowerShot SX210 IS Camera User Guide
Page 96
... that people have their eyes shut, appears. Adjusting the Flash Output In D mode, you choose the 4 tab, then [Flash Settings] and set the [Flash Mode] option to [Manual]. When a person with shut eyes is detected, a frame and appear. • In or $ mode, when the number of flash output. Choose [Blink Detection]. ∆ Press the...
... that people have their eyes shut, appears. Adjusting the Flash Output In D mode, you choose the 4 tab, then [Flash Settings] and set the [Flash Mode] option to [Manual]. When a person with shut eyes is detected, a frame and appear. • In or $ mode, when the number of flash output. Choose [Blink Detection]. ∆ Press the...

PowerShot SX210 IS Camera User Guide
Page 105
... when in > or z. • Zooming in More Closely on Subjects (Digital Zoom) (p. 65) The sounds from zoom operation will be used in Manual Focus Mode (p. 87)* • Turning Off the AF Assist Beam (p. 150)* • Displaying the Overlay (p. 151)* [3:2 Guide] is not available. • Changing ...the IS-Mode Settings (p. 152)* You can be recorded. • Using the Self-Timer (p. 68)* • Changing the Focus Range (Macro) (p. 71)* • Adjusting the ...
... when in > or z. • Zooming in More Closely on Subjects (Digital Zoom) (p. 65) The sounds from zoom operation will be used in Manual Focus Mode (p. 87)* • Turning Off the AF Assist Beam (p. 150)* • Displaying the Overlay (p. 151)* [3:2 Guide] is not available. • Changing ...the IS-Mode Settings (p. 152)* You can be recorded. • Using the Self-Timer (p. 68)* • Changing the Focus Range (Macro) (p. 71)* • Adjusting the ...

PowerShot SX210 IS Camera User Guide
Page 164
... Screen Shooting (Information Display) Battery Charge Indicator (p. 15) Camera Orientation* White Balance (p. 75) My Colors (p. 77) i-Contrast (p. 93) Drive Mode (p. 76) Camera Shake Warning (pp. 26, 159) Metering Methods (p. 86) Compression (Image Quality) (p. 72) / Recording Pixels (p. 72) ...78, 79) Recording Pixels (Movies) (p. 103) Digital Zoom Magnification (p. 65) / Digital Tele-converter (p. 66) Focus Range (p. 71) / Manual Focus (p. 87) Shooting Mode (p. 42) Flash Mode (pp. 64, 71, 89) Red-Eye Correction (p. 94) Flash Exposure Compensation / Flash Output (pp. 95, 96) Spot AE Point (p....
... Screen Shooting (Information Display) Battery Charge Indicator (p. 15) Camera Orientation* White Balance (p. 75) My Colors (p. 77) i-Contrast (p. 93) Drive Mode (p. 76) Camera Shake Warning (pp. 26, 159) Metering Methods (p. 86) Compression (Image Quality) (p. 72) / Recording Pixels (p. 72) ...78, 79) Recording Pixels (Movies) (p. 103) Digital Zoom Magnification (p. 65) / Digital Tele-converter (p. 66) Focus Range (p. 71) / Manual Focus (p. 87) Shooting Mode (p. 42) Flash Mode (pp. 64, 71, 89) Red-Eye Correction (p. 94) Flash Exposure Compensation / Flash Output (pp. 95, 96) Spot AE Point (p....

PowerShot SX210 IS Camera User Guide
Page 165
Playback (Detailed Information Display) Print List (p. 138) My Category (p. 125) Shooting Mode (p. 42) ISO Speed (p. 74) Exposure Compensation (p. 70) / Exposure Shift Amount (p. 104) White Balance (p. 75) Histogram (p. 45) Compression (Image Quality) (p. 72) / (Movies) ...pp. 91, 92), Image Quality (Movies) (p. 103) i-Contrast (pp. 93, 133) Flash (pp. 25, 71, 89), Flash Exposure Compensation (p. 95) Focus Range (p. 71) / Manual Focus (p. 87) File Size (p. 73) Still Images: Recording Pixels (p. 72) Movies: Movie Length (p. 103) Image Editing (pp. 130 - 134) Protect (p. 120) Favorites (p. 127) ...
Playback (Detailed Information Display) Print List (p. 138) My Category (p. 125) Shooting Mode (p. 42) ISO Speed (p. 74) Exposure Compensation (p. 70) / Exposure Shift Amount (p. 104) White Balance (p. 75) Histogram (p. 45) Compression (Image Quality) (p. 72) / (Movies) ...pp. 91, 92), Image Quality (Movies) (p. 103) i-Contrast (pp. 93, 133) Flash (pp. 25, 71, 89), Flash Exposure Compensation (p. 95) Focus Range (p. 71) / Manual Focus (p. 87) File Size (p. 73) Still Images: Recording Pixels (p. 72) Movies: Movie Length (p. 103) Image Editing (pp. 130 - 134) Protect (p. 120) Favorites (p. 127) ...


