ImageBrowser 6.5 for Macintosh Instruction Manual
Page 9
... assume that have correctly installed the software. CameraWindow (Menu Screen) Table of the desktop). 1 Connect the camera to the computer with the supplied interface cable. 2 Turn on how to connect the camera to a computer, refer to communicate with the computer. 3 Click [Import Images from Camera] and then click [Import Untransferred Images...
... assume that have correctly installed the software. CameraWindow (Menu Screen) Table of the desktop). 1 Connect the camera to the computer with the supplied interface cable. 2 Turn on how to connect the camera to a computer, refer to communicate with the computer. 3 Click [Import Images from Camera] and then click [Import Untransferred Images...
ImageBrowser 6.5 for Macintosh Instruction Manual
Page 17
... display Preview display Full screen display Double-clicking an image switches to the Menu screen. Selects all images. Table of chosen images turns blue. Things to Remember Mastering the Basics More Advanced Techniques Appendices Image Transfer Screen This screen appears when you want to transfer and... click the button to transfer the image to your computer. Turns the shooting date and folder name below the thumbnails on the camera model. Rotates chosen images 90° to the left or ...
... display Preview display Full screen display Double-clicking an image switches to the Menu screen. Selects all images. Table of chosen images turns blue. Things to Remember Mastering the Basics More Advanced Techniques Appendices Image Transfer Screen This screen appears when you want to transfer and... click the button to transfer the image to your computer. Turns the shooting date and folder name below the thumbnails on the camera model. Rotates chosen images 90° to the left or ...
ImageBrowser 6.5 for Macintosh Instruction Manual
Page 18
... size (when in Viewer Window. Thumbnail display Preview display Full screen display Double-clicking an image switches to the Menu screen. Turns the shooting date and folder name below the thumbnails on your computer to the camera. Transfers images on and off (when in... Organize Images Screen This screen appears when you cannot retrieve the deleted images. Switches between window display modes. Table of chosen images turns blue. Rotates chosen images 90° to the left will delete the image from the camera. Protects/cancels protection for the image...
... size (when in Viewer Window. Thumbnail display Preview display Full screen display Double-clicking an image switches to the Menu screen. Turns the shooting date and folder name below the thumbnails on your computer to the camera. Transfers images on and off (when in... Organize Images Screen This screen appears when you cannot retrieve the deleted images. Switches between window display modes. Table of chosen images turns blue. Rotates chosen images 90° to the left will delete the image from the camera. Protects/cancels protection for the image...
ImageBrowser 6.5 for Macintosh Instruction Manual
Page 47
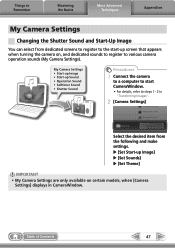
... Settings Changing the Shutter Sound and Start-Up Image You can select from the following and make settings. u [Set Start-up screen that appears when turning the camera on certain models, when [Camera Settings] displays in "Transferring Images". 2 [Camera Settings] Select the desired item from dedicated screens to register to the...
... Settings Changing the Shutter Sound and Start-Up Image You can select from the following and make settings. u [Set Start-up screen that appears when turning the camera on certain models, when [Camera Settings] displays in "Transferring Images". 2 [Camera Settings] Select the desired item from dedicated screens to register to the...
Software User Guide for Windows
Page 9
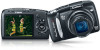
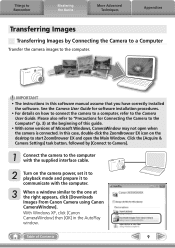
... Appendices Transferring Images Transferring Images by [Connect to Camera]. 1 Connect the camera to the computer with the supplied interface cable. 2 Turn on the camera power, set it to playback mode and prepare it to communicate with the computer. 3 When a window similar to...the desktop to the Computer" (p. 3) at the right appears, click [Downloads Images From Canon Camera using Canon CameraWindow]. IMPORTANT • The instructions in the AutoPlay window. With Windows XP, click [Canon CameraWindow] then [OK] in this case, double-click the ZoomBrowser EX icon on how to...
... Appendices Transferring Images Transferring Images by [Connect to Camera]. 1 Connect the camera to the computer with the supplied interface cable. 2 Turn on the camera power, set it to playback mode and prepare it to communicate with the computer. 3 When a window similar to...the desktop to the Computer" (p. 3) at the right appears, click [Downloads Images From Canon Camera using Canon CameraWindow]. IMPORTANT • The instructions in the AutoPlay window. With Windows XP, click [Canon CameraWindow] then [OK] in this case, double-click the ZoomBrowser EX icon on how to...

Software User Guide for Windows
Page 17
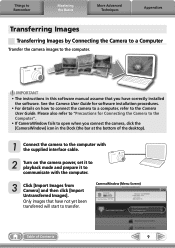
... display) Returns to preview display. Rotates chosen images 90° to your computer. Closes CameraWindow. Table of chosen images turns blue. Changes thumbnail size (when in thumbnail display). Selects all images. Turns the shooting date and folder name below the thumbnails on the camera that have not yet been transferred. Switches between...
... display) Returns to preview display. Rotates chosen images 90° to your computer. Closes CameraWindow. Table of chosen images turns blue. Changes thumbnail size (when in thumbnail display). Selects all images. Turns the shooting date and folder name below the thumbnails on the camera that have not yet been transferred. Switches between...

Software User Guide for Windows
Page 18
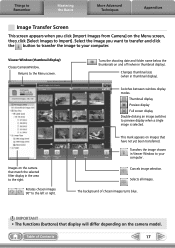
.... Deletes the image chosen in thumbnail display). Exercise adequate caution, as thumbnails (small images) on the right of the screen. Table of chosen images turns blue. Turns the shooting date and folder name below the thumbnails on your computer to the camera. Rotates chosen images 90° to preview display. Viewer Window...
.... Deletes the image chosen in thumbnail display). Exercise adequate caution, as thumbnails (small images) on the right of the screen. Table of chosen images turns blue. Turns the shooting date and folder name below the thumbnails on your computer to the camera. Rotates chosen images 90° to preview display. Viewer Window...

Software User Guide for Windows
Page 45
...desired item from dedicated screens to register to the start-up screen that appears when turning the camera on the camera power, and set it to playback mode. 3 Select [Downloads Images From Canon Camera using Canon CameraWindow]. Things to Remember Mastering the Basics More Advanced Techniques Appendices My Camera Settings ... be deleted. u [Set Start-up Sound • Shutter Sound • Operation Sound • Selftimer Sound Procedures 1 Connect the camera to the computer. 2 Turn on , and dedicated sounds to register to various camera operation sounds (My Camera Settings).
...desired item from dedicated screens to register to the start-up screen that appears when turning the camera on the camera power, and set it to playback mode. 3 Select [Downloads Images From Canon Camera using Canon CameraWindow]. Things to Remember Mastering the Basics More Advanced Techniques Appendices My Camera Settings ... be deleted. u [Set Start-up Sound • Shutter Sound • Operation Sound • Selftimer Sound Procedures 1 Connect the camera to the computer. 2 Turn on , and dedicated sounds to register to various camera operation sounds (My Camera Settings).

Software User Guide for Windows
Page 47
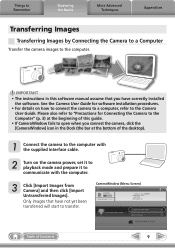
... use the "MOV" data type can be transferred to your camera's memory card. Procedures 1 Connect the camera to the computer. 2 Turn on a large screen. Things to Remember Mastering the Basics More Advanced Techniques Appendices Transferring Images Transferring Images to a Camera Images transferred once... CameraWindow (menu screen) by clicking the [Acquire & Camera Settings] task button, followed by [Connect to Camera]. 47 Select [Canon CameraWindow] when using Canon CameraWindow]. Show favorite images to friends or connect a TV to show them on the camera power, and set it to the ...
... use the "MOV" data type can be transferred to your camera's memory card. Procedures 1 Connect the camera to the computer. 2 Turn on a large screen. Things to Remember Mastering the Basics More Advanced Techniques Appendices Transferring Images Transferring Images to a Camera Images transferred once... CameraWindow (menu screen) by clicking the [Acquire & Camera Settings] task button, followed by [Connect to Camera]. 47 Select [Canon CameraWindow] when using Canon CameraWindow]. Show favorite images to friends or connect a TV to show them on the camera power, and set it to the ...
Software User Guide for Macintosh
Page 9
... software installation procedures. • For details on the camera power, set it to playback mode and prepare it to communicate with the supplied interface cable. 2 Turn on how to connect the camera to a computer, refer to the computer with the computer. 3 Click [Import Images from Camera] and then click [Import Untransferred...
... software installation procedures. • For details on the camera power, set it to playback mode and prepare it to communicate with the supplied interface cable. 2 Turn on how to connect the camera to a computer, refer to the computer with the computer. 3 Click [Import Images from Camera] and then click [Import Untransferred...

Software User Guide for Macintosh
Page 17
...thumbnail display) Closes CameraWindow. Transfers the image chosen in thumbnail display). Returns to preview display when a single image is selected. Turns the shooting date and folder name below the thumbnails on images that match the selected filter display in thumbnail display). Table of chosen images... turns blue. Images on the Menu screen, then click [Select Images to the left or right. Thumbnail display Preview display Full ...
...thumbnail display) Closes CameraWindow. Transfers the image chosen in thumbnail display). Returns to preview display when a single image is selected. Turns the shooting date and folder name below the thumbnails on images that match the selected filter display in thumbnail display). Table of chosen images... turns blue. Images on the Menu screen, then click [Select Images to the left or right. Thumbnail display Preview display Full ...

Software User Guide for Macintosh
Page 18
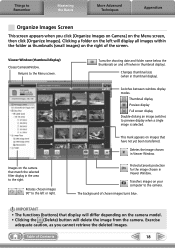
...(thumbnail display) Closes CameraWindow. Switches between window display modes. Protects/cancels protection for the image chosen in thumbnail display). Turns the shooting date and folder name below the thumbnails on images that match the selected filter display in Viewer Window. Changes ...to preview display when a single image is selected. Deletes the image chosen in the area to the right. Table of chosen images turns blue. The background of Contents 18 Clicking a folder on the left or right. Things to Remember Mastering the Basics More Advanced Techniques ...
...(thumbnail display) Closes CameraWindow. Switches between window display modes. Protects/cancels protection for the image chosen in thumbnail display). Turns the shooting date and folder name below the thumbnails on images that match the selected filter display in Viewer Window. Changes ...to preview display when a single image is selected. Deletes the image chosen in the area to the right. Table of chosen images turns blue. The background of Contents 18 Clicking a folder on the left or right. Things to Remember Mastering the Basics More Advanced Techniques ...
Software User Guide for Macintosh
Page 46
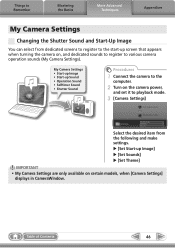
u [Set Start-up screen that appears when turning the camera on certain models, when [Camera Settings] displays in CameraWindow. Things to Remember Mastering the Basics More Advanced Techniques Appendices My Camera Settings Changing ... Settings • Start-up Image • Start-up Sound • Operation Sound • Selftimer Sound • Shutter Sound Procedures 1 Connect the camera to the computer. 2 Turn on the camera power, and set it to playback mode. 3 [Camera Settings] Select the desired item from dedicated screens to register to the start-up...
u [Set Start-up screen that appears when turning the camera on certain models, when [Camera Settings] displays in CameraWindow. Things to Remember Mastering the Basics More Advanced Techniques Appendices My Camera Settings Changing ... Settings • Start-up Image • Start-up Sound • Operation Sound • Selftimer Sound • Shutter Sound Procedures 1 Connect the camera to the computer. 2 Turn on the camera power, and set it to playback mode. 3 [Camera Settings] Select the desired item from dedicated screens to register to the start-up...

Software User Guide for Macintosh
Page 48
...8226; If ImageBrowser's Browser Window is open when the camera is connected (directly after transferring for instance), open the CameraWindow (menu screen) by clicking the [Canon Camera] icon in "Specifications" near the end of Contents 48 Table of the Camera User Guide to see if the camera uses the "MOV" data...computer can be transferred back to show them on Camera] 4 [Organize Images] 5 (Upload) IMPORTANT • Cameras that camera. Procedures 1 Connect the camera to the computer. 2 Turn on the camera power, and set it to playback mode. 3 [Organize Images on a large screen.
...8226; If ImageBrowser's Browser Window is open when the camera is connected (directly after transferring for instance), open the CameraWindow (menu screen) by clicking the [Canon Camera] icon in "Specifications" near the end of Contents 48 Table of the Camera User Guide to see if the camera uses the "MOV" data...computer can be transferred back to show them on Camera] 4 [Organize Images] 5 (Upload) IMPORTANT • Cameras that camera. Procedures 1 Connect the camera to the computer. 2 Turn on the camera power, and set it to playback mode. 3 [Organize Images on a large screen.

PowerShot SX120 IS Camera User Guide
Page 5
What Do You Want to Do? 1 View ● Look at my pictures 25 ● Easy Playback (Easy Mode 30 ● Automatically play back pictures (slideshow 102 ● Look at my pictures on a TV 105 ● Quickly search pictures 100, 101 ● Erase pictures 26, 30, 107 ● Protect pictures from accidental erasure 106 E Shoot/View Movies ● Shoot movies 31 ● View movies 33, 98 2 Print ● Easily print pictures 27 Save ● Save images to a computer 34 3 Other ● Turn off sounds 49 ● Use the camera abroad 40 5
What Do You Want to Do? 1 View ● Look at my pictures 25 ● Easy Playback (Easy Mode 30 ● Automatically play back pictures (slideshow 102 ● Look at my pictures on a TV 105 ● Quickly search pictures 100, 101 ● Erase pictures 26, 30, 107 ● Protect pictures from accidental erasure 106 E Shoot/View Movies ● Shoot movies 31 ● View movies 33, 98 2 Print ● Easily print pictures 27 Save ● Save images to a computer 34 3 Other ● Turn off sounds 49 ● Use the camera abroad 40 5

PowerShot SX120 IS Camera User Guide
Page 6
... 21 Taking Pictures 22 Viewing Images 25 Erasing Images 26 Printing Images 27 Shooting in Easy mode 29 Viewing or Erasing in Program AE 66 Turning the Flash On 66 Adjusting the Brightness (Exposure Compensation 67 Shooting Close-ups (Macro 67 Changing the Recording Pixels (Image Size 68 Changing the Compression...
... 21 Taking Pictures 22 Viewing Images 25 Erasing Images 26 Printing Images 27 Shooting in Easy mode 29 Viewing or Erasing in Program AE 66 Turning the Flash On 66 Adjusting the Brightness (Exposure Compensation 67 Shooting Close-ups (Macro 67 Changing the Recording Pixels (Image Size 68 Changing the Compression...

PowerShot SX120 IS Camera User Guide
Page 9
..., or thinner to clean the equipment. • Do not allow liquids or foreign objects to also check the guides included with the camera interior, immediately turn the camera power off and remove the batteries. • Use only recommended power sources. Exposure to the intense light produced by the flash could result...
..., or thinner to clean the equipment. • Do not allow liquids or foreign objects to also check the guides included with the camera interior, immediately turn the camera power off and remove the batteries. • Use only recommended power sources. Exposure to the intense light produced by the flash could result...

PowerShot SX120 IS Camera User Guide
Page 18
... Date and Time The Date/Time settings screen will appear the first time the camera is turned on the camera. ● Press the power button. X The Date/Time screen will turn off the camera. If you turn the  dial to set a value. Reappearing Date/Time screen Set the correct date and time.... Make the setting. ● Press the m button. Turn on . X Once the date and time have not set the date and time, the Date/ Time screen will appear each time you have been set, ...
... Date and Time The Date/Time settings screen will appear the first time the camera is turned on the camera. ● Press the power button. X The Date/Time screen will turn off the camera. If you turn the  dial to set a value. Reappearing Date/Time screen Set the correct date and time.... Make the setting. ● Press the m button. Turn on . X Once the date and time have not set the date and time, the Date/ Time screen will appear each time you have been set, ...
PowerShot SX120 IS Camera User Guide
Page 19
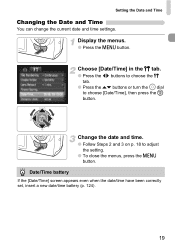
Choose [Date/Time] in the 3 tab. ● Press the qr buttons to choose the 3 tab. ● Press the op buttons or turn the  dial to adjust the setting. ● To close the menus, press the n button. Change the date and time. ● Follow Steps 2 and 3 on p. ...
Choose [Date/Time] in the 3 tab. ● Press the qr buttons to choose the 3 tab. ● Press the op buttons or turn the  dial to adjust the setting. ● To close the menus, press the n button. Change the date and time. ● Follow Steps 2 and 3 on p. ...

PowerShot SX120 IS Camera User Guide
Page 20
... press the n button . X Once the display language has been set, the language menu will close. Set the display language. ● Press the opqr buttons or turn the  dial to choose a language, then press the m button. You can change the display language by pressing the n button, choosing the 3 tab, and choosing...
... press the n button . X Once the display language has been set, the language menu will close. Set the display language. ● Press the opqr buttons or turn the  dial to choose a language, then press the m button. You can change the display language by pressing the n button, choosing the 3 tab, and choosing...


