User Manual
Page 2
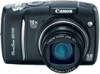
... please contact the retail outlet at which you purchased the product. a Camera b AA Alkaline Batteries (×2) c Memory Card (32 MB) d Interface Cable IFC-400PCU e AV Cable AVC-DC400 f Wrist Strap WS-DC5 g Canon Digital Camera Solution Disk h Warranty Card i User Guides • Camera User Guide (this guide) • Direct Print User Guide (Connecting the...
... please contact the retail outlet at which you purchased the product. a Camera b AA Alkaline Batteries (×2) c Memory Card (32 MB) d Interface Cable IFC-400PCU e AV Cable AVC-DC400 f Wrist Strap WS-DC5 g Canon Digital Camera Solution Disk h Warranty Card i User Guides • Camera User Guide (this guide) • Direct Print User Guide (Connecting the...
User Manual
Page 6
... Settings/Transfer Settings 148 Setting the DPOF Print Settings 148 Setting the DPOF Transfer Settings 152 Configuring the Camera 154 Power Saving Function 154 Formatting Memory Cards 156 Resetting the File Number 157 Creating an Image Destination (Folder 159 Setting the Auto Rotate Function 161 Resetting Settings to Their Default Values 162...
... Settings/Transfer Settings 148 Setting the DPOF Print Settings 148 Setting the DPOF Transfer Settings 152 Configuring the Camera 154 Power Saving Function 154 Formatting Memory Cards 156 Resetting the File Number 157 Creating an Image Destination (Folder 159 Setting the Auto Rotate Function 161 Resetting Settings to Their Default Values 162...
User Manual
Page 8
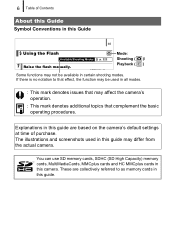
...are collectively referred to that effect, the function may differ from the actual camera. You can use SD memory cards, SDHC (SD High Capacity) memory cards, MultiMediaCards, MMCplus cards and HC MMCplus cards in this guide may be available in this guide. The illustrations and screenshots used in all modes. ...used in this Guide 65 Using the Flash Available Shooting Modes 1 Raise the flash manually. If there is no notation to as memory cards in this guide are based on the camera's default settings at time of Contents About this Guide Symbol Conventions in this camera. ...
...are collectively referred to that effect, the function may differ from the actual camera. You can use SD memory cards, SDHC (SD High Capacity) memory cards, MultiMediaCards, MMCplus cards and HC MMCplus cards in this guide may be available in this guide. The illustrations and screenshots used in all modes. ...used in this Guide 65 Using the Flash Available Shooting Modes 1 Raise the flash manually. If there is no notation to as memory cards in this guide are based on the camera's default settings at time of Contents About this Guide Symbol Conventions in this camera. ...
User Manual
Page 9
...highly recommend that you shoot several trial images to a Canon Customer Support Help Desk. Please be advised that in certain cases the copying of images from any malfunction of a camera or accessory, including memory cards, that results in a manner that the camera is ...supplied with a warranty claim to confirm that infringes upon or contravenes international or domestic copyright laws and regulations. Please note that Canon Inc., its subsidiaries and affiliates, and its distributors are intended for any consequential damages arising from performances, exhibitions, or commercial...
...highly recommend that you shoot several trial images to a Canon Customer Support Help Desk. Please be advised that in certain cases the copying of images from any malfunction of a camera or accessory, including memory cards, that results in a manner that the camera is ...supplied with a warranty claim to confirm that infringes upon or contravenes international or domestic copyright laws and regulations. Please note that Canon Inc., its subsidiaries and affiliates, and its distributors are intended for any consequential damages arising from performances, exhibitions, or commercial...

User Manual
Page 12
Memory Card/Battery Cover Lock a Open the cover (c) b Slide c the cover (b) 2. Negative end (-) Positive end (+) Insert the two supplied AA-size alkaline batteries. Getting Started 10 Preparations Preparations Installing the Batteries and Memory Card 1. Slide the memory card/battery cover lock a and hold it open while sliding the cover b and opening it (c). Install two batteries.
Memory Card/Battery Cover Lock a Open the cover (c) b Slide c the cover (b) 2. Negative end (-) Positive end (+) Insert the two supplied AA-size alkaline batteries. Getting Started 10 Preparations Preparations Installing the Batteries and Memory Card 1. Slide the memory card/battery cover lock a and hold it open while sliding the cover b and opening it (c). Install two batteries.
User Manual
Page 13
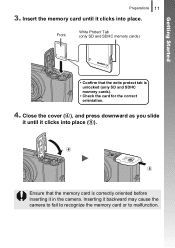
d e Ensure that the write protect tab is correctly oriented before inserting it backward may cause the camera to fail to recognize the memory card or to malfunction. Getting Started Preparations 11 3. Insert the memory card until it clicks into place (e). Close the cover (d), and press downward as you slide it until it clicks into place. Inserting it in the camera. Front Write Protect Tab (only SD and SDHC memory cards) • Confirm that the memory card is unlocked (only SD and SDHC memory cards). • Check the card for the correct orientation. 4.
d e Ensure that the write protect tab is correctly oriented before inserting it backward may cause the camera to fail to recognize the memory card or to malfunction. Getting Started Preparations 11 3. Insert the memory card until it clicks into place (e). Close the cover (d), and press downward as you slide it until it clicks into place. Inserting it in the camera. Front Write Protect Tab (only SD and SDHC memory cards) • Confirm that the memory card is unlocked (only SD and SDHC memory cards). • Check the card for the correct orientation. 4.
User Manual
Page 14
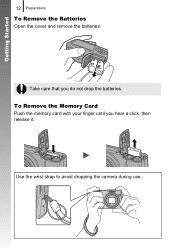
To Remove the Memory Card Push the memory card with your finger until you do not drop the batteries. Use the wrist strap to avoid dropping the camera during use. Getting Started 12 Preparations To Remove the Batteries Open the cover and remove the batteries. Take care that you hear a click, then release it.
To Remove the Memory Card Push the memory card with your finger until you do not drop the batteries. Use the wrist strap to avoid dropping the camera during use. Getting Started 12 Preparations To Remove the Batteries Open the cover and remove the batteries. Take care that you hear a click, then release it.

User Manual
Page 18
... pressing fully Shooting Preparations Complete: Lights green (orange when the flash will fire) Recording: Blinks green AF Frame An AF frame will record to the memory card. Correct Incorrect Press halfway to the first stage is being displayed. • If you press the shutter button halfway*. * The shutter button has a two-stage...
... pressing fully Shooting Preparations Complete: Lights green (orange when the flash will fire) Recording: Blinks green AF Frame An AF frame will record to the memory card. Correct Incorrect Press halfway to the first stage is being displayed. • If you press the shutter button halfway*. * The shutter button has a two-stage...

User Manual
Page 20
... if you select [Last seen], the last image viewed will display the most recent image regardless of the [Resume] settings: shooting an image, changing the memory card, or editing an image on the memory card using the control dial. Press the (playback) button. 2.
... if you select [Last seen], the last image viewed will display the most recent image regardless of the [Resume] settings: shooting an image, changing the memory card, or editing an image on the memory card using the control dial. Press the (playback) button. 2.
User Manual
Page 25
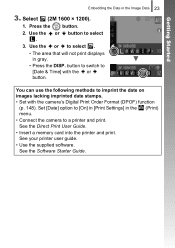
Getting Started Embedding the Date in gray. • Press the DISP. See the Direct Print User Guide. • Insert a memory card into the printer and print. Use the or button to a printer and print. You can use the following methods to imprint the date on images ...
Getting Started Embedding the Date in gray. • Press the DISP. See the Direct Print User Guide. • Insert a memory card into the printer and print. Use the or button to a printer and print. You can use the following methods to imprint the date on images ...
User Manual
Page 27
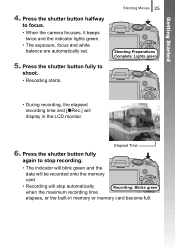
... elapsed recording time and [zRec.] will stop recording. • The indicator will blink green and the data will be recorded onto the memory card. • Recording will display in memory or memory card become full. Press the shutter button halfway to shoot. • Recording starts. Getting Started 4. Press the shutter button fully again to stop...
... elapsed recording time and [zRec.] will stop recording. • The indicator will blink green and the data will be recorded onto the memory card. • Recording will display in memory or memory card become full. Press the shutter button halfway to shoot. • Recording starts. Getting Started 4. Press the shutter button fully again to stop...

User Manual
Page 36
Getting Started 34 System Map System Map Supplied with Camera Interface Cable IFC-400PCU*1 Wrist Strap WS-DC5 Memory Card (32 MB) AV Cable AVC-DC400*1 AA-size Alkaline Batteries (×2) Canon Digital Camera Solution Disk Battery and Charger Kit CBK4-300*5 AC Adapter Kit ACK800 „ Battery Charger CB-5AH/CB5AHE „ AA-size NiMH batteries NB-3AH (×4) • NiMH Battery NB4-300 (set of 4 AA-size) also available separately. • Two batteries are used for this camera. „ Compact Power Adapter CA-PS800 „ Power Cord
Getting Started 34 System Map System Map Supplied with Camera Interface Cable IFC-400PCU*1 Wrist Strap WS-DC5 Memory Card (32 MB) AV Cable AVC-DC400*1 AA-size Alkaline Batteries (×2) Canon Digital Camera Solution Disk Battery and Charger Kit CBK4-300*5 AC Adapter Kit ACK800 „ Battery Charger CB-5AH/CB5AHE „ AA-size NiMH batteries NB-3AH (×4) • NiMH Battery NB4-300 (set of 4 AA-size) also available separately. • Two batteries are used for this camera. „ Compact Power Adapter CA-PS800 „ Power Cord

User Manual
Page 43
Components Guide 41 „ Back View a Screen (LCD Monitor) (p. 58) b Terminal Cover c Strap Mount (p. 12) d Memory Card/Battery Cover Lock (p. 10) e Memory Card/Battery Cover (p. 10) f Tripod Socket g A/V OUT (Audio/Video output) and DIGITAL Terminal (pp. 20, 29, 163) h DC IN (Power Input) Terminal (p. 191)
Components Guide 41 „ Back View a Screen (LCD Monitor) (p. 58) b Terminal Cover c Strap Mount (p. 12) d Memory Card/Battery Cover Lock (p. 10) e Memory Card/Battery Cover (p. 10) f Tripod Socket g A/V OUT (Audio/Video output) and DIGITAL Terminal (pp. 20, 29, 163) h DC IN (Power Input) Terminal (p. 191)
User Manual
Page 47
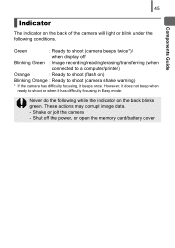
Green : Ready to shoot (camera beeps twice*)/ when display off the power, or open the memory card/battery cover Shake or jolt the camera - Shut off Blinking Green : Image recording/reading/erasing/transferring (when connected to a computer/printer) Orange : Ready to shoot (...
Green : Ready to shoot (camera beeps twice*)/ when display off the power, or open the memory card/battery cover Shake or jolt the camera - Shut off Blinking Green : Image recording/reading/erasing/transferring (when connected to a computer/printer) Orange : Ready to shoot (...
User Manual
Page 58
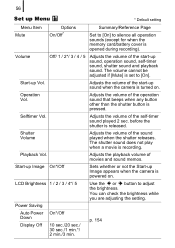
... Menu * Default setting Menu Item Mute Volume Options On/Off* Summary/Reference Page Set to [On] to silence all operation sounds (except for when the memory card/battery cover is released. Operation Vol. Adjusts the volume of movies and sound memos. You can check the brightness while you are adjusting the setting...
... Menu * Default setting Menu Item Mute Volume Options On/Off* Summary/Reference Page Set to [On] to silence all operation sounds (except for when the memory card/battery cover is released. Operation Vol. Adjusts the volume of movies and sound memos. You can check the brightness while you are adjusting the setting...
User Manual
Page 71
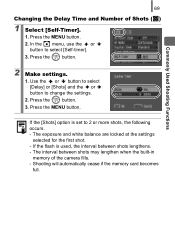
... interval between shots may lengthen when the built-in memory of Shots ( ) 1 Select [Self-Timer]. 1. Commonly Used Shooting Functions 69 Changing the Delay Time and Number of the camera fills. - Press the MENU button. 2. Press the button. 3. Shooting will automatically cease if the memory card becomes full. If the flash is set to...
... interval between shots may lengthen when the built-in memory of Shots ( ) 1 Select [Self-Timer]. 1. Commonly Used Shooting Functions 69 Changing the Delay Time and Number of the camera fills. - Press the MENU button. 2. Press the button. 3. Shooting will automatically cease if the memory card becomes full. If the flash is set to...

User Manual
Page 73
... more images. z See Image Data Sizes (Estimated) (p. 204). Commonly Used Shooting Functions Changing the Compression (Still Images) Available Shooting Modes p. 222 1 Select a compression setting. 1. z See Memory Cards and Estimated Capacities (p. 203). Use the or and the or the option. Press the button. Press the button. 2. Approximate Values for Compression Settings Compression Purpose...
... more images. z See Image Data Sizes (Estimated) (p. 204). Commonly Used Shooting Functions Changing the Compression (Still Images) Available Shooting Modes p. 222 1 Select a compression setting. 1. z See Memory Cards and Estimated Capacities (p. 203). Use the or and the or the option. Press the button. Press the button. 2. Approximate Values for Compression Settings Compression Purpose...
User Manual
Page 91
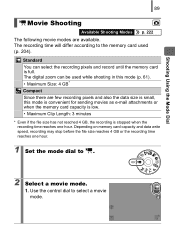
.... The recording time will differ according to select a movie mode. Use the control dial to the memory card used while shooting in this mode is convenient for sending movies as e-mail attachments or when the memory card capacity is low. • Maximum Clip Length: 3 minutes * Even if the file size has ... recording pixels and also the data size is small, this mode (p. 61). • Maximum Size: 4 GB* Compact Since there are available. Depending on memory card capacity and data write speed, recording may stop before the file size reaches 4 GB or the recording time reaches one hour.
.... The recording time will differ according to select a movie mode. Use the control dial to the memory card used while shooting in this mode is convenient for sending movies as e-mail attachments or when the memory card capacity is low. • Maximum Clip Length: 3 minutes * Even if the file size has ... recording pixels and also the data size is small, this mode (p. 61). • Maximum Size: 4 GB* Compact Since there are available. Depending on memory card capacity and data write speed, recording may stop before the file size reaches 4 GB or the recording time reaches one hour.
User Manual
Page 92
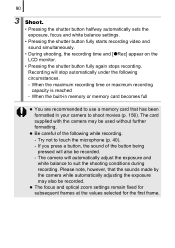
...also be used without further formatting. The camera will stop automatically under the following while recording. - Try not to use a memory card that the sounds made by the camera while automatically adjusting the exposure may be recorded. - Recording will automatically adjust the exposure...is reached - If you press a button, the sound of the following circumstances. - Please note, however, that has been formatted in memory or memory card becomes full z You are recommended to touch the microphone (p. 40). - z The focus and optical zoom settings remain fixed for subsequent...
...also be used without further formatting. The camera will stop automatically under the following while recording. - Try not to use a memory card that the sounds made by the camera while automatically adjusting the exposure may be recorded. - Recording will automatically adjust the exposure...is reached - If you press a button, the sound of the following circumstances. - Please note, however, that has been formatted in memory or memory card becomes full z You are recommended to touch the microphone (p. 40). - z The focus and optical zoom settings remain fixed for subsequent...

User Manual
Page 94
... shoot for twice as long in this mode compared to a file of the same size shot in the other modes. 1 Select the recording pixels. 1. z See Memory Cards and Estimated Capacities (p. 204). LP 320 × 240 30 frames/sec. *1 The (Compact) is fixed to (160 × 120 pixels, 15 frames/sec). *2 When priority...
... shoot for twice as long in this mode compared to a file of the same size shot in the other modes. 1 Select the recording pixels. 1. z See Memory Cards and Estimated Capacities (p. 204). LP 320 × 240 30 frames/sec. *1 The (Compact) is fixed to (160 × 120 pixels, 15 frames/sec). *2 When priority...


