
User Manual
Page 7
... Adjusting the Tone (White Balance 71 Adjusting the Brightness (Exposure Compensation 72 W Continuous Shooting 72 Changing the Tone of an Image (My Colors 73 Î Shooting Using the Two Second Self-Timer 74 $ Customizing the Self-Timer ........ 75 Shooting Using the Viewfinder........ 76 Shooting Using... Value 89 Setting the Flash Output 90 @ Adjusting Dark Subjects and Shooting (i-Contrast 91 Œ Red-Eye Correction 92 Changing the Color and Shooting ... 93 L Shooting Stitch Assist Images 96 6 Using Various Functions for Shooting Movies 97 Changing the Movie Mode 98 Changing...
... Adjusting the Tone (White Balance 71 Adjusting the Brightness (Exposure Compensation 72 W Continuous Shooting 72 Changing the Tone of an Image (My Colors 73 Î Shooting Using the Two Second Self-Timer 74 $ Customizing the Self-Timer ........ 75 Shooting Using the Viewfinder........ 76 Shooting Using... Value 89 Setting the Flash Output 90 @ Adjusting Dark Subjects and Shooting (i-Contrast 91 Œ Red-Eye Correction 92 Changing the Color and Shooting ... 93 L Shooting Stitch Assist Images 96 6 Using Various Functions for Shooting Movies 97 Changing the Movie Mode 98 Changing...
User Manual
Page 8
... the camera in your bag, ensure that hard objects do not come into contact with the camera in your pocket. Adding Effects With the My Colors Function 123 @ Adjusting Dark Subjects (i-Contrast 124 ] Correcting Red-Eye Effect.........125 ^ Attaching Sound Memos...........127 Transferring Images to the strap. Table of Messages That...
... the camera in your bag, ensure that hard objects do not come into contact with the camera in your pocket. Adding Effects With the My Colors Function 123 @ Adjusting Dark Subjects (i-Contrast 124 ] Correcting Red-Eye Effect.........125 ^ Attaching Sound Memos...........127 Transferring Images to the strap. Table of Messages That...
User Manual
Page 20
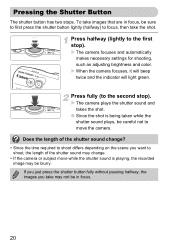
.... Pressing the Shutter Button The shutter button has two stops. X The camera focuses and automatically makes necessary settings for shooting, such as adjusting brightness and color.
.... Pressing the Shutter Button The shutter button has two stops. X The camera focuses and automatically makes necessary settings for shooting, such as adjusting brightness and color.

User Manual
Page 21
Set the A mode. ● Set the mode dial to be automatically detected and focused (p. 82), and the color and the brightness will zoom out from your subject making it appear smaller. Compose the shot of people, the face will be the main subject, ...
Set the A mode. ● Set the mode dial to be automatically detected and focused (p. 82), and the color and the brightness will zoom out from your subject making it appear smaller. Compose the shot of people, the face will be the main subject, ...

User Manual
Page 31
...: 512 MB or more Windows XP: 256 MB or more Viewing movies 1 GB or more USB Canon Utilities ZoomBrowser EX: 200 MB or more PhotoStitch: 40 MB or more 1,024 x 768 pixels/32,000 Colors or better 31 Downloading Images to a Computer You can use the included software to download the images....5): 512 MB or more Mac OS X (v10.4): 256 MB or more Viewing movies 1 GB or more USB Canon Utilities ImageBrowser: 300 MB or more PhotoStitch: 50 MB or more 1,024 x 768 pixels/High Color (16 bit) or better Macintosh OS Computer model CPU RAM Interface Free Hard Disk Space Display Mac OS...
...: 512 MB or more Windows XP: 256 MB or more Viewing movies 1 GB or more USB Canon Utilities ZoomBrowser EX: 200 MB or more PhotoStitch: 40 MB or more 1,024 x 768 pixels/32,000 Colors or better 31 Downloading Images to a Computer You can use the included software to download the images....5): 512 MB or more Mac OS X (v10.4): 256 MB or more Viewing movies 1 GB or more USB Canon Utilities ImageBrowser: 300 MB or more PhotoStitch: 50 MB or more 1,024 x 768 pixels/High Color (16 bit) or better Macintosh OS Computer model CPU RAM Interface Free Hard Disk Space Display Mac OS...

User Manual
Page 42
Information Displayed on the Screen Shooting (Information Display) Exposure Compensation (p. 72) White Balance (p. 71) My Colors (p. 73) Flash Exposure Compensation/ Flash Output (pp. 88, 90) Metering Modes (p. 87) Image Quality (Compression) (p. 68) Recording Pixels (p. 68) Histogram (p. 44) Digital Zoom Magnification (p. 58) / ...
Information Displayed on the Screen Shooting (Information Display) Exposure Compensation (p. 72) White Balance (p. 71) My Colors (p. 73) Flash Exposure Compensation/ Flash Output (pp. 88, 90) Metering Modes (p. 87) Image Quality (Compression) (p. 68) Recording Pixels (p. 68) Histogram (p. 44) Digital Zoom Magnification (p. 58) / ...

User Manual
Page 43
... / Infinity / Manual Focus (pp. 63, 67, 85) File Size (pp. 68, 98) Recording Pixels (p. 68) / Elapsed Time (Movies) (p. 99) Sound Memo (p. 127) Protect (p. 117) My Colors (p. 73) Red-Eye Correction (p. 125) Shooting Date and Time (p. 60) Switching the Display You can change the display using the l button. Information Displayed on the...
... / Infinity / Manual Focus (pp. 63, 67, 85) File Size (pp. 68, 98) Recording Pixels (p. 68) / Elapsed Time (Movies) (p. 99) Sound Memo (p. 127) Protect (p. 117) My Colors (p. 73) Red-Eye Correction (p. 125) Shooting Date and Time (p. 60) Switching the Display You can change the display using the l button. Information Displayed on the...
User Manual
Page 44
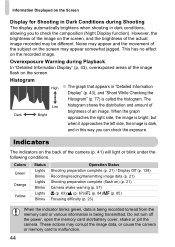
... shooting in dark conditions, allowing you can check the exposure. Indicators The indicators on the back of the subject on the screen may be different. Colors Green Orange Yellow Status Lights Blinks Lights Blinks Lights Blinks Operation Status Shooting preparation complete (p. 21) / Display Off (p. 138) Recording/reading/transmitting image data (p. 21...
... shooting in dark conditions, allowing you can check the exposure. Indicators The indicators on the back of the subject on the screen may be different. Colors Green Orange Yellow Status Lights Blinks Lights Blinks Lights Blinks Operation Status Shooting preparation complete (p. 21) / Display Off (p. 138) Recording/reading/transmitting image data (p. 21...
User Manual
Page 49
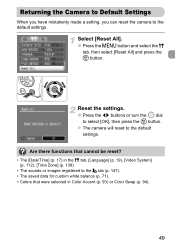
... settings. ● Press the qr buttons or turn the  dial to the 5 tab (p. 147). • The saved data for custom white balance (p. 71). • Colors that were selected in Color Accent (p. 93) or Color Swap (p. 94). 49
... settings. ● Press the qr buttons or turn the  dial to the 5 tab (p. 147). • The saved data for custom white balance (p. 71). • Colors that were selected in Color Accent (p. 93) or Color Swap (p. 94). 49
User Manual
Page 52
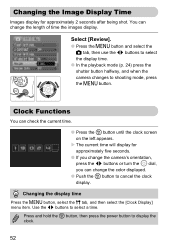
Clock Functions You can change the color displayed. ● Push the m button to cancel the clock display. Use the qr buttons to shooting mode, press the n button. X The current time will display ...
Clock Functions You can change the color displayed. ● Push the m button to cancel the clock display. Use the qr buttons to shooting mode, press the n button. X The current time will display ...
User Manual
Page 55
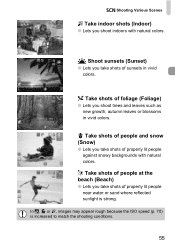
w Take shots of people at the beach (Beach) ● Lets you shoot indoors with natural colors. K Shooting Various Scenes H Take indoor shots (Indoor) ● Lets you take shots of properly lit people near water or sand where reflected sunlight is increased ...) ● Lets you take shots of foliage (Foliage) ● Lets you shoot trees and leaves such as new growth, autumn leaves or blossoms in vivid colors. P Take shots of people and snow (Snow) ● Lets you take shots of properly lit people against snowy backgrounds with natural...
w Take shots of people at the beach (Beach) ● Lets you shoot indoors with natural colors. K Shooting Various Scenes H Take indoor shots (Indoor) ● Lets you take shots of properly lit people near water or sand where reflected sunlight is increased ...) ● Lets you take shots of foliage (Foliage) ● Lets you shoot trees and leaves such as new growth, autumn leaves or blossoms in vivid colors. P Take shots of people and snow (Snow) ● Lets you take shots of properly lit people against snowy backgrounds with natural...
User Manual
Page 56
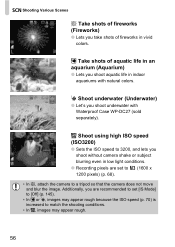
... to 3200, and lets you take shots of aquatic life in an aquarium (Aquarium) ● Lets you shoot aquatic life in vivid colors. Additionally, you shoot underwater with natural colors. S Shoot underwater (Underwater) ● Let's you are set [IS Mode] to [Off] (p. 145). • In y or S, images may appear rough. 56 y Take...
... to 3200, and lets you take shots of aquatic life in an aquarium (Aquarium) ● Lets you shoot aquatic life in vivid colors. Additionally, you shoot underwater with natural colors. S Shoot underwater (Underwater) ● Let's you are set [IS Mode] to [Off] (p. 145). • In y or S, images may appear rough. 56 y Take...

User Manual
Page 71
Auto Day Light Cloudy Tungsten Fluorescent Fluorescent H Custom Automatically sets the optimal white balance for natural looking colors. Fine weather condition, outdoor shooting. Cloudy, shady, twilight conditions Tungsten, bulb-type (3-wavelength) fluorescent. Make sure that you set...white balance for the shooting conditions. menu. X The tint on the screen will change when the white balance data is filled with the appropriate color. Daylight fluorescent, daylight-type (3-wavelength) fluorescent. in the Select an option. ● Press the qr buttons or turn the  ...
Auto Day Light Cloudy Tungsten Fluorescent Fluorescent H Custom Automatically sets the optimal white balance for natural looking colors. Fine weather condition, outdoor shooting. Cloudy, shady, twilight conditions Tungsten, bulb-type (3-wavelength) fluorescent. Make sure that you set...white balance for the shooting conditions. menu. X The tint on the screen will change when the white balance data is filled with the appropriate color. Daylight fluorescent, daylight-type (3-wavelength) fluorescent. in the Select an option. ● Press the qr buttons or turn the  ...

User Manual
Page 73
X The setting you made will be set (p. 71) • In and , colors other than people's skin color may not obtain the expected results depending on the screen. - You may change the tone of an image into sepia or black and white when shooting. Black and white. Makes mountains, foliage and other blue subjects more vivid...
X The setting you made will be set (p. 71) • In and , colors other than people's skin color may not obtain the expected results depending on the screen. - You may change the tone of an image into sepia or black and white when shooting. Black and white. Makes mountains, foliage and other blue subjects more vivid...

User Manual
Page 74
... p. 61. 74 Display the [Drive Settings] screen. ● After pressing the p button, immediately press the n button. Changing the Tone of an Image (My Colors) Custom Color The contrast, sharpness, color saturation, red, green, blue, and skin tones in an image can set the self-timer to select Î, then press the m button. ●...
... p. 61. 74 Display the [Drive Settings] screen. ● After pressing the p button, immediately press the n button. Changing the Tone of an Image (My Colors) Custom Color The contrast, sharpness, color saturation, red, green, blue, and skin tones in an image can set the self-timer to select Î, then press the m button. ●...
User Manual
Page 80
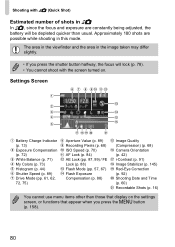
The area in the viewfinder and the area in this mode. Settings Screen Battery Charge Indicator (p. 13) Exposure Compensation (p. 72) White Balance (p. 71) My Colors (p. 73) Histogram (p. 44) Shutter Speed (p. 89) Drive Mode (pp. 61, 62, 72, 75) Aperture Value (p. 89) Recording Pixels (p. 68) ISO Speed (p. 70) AF Lock (p. 84) ...
The area in the viewfinder and the area in this mode. Settings Screen Battery Charge Indicator (p. 13) Exposure Compensation (p. 72) White Balance (p. 71) My Colors (p. 73) Histogram (p. 44) Shutter Speed (p. 89) Drive Mode (pp. 61, 62, 72, 75) Aperture Value (p. 89) Recording Pixels (p. 68) ISO Speed (p. 70) AF Lock (p. 84) ...

User Manual
Page 81
... explained assuming that the mode dial is set to 6, and the camera is in D mode. • Setting the mode dial to K, and selecting "Changing the Color and Shooting" (p. 93), "L Shooting Stitch Assist Images" (p. 96), and various other modes are explained. • Before attempting to shoot using a function explained in this chapter...
... explained assuming that the mode dial is set to 6, and the camera is in D mode. • Setting the mode dial to K, and selecting "Changing the Color and Shooting" (p. 93), "L Shooting Stitch Assist Images" (p. 96), and various other modes are explained. • Before attempting to shoot using a function explained in this chapter...

User Manual
Page 93
... dial to black and white. However, depending on the scene, the image may become rough, or the colors may cause the image to remain, increase the value of -. T Color Accent You can change the area you want to color. ● When you want only the color that are close to the color you want... the area to be recorded. When you want , and press the q button. We recommend saving the original image as well as expected. X The color indicated will return to the shooting screen. • Using the flash may not come out different than expected. • Even if you turn off the...
... dial to black and white. However, depending on the scene, the image may become rough, or the colors may cause the image to remain, increase the value of -. T Color Accent You can change the area you want to color. ● When you want only the color that are close to the color you want... the area to be recorded. When you want , and press the q button. We recommend saving the original image as well as expected. X The color indicated will return to the shooting screen. • Using the flash may not come out different than expected. • Even if you turn off the...
User Manual
Page 94
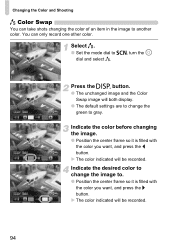
... q button. Indicate the color before changing the image. ● Position the center frame so it is filled with the color you want , and press the r button. Changing the Color and Shooting Y Color Swap You can only record one other color. You can take shots changing the color of an item in the... image to gray. X The color indicated will both display. ● The...
... q button. Indicate the color before changing the image. ● Position the center frame so it is filled with the color you want , and press the r button. Changing the Color and Shooting Y Color Swap You can only record one other color. You can take shots changing the color of an item in the... image to gray. X The color indicated will both display. ● The...
User Manual
Page 95
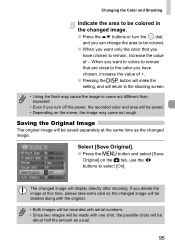
... [Save Original]. ● Press the n button and select [Save Original] on the scene, the image may cause the image to come out rough. Changing the Color and Shooting Indicate the area to be colored in the changed image. ● Press the op buttons or turn off the power, the recorded... area will be saved. • Depending on the 4 tab, use the qr buttons to select [On]. When you want only the color that are close to remain, increase the value of +. ● Pressing the l button will make the setting, and will display directly after shooting. The changed ...
... [Save Original]. ● Press the n button and select [Save Original] on the scene, the image may cause the image to come out rough. Changing the Color and Shooting Indicate the area to be colored in the changed image. ● Press the op buttons or turn off the power, the recorded... area will be saved. • Depending on the 4 tab, use the qr buttons to select [On]. When you want only the color that are close to remain, increase the value of +. ● Pressing the l button will make the setting, and will display directly after shooting. The changed ...


