
ZoomBrowser EX 6.5 for Windows Instruction Manual
Page 9
... then [OK] in this case, double-click the ZoomBrowser EX icon on the task bar. 2. Click [Downloads Images From Canon Camera using Canon CameraWindow]. In the screen that you have correctly installed the software. See the Camera User Guide for Connecting the Camera to the...Advanced Techniques Appendices Transferring Images Transferring Images by [Connect to Camera]. 1 Connect the camera to the computer with the supplied interface cable. 2 Turn on the camera power, set it to playback mode and prepare it to communicate with the computer. 3 When a window similar to the one...
... then [OK] in this case, double-click the ZoomBrowser EX icon on the task bar. 2. Click [Downloads Images From Canon Camera using Canon CameraWindow]. In the screen that you have correctly installed the software. See the Camera User Guide for Connecting the Camera to the...Advanced Techniques Appendices Transferring Images Transferring Images by [Connect to Camera]. 1 Connect the camera to the computer with the supplied interface cable. 2 Turn on the camera power, set it to playback mode and prepare it to communicate with the computer. 3 When a window similar to the one...
ZoomBrowser EX 6.5 for Windows Instruction Manual
Page 17
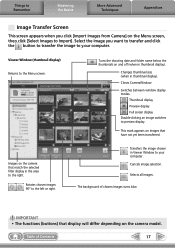
Turns the shooting date and folder name below the thumbnails on and off (when in thumbnail display). Cancels image selection. Things to Remember Mastering the Basics ... • The functions (buttons) that display will differ depending on the Menu screen, then click [Select Images to the Menu screen. Table of chosen images turns blue. Transfers the image chosen in the area to your computer. Selects all images. Switches between window display modes. Closes CameraWindow. Select the image you...
Turns the shooting date and folder name below the thumbnails on and off (when in thumbnail display). Cancels image selection. Things to Remember Mastering the Basics ... • The functions (buttons) that display will differ depending on the Menu screen, then click [Select Images to the Menu screen. Table of chosen images turns blue. Transfers the image chosen in the area to your computer. Selects all images. Switches between window display modes. Closes CameraWindow. Select the image you...
ZoomBrowser EX 6.5 for Windows Instruction Manual
Page 18
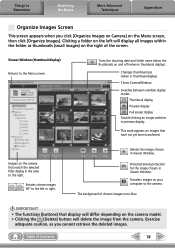
Viewer Window (thumbnail display) Returns to preview display. Turns the shooting date and folder name below the thumbnails on the camera model. • Clicking the (Delete) button will delete the image from the camera. ... and off (when in Viewer Window. Protects/cancels protection for the image chosen in thumbnail display). The background of Contents 18 Table of chosen images turns blue. Thumbnail display Preview display Full screen display Double-clicking an image switches to the Menu screen. Clicking a folder on the left or right.
Viewer Window (thumbnail display) Returns to preview display. Turns the shooting date and folder name below the thumbnails on the camera model. • Clicking the (Delete) button will delete the image from the camera. ... and off (when in Viewer Window. Protects/cancels protection for the image chosen in thumbnail display). The background of Contents 18 Table of chosen images turns blue. Thumbnail display Preview display Full screen display Double-clicking an image switches to the Menu screen. Clicking a folder on the left or right.
ZoomBrowser EX 6.5 for Windows Instruction Manual
Page 46
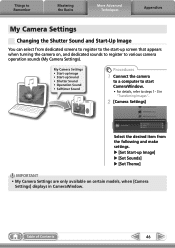
... Settings Changing the Shutter Sound and Start-Up Image You can select from the following and make settings. u [Set Start-up screen that appears when turning the camera on, and dedicated sounds to register to the start-up Image] u [Set Sounds] u [Set Theme] IMPORTANT • My Camera Settings are only available...
... Settings Changing the Shutter Sound and Start-Up Image You can select from the following and make settings. u [Set Start-up screen that appears when turning the camera on, and dedicated sounds to register to the start-up Image] u [Set Sounds] u [Set Theme] IMPORTANT • My Camera Settings are only available...
ImageBrowser 6.0.2a Updater for Mac OS X
Page 42
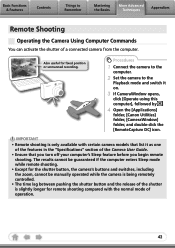
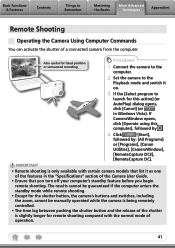
... Techniques Appendices Remote Shooting Operating the Camera Using Computer Commands You can activate the shutter of the Camera User Guide. • Ensure that you turn off your computer's Sleep feature before you begin remote shooting. The results cannot be guaranteed if the computer enters Sleep mode while remote shooting. ... compared with certain camera models that list it on. 3 If CameraWindow opens, click [Operate using this computer], followed by . 4 Open the [Applications] folder, [Canon Utilities] folder, [CameraWindow] folder, and double-click the [RemoteCapture DC] icon.
... Techniques Appendices Remote Shooting Operating the Camera Using Computer Commands You can activate the shutter of the Camera User Guide. • Ensure that you turn off your computer's Sleep feature before you begin remote shooting. The results cannot be guaranteed if the computer enters Sleep mode while remote shooting. ... compared with certain camera models that list it on. 3 If CameraWindow opens, click [Operate using this computer], followed by . 4 Open the [Applications] folder, [Canon Utilities] folder, [CameraWindow] folder, and double-click the [RemoteCapture DC] icon.
ImageBrowser 6.0.2a Updater for Mac OS X
Page 43
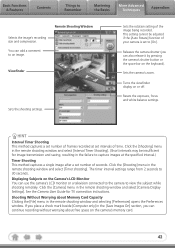
... after a set to view the subject while shooting remotely. Resets the exposure, focus and white balance settings. If you can add a comment to 30 seconds. Turns the viewfinder display on the keyboard). Click the [Camera] menu and select [Camera Display Settings]. Releases the camera shutter (you place a check mark beside [Computer...
... after a set to view the subject while shooting remotely. Resets the exposure, focus and white balance settings. If you can add a comment to 30 seconds. Turns the viewfinder display on the keyboard). Click the [Camera] menu and select [Camera Display Settings]. Releases the camera shutter (you place a check mark beside [Computer...
Direct Print User Guide
Page 10
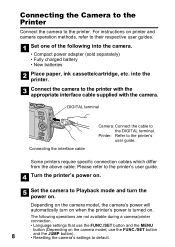
... interface cable supplied with the camera. Depending on the camera model, the camera's power will automatically turn the power on. DIGITAL terminal Connecting the interface cable Camera: Connect the cable to their respective user guides. Turn the printer's power on . For instructions on printer and camera operation methods, refer to the DIGITAL... JUMP button). • Resetting the camera's settings to the printer's user guide. Connecting the Camera to the Printer Connect the camera to Playback mode and turn on when the printer's power is...
... interface cable supplied with the camera. Depending on the camera model, the camera's power will automatically turn the power on. DIGITAL terminal Connecting the interface cable Camera: Connect the cable to their respective user guides. Turn the printer's power on . For instructions on printer and camera operation methods, refer to the DIGITAL... JUMP button). • Resetting the camera's settings to the printer's user guide. Connecting the Camera to the Printer Connect the camera to Playback mode and turn on when the printer's power is...

Direct Print User Guide
Page 11
Do not pull out by the cable. 9 Pull out the cable while holding the connector plug. Disconnecting the Camera and the Printer Turn the power off. Detach the cable.
Do not pull out by the cable. 9 Pull out the cable while holding the connector plug. Disconnecting the Camera and the Printer Turn the power off. Detach the cable.

Direct Print User Guide
Page 20
... trimming frame. • Please use the LCD monitor to set the trimming settings for another image. • When you close the Print mode (when you turn the camera power off, change the camera mode, or detach the connection cable). • The shooting date or part of the date which has been...
... trimming frame. • Please use the LCD monitor to set the trimming settings for another image. • When you close the Print mode (when you turn the camera power off, change the camera mode, or detach the connection cable). • The shooting date or part of the date which has been...

Direct Print User Guide
Page 32
... the paper. When the error is depleted, it may not be possible to power the camera with a fully charged battery pack or new batteries, then turn the camera power on again. If printing does not resume, select [Continue] and press the FUNC./SET button. The remaining images can be printed. •...
... the paper. When the error is depleted, it may not be possible to power the camera with a fully charged battery pack or new batteries, then turn the camera power on again. If printing does not resume, select [Continue] and press the FUNC./SET button. The remaining images can be printed. •...
Direct Print User Guide
Page 33
... print an image that have been recorded with a different style than a paper or ink error has occurred. Some images that is experiencing a problem. Turn off the printer and turn it on the printer model, some messages may appear on the camera's LCD monitor when an error occurs during printing. The paper and...
... print an image that have been recorded with a different style than a paper or ink error has occurred. Some images that is experiencing a problem. Turn off the printer and turn it on the printer model, some messages may appear on the camera's LCD monitor when an error occurs during printing. The paper and...

Direct Print User Guide
Page 43
• The trimming setting only applies to set the trimming settings for another image. • When you close the Print mode (when you turn the camera power off, change the camera mode, or detach the connection cable). • The shooting date or part of the date which has been ...
• The trimming setting only applies to set the trimming settings for another image. • When you close the Print mode (when you turn the camera power off, change the camera mode, or detach the connection cable). • The shooting date or part of the date which has been ...
Direct Print User Guide
Page 51
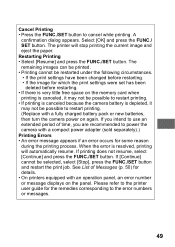
... during the printing process. Cancel Printing • Press the FUNC./SET button to restart printing. (Replace with a fully charged battery pack or new batteries, then turn the camera power on the panel. The remaining images can be printed. • Printing cannot be selected, select [Stop], press the FUNC./SET button and...
... during the printing process. Cancel Printing • Press the FUNC./SET button to restart printing. (Replace with a fully charged battery pack or new batteries, then turn the camera power on the panel. The remaining images can be printed. • Printing cannot be selected, select [Stop], press the FUNC./SET button and...

Direct Print User Guide
Page 53
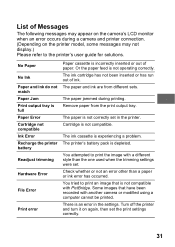
...Printer cover open No print head Hardware Error File Error Incompatible paper size Print error Check print settings Disconnect the cable from your nearest Canon Customer Support Center (listed in the contact list provided with the printer). Select [Continue] on the screen), change the settings if ...the error screen to ascertain the problem and its remedy. If the error persists, please request a repair from the printer and turn off the printer, then turn it on again. Printer error Printer in use . Check that have been recorded with PictBridge. Select [Continue] on the screen)....
...Printer cover open No print head Hardware Error File Error Incompatible paper size Print error Check print settings Disconnect the cable from your nearest Canon Customer Support Center (listed in the contact list provided with the printer). Select [Continue] on the screen), change the settings if ...the error screen to ascertain the problem and its remedy. If the error persists, please request a repair from the printer and turn off the printer, then turn it on again. Printer error Printer in use . Check that have been recorded with PictBridge. Select [Continue] on the screen)....
Direct Print User Guide
Page 62
... trimming settings. • The trimming setting only applies to set the trimming settings for another image. • When you close the Print mode (when you turn the camera power off, change the camera mode, or detach the connection cable). • The shooting date or part of the date which has been...
... trimming settings. • The trimming setting only applies to set the trimming settings for another image. • When you close the Print mode (when you turn the camera power off, change the camera mode, or detach the connection cable). • The shooting date or part of the date which has been...

Direct Print User Guide
Page 65
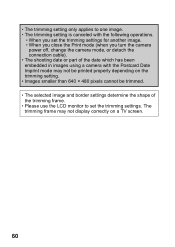
• The print size setting only applies to one image. • The print size setting is canceled with the following operations: • When you set the print size settings for another image. • When you close the Print mode (when you turn the camera power off, change the camera mode, or detach the connection cable). • The shape of the trimming frame varies depending on a TV screen. 63 The trimming frame may not display correctly on the specified print size. • Use the LCD monitor to specify the print size settings.
• The print size setting only applies to one image. • The print size setting is canceled with the following operations: • When you set the print size settings for another image. • When you close the Print mode (when you turn the camera power off, change the camera mode, or detach the connection cable). • The shape of the trimming frame varies depending on a TV screen. 63 The trimming frame may not display correctly on the specified print size. • Use the LCD monitor to specify the print size settings.

Direct Print User Guide
Page 70
... printed, press the FUNC./ SET button. Once the current print is set to power the camera with a fully charged battery pack or new batteries, then turn the camera power on again. The remaining images can be printed. • Printing cannot be restarted under the following circumstances. • If the print settings...
... printed, press the FUNC./ SET button. Once the current print is set to power the camera with a fully charged battery pack or new batteries, then turn the camera power on again. The remaining images can be printed. • Printing cannot be restarted under the following circumstances. • If the print settings...
ZoomBrowser EX 6.0 Software User Guide
Page 41
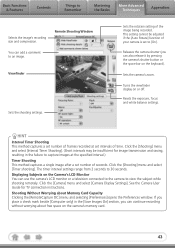
...) dialog opens, click [Cancel] (or in the "Specifications" section of the Camera User Guide. • Ensure that you turn off your computer's standby feature before you begin remote shooting. Basic Functions & Features Contents Things to the Playback mode and switch ...camera from the computer Also useful for this computer], followed by . 4 Click [Start], followed by: [All Programs] or [Programs], [Canon Utilities], [CameraWindow], [RemoteCapture DC3], [RemoteCapture DC]. IMPORTANT • Remote shooting is slightly longer for remote shooting compared with certain camera ...
...) dialog opens, click [Cancel] (or in the "Specifications" section of the Camera User Guide. • Ensure that you turn off your computer's standby feature before you begin remote shooting. Basic Functions & Features Contents Things to the Playback mode and switch ...camera from the computer Also useful for this computer], followed by . 4 Click [Start], followed by: [All Programs] or [Programs], [Canon Utilities], [CameraWindow], [RemoteCapture DC3], [RemoteCapture DC]. IMPORTANT • Remote shooting is slightly longer for remote shooting compared with certain camera ...
ZoomBrowser EX 6.0 Software User Guide
Page 42
... timer interval settings range from 2 seconds to Remember Mastering the Basics More Advanced Techniques Appendices Remote Shooting Window Selects the image's recording size and compression. Turns the viewfinder display on the Camera's LCD Monitor You can continue recording without worrying about Memory Card Capacity Clicking the [File] menu in the [Save...
... timer interval settings range from 2 seconds to Remember Mastering the Basics More Advanced Techniques Appendices Remote Shooting Window Selects the image's recording size and compression. Turns the viewfinder display on the Camera's LCD Monitor You can continue recording without worrying about Memory Card Capacity Clicking the [File] menu in the [Save...

PowerShot SD950 IS DIGITAL ELPH / DIGITAL IXUS 960 IS Camera User Guide
Page 14
Getting Started 12 Preparations Setting the Date and Time The Date/Time settings menu will appear the first time the power is turned on. Power Button Button / / / Buttons 1. Press the button. Press the button. 2. Use the or button to set the button. 5. Button 3. Press the or button to ...
Getting Started 12 Preparations Setting the Date and Time The Date/Time settings menu will appear the first time the power is turned on. Power Button Button / / / Buttons 1. Press the button. Press the button. 2. Use the or button to set the button. 5. Button 3. Press the or button to ...


