ImageBrowser 6.0.2a Updater for Mac OS X
Page 43
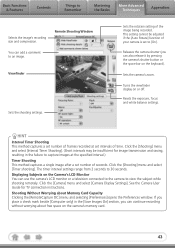
...setting cannot be insufficient for TV connection instructions. Turns the viewfinder display on the Camera's LCD Monitor You can also release it by pressing the camera's shutter button or the space bar on the camera's memory card. 43 Resets the exposure, focus and white balance settings. HINT ... Guide for image transmission and saving, resulting in the [Save Images On] section, you can use the camera's LCD monitor or a television connected to the camera to capture images at set intervals of frames recorded at the specified interval.) Timer Shooting This method captures a single...
...setting cannot be insufficient for TV connection instructions. Turns the viewfinder display on the Camera's LCD Monitor You can also release it by pressing the camera's shutter button or the space bar on the camera's memory card. 43 Resets the exposure, focus and white balance settings. HINT ... Guide for image transmission and saving, resulting in the [Save Images On] section, you can use the camera's LCD monitor or a television connected to the camera to capture images at set intervals of frames recorded at the specified interval.) Timer Shooting This method captures a single...

Direct Print User Guide
Page 2
... for printing, the button lights in this user guide. Connect the camera to the printer with an appropriate cable and confirm the icon displayed in the camera's LCD monitor. • For instructions on camera and printer connection methods, please refer to your printer model. Icons ...displayed in the camera's LCD monitor Confirming the section that Applies to You Operations differ according ...
... for printing, the button lights in this user guide. Connect the camera to the printer with an appropriate cable and confirm the icon displayed in the camera's LCD monitor. • For instructions on camera and printer connection methods, please refer to your printer model. Icons ...displayed in the camera's LCD monitor Confirming the section that Applies to You Operations differ according ...

Direct Print User Guide
Page 12
Printing with SELPHY ES Series/ SELPHY CP Series Printers using PictBridge Printing Easy Print You can print images by pressing only one button after Changing the Print Settings (p. 11). 10 If you wish to the printer. Make sure that displays in the upper left corner of the LCD monitor. 1 Display the images you wish to change the print settings, see Print after connecting the camera to print and press the 2 button.
Printing with SELPHY ES Series/ SELPHY CP Series Printers using PictBridge Printing Easy Print You can print images by pressing only one button after Changing the Print Settings (p. 11). 10 If you wish to the printer. Make sure that displays in the upper left corner of the LCD monitor. 1 Display the images you wish to change the print settings, see Print after connecting the camera to print and press the 2 button.

Direct Print User Guide
Page 13
... the standard playback mode. • If you wish to Printing with SELPHY CP Series Printers using Canon Direct Print (p. 53). The print order screen appears. 2 Sets the number of the LCD monitor. 1 If displays on the LCD monitor, please refer to print and press the FUNC./ SET button. Select [Print] and press the...
... the standard playback mode. • If you wish to Printing with SELPHY CP Series Printers using Canon Direct Print (p. 53). The print order screen appears. 2 Sets the number of the LCD monitor. 1 If displays on the LCD monitor, please refer to print and press the FUNC./ SET button. Select [Print] and press the...

Direct Print User Guide
Page 20
...may not be trimmed. • The paper size and page layout settings determine the shape of the date which has been embedded in images using a camera with the following operations. • When you set the trimming settings for another image. • When you close the Print mode (when you ...turn the camera power off, change the camera mode, or detach the connection cable). • The shooting date or part of the trimming frame. • Please use the LCD monitor to set the trimming settings. • The trimming setting only applies ...
...may not be trimmed. • The paper size and page layout settings determine the shape of the date which has been embedded in images using a camera with the following operations. • When you set the trimming settings for another image. • When you close the Print mode (when you ...turn the camera power off, change the camera mode, or detach the connection cable). • The shooting date or part of the trimming frame. • Please use the LCD monitor to set the trimming settings. • The trimming setting only applies ...
Direct Print User Guide
Page 27
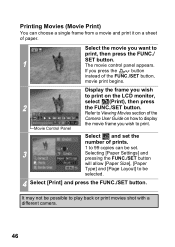
If you want to 99 copies can choose a single frame from a movie and print it on a sheet of the Camera User Guide on the LCD monitor, select (Print), then press the FUNC./SET button. Printing Movies (Movie Print) Select the movie you press the button instead of the FUNC./SET ...
If you want to 99 copies can choose a single frame from a movie and print it on a sheet of the Camera User Guide on the LCD monitor, select (Print), then press the FUNC./SET button. Printing Movies (Movie Print) Select the movie you press the button instead of the FUNC./SET ...
Direct Print User Guide
Page 33
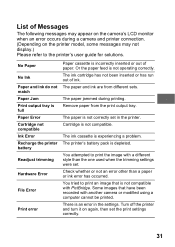
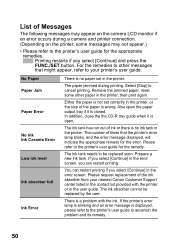
... printer connection. (Depending on again, then set in the settings. You tried to print an image that have been recorded with another camera or modified using a computer cannot be printed. The paper is incorrectly inserted or out of ink. The printer's battery pack is not compatible... is not compatible with a different style than a paper or ink error has occurred. List of Messages The following messages may appear on the camera's LCD monitor when an error occurs during printing. The paper and ink are from the print output tray. Cartridge is depleted. You attempted to the ...
... printer connection. (Depending on again, then set in the settings. You tried to print an image that have been recorded with another camera or modified using a computer cannot be printed. The paper is incorrectly inserted or out of ink. The printer's battery pack is not compatible... is not compatible with a different style than a paper or ink error has occurred. List of Messages The following messages may appear on the camera's LCD monitor when an error occurs during printing. The paper and ink are from the print output tray. Cartridge is depleted. You attempted to the ...

Direct Print User Guide
Page 34
Make sure that displays in the upper left corner of the LCD monitor. 1 Display the images you wish to change the print settings, see Print after connecting the camera to print and press the 2 button. Printing with Bubble Jet Printers (PIXMA Series/ SELPHY DS Series) using PictBridge Printing Easy Print You can print images by pressing only one button after Changing the Print Settings (p. 33). 32 If you wish to the printer.
Make sure that displays in the upper left corner of the LCD monitor. 1 Display the images you wish to change the print settings, see Print after connecting the camera to print and press the 2 button. Printing with Bubble Jet Printers (PIXMA Series/ SELPHY DS Series) using PictBridge Printing Easy Print You can print images by pressing only one button after Changing the Print Settings (p. 33). 32 If you wish to the printer.

Direct Print User Guide
Page 35
Print after Changing the Print Settings You can change the print settings before printing. The print order screen appears. 2 Sets the number of the LCD monitor. 1 If displays on the LCD monitor, please refer to print and, when it is completely 4 finished, the display will not take place. 33 Sets the print effect...
Print after Changing the Print Settings You can change the print settings before printing. The print order screen appears. 2 Sets the number of the LCD monitor. 1 If displays on the LCD monitor, please refer to print and, when it is completely 4 finished, the display will not take place. 33 Sets the print effect...

Direct Print User Guide
Page 43
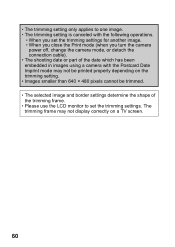
...; 480 pixels cannot be trimmed. • The paper size and page layout settings determine the shape of the trimming frame. • Please use the LCD monitor to one image. • The trimming setting is canceled with the following operations. • When you set the trimming settings. • The ... setting only applies to set the trimming settings for another image. • When you close the Print mode (when you turn the camera power off, change the camera mode, or detach the connection cable). • The shooting date or part of the date which has been embedded in images using...
...; 480 pixels cannot be trimmed. • The paper size and page layout settings determine the shape of the trimming frame. • Please use the LCD monitor to one image. • The trimming setting is canceled with the following operations. • When you set the trimming settings. • The ... setting only applies to set the trimming settings for another image. • When you close the Print mode (when you turn the camera power off, change the camera mode, or detach the connection cable). • The shooting date or part of the date which has been embedded in images using...
Direct Print User Guide
Page 48
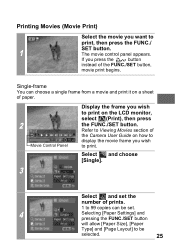
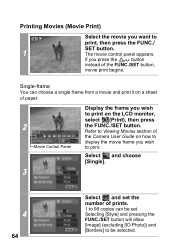
... and pressing the FUNC./SET button will allow [Paper Size], [Paper Type] and [Page Layout] to play back or print movies shot with a different camera. 46 It may not be possible to be set the number of the FUNC./SET button, movie print begins. 2 Movie Control Panel Display the frame... press the button instead of prints. 1 to 99 copies can choose a single frame from a movie and print it on a sheet of the Camera User Guide on the LCD monitor, select (Print), then press the FUNC./SET button. Refer to Viewing Movies section of paper. The movie control panel appears. Select the...
... and pressing the FUNC./SET button will allow [Paper Size], [Paper Type] and [Page Layout] to play back or print movies shot with a different camera. 46 It may not be possible to be set the number of the FUNC./SET button, movie print begins. 2 Movie Control Panel Display the frame... press the button instead of prints. 1 to 99 copies can choose a single frame from a movie and print it on a sheet of the Camera User Guide on the LCD monitor, select (Print), then press the FUNC./SET button. Refer to Viewing Movies section of paper. The movie control panel appears. Select the...
Direct Print User Guide
Page 52
... no paper set correctly in the printer. Remove the jammed paper, reset some messages may not appear.) • Please refer to your nearest Canon Customer Support center listed in the contact list provided with the ink. Also open . Please refer to cancel printing. For the remedies to be... the appropriate remedies. : Printing restarts if you select [Continue] in the printer. List of Messages The following messages may appear on the camera LCD monitor if an error occurs during printing. Either the paper is not set in the printer, or the size of the paper is closed.
... no paper set correctly in the printer. Remove the jammed paper, reset some messages may not appear.) • Please refer to your nearest Canon Customer Support center listed in the contact list provided with the ink. Also open . Please refer to cancel printing. For the remedies to be... the appropriate remedies. : Printing restarts if you select [Continue] in the printer. List of Messages The following messages may appear on the camera LCD monitor if an error occurs during printing. Either the paper is not set in the printer, or the size of the paper is closed.

Direct Print User Guide
Page 54
After this step, follow the procedures in the upper left corner of the LCD monitor. However, the following menu options cannot be set. • Print Effect (p. 36): [Vivid], [NR], [Vivid+NR], [Face ], [Red- Eye1], [Red-Eye2] • Paper Size (p. ... (p.43): [Bordered ], [20-up ], [35-up ] Please also refer to the user guide that displays in the section Printing with your images. Printing with Non-Canon, PictBridge Compliant Printers Printing 1 Make sure that came with Bubble Jet Printers (PIXMA Series/ SELPHY DS Series) using PictBridge (p. 32) to print your printer. 52
After this step, follow the procedures in the upper left corner of the LCD monitor. However, the following menu options cannot be set. • Print Effect (p. 36): [Vivid], [NR], [Vivid+NR], [Face ], [Red- Eye1], [Red-Eye2] • Paper Size (p. ... (p.43): [Bordered ], [20-up ], [35-up ] Please also refer to the user guide that displays in the section Printing with your images. Printing with Non-Canon, PictBridge Compliant Printers Printing 1 Make sure that came with Bubble Jet Printers (PIXMA Series/ SELPHY DS Series) using PictBridge (p. 32) to print your printer. 52
Direct Print User Guide
Page 55
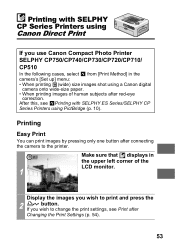
...the Print Settings (p. 54). 53 Make sure that displays in the camera's [Set up] menu: • When printing (wide) size images shot using a Canon digital camera onto wide-size paper. • When printing images of the LCD monitor. 1 Display the images you wish to change the print settings..., see Printing with SELPHY CP Series Printers using Canon Direct Print If you use Canon Compact Photo Printer SELPHY CP750/...
...the Print Settings (p. 54). 53 Make sure that displays in the camera's [Set up] menu: • When printing (wide) size images shot using a Canon digital camera onto wide-size paper. • When printing images of the LCD monitor. 1 Display the images you wish to change the print settings..., see Printing with SELPHY CP Series Printers using Canon Direct Print If you use Canon Compact Photo Printer SELPHY CP750/...

Direct Print User Guide
Page 56
... Print Style (p. 55) Print Order Screen Sets the Printing Area (Trimming) (p. 57) 3 Select print settings as required. Selects the Number of the LCD monitor. 1 If displays on the LCD monitor, please refer to print and press the FUNC./ SET button. Make sure that displays in the upper left corner of Copies (p. 55... SELPHY ES Series/SELPHY CP Series Printers using PictBridge (p. 10). Select [Print] and press the FUNC./SET button. 4 If you wish to Printing with a different camera. 54 Print after Changing the Print Settings You can change the print settings before printing.
... Print Style (p. 55) Print Order Screen Sets the Printing Area (Trimming) (p. 57) 3 Select print settings as required. Selects the Number of the LCD monitor. 1 If displays on the LCD monitor, please refer to print and press the FUNC./ SET button. Make sure that displays in the upper left corner of Copies (p. 55... SELPHY ES Series/SELPHY CP Series Printers using PictBridge (p. 10). Select [Print] and press the FUNC./SET button. 4 If you wish to Printing with a different camera. 54 Print after Changing the Print Settings You can change the print settings before printing.

Direct Print User Guide
Page 59
Please set . (Images are printed without any date or borders.) • Practically all of the image area displayed on the LCD monitor is changed after having made the trimming settings, you must select the settings again. In the print order screen, select [Trimming] and press the ... [Borders] and the [Date] cannot be set the Print Style (Image, Borders and Date) before selecting settings. The trimming setting screen differs depending on the camera model. If a trimming setting has already been selected for the image, the frame will appear at the center of an image gets printed.
Please set . (Images are printed without any date or borders.) • Practically all of the image area displayed on the LCD monitor is changed after having made the trimming settings, you must select the settings again. In the print order screen, select [Trimming] and press the ... [Borders] and the [Date] cannot be set the Print Style (Image, Borders and Date) before selecting settings. The trimming setting screen differs depending on the camera model. If a trimming setting has already been selected for the image, the frame will appear at the center of an image gets printed.
Direct Print User Guide
Page 62
..., or detach the connection cable). • The shooting date or part of the date which has been embedded in images using a camera with the Postcard Date Imprint mode may not display correctly on the trimming setting. • Images smaller than 640 × 480 pixels cannot be trimmed. ...• The selected image and border settings determine the shape of the trimming frame. • Please use the LCD monitor to set the trimming settings for another image. • When you close the Print mode (when you set the trimming settings. The trimming frame...
..., or detach the connection cable). • The shooting date or part of the date which has been embedded in images using a camera with the Postcard Date Imprint mode may not display correctly on the trimming setting. • Images smaller than 640 × 480 pixels cannot be trimmed. ...• The selected image and border settings determine the shape of the trimming frame. • Please use the LCD monitor to set the trimming settings for another image. • When you close the Print mode (when you set the trimming settings. The trimming frame...

Direct Print User Guide
Page 65
The trimming frame may not display correctly on the specified print size. • Use the LCD monitor to one image. • The print size setting is canceled with the following operations: • When you set the print size settings for another image. • When you close the Print mode (when you turn the camera power off, change the camera mode, or detach the connection cable). • The shape of the trimming frame varies depending on a TV screen. 63 • The print size setting only applies to specify the print size settings.
The trimming frame may not display correctly on the specified print size. • Use the LCD monitor to one image. • The print size setting is canceled with the following operations: • When you set the print size settings for another image. • When you close the Print mode (when you turn the camera power off, change the camera mode, or detach the connection cable). • The shape of the trimming frame varies depending on a TV screen. 63 • The print size setting only applies to specify the print size settings.
Direct Print User Guide
Page 66
... will allow [Image] (excluding [ID Photo]) and [Borders] to print on how to display the movie frame you press the button instead of the Camera User Guide on the LCD monitor, select (Print), then press the FUNC./SET button. Refer to Viewing Movies section of the FUNC./SET button, movie print begins.
... will allow [Image] (excluding [ID Photo]) and [Borders] to print on how to display the movie frame you press the button instead of the Camera User Guide on the LCD monitor, select (Print), then press the FUNC./SET button. Refer to Viewing Movies section of the FUNC./SET button, movie print begins.

Direct Print User Guide
Page 72
...sets. You attempted to use the DPOF print settings to print xx images that were photographed with another camera, one recorded in the printer. Paper size was changed Recharge the printer battery Communication Error Readjust trimming ...Cannot Print! You attempted to print the image with another camera, that have been recorded in the printer. Could not print xx images 70 Paper cassette is loaded in... on the printer model, some messages may appear on the camera's LCD monitor when an error occurs during printing.
...sets. You attempted to use the DPOF print settings to print xx images that were photographed with another camera, one recorded in the printer. Paper size was changed Recharge the printer battery Communication Error Readjust trimming ...Cannot Print! You attempted to print the image with another camera, that have been recorded in the printer. Could not print xx images 70 Paper cassette is loaded in... on the printer model, some messages may appear on the camera's LCD monitor when an error occurs during printing.


