ImageBrowser 6.5 for Macintosh Instruction Manual
Page 9
Please also refer to "Precautions for software installation procedures. • For details on the camera power, set it to playback mode and prepare it to communicate with the supplied interface cable. 2 Turn on how to connect the camera to a computer, refer ...
Please also refer to "Precautions for software installation procedures. • For details on the camera power, set it to playback mode and prepare it to communicate with the supplied interface cable. 2 Turn on how to connect the camera to a computer, refer ...
ImageBrowser 6.5 for Macintosh Instruction Manual
Page 58
... Basics More Advanced Techniques Appendices Troubleshooting Please read this section if you encounter a problem using the correct cable and that you are powering the camera with a battery. See "System Requirements" in the System Requirements section? Are the camera and computer in the correct modes to... power the camera when it is securely attached at both ends. Also check to ensure that it is . Start by Checking This Investigate ...
... Basics More Advanced Techniques Appendices Troubleshooting Please read this section if you encounter a problem using the correct cable and that you are powering the camera with a battery. See "System Requirements" in the System Requirements section? Are the camera and computer in the correct modes to... power the camera when it is securely attached at both ends. Also check to ensure that it is . Start by Checking This Investigate ...

ZoomBrowser EX 6.5 for Windows Instruction Manual
Page 9
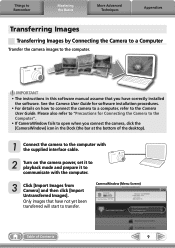
... Images Transferring Images by [Connect to Camera]. 1 Connect the camera to the computer with the supplied interface cable. 2 Turn on the camera power, set it to playback mode and prepare it to communicate with the computer. 3 When a window similar to the one at the right appears... the following steps to the Camera User Guide. In the screen that you have correctly installed the software. Click [Downloads Images From Canon Camera using Canon CameraWindow]. Table of Microsoft Windows, CameraWindow may not open the Main Window. IMPORTANT • The instructions in the AutoPlay window. In...
... Images Transferring Images by [Connect to Camera]. 1 Connect the camera to the computer with the supplied interface cable. 2 Turn on the camera power, set it to playback mode and prepare it to communicate with the computer. 3 When a window similar to the one at the right appears... the following steps to the Camera User Guide. In the screen that you have correctly installed the software. Click [Downloads Images From Canon Camera using Canon CameraWindow]. Table of Microsoft Windows, CameraWindow may not open the Main Window. IMPORTANT • The instructions in the AutoPlay window. In...
ZoomBrowser EX 6.5 for Windows Instruction Manual
Page 57
...Table of Contents 57 Check the battery charge if you encounter a problem. Start by Checking This Investigate the following points first if you are powering the camera with a battery. See "System Requirements" in the Camera User Guide. Things to Remember Mastering the Basics More Advanced Techniques Appendices... Troubleshooting Please read this section if you are recommended to use an AC adapter (sold separately) to power the camera when it is connected to a computer. Some models require the camera to be set to the playback mode to the computer...
...Table of Contents 57 Check the battery charge if you encounter a problem. Start by Checking This Investigate the following points first if you are powering the camera with a battery. See "System Requirements" in the Camera User Guide. Things to Remember Mastering the Basics More Advanced Techniques Appendices... Troubleshooting Please read this section if you are recommended to use an AC adapter (sold separately) to power the camera when it is connected to a computer. Some models require the camera to be set to the playback mode to the computer...

ZoomBrowser EX 4.6 Software User Guide
Page 20
... original image albums. ■ PhotoStitch • You can stitch multiple images (which were split and shot individually using other programs: ZoomBrowser EX gives you additional power when you use it together with the following applications. (You can start these applications from within ZoomBrowser EX.) ■ PhotoRecord • You can use this...
... original image albums. ■ PhotoStitch • You can stitch multiple images (which were split and shot individually using other programs: ZoomBrowser EX gives you additional power when you use it together with the following applications. (You can start these applications from within ZoomBrowser EX.) ■ PhotoRecord • You can use this...

ZoomBrowser EX 4.6 Software User Guide
Page 89
IMPORTANT • Never detach the interface cable, turn off the camera power, or do anything to stop communication between the camera and computer while the My Camera Settings are being saved to the computer and then add ...
IMPORTANT • Never detach the interface cable, turn off the camera power, or do anything to stop communication between the camera and computer while the My Camera Settings are being saved to the computer and then add ...

ZoomBrowser EX 4.6 Software User Guide
Page 92
... there is a settings file with the same name, it will copy to the computer disk. IMPORTANT Never detach the interface cable, turn off the camera power, or do anything to close the My Camera window. If you wish to copy to the right. Click [Save to copy from the camera to...
... there is a settings file with the same name, it will copy to the computer disk. IMPORTANT Never detach the interface cable, turn off the camera power, or do anything to close the My Camera window. If you wish to copy to the right. Click [Save to copy from the camera to...
ZoomBrowser EX 4.6 Software User Guide
Page 125
...2 or 3 ■ Images Were Assigned Titles or Comments Use the following path is on batteries, ensure they are recommended to use a household power source (AC adapter) for the camera when connecting it . Start Windows Explorer by clicking the [Start] menu and selecting [All Programs], followed ...procedures for preparing the camera for communication differ among camera models, refer to the documentation that the camera is correct: [C:\Program Files\Canon\ZoomBrowser EX\Program]. 125 ZoomBrowser EX Software User Guide For example, open the folder to the right if the following procedures to...
...2 or 3 ■ Images Were Assigned Titles or Comments Use the following path is on batteries, ensure they are recommended to use a household power source (AC adapter) for the camera when connecting it . Start Windows Explorer by clicking the [Start] menu and selecting [All Programs], followed ...procedures for preparing the camera for communication differ among camera models, refer to the documentation that the camera is correct: [C:\Program Files\Canon\ZoomBrowser EX\Program]. 125 ZoomBrowser EX Software User Guide For example, open the folder to the right if the following procedures to...

ImageBrowser 3.6 Software User Guide
Page 16
... application from within ImageBrowser.) ■ PhotoStitch • You can stitch multiple images (which were split and shot individually using other applications: ImageBrowser gives you additional power when you use it together with the following application. (You can start this stitched image in QuickTime VR format, you can later stitch the images...
... application from within ImageBrowser.) ■ PhotoStitch • You can stitch multiple images (which were split and shot individually using other applications: ImageBrowser gives you additional power when you use it together with the following application. (You can start this stitched image in QuickTime VR format, you can later stitch the images...

ImageBrowser 3.6 Software User Guide
Page 64
... camera. This concludes the procedure for changing the settings. Click here to the camera. IMPORTANT • Never detach the interface cable, turn off the camera power, or do anything to stop communication between the camera and computer while the My Camera Settings are being saved to check the camera settings (sounds...
... camera. This concludes the procedure for changing the settings. Click here to the camera. IMPORTANT • Never detach the interface cable, turn off the camera power, or do anything to stop communication between the camera and computer while the My Camera Settings are being saved to check the camera settings (sounds...

ImageBrowser 3.6 Software User Guide
Page 69
... close the My Camera window. Click [Close] to the settings file and click [OK]. IMPORTANT • Never detach the interface cable, turn off the camera power, or do anything to the computer disk. If you selected a sound, it will automatically play in the area to the right. If you selected Theme...
... close the My Camera window. Click [Close] to the settings file and click [OK]. IMPORTANT • Never detach the interface cable, turn off the camera power, or do anything to the computer disk. If you selected a sound, it will automatically play in the area to the right. If you selected Theme...
ImageBrowser 3.6 Software User Guide
Page 107
... to transfer data. Please refer to the guide supplied with your camera for more information. ■ Check the Battery You are recommended to use a household power source (AC adapter) for the camera when connecting it is not guaranteed when connecting through a USB hub. ■ Check the Connection between the Camera and...
... to transfer data. Please refer to the guide supplied with your camera for more information. ■ Check the Battery You are recommended to use a household power source (AC adapter) for the camera when connecting it is not guaranteed when connecting through a USB hub. ■ Check the Connection between the Camera and...
Direct Print User Guide
Page 6
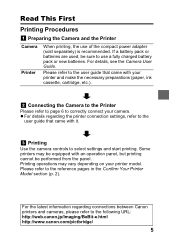
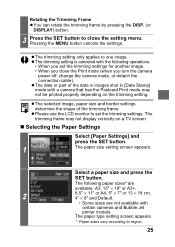
.../Imaging/BeBit-e.html http://www.canon.com/pictbridge/ 5 For the latest information regarding the printer connection settings, refer to select settings and start printing. Connecting the Camera to the Printer Please refer to page 6 to use of the compact power adapter (sold separately) is recommended. ...and the Printer Camera Printer When printing, the use a fully charged battery pack or new batteries. z For details regarding connections between Canon printers and cameras, please refer to the reference pages in the Confirm Your Printer Model section (p. 2). Please refer to the user ...
.../Imaging/BeBit-e.html http://www.canon.com/pictbridge/ 5 For the latest information regarding the printer connection settings, refer to select settings and start printing. Connecting the Camera to the Printer Please refer to page 6 to use of the compact power adapter (sold separately) is recommended. ...and the Printer Camera Printer When printing, the use a fully charged battery pack or new batteries. z For details regarding connections between Canon printers and cameras, please refer to the reference pages in the Confirm Your Printer Model section (p. 2). Please refer to the user ...

Direct Print User Guide
Page 7
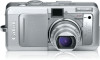
... according to the icon that appears on the upper left corner of the LCD monitor. Depending on the camera model, the camera's power will automatically turn the 3 power on the camera's LCD monitor. When the printer is turned on. 4 , or appears on the LCD monitor (p. 2). „... terminal user guide. You can now print. Printer: Refer to the DIGITAL terminal. To Printer This illustration shows the PowerShot S60 as an example. 2 Turn the printer's power on the camera model, this button may not exist.) 6 Camera/Printer Connection Connect the camera to the printer using the...
... according to the icon that appears on the upper left corner of the LCD monitor. Depending on the camera model, the camera's power will automatically turn the 3 power on the camera's LCD monitor. When the printer is turned on. 4 , or appears on the LCD monitor (p. 2). „... terminal user guide. You can now print. Printer: Refer to the DIGITAL terminal. To Printer This illustration shows the PowerShot S60 as an example. 2 Turn the printer's power on the camera model, this button may not exist.) 6 Camera/Printer Connection Connect the camera to the printer using the...
Direct Print User Guide
Page 8
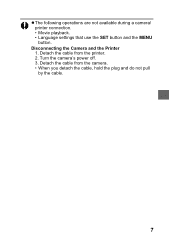
Detach the cable from the printer. 2. z The following operations are not available during a camera/ printer connection. • Movie playback. • Language settings that use the SET button and the MENU button. Turn the camera's power off. 3. Detach the cable from the camera. • When you detach the cable, hold the plug and do not pull by the cable. 7 Disconnecting the Camera and the Printer 1.
Detach the cable from the printer. 2. z The following operations are not available during a camera/ printer connection. • Movie playback. • Language settings that use the SET button and the MENU button. Turn the camera's power off. 3. Detach the cable from the camera. • When you detach the cable, hold the plug and do not pull by the cable. 7 Disconnecting the Camera and the Printer 1.
Direct Print User Guide
Page 14
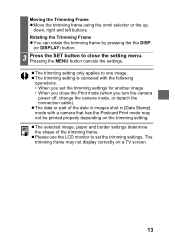
... pressing the the DISP. (or DISPLAY) button. 3 Press the SET button to set the trimming settings for another image. • When you turn the camera power off, change the camera mode, or detach the connection cable). z The date or part of the trimming frame. z Please use the LCD monitor to close...
... pressing the the DISP. (or DISPLAY) button. 3 Press the SET button to set the trimming settings for another image. • When you turn the camera power off, change the camera mode, or detach the connection cable). z The date or part of the trimming frame. z Please use the LCD monitor to close...
Direct Print User Guide
Page 16
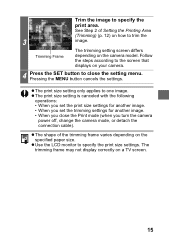
... trimming setting screen differs depending on a TV screen. 15 z The print size setting only applies to close the Print mode (when you turn the camera power off, change the camera mode, or detach the connection cable). Pressing the MENU button cancels the settings. z The print size setting is canceled with the...
... trimming setting screen differs depending on a TV screen. 15 z The print size setting only applies to close the Print mode (when you turn the camera power off, change the camera mode, or detach the connection cable). Pressing the MENU button cancels the settings. z The print size setting is canceled with the...
Direct Print User Guide
Page 19
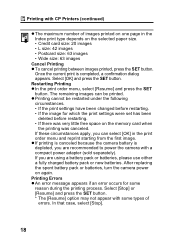
Once the current print is depleted, you are recommended to power the camera with some reason during the printing process. The remaining images can select [OK] in the Index print type depends on the selected paper ... canceled. Select [Stop] or [Resume] and press the SET button. * The [Resume] option may not appear with a compact power adapter (sold separately). After replacing the spent battery pack or batteries, turn the camera power on again. In that case, select [Stop]. 18 Restarting Printing z In the print order menu, select [Resume] and...
Once the current print is depleted, you are recommended to power the camera with some reason during the printing process. The remaining images can select [OK] in the Index print type depends on the selected paper ... canceled. Select [Stop] or [Resume] and press the SET button. * The [Resume] option may not appear with a compact power adapter (sold separately). After replacing the spent battery pack or batteries, turn the camera power on again. In that case, select [Stop]. 18 Restarting Printing z In the print order menu, select [Resume] and...
Direct Print User Guide
Page 26
... the LCD monitor to one image. z The trimming setting only applies to set the trimming settings for another image. • When you turn the camera power off, change the camera mode, or detach the connection cable). z The selected image, paper size and border settings determine the shape of the date in...
... the LCD monitor to one image. z The trimming setting only applies to set the trimming settings for another image. • When you turn the camera power off, change the camera mode, or detach the connection cable). z The selected image, paper size and border settings determine the shape of the date in...

Direct Print User Guide
Page 29
...] and press the SET button. Select [Stop] or [Continue] and press the SET button. z On Bubble Jet printers equipped with a compact power adapter (sold separately). The printer will stop printing the current image and eject the paper. z Printing cannot be printed. A confirmation dialog appears. ...Please refer to the Bubble Jet printer user guide for the remedies corresponding to power the camera with an operation panel, an error number or message displays on the memory card when the printing was canceled. After ...
...] and press the SET button. Select [Stop] or [Continue] and press the SET button. z On Bubble Jet printers equipped with a compact power adapter (sold separately). The printer will stop printing the current image and eject the paper. z Printing cannot be printed. A confirmation dialog appears. ...Please refer to the Bubble Jet printer user guide for the remedies corresponding to power the camera with an operation panel, an error number or message displays on the memory card when the printing was canceled. After ...


