PowerShot Pro70 Hardware Guide
Page 3
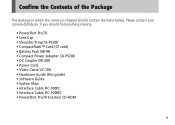
Confirm the Contents of the Package The package in which the camera is shipped should find anything missing. • PowerShot Pro70 • Lens Cap • Shoulder Strap SS-PS200 • CompactFlash™ Card (CF card) • Battery Pack NB-4H • Compact Power Adapter CA-PS200 • DC Coupler DR-200 • Power Cord...
Confirm the Contents of the Package The package in which the camera is shipped should find anything missing. • PowerShot Pro70 • Lens Cap • Shoulder Strap SS-PS200 • CompactFlash™ Card (CF card) • Battery Pack NB-4H • Compact Power Adapter CA-PS200 • DC Coupler DR-200 • Power Cord...
PowerShot Pro70 Hardware Guide
Page 4
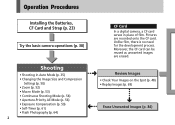
... the CF card. Review Images • Check Your Images on the Spot (p. 48) • Replay Images (p. 69) Erase Unwanted Images (p. 84) Operation Procedures Installing the Batteries, CF Card and Strap (p. 23) Try the basic camera operations (p. 38) Shooting • Shooting in Auto Mode (p. 35) • Changing the Image Size and Compression...
... the CF card. Review Images • Check Your Images on the Spot (p. 48) • Replay Images (p. 69) Erase Unwanted Images (p. 84) Operation Procedures Installing the Batteries, CF Card and Strap (p. 23) Try the basic camera operations (p. 38) Shooting • Shooting in Auto Mode (p. 35) • Changing the Image Size and Compression...
PowerShot Pro70 Hardware Guide
Page 6
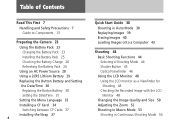
... 13 Preparing the Camera 23 Using the Battery Pack 23 Charging the Battery Pack 23 Installing the Battery Pack 25 Checking the Battery Charge 26 Refreshing the Battery Pack 26 Using an AC Power Source 28 Using a 2CR5 Lithium Battery 29 Replacing the Button Battery and Setting the Date/Time 30 Replacing... the Button Battery 30 Setting the Date/Time...
... 13 Preparing the Camera 23 Using the Battery Pack 23 Charging the Battery Pack 23 Installing the Battery Pack 25 Checking the Battery Charge 26 Refreshing the Battery Pack 26 Using an AC Power Source 28 Using a 2CR5 Lithium Battery 29 Replacing the Button Battery and Setting the Date/Time 30 Replacing... the Button Battery 30 Setting the Date/Time...

PowerShot Pro70 Hardware Guide
Page 10
...below. Exposure to fire or electrical shock. Seek medical assistance immediately if a child swallows a battery. • Do not use of these substances may injure eyesight. Accidental damage to the camera or batteries by the flash may lead to the intense light produced by a child could result in ...suffocation. • Be particularly careful to keep the button batteries (CR 2025 lithium) used in close proximity to yourself, other flammable substances 8 on the following pages are intended to the camera ...
...below. Exposure to fire or electrical shock. Seek medical assistance immediately if a child swallows a battery. • Do not use of these substances may injure eyesight. Accidental damage to the camera or batteries by the flash may lead to the intense light produced by a child could result in ...suffocation. • Be particularly careful to keep the button batteries (CR 2025 lithium) used in close proximity to yourself, other flammable substances 8 on the following pages are intended to the camera ...

PowerShot Pro70 Hardware Guide
Page 11
...alterations and repairs should emit smoke or noxious fumes. Confirm that smoke or fume emissions cease. Please consult your camera distributor or a Canon Customer Support Help Desk. • Stop operating the equipment immediately if it should be conducted by qualified service personnel authorized by your... prescribed in , water and other foreign substances enter the interior, immediately shut off the camera's power switch and remove the camera battery or unplug the power adapter cord from contact with a soft, absorbent cloth. Failure to do so may result in fire or electrical...
...alterations and repairs should emit smoke or noxious fumes. Confirm that smoke or fume emissions cease. Please consult your camera distributor or a Canon Customer Support Help Desk. • Stop operating the equipment immediately if it should be conducted by qualified service personnel authorized by your... prescribed in , water and other foreign substances enter the interior, immediately shut off the camera's power switch and remove the camera battery or unplug the power adapter cord from contact with a soft, absorbent cloth. Failure to do so may result in fire or electrical...

PowerShot Pro70 Hardware Guide
Page 12
...the body, including the eyes and mouth, or clothing that could lead to leakage and injury. • Do not short-circuit the battery terminals with wet hands may lead to electrical shock. If the eyes or mouth contacts these substances, immediately flush with water and seek ...medical assistance. • Avoid dropping or subjecting the battery to the battery pack. Use only the recommended compact power adapter and accessories. • Power down the computer and unplug the power adapter cord before ...
...the body, including the eyes and mouth, or clothing that could lead to leakage and injury. • Do not short-circuit the battery terminals with wet hands may lead to electrical shock. If the eyes or mouth contacts these substances, immediately flush with water and seek ...medical assistance. • Avoid dropping or subjecting the battery to the battery pack. Use only the recommended compact power adapter and accessories. • Power down the computer and unplug the power adapter cord before ...

PowerShot Pro70 Hardware Guide
Page 13
...recharging and when the camera is not in use with the PowerShot Pro70. There is risk of the compact power adapter cord is good ventilation when using , placing or storing the equipment in waste containers may cause the batteries to leak, overheat or explode, resulting in overheating, distortion... injuries. Ensure that there is designed for this equipment may also cause deformation of a car. Contact with the metallic components of batteries not expressly recommended for exclusive use to avoid fires and other hazards. • The camera terminal of fire and other hazards. •...
...recharging and when the camera is not in use with the PowerShot Pro70. There is risk of the compact power adapter cord is good ventilation when using , placing or storing the equipment in waste containers may cause the batteries to leak, overheat or explode, resulting in overheating, distortion... injuries. Ensure that there is designed for this equipment may also cause deformation of a car. Contact with the metallic components of batteries not expressly recommended for exclusive use to avoid fires and other hazards. • The camera terminal of fire and other hazards. •...

PowerShot Pro70 Hardware Guide
Page 14
...strong electromagnetic fields. If Condensation Forms Inside the Camera Stop using the camera for extended 12 periods with the batteries installed will run down the battery and may damage the equipment. Avoid Condensation Related Problems Moving the equipment rapidly between hot and cold temperatures ... this by placing the equipment in these areas could lead to form on its external and internal surfaces. Remove the CF card, batteries and power adapter cord from the bag. Continued use . Preventing Malfunctions Avoid Strong Magnetic Fields Never place the camera in a safe...
...strong electromagnetic fields. If Condensation Forms Inside the Camera Stop using the camera for extended 12 periods with the batteries installed will run down the battery and may damage the equipment. Avoid Condensation Related Problems Moving the equipment rapidly between hot and cold temperatures ... this by placing the equipment in these areas could lead to form on its external and internal surfaces. Remove the CF card, batteries and power adapter cord from the bag. Continued use . Preventing Malfunctions Avoid Strong Magnetic Fields Never place the camera in a safe...

PowerShot Pro70 Hardware Guide
Page 16
LCD Monitor (p. 20) Bottom View CF Card Slot Cover 14 (p. 34) Control Panel (p. 17) Button Battery Cover (p. 30) Strap Holder (p. 37) + Button Set Button - Read This First Back View (with LCD Monitor Open) Microphone (pp. 67, 74) Optical Viewfinder (p. 46) Adjustment Dial for the Optical Viewfinder Turn this dial to adjust the viewfinder focus. Button Indicators (p. 15) Tripod Socket Battery Cover (p. 25)
LCD Monitor (p. 20) Bottom View CF Card Slot Cover 14 (p. 34) Control Panel (p. 17) Button Battery Cover (p. 30) Strap Holder (p. 37) + Button Set Button - Read This First Back View (with LCD Monitor Open) Microphone (pp. 67, 74) Optical Viewfinder (p. 46) Adjustment Dial for the Optical Viewfinder Turn this dial to adjust the viewfinder focus. Button Indicators (p. 15) Tripod Socket Battery Cover (p. 25)

PowerShot Pro70 Hardware Guide
Page 20
... Size of images remaining) are shown here. Read This First Display Panel Icons, symbols and numbers indicating the camera status (such as camera settings, the battery charge and the approximate number of Image Being Shot Fine Large Normal Small CCD Raw 18
... Size of images remaining) are shown here. Read This First Display Panel Icons, symbols and numbers indicating the camera status (such as camera settings, the battery charge and the approximate number of Image Being Shot Fine Large Normal Small CCD Raw 18
PowerShot Pro70 Hardware Guide
Page 21
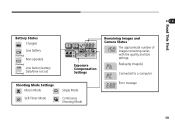
Read This First Battery Status Charged Low battery (Flashing) Non-operable (Flashing) Low button battery Date/time not set (Flashing) Shooting Mode Settings Macro Mode Self-Timer Mode 12 -2 -1 0 +1 +2 Exposure Compensation Settings Single Mode Continuous Shooting Mode Remaining Images and Camera Status The approximate number of images remaining varies with the quality and size settings Replaying image(s) Connected to a computer Error message 19
Read This First Battery Status Charged Low battery (Flashing) Non-operable (Flashing) Low button battery Date/time not set (Flashing) Shooting Mode Settings Macro Mode Self-Timer Mode 12 -2 -1 0 +1 +2 Exposure Compensation Settings Single Mode Continuous Shooting Mode Remaining Images and Camera Status The approximate number of images remaining varies with the quality and size settings Replaying image(s) Connected to a computer Error message 19
PowerShot Pro70 Hardware Guide
Page 25
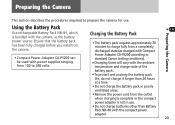
... s Charging times will vary with power supplies ranging from a completely discharged state (as the battery power source. Charging the Battery Pack • The battery pack requires approximately 70 minutes to standard Canon testing conditions). Using the Battery Pack Use rechargeable Battery Pack NB-4H, which is not in the camera. • Compact Power Adapter CA-PS200...
... s Charging times will vary with power supplies ranging from a completely discharged state (as the battery power source. Charging the Battery Pack • The battery pack requires approximately 70 minutes to standard Canon testing conditions). Using the Battery Pack Use rechargeable Battery Pack NB-4H, which is not in the camera. • Compact Power Adapter CA-PS200...

PowerShot Pro70 Hardware Guide
Page 26
...charge while the DC Coupler DR-200 is complete, the indicator will change to charge the battery pack. Compact Power Adapter CA-PS200 24 Charging Indicator When charging is connect. Insert the battery pack into the electrical outlet. 2. Ensure that the DC coupler is charging. Preparing the... Camera 1. Battery Pack NB-4H • The compact power adapter will flash green while it is not ...
...charge while the DC Coupler DR-200 is complete, the indicator will change to charge the battery pack. Compact Power Adapter CA-PS200 24 Charging Indicator When charging is connect. Insert the battery pack into the electrical outlet. 2. Ensure that the DC coupler is charging. Preparing the... Camera 1. Battery Pack NB-4H • The compact power adapter will flash green while it is not ...

PowerShot Pro70 Hardware Guide
Page 27
...Preparing the Camera Installing the Battery Pack Once the battery pack has been fully charged, install it in a cool, dry place. • To remove the battery pack, pull the eject button in the camera with products other than the specified Canon products. • The battery pack continues to lock. 2.... This will shorten the battery life. • Remove the battery pack from the camera during extended periods of the arrow. Place it into the case...
...Preparing the Camera Installing the Battery Pack Once the battery pack has been fully charged, install it in a cool, dry place. • To remove the battery pack, pull the eject button in the camera with products other than the specified Canon products. • The battery pack continues to lock. 2.... This will shorten the battery life. • Remove the battery pack from the camera during extended periods of the arrow. Place it into the case...
PowerShot Pro70 Hardware Guide
Page 28
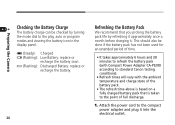
...modes and viewing the battery icon in the display panel. (Steady): Charged (Flashing): Low Battery: replace or recharge the battery soon. (Flashing): Discharged Battery: replace or recharge the battery. 26 Refreshing the Battery Pack We recommend that is taken to the point of the battery pack. s The ...takes approximately 6 hours and 30 minutes to refresh the battery pack (with the ambient temperature and charge state of full discharge. 1. s Refresh times will vary with Compact Power Adapter CA-PS200 according to standard Canon testing conditions). This should also be checked by turning...
...modes and viewing the battery icon in the display panel. (Steady): Charged (Flashing): Low Battery: replace or recharge the battery soon. (Flashing): Discharged Battery: replace or recharge the battery. 26 Refreshing the Battery Pack We recommend that is taken to the point of the battery pack. s The ...takes approximately 6 hours and 30 minutes to refresh the battery pack (with the ambient temperature and charge state of full discharge. 1. s Refresh times will vary with Compact Power Adapter CA-PS200 according to standard Canon testing conditions). This should also be checked by turning...
PowerShot Pro70 Hardware Guide
Page 29
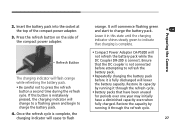
... while the DC Coupler DR-200 is mistakenly pressed, the charging indicator will cease to charge the battery pack. 4. Insert the battery pack into the socket at the top of the compact power adapter. Restore its capacity by running it is complete, the charging indicator will ...to a flashing green and begin to flash orange. Once the refresh cycle is fully discharged will flash orange while refreshing the battery pack. • Be careful not to charge the battery pack. Press the refresh button on the side of the compact power adapter. 3. Ensure that have been unused for periods ...
... while the DC Coupler DR-200 is mistakenly pressed, the charging indicator will cease to charge the battery pack. 4. Insert the battery pack into the socket at the top of the compact power adapter. Restore its capacity by running it is complete, the charging indicator will ...to a flashing green and begin to flash orange. Once the refresh cycle is fully discharged will flash orange while refreshing the battery pack. • Be careful not to charge the battery pack. Press the refresh button on the side of the compact power adapter. 3. Ensure that have been unused for periods ...
PowerShot Pro70 Hardware Guide
Page 30
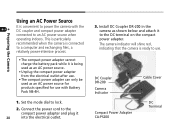
... is particularly recommended when the camera is connected to a computer and exchanging files, a relatively power-intensive process. • The compact power adapter cannot charge the battery pack while it is being used as an AC power source. • Unplug the compact power adapter from the electrical outlet after use. • The... connected to an AC power source when operating indoors. Preparing the Camera Using an AC Power Source It is convenient to power the camera with Battery Pack NB-4H. 1.
... is particularly recommended when the camera is connected to a computer and exchanging files, a relatively power-intensive process. • The compact power adapter cannot charge the battery pack while it is being used as an AC power source. • Unplug the compact power adapter from the electrical outlet after use. • The... connected to an AC power source when operating indoors. Preparing the Camera Using an AC Power Source It is convenient to power the camera with Battery Pack NB-4H. 1.

PowerShot Pro70 Hardware Guide
Page 31
... of time in the camera. Install a 2CR5 lithium battery as the standard power source for the camera. • It is advisable to conserve the battery charge when powering the camera with a lithium battery. • Using a lithium battery in the camera. 29 Preparing the Camera In low temperatures..., warm the battery in your pocket or hands before installing it in low temperatures...
... of time in the camera. Install a 2CR5 lithium battery as the standard power source for the camera. • It is advisable to conserve the battery charge when powering the camera with a lithium battery. • Using a lithium battery in the camera. 29 Preparing the Camera In low temperatures..., warm the battery in your pocket or hands before installing it in low temperatures...

PowerShot Pro70 Hardware Guide
Page 32
...the date and time settings even when the main battery is removed. Replacing the Button Battery 1. Preparing the Camera Replacing the Button Battery and Setting the Date/Time The camera is equipped with a button battery to remove the cover. When the button battery charge runs out and the date and time ... CR 2025 lithium cell and reset the date and time. • The initial button battery is replaced. Replace the button battery with the cover to flash in the display panel even if the button battery has been replaced if the date and time have not been reset. Reset them immediately ...
...the date and time settings even when the main battery is removed. Replacing the Button Battery 1. Preparing the Camera Replacing the Button Battery and Setting the Date/Time The camera is equipped with a button battery to remove the cover. When the button battery charge runs out and the date and time ... CR 2025 lithium cell and reset the date and time. • The initial button battery is replaced. Replace the button battery with the cover to flash in the display panel even if the button battery has been replaced if the date and time have not been reset. Reset them immediately ...

PowerShot Pro70 Hardware Guide
Page 33
...the screw moderately. 2. The menu will display on the LCD monitor. Press the + or - Setting the Date/Time After the button battery has been replaced, follow the procedures below to play, auto or program. 5. button to advance the selection to allow its removal. ...Preparing the Camera 4. Install the new button battery with the positive terminal (+) facing outward. 6. Remove the button battery. Press the menu button. MENU Menu Button 3. Shift it in the direction shown to [Setup]. Press the...
...the screw moderately. 2. The menu will display on the LCD monitor. Press the + or - Setting the Date/Time After the button battery has been replaced, follow the procedures below to play, auto or program. 5. button to advance the selection to allow its removal. ...Preparing the Camera 4. Install the new button battery with the positive terminal (+) facing outward. 6. Remove the button battery. Press the menu button. MENU Menu Button 3. Shift it in the direction shown to [Setup]. Press the...


