
PowerShot G10 Camera User Guide
Page 20
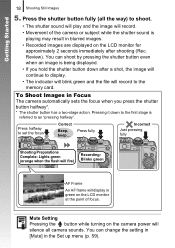
... to display. • The indicator will blink green and the file will display in the Set up menu (p. 59). Press the shutter button fully (all camera sounds. Pressing it down after shooting (Rec. Getting Started 18 Shooting Still Images 5. To Shoot Images in Focus The... displayed. • If you press the shutter button halfway*. * The shutter button has a two-stage action. Review). You can change the setting in [Mute] in green on the LCD monitor at the point of the camera or subject while the shutter sound is playing may result in blurred images. • Recorded images...
... to display. • The indicator will blink green and the file will display in the Set up menu (p. 59). Press the shutter button fully (all camera sounds. Pressing it down after shooting (Rec. Getting Started 18 Shooting Still Images 5. To Shoot Images in Focus The... displayed. • If you press the shutter button halfway*. * The shutter button has a two-stage action. Review). You can change the setting in [Mute] in green on the LCD monitor at the point of the camera or subject while the shutter sound is playing may result in blurred images. • Recorded images...
PowerShot G10 Camera User Guide
Page 54
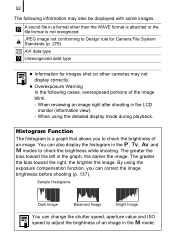
...the brightness while shooting. AVI data type Unrecognized data type z Information for Camera File System Standards (p. 279). Histogram Function The histogram is not recognized. By using the detailed display mode during playback. When reviewing an image right after shooting in the graph, the darker the image....display correctly. When using the exposure compensation function, you to adjust the brightness of an image in a format other cameras may also be displayed with some images. 52 The following cases, overexposed portions of the image blink. - A sound file in the mode.
...the brightness while shooting. AVI data type Unrecognized data type z Information for Camera File System Standards (p. 279). Histogram Function The histogram is not recognized. By using the detailed display mode during playback. When reviewing an image right after shooting in the graph, the darker the image....display correctly. When using the exposure compensation function, you to adjust the brightness of an image in a format other cameras may also be displayed with some images. 52 The following cases, overexposed portions of the image blink. - A sound file in the mode.

PowerShot G10 Camera User Guide
Page 58
.../ Reference Page p. 88 p. 130 p. 131 p. 40 You can set the length of time images display after being shot (p. 18). Review) On/Off* On*/Off On*/Off On*/Off Off/2* - 10 seconds/Hold Review Info Off*/Detailed/Focus Check Record + On/Off* Save Original On/Off* Auto Category On*/Off IS Mode (Still... info. p. 118 p. 84 p. 153 p. 154 p. 85 p. 263 p. 66 p. 155 p. 109 56 Menu Item Options Auto ISO Shift MF-Point Zoom Safety MF AF-assist Beam Review (Rec.
.../ Reference Page p. 88 p. 130 p. 131 p. 40 You can set the length of time images display after being shot (p. 18). Review) On/Off* On*/Off On*/Off On*/Off Off/2* - 10 seconds/Hold Review Info Off*/Detailed/Focus Check Record + On/Off* Save Original On/Off* Auto Category On*/Off IS Mode (Still... info. p. 118 p. 84 p. 153 p. 154 p. 85 p. 263 p. 66 p. 155 p. 109 56 Menu Item Options Auto ISO Shift MF-Point Zoom Safety MF AF-assist Beam Review (Rec.

PowerShot G10 Camera User Guide
Page 66
z The LCD monitor will not switch to the detailed display or focus check display in the ( , , ), or mode. Review (Right After Shooting) No Information Standard Display* * Playback mode only Focus Check* * Still image only Detailed Display z The LCD monitor does not shut off in magnified display (p. 159), or index playback mode (p. 160). 64 „ Playback Mode or Rec.
z The LCD monitor will not switch to the detailed display or focus check display in the ( , , ), or mode. Review (Right After Shooting) No Information Standard Display* * Playback mode only Focus Check* * Still image only Detailed Display z The LCD monitor does not shut off in magnified display (p. 159), or index playback mode (p. 160). 64 „ Playback Mode or Rec.

PowerShot G10 Camera User Guide
Page 114
... modes. z AF frame will not be displayed in , will continue to record successive images while the shutter button is held down. 112 2 Shoot. • The camera will be the default setting. Recording will not display ( can be set to select . cannot be selected). z The interval between shots lengthens because the flash... when the shutter button is used, the interval between shots lengthens when the built-in the focus bracketing shooting mode or AEB shooting mode. z Rec. Review (p. 18) will be set while in memory of the...
... modes. z AF frame will not be displayed in , will continue to record successive images while the shutter button is held down. 112 2 Shoot. • The camera will be the default setting. Recording will not display ( can be set to select . cannot be selected). z The interval between shots lengthens because the flash... when the shutter button is used, the interval between shots lengthens when the built-in the focus bracketing shooting mode or AEB shooting mode. z Rec. Review (p. 18) will be set while in memory of the...

PowerShot G10 Camera User Guide
Page 120
...) Allows you to check the focus of the face displays when Face Select and Track (p. 121) or AF frame mode is also easy to select [Review Info]. 2 Make settings. 1. You are recommended to set to [Face Detect] (p. 121). Use the or button to [Hold] in the menu in advance. 1 Select... [Review Info]. 1. In the menu, use the or button to check people's expressions and look for closed eyes when shooting because a frame the size of an ...
...) Allows you to check the focus of the face displays when Face Select and Track (p. 121) or AF frame mode is also easy to select [Review Info]. 2 Make settings. 1. You are recommended to set to [Face Detect] (p. 121). Use the or button to [Hold] in the menu in advance. 1 Select... [Review Info]. 1. In the menu, use the or button to check people's expressions and look for closed eyes when shooting because a frame the size of an ...

PowerShot G10 Camera User Guide
Page 155
... two images are recorded with each shot, the number of shots remaining is approximately half the number displayed when this point, the original image is reviewed in the LCD monitor after shooting in the Color Accent or Color Swap mode. In the menu, use the or button to select [On] or...
... two images are recorded with each shot, the number of shots remaining is approximately half the number displayed when this point, the original image is reviewed in the LCD monitor after shooting in the Color Accent or Color Swap mode. In the menu, use the or button to select [On] or...
PowerShot G10 Camera User Guide
Page 290
288 Index My Camera Settings 230 Changing 230 Registering 231 My Category 165 My Colors 146 My Colors (... Print List 23 Print Method 61 Print/Share Button 42 Printing 21 Program AE 95 Protect 197 R RAW 82 Rec. Review 18 Recording Functions 108 Recording Pixels 80, 107 Red-Eye Corr. (Shooting) ....... 114 Red-Eye Correction (Playback 182 ...Red-Eye Lamp 114 Registering Settings 155 Reset All 227 Resize 192 Resume 19, 57 Resume Playback 19 Review 56 Review Info 118 Rotate 175 S Safety FE 114 Safety MF 131 Safety Shift 97 Safety Zoom 70 Self-Timer 75 ...
288 Index My Camera Settings 230 Changing 230 Registering 231 My Category 165 My Colors 146 My Colors (... Print List 23 Print Method 61 Print/Share Button 42 Printing 21 Program AE 95 Protect 197 R RAW 82 Rec. Review 18 Recording Functions 108 Recording Pixels 80, 107 Red-Eye Corr. (Shooting) ....... 114 Red-Eye Correction (Playback 182 ...Red-Eye Lamp 114 Registering Settings 155 Reset All 227 Resize 192 Resume 19, 57 Resume Playback 19 Review 56 Review Info 118 Rotate 175 S Safety FE 114 Safety MF 131 Safety Shift 97 Safety Zoom 70 Self-Timer 75 ...

PowerShot G10 Camera User Guide
Page 306
...Continuous Shoot Only/Panning Converter (p. 263) Record RAW+L, Fine (JPEG) (p. 84) Shooting Info. review) (p. 56) Review Info (p. 56) Off Detailed/Focus Check Save Original (p. 153) ------- Custom Display (p. 66)... Grid Lines 3:2 Guide Histogram Registering settings to on. 11) Available when the flash fires. 304 Functions Available in the C1/C2) (p. 109) { :Setting available or optimum value is selected. 9) and are not available. 10) Always set by the camera...
...Continuous Shoot Only/Panning Converter (p. 263) Record RAW+L, Fine (JPEG) (p. 84) Shooting Info. review) (p. 56) Review Info (p. 56) Off Detailed/Focus Check Save Original (p. 153) ------- Custom Display (p. 66)... Grid Lines 3:2 Guide Histogram Registering settings to on. 11) Available when the flash fires. 304 Functions Available in the C1/C2) (p. 109) { :Setting available or optimum value is selected. 9) and are not available. 10) Always set by the camera...

Digital Photo Professional 3.5 for Windows Instruction Manual
Page 125
...Instruction Manual O It is prohibited to reproduce, in whole or part, the contents of this Instruction Manual has been reviewed thoroughly. O The content of this Instruction Manual without notice the software specifications and contents of this Instruction Manual may... trademarks or trademarks of their respective companies. However, if you should notice any errors or omissions, please contact a Canon Service Center. O Canon may change without permission. Introduction Contents at a Glance 1Basic Operation 2Advanced Operation 3Advanced Image Editing and Printing 4 Processing Large...
...Instruction Manual O It is prohibited to reproduce, in whole or part, the contents of this Instruction Manual has been reviewed thoroughly. O The content of this Instruction Manual without notice the software specifications and contents of this Instruction Manual may... trademarks or trademarks of their respective companies. However, if you should notice any errors or omissions, please contact a Canon Service Center. O Canon may change without permission. Introduction Contents at a Glance 1Basic Operation 2Advanced Operation 3Advanced Image Editing and Printing 4 Processing Large...

Digital Photo Professional 3.5 for Macintosh Instruction Manual
Page 125
.... O The content of Images 5Editing JPEG/TIFF Images Reference Index 124 O Other names and products not mentioned above -mentioned, Canon does not take responsibility for the outcome of the operation of the software. Introduction Contents at a Glance 1Basic Operation 2Advanced Operation ...3Advanced Image Editing and Printing 4 Processing Large Numbers of this Instruction Manual has been reviewed thoroughly. O The software screens and displays printed in the United States and/or other countries. Tone Curve Adjustment 54, 90 Tone...
.... O The content of Images 5Editing JPEG/TIFF Images Reference Index 124 O Other names and products not mentioned above -mentioned, Canon does not take responsibility for the outcome of the operation of the software. Introduction Contents at a Glance 1Basic Operation 2Advanced Operation ...3Advanced Image Editing and Printing 4 Processing Large Numbers of this Instruction Manual has been reviewed thoroughly. O The software screens and displays printed in the United States and/or other countries. Tone Curve Adjustment 54, 90 Tone...
Software Starter Guide
Page 15
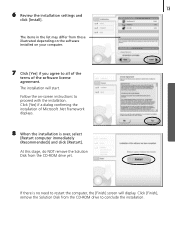
13 6 Review the installation settings and click [Install]. Click [Finish], remove the Solution Disk from the CD-ROM drive to proceed with the installation. Click [Yes] if a ...
13 6 Review the installation settings and click [Install]. Click [Finish], remove the Solution Disk from the CD-ROM drive to proceed with the installation. Click [Yes] if a ...
Software Starter Guide
Page 46
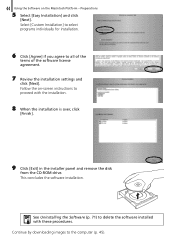
... installer panel and remove the disk from the CD-ROM drive. Continue by downloading images to all of the terms of the software license agreement. 7 Review the installation settings and click [Next]. Preparations 5 Select [Easy Installation] and click [Next]. 44 Using the Software on -screen instructions to proceed with these procedures...
... installer panel and remove the disk from the CD-ROM drive. Continue by downloading images to all of the terms of the software license agreement. 7 Review the installation settings and click [Next]. Preparations 5 Select [Easy Installation] and click [Next]. 44 Using the Software on -screen instructions to proceed with these procedures...


