User Guide
Page 3
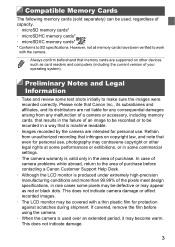
... for personal use . This does not indicate camera damage or affect recorded images. • The LCD monitor may become warm. If covered, remove the film before contacting a Canon Customer Support Help Desk. • Although the LCD monitor is used over an extended period, it may be used, regardless of capacity. • microSD memory cards* • microSDHC memory cards* • microSDXC memory cards* * Conforms to SD specifications. In case of camera problems while...
... for personal use . This does not indicate camera damage or affect recorded images. • The LCD monitor may become warm. If covered, remove the film before contacting a Canon Customer Support Help Desk. • Although the LCD monitor is used over an extended period, it may be used, regardless of capacity. • microSD memory cards* • microSDHC memory cards* • microSDXC memory cards* * Conforms to SD specifications. In case of camera problems while...
User Guide
Page 4
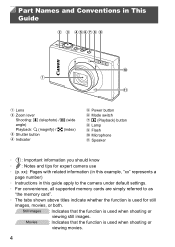
... viewing still images. Part Names and Conventions in this example, "xx" represents a page number) • Instructions in This Guide Lens Zoom lever Shooting: i (telephoto) / j (wide angle) Playback: k (magnify) / g (index) Shutter button Indicator Power button Mode switch 1 (Playback) button Lamp Flash Microphone Speaker • : Important information you should know • : Notes and tips for still images, movies, or both. xx): Pages with related information (in this guide apply to the camera under default settings. • For convenience, all supported memory cards...
... viewing still images. Part Names and Conventions in this example, "xx" represents a page number) • Instructions in This Guide Lens Zoom lever Shooting: i (telephoto) / j (wide angle) Playback: k (magnify) / g (index) Shutter button Indicator Power button Mode switch 1 (Playback) button Lamp Flash Microphone Speaker • : Important information you should know • : Notes and tips for still images, movies, or both. xx): Pages with related information (in this guide apply to the camera under default settings. • For convenience, all supported memory cards...
User Guide
Page 5
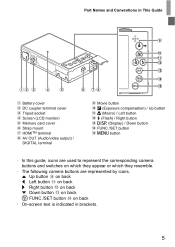
... is indicated in This Guide Battery cover DC coupler terminal cover Tripod socket Screen (LCD monitor) Memory card cover Strap mount HDMITM terminal AV OUT (Audio/video output) / DIGITAL terminal Movie button b (Exposure compensation) / Up button e (Macro) / Left button h (Flash) / Right button l (Display) / Down button FUNC./SET button n button • In this guide, icons are used to represent the corresponding camera buttons and switches on which they appear or which they resemble. • The following camera buttons are represented by icons. Part...
... is indicated in This Guide Battery cover DC coupler terminal cover Tripod socket Screen (LCD monitor) Memory card cover Strap mount HDMITM terminal AV OUT (Audio/video output) / DIGITAL terminal Movie button b (Exposure compensation) / Up button e (Macro) / Left button h (Flash) / Right button l (Display) / Down button FUNC./SET button n button • In this guide, icons are used to represent the corresponding camera buttons and switches on which they appear or which they resemble. • The following camera buttons are represented by icons. Part...
User Guide
Page 16
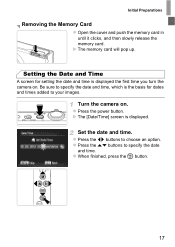
z Press the power button. Turn the camera on . Set the date and time. Initial Preparations Removing the Memory Card z Open the cover and push the memory card in until it clicks, and then slowly release the memory card. Setting the Date and Time A screen for dates and times added to specify the date and time, which is the basis for setting the date and time is displayed. X The [Date/Time] screen is displayed the first time you turn the camera on . z Press the op buttons to...
z Press the power button. Turn the camera on . Set the date and time. Initial Preparations Removing the Memory Card z Open the cover and push the memory card in until it clicks, and then slowly release the memory card. Setting the Date and Time A screen for dates and times added to specify the date and time, which is the basis for setting the date and time is displayed. X The [Date/Time] screen is displayed the first time you turn the camera on . z Press the op buttons to...
User Guide
Page 25
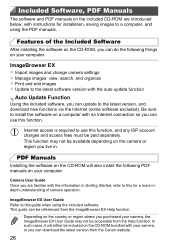
... installation, saving images to a computer, and using the included software. Camera User Guide Once you are introduced below, with the auto update function Auto Update Function Using the included software, you can do the following PDF manuals on the CD-ROM will either be referenced from the Canon website. 26 PDF Manuals Installing the software on your computer. ImageBrowser EX z Import images and change camera settings z Manage images: view, search, and organize z Print and edit images z Update to this function, and any ISP account charges...
... installation, saving images to a computer, and using the included software. Camera User Guide Once you are introduced below, with the auto update function Auto Update Function Using the included software, you can do the following PDF manuals on the CD-ROM will either be referenced from the Canon website. 26 PDF Manuals Installing the software on your computer. ImageBrowser EX z Import images and change camera settings z Manage images: view, search, and organize z Print and edit images z Update to this function, and any ISP account charges...
User Guide
Page 27
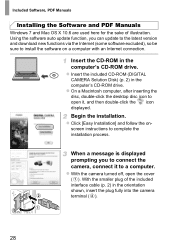
... desktop disc icon to install the software on - Included Software, PDF Manuals Installing the Software and PDF Manuals Windows 7 and Mac OS X 10.6 are used here for the sake of the included interface cable (p. 2) in the orientation shown, insert the plug fully into the camera terminal ( ). 28 Using the software auto update function, you to connect the camera, connect it , and then double-click the icon displayed. Begin the installation. screen instructions to a computer. When a message is displayed prompting you...
... desktop disc icon to install the software on - Included Software, PDF Manuals Installing the Software and PDF Manuals Windows 7 and Mac OS X 10.6 are used here for the sake of the included interface cable (p. 2) in the orientation shown, insert the plug fully into the camera terminal ( ). 28 Using the software auto update function, you to connect the camera, connect it , and then double-click the icon displayed. Begin the installation. screen instructions to a computer. When a message is displayed prompting you...
User Guide
Page 28
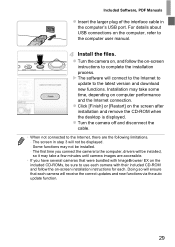
... several cameras that each . Included Software, PDF Manuals z Insert the larger plug of the interface cable in step 3 will not be displayed. - z Turn the camera on, and follow the on computer performance and the Internet connection. The screen in the computer's USB port. Installation may take some time, depending on -screen installation instructions for each camera will connect to the Internet to update to the computer user manual. z Click [Finish] or [Restart] on...
... several cameras that each . Included Software, PDF Manuals z Insert the larger plug of the interface cable in step 3 will not be displayed. - z Turn the camera on, and follow the on computer performance and the Internet connection. The screen in the computer's USB port. Installation may take some time, depending on -screen installation instructions for each camera will connect to the Internet to update to the computer user manual. z Click [Finish] or [Restart] on...
User Guide
Page 30
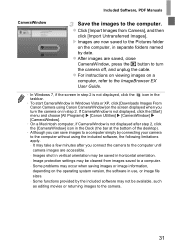
... without using Canon CameraWindow] on the computer, in vertical orientation may take a few minutes after step 2, click the [CameraWindow] icon in use, or image file sizes. - z Click [Import Images from images saved to the computer. z For instructions on viewing images on a computer, refer to the computer until camera images are now saved to the Pictures folder on the screen displayed when you turn the camera off, and unplug the cable. Images shot in separate folders named by connecting your camera...
... without using Canon CameraWindow] on the computer, in vertical orientation may take a few minutes after step 2, click the [CameraWindow] icon in use, or image file sizes. - z Click [Import Images from images saved to the computer. z For instructions on viewing images on a computer, refer to the computer until camera images are now saved to the Pictures folder on the screen displayed when you turn the camera off, and unplug the cable. Images shot in separate folders named by connecting your camera...
User Guide
Page 36
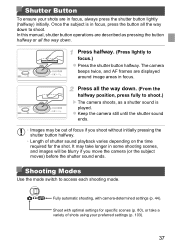
... shooting mode. Fully automatic shooting, with optimal settings for the shot. In this manual, shutter button operations are displayed around image areas in focus, always press the shutter button lightly (halfway) initially. Shooting Modes Use the mode switch to focus.) z Press the shutter button halfway. Press all the way down . z Keep the camera still until the shutter sound ends. • Images may take a variety of shutter sound playback varies depending on the time required for specific scenes (p. 80), or take longer in focus, press the button...
... shooting mode. Fully automatic shooting, with optimal settings for the shot. In this manual, shutter button operations are displayed around image areas in focus, always press the shutter button lightly (halfway) initially. Shooting Modes Use the mode switch to focus.) z Press the shutter button halfway. Press all the way down . z Keep the camera still until the shutter sound ends. • Images may take a variety of shutter sound playback varies depending on the time required for specific scenes (p. 80), or take longer in focus, press the button...
User Guide
Page 68
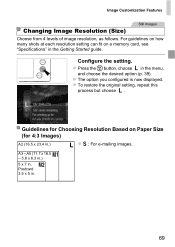
Image Customization Features Still Images Changing Image Resolution (Size) Choose from 4 levels of image resolution, as follows. Configure the setting. X The option you configured is now displayed. z To restore the original setting, repeat this process but choose . For guidelines on how many shots at each resolution setting can fit on Paper Size (for Choosing Resolution Based on a memory card, see "Specifications" in the menu, and choose the...
Image Customization Features Still Images Changing Image Resolution (Size) Choose from 4 levels of image resolution, as follows. Configure the setting. X The option you configured is now displayed. z To restore the original setting, repeat this process but choose . For guidelines on how many shots at each resolution setting can fit on Paper Size (for Choosing Resolution Based on a memory card, see "Specifications" in the menu, and choose the...
User Guide
Page 92
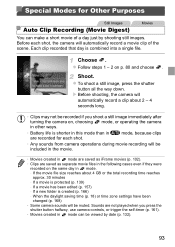
... file. X Before shooting, the camera will automatically record a clip about 4 GB or the total recording time reaches approx. 30 minutes - z To shoot a still image, press the shutter button all the way down. When the daylight saving time (p. 18) or time zone settings have been changed (p. 168) • Some camera sounds will be viewed by shooting still images. Each clip recorded that day is created (p. 166) - Special Modes for each shot, the camera will automatically record a movie...
... file. X Before shooting, the camera will automatically record a clip about 4 GB or the total recording time reaches approx. 30 minutes - z To shoot a still image, press the shutter button all the way down. When the daylight saving time (p. 18) or time zone settings have been changed (p. 168) • Some camera sounds will be viewed by shooting still images. Each clip recorded that day is created (p. 166) - Special Modes for each shot, the camera will automatically record a movie...
User Guide
Page 96
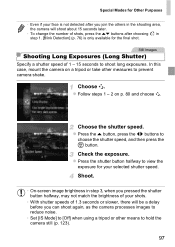
... take other means to hold the camera still (p. 123). 97 Choose the shutter speed. z Press the o button, press the qr buttons to shoot long exposures. Shoot. • On-screen image brightness in step 3, when you can shoot again, as the camera processes images to reduce noise. • Set [IS Mode] to [Off] when using a tripod or other measures to view the exposure for the final shot. Still Images Shooting Long Exposures (Long Shutter) Specify a shutter speed...
... take other means to hold the camera still (p. 123). 97 Choose the shutter speed. z Press the o button, press the qr buttons to shoot long exposures. Shoot. • On-screen image brightness in step 3, when you can shoot again, as the camera processes images to reduce noise. • Set [IS Mode] to [Off] when using a tripod or other measures to view the exposure for the final shot. Still Images Shooting Long Exposures (Long Shutter) Specify a shutter speed...
User Guide
Page 108
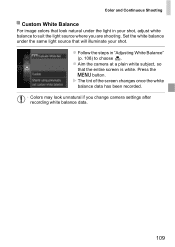
... suit the light source where you change camera settings after recording white balance data. 109 z Follow the steps in your shot. Press the n button. X The tint of the screen changes once the white balance data has been recorded. • Colors may look natural under the same light source that will illuminate your shot, adjust white balance to choose . z Aim the camera at a plain white subject, so that the entire screen is white. Color and Continuous Shooting Custom White Balance For image colors that...
... suit the light source where you change camera settings after recording white balance data. 109 z Follow the steps in your shot. Press the n button. X The tint of the screen changes once the white balance data has been recorded. • Colors may look natural under the same light source that will illuminate your shot, adjust white balance to choose . z Aim the camera at a plain white subject, so that the entire screen is white. Color and Continuous Shooting Custom White Balance For image colors that...
User Guide
Page 165
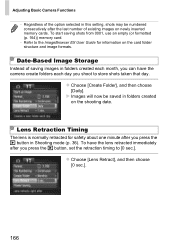
... 1 button, set the retraction timing to store shots taken that day. Adjusting Basic Camera Functions • Regardless of the option selected in this setting, shots may be saved in folders created on newly inserted memory cards. To start saving shots from 0001, use an empty (or formatted (p. 164)) memory card. • Refer to the ImageBrowser EX User Guide for safety about one minute after the last number of existing images on the shooting date. Lens Retraction Timing The lens...
... 1 button, set the retraction timing to store shots taken that day. Adjusting Basic Camera Functions • Regardless of the option selected in this setting, shots may be saved in folders created on newly inserted memory cards. To start saving shots from 0001, use an empty (or formatted (p. 164)) memory card. • Refer to the ImageBrowser EX User Guide for safety about one minute after the last number of existing images on the shooting date. Lens Retraction Timing The lens...

User Guide
Page 176
Forcing the cables into the camera at the same time as an HDMI Cable HTC-100. Configure the setting. For details, refer to the TV. Connect the camera to the TV user manual. In this case, you will need to an HDMI CEC-compatible TV enables playback (including slideshow playback) using the TV remote control. On the camera, press the 1 button. X Images from the camera are not played while the camera is displayed on...
Forcing the cables into the camera at the same time as an HDMI Cable HTC-100. Configure the setting. For details, refer to the TV. Connect the camera to the TV user manual. In this case, you will need to an HDMI CEC-compatible TV enables playback (including slideshow playback) using the TV remote control. On the camera, press the 1 button. X Images from the camera are not played while the camera is displayed on...
User Guide
Page 186
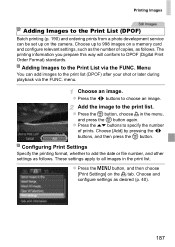
... print list. Add the image to DPOF (Digital Print Order Format) standards. Configuring Print Settings Specify the printing format, whether to add the date or file number, and other settings as desired (p. 40). 187 z Press the n button, and then choose [Print Settings] on a memory card and configure relevant settings, such as the number of prints. Choose and configure settings as follows. Choose an image. z Press the m button, choose c in the print list. Adding Images to the Print...
... print list. Add the image to DPOF (Digital Print Order Format) standards. Configuring Print Settings Specify the printing format, whether to add the date or file number, and other settings as desired (p. 40). 187 z Press the n button, and then choose [Print Settings] on a memory card and configure relevant settings, such as the number of prints. Choose and configure settings as follows. Choose an image. z Press the m button, choose c in the print list. Adding Images to the Print...
User Guide
Page 195
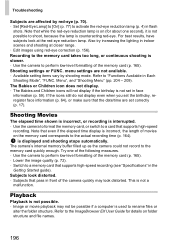
... the folder structure. Shooting Movies The elapsed time shown is incorrect, or recording is interrupted. • Use the camera to format the memory card, or switch to a card that even if the elapsed time display is slower. • Use the camera to perform low-level formatting of movies on folder structure and file names. 196 Recording to the memory card quickly enough. menu settings are affected by shooting mode. Shooting settings or FUNC. Also try increasing the lighting in Each Shooting Mode", "FUNC...
... the folder structure. Shooting Movies The elapsed time shown is incorrect, or recording is interrupted. • Use the camera to format the memory card, or switch to a card that even if the elapsed time display is slower. • Use the camera to perform low-level formatting of movies on folder structure and file names. 196 Recording to the memory card quickly enough. menu settings are affected by shooting mode. Shooting settings or FUNC. Also try increasing the lighting in Each Shooting Mode", "FUNC...
User Guide
Page 198
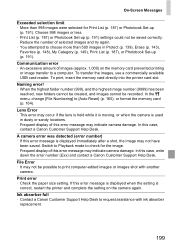
... 3 menu, change [File Numbering] to a computer. Print error • Check the paper size setting. In this case, contact a Canon Customer Support Help Desk. If this error message is displayed immediately after a shot, the image may not have been saved. Lens Error • This error may occur if the lens is held while it is moving, or when the camera is correct, restart the printer and complete the setting on the memory card prevented printing or image transfer to [Auto Reset] (p. 165), or format...
... 3 menu, change [File Numbering] to a computer. Print error • Check the paper size setting. In this case, contact a Canon Customer Support Help Desk. If this error message is displayed immediately after a shot, the image may not have been saved. Lens Error • This error may occur if the lens is held while it is moving, or when the camera is correct, restart the printer and complete the setting on the memory card prevented printing or image transfer to [Auto Reset] (p. 165), or format...
User Guide
Page 201
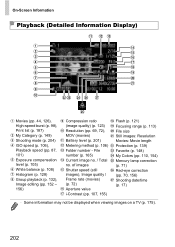
...) Flash (p. 121) Focusing range (p. 113) File size Still images: Resolution Movies: Movie length Protection (p. 139) Favorite (p. 148) My Colors (pp. 110, 154) Mercury lamp correction (p. 71) Red-eye correction (pp. 70, 156) Shooting date/time (p. 17) • Some information may not be displayed when viewing images on a TV (p. 175). 202 On-Screen Information Playback (Detailed Information Display) Movies (pp. 44, 126), High-speed burst (p. 98), Print list (p. 187) My Category (p. 149) Shooting mode (p. 204) ISO speed (p. 106), Playback speed...
...) Flash (p. 121) Focusing range (p. 113) File size Still images: Resolution Movies: Movie length Protection (p. 139) Favorite (p. 148) My Colors (pp. 110, 154) Mercury lamp correction (p. 71) Red-eye correction (pp. 70, 156) Shooting date/time (p. 17) • Some information may not be displayed when viewing images on a TV (p. 175). 202 On-Screen Information Playback (Detailed Information Display) Movies (pp. 44, 126), High-speed burst (p. 98), Print list (p. 187) My Category (p. 149) Shooting mode (p. 204) ISO speed (p. 106), Playback speed...
User Guide
Page 211
... date/time to images 57 Changing 19 Setting 17 World clock 168 DC coupler 179 Defaults J Reset all DIGITAL CAMERA Solution Disk 2 Digital tele-converter 114 212 Digital zoom 53 Display language 20 DPOF 187 E Editing Cropping 153 i-Contrast 155 My Colors 154 Red-eye correction 156 Resizing images 152 Erasing 143 Erasing all 143 Error messages 198 Exposure AE lock 105 Compensation 105 FE lock 122 F Face detect (AF frame mode 115 Face ID 59, 133 Face self-timer (shooting mode...
... date/time to images 57 Changing 19 Setting 17 World clock 168 DC coupler 179 Defaults J Reset all DIGITAL CAMERA Solution Disk 2 Digital tele-converter 114 212 Digital zoom 53 Display language 20 DPOF 187 E Editing Cropping 153 i-Contrast 155 My Colors 154 Red-eye correction 156 Resizing images 152 Erasing 143 Erasing all 143 Error messages 198 Exposure AE lock 105 Compensation 105 FE lock 122 F Face detect (AF frame mode 115 Face ID 59, 133 Face self-timer (shooting mode...


