Direct Print User Guide
Page 13
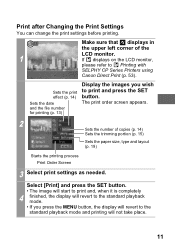
... Sets the trimming portion (p. 15) Sets the paper size, type and layout (p. 19) Starts the printing process Print Order Screen 3 Select print settings as needed. Sets the print effect (p. 14) Sets the date and the file number for printing (p. ...• If you wish to print and press the SET button. The print order screen appears. 2 Sets the number of the LCD monitor. 1 If displays on the LCD monitor, please refer to print and, when it is completely 4 finished, the display.... • The image will start to Printing with SELPHY CP Series Printers using Canon Direct Print (p. 53).
... Sets the trimming portion (p. 15) Sets the paper size, type and layout (p. 19) Starts the printing process Print Order Screen 3 Select print settings as needed. Sets the print effect (p. 14) Sets the date and the file number for printing (p. ...• If you wish to print and press the SET button. The print order screen appears. 2 Sets the number of the LCD monitor. 1 If displays on the LCD monitor, please refer to print and, when it is completely 4 finished, the display.... • The image will start to Printing with SELPHY CP Series Printers using Canon Direct Print (p. 53).
Direct Print User Guide
Page 20
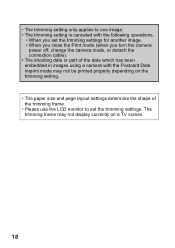
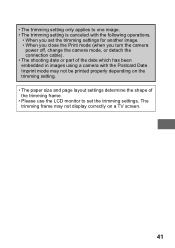
... display correctly on the trimming setting. • The paper size and page layout settings determine the shape of the trimming frame. • Please use the LCD monitor to set the trimming settings. The trimming frame may not be printed properly depending on a TV...
... display correctly on the trimming setting. • The paper size and page layout settings determine the shape of the trimming frame. • Please use the LCD monitor to set the trimming settings. The trimming frame may not be printed properly depending on a TV...
Direct Print User Guide
Page 25
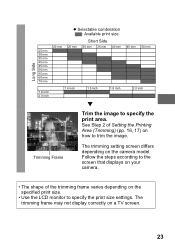
... of Setting the Printing Area (Trimming) (pp. 16, 17) on the specified print size. • Use the LCD monitor to specify the print size settings. Trimming Frame The trimming setting screen differs depending on a TV screen. 23 See Step 2 of the trimming frame varies depending on how to specify the print area. Long...
... of Setting the Printing Area (Trimming) (pp. 16, 17) on the specified print size. • Use the LCD monitor to specify the print size settings. Trimming Frame The trimming setting screen differs depending on a TV screen. 23 See Step 2 of the trimming frame varies depending on how to specify the print area. Long...

Direct Print User Guide
Page 35
... (p. 38) Sets the paper size, type and layout (p. 42) Starts the printing process Print Order Screen 3 Select print settings as needed. The print order screen appears. 2 Sets the number of the LCD monitor. 1 If displays on the LCD monitor, please refer to the standard playback mode and printing will not take place. 33 Select...
... (p. 38) Sets the paper size, type and layout (p. 42) Starts the printing process Print Order Screen 3 Select print settings as needed. The print order screen appears. 2 Sets the number of the LCD monitor. 1 If displays on the LCD monitor, please refer to the standard playback mode and printing will not take place. 33 Select...
Direct Print User Guide
Page 43
The trimming frame may not be printed properly depending on a TV screen. 41 • The trimming setting only applies to one image. • The trimming setting is canceled with the following operations. • When you set the ... display correctly on the trimming setting. • The paper size and page layout settings determine the shape of the trimming frame. • Please use the LCD monitor to set the trimming settings.
The trimming frame may not be printed properly depending on a TV screen. 41 • The trimming setting only applies to one image. • The trimming setting is canceled with the following operations. • When you set the ... display correctly on the trimming setting. • The paper size and page layout settings determine the shape of the trimming frame. • Please use the LCD monitor to set the trimming settings.
Direct Print User Guide
Page 52
... Error There is wrong. Remove the jammed paper, reset some messages may appear on the camera LCD monitor if an error occurs during printing. The number of times that might appear, refer to your nearest Canon Customer Support center listed in the contact list provided with the ink. If the printer's error.... : Printing restarts if you select [Continue] and press the SET button. Also open the paper output tray if it is not set in the error screen, you can restart printing if you select [Continue] in the error...
... Error There is wrong. Remove the jammed paper, reset some messages may appear on the camera LCD monitor if an error occurs during printing. The number of times that might appear, refer to your nearest Canon Customer Support center listed in the contact list provided with the ink. If the printer's error.... : Printing restarts if you select [Continue] and press the SET button. Also open the paper output tray if it is not set in the error screen, you can restart printing if you select [Continue] in the error...
Direct Print User Guide
Page 56
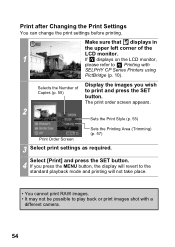
...the SET button. Print after Changing the Print Settings You can change the print settings before printing. Selects the Number of the LCD monitor. 1 If displays on the LCD monitor, please refer to play back or print images shot with SELPHY CP Series Printers using PictBridge (p. 10). Make sure ... place. • You cannot print RAW images. • It may not be possible to Printing with a different camera. 54 The print order screen appears. 2 Sets the Print Style (p. 55) Print Order Screen Sets the Printing Area (Trimming) (p. 57) 3 Select print settings as required.
...the SET button. Print after Changing the Print Settings You can change the print settings before printing. Selects the Number of the LCD monitor. 1 If displays on the LCD monitor, please refer to play back or print images shot with SELPHY CP Series Printers using PictBridge (p. 10). Make sure ... place. • You cannot print RAW images. • It may not be possible to Printing with a different camera. 54 The print order screen appears. 2 Sets the Print Style (p. 55) Print Order Screen Sets the Printing Area (Trimming) (p. 57) 3 Select print settings as required.
Direct Print User Guide
Page 59
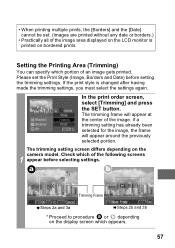
... selected portion. Please set . (Images are printed without any date or borders.) • Practically all of the image area displayed on the LCD monitor is changed after having made the trimming settings, you must select the settings again. If the print style is printed on bordered prints.... a b Trimming Frame Steps 2a and 3a Steps 2b and 3b * Proceed to procedure a or b depending on the display screen which of the following screens 1 appear before setting the trimming settings. Setting the Printing Area (Trimming) You can specify which portion of an image gets printed. The...
... selected portion. Please set . (Images are printed without any date or borders.) • Practically all of the image area displayed on the LCD monitor is changed after having made the trimming settings, you must select the settings again. If the print style is printed on bordered prints.... a b Trimming Frame Steps 2a and 3a Steps 2b and 3b * Proceed to procedure a or b depending on the display screen which of the following screens 1 appear before setting the trimming settings. Setting the Printing Area (Trimming) You can specify which portion of an image gets printed. The...
Direct Print User Guide
Page 62
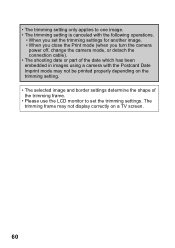
... not display correctly on the trimming setting. • The selected image and border settings determine the shape of the trimming frame. • Please use the LCD monitor to set the trimming settings. The trimming frame may not be printed properly depending on a TV...
... not display correctly on the trimming setting. • The selected image and border settings determine the shape of the trimming frame. • Please use the LCD monitor to set the trimming settings. The trimming frame may not be printed properly depending on a TV...
Direct Print User Guide
Page 65
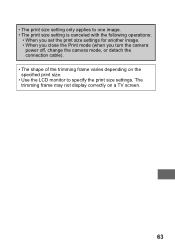
The trimming frame may not display correctly on the specified print size. • Use the LCD monitor to one image. • The print size setting is canceled with the following operations: • When you set the print size settings for another image. • When you close the Print mode (when you turn the camera power off, change the camera mode, or detach the connection cable). • The shape of the trimming frame varies depending on a TV screen. 63 • The print size setting only applies to specify the print size settings.
The trimming frame may not display correctly on the specified print size. • Use the LCD monitor to one image. • The print size setting is canceled with the following operations: • When you set the print size settings for another image. • When you close the Print mode (when you turn the camera power off, change the camera mode, or detach the connection cable). • The shape of the trimming frame varies depending on a TV screen. 63 • The print size setting only applies to specify the print size settings.

PowerShot A640/A630 Camera User Guide Camera User Guide Advanced
Page 15
... (p. 51) AF Lock (p. 50) AE Lock (p. 52) FE Lock (p. 54) (Red)*1 Camera Shake Warning (p. 14) *1 Appears even if the LCD monitor is set to Standard display. *2 PowerShot A640 screen 13 Information Displayed on the LCD Monitor Shooting Information (Shooting Mode) Digital Tele-Converter*1 (p. 30) Zoom Magnification*1*2 (p. 30) *1 Spot AE Point Frame (p. 55) *1 AF Frame (p. 47...
... (p. 51) AF Lock (p. 50) AE Lock (p. 52) FE Lock (p. 54) (Red)*1 Camera Shake Warning (p. 14) *1 Appears even if the LCD monitor is set to Standard display. *2 PowerShot A640 screen 13 Information Displayed on the LCD Monitor Shooting Information (Shooting Mode) Digital Tele-Converter*1 (p. 30) Zoom Magnification*1*2 (p. 30) *1 Spot AE Point Frame (p. 55) *1 AF Frame (p. 47...
PowerShot A640/A630 Camera User Guide Camera User Guide Advanced
Page 38
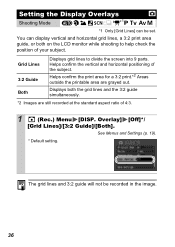
... simultaneously. *2 Images are grayed out. See Menus and Settings (p. 19). * Default setting. The grid lines and 3:2 guide will not be set. Displays both on the LCD monitor while shooting to divide the screen into 9 parts. Helps confirm the vertical and horizontal positioning of your subject.
... simultaneously. *2 Images are grayed out. See Menus and Settings (p. 19). * Default setting. The grid lines and 3:2 guide will not be set. Displays both on the LCD monitor while shooting to divide the screen into 9 parts. Helps confirm the vertical and horizontal positioning of your subject.

ZoomBrowser EX 5.7 Software User Guide
Page 9
... camera procedures. • The content on how to connect the camera to select between camera models. If your Camera User Guide for information on the LCD monitor and the method for a wireless connection. Chapter 2 Downloading and Printing Images Chapter 3 What You Can Do with it will blink and a Direct ...User Guide • If a dialog allowing you start up the camera, click the [File] menu and clear the check mark from the [Displays this screen when the camera is ImageBrowser? Please see your camera features a (Print/Share) button, it connected to Download Images 1.
... camera procedures. • The content on how to connect the camera to select between camera models. If your Camera User Guide for information on the LCD monitor and the method for a wireless connection. Chapter 2 Downloading and Printing Images Chapter 3 What You Can Do with it will blink and a Direct ...User Guide • If a dialog allowing you start up the camera, click the [File] menu and clear the check mark from the [Displays this screen when the camera is ImageBrowser? Please see your camera features a (Print/Share) button, it connected to Download Images 1.
ZoomBrowser EX 5.7 Software User Guide
Page 132
...Browser Window 22, 24, 25, 28, 32 Camera Control Window 6, 9, 11, 15 Camera Settings 41 Canon Camera 16 Caption 107 Clear 105 Color Management 130 Color/Brightness Adjustment 79, 81 Comment 76 Contextual Menus 7 ...Mode 50 Displaying Multiple Images 57 Displaying the Autofocus Frame 58 Displaying the Subject on the Camera's LCD Monitor 45 Download Mark 10 Downloading Images 8, 9, 17, 18, 19, 22 Camera Operations 17...76 Filter Tool 53 Fixed Photo Size Printing 103 Font 107 Font Size 107 Font Style 107 Full Screen Display 56 H Header 109 Help 131 Hiding the Explorer Panel 52 Histogram 76, 84 I Image ...
...Browser Window 22, 24, 25, 28, 32 Camera Control Window 6, 9, 11, 15 Camera Settings 41 Canon Camera 16 Caption 107 Clear 105 Color Management 130 Color/Brightness Adjustment 79, 81 Comment 76 Contextual Menus 7 ...Mode 50 Displaying Multiple Images 57 Displaying the Autofocus Frame 58 Displaying the Subject on the Camera's LCD Monitor 45 Download Mark 10 Downloading Images 8, 9, 17, 18, 19, 22 Camera Operations 17...76 Filter Tool 53 Fixed Photo Size Printing 103 Font 107 Font Size 107 Font Style 107 Full Screen Display 56 H Header 109 Help 131 Hiding the Explorer Panel 52 Histogram 76, 84 I Image ...

ZoomBrowser EX 5.7 Software User Guide
Page 15
...Next IMPORTANT • Check to download images with cameras that were recorded using camera commands. • The content of the LCD monitor screen and the method for downloading from a memory card in a camera or in the correct state for downloading images shot from ... 5 Organizing Images Chapter 6 Using Supplementary Features Appendices Index Downloading Images to Step 2 if the Camera Control Window opens on the camera's LCD monitor. ZoomBrowser EX Software User Guide Using Camera Commands to download images. Table of whether your camera has a (Print/Share) button, ...
...Next IMPORTANT • Check to download images with cameras that were recorded using camera commands. • The content of the LCD monitor screen and the method for downloading from a memory card in a camera or in the correct state for downloading images shot from ... 5 Organizing Images Chapter 6 Using Supplementary Features Appendices Index Downloading Images to Step 2 if the Camera Control Window opens on the camera's LCD monitor. ZoomBrowser EX Software User Guide Using Camera Commands to download images. Table of whether your camera has a (Print/Share) button, ...


