
User Guide
Page 1
DIGITAL CAMERA ENGLISH Camera User Guide Camera User Guide CDI-E144-010 © 2004 CANON INC. PRINTED IN CHINA z Please read the Read This First section (p. 4). z Please also see the Software Starter Guide and the Direct Print User Guide.
DIGITAL CAMERA ENGLISH Camera User Guide Camera User Guide CDI-E144-010 © 2004 CANON INC. PRINTED IN CHINA z Please read the Read This First section (p. 4). z Please also see the Software Starter Guide and the Direct Print User Guide.

User Guide
Page 2
... in this guide is accurate and complete, no liability can be accepted for any errors or omissions. • Canon reserves the right to change the specifications of the hardware and software described herein at any time without the prior written permission of...of the camera, the software, the CompactFlashTM cards (CF cards), personal computers, peripheral devices, or use of non-Canon CF cards. 0 Trademark Acknowledgements • Canon and PowerShot are trademarks of Canon Inc.. • CompactFlash is a trademark of SanDisk Corporation. • Macintosh, Mac OS and QuickTime are trademarks of...
... in this guide is accurate and complete, no liability can be accepted for any errors or omissions. • Canon reserves the right to change the specifications of the hardware and software described herein at any time without the prior written permission of...of the camera, the software, the CompactFlashTM cards (CF cards), personal computers, peripheral devices, or use of non-Canon CF cards. 0 Trademark Acknowledgements • Canon and PowerShot are trademarks of Canon Inc.. • CompactFlash is a trademark of SanDisk Corporation. • Macintosh, Mac OS and QuickTime are trademarks of...

User Guide
Page 3
As in the example below, the mode dial should be set to a Computer Direct Print User Guide Printer User Guide Using the Printer and Printing Symbols Used Icons under title bars show the operations mode. This mark denotes additional topics that may affect the camera's operation. Flowchart and Reference Guides This Guide Shooting with the Camera Software Starter Guide Installing the Software This Guide Connecting the Camera to a Computer This Guide Software Starter Guide Downloading Images to or . Using the Flash Mode Dial This mark denotes issues that complement the basic operating...
As in the example below, the mode dial should be set to a Computer Direct Print User Guide Printer User Guide Using the Printer and Printing Symbols Used Icons under title bars show the operations mode. This mark denotes additional topics that may affect the camera's operation. Flowchart and Reference Guides This Guide Shooting with the Camera Software Starter Guide Installing the Software This Guide Connecting the Camera to a Computer This Guide Software Starter Guide Downloading Images to or . Using the Flash Mode Dial This mark denotes issues that complement the basic operating...

User Guide
Page 4
Read This First 4 Please Read 4 Safety Precautions 6 Preventing Malfunctions 11 Components Guide 12 Preparing the Camera 15 Installing the Batteries 15 Installing a CF Card 18 Setting the Date/Time 21 Setting the Language 22 Opening the LCD Monitor 24 Using the LCD Monitor 26 Basic Functions 31 Turning the Power On/Off 31 Switching between Shooting and Playback.... 32 Shooting - Advanced Functions 66 Selecting Menus and Settings 66 The Basics 34 Auto Mode 34 Reviewing an Image Right after Shooting ...... 37 Using the Mode Dial (Image Zone 39 Portrait 39 ...
Read This First 4 Please Read 4 Safety Precautions 6 Preventing Malfunctions 11 Components Guide 12 Preparing the Camera 15 Installing the Batteries 15 Installing a CF Card 18 Setting the Date/Time 21 Setting the Language 22 Opening the LCD Monitor 24 Using the LCD Monitor 26 Basic Functions 31 Turning the Power On/Off 31 Switching between Shooting and Playback.... 32 Shooting - Advanced Functions 66 Selecting Menus and Settings 66 The Basics 34 Auto Mode 34 Reviewing an Image Right after Shooting ...... 37 Using the Mode Dial (Image Zone 39 Portrait 39 ...

User Guide
Page 5
Menu Settings and Default Settings 69 Resetting the Settings to a Computer 108 Computer System Requirements 109 Viewing Images on a TV Set 117 Resetting the File Number 118 Customizing the Camera (My Camera Settings) ..120 Registering My Camera Settings 121 List of Messages 124 Troubleshooting 126 Appendix 132 Using the Power Kits (Sold Separately) ....... 132 Using the Lenses (Sold Separately 135 Camera Care and Maintenance 139 Specifications 140 Battery Performance 144 CF Cards and Estimated Capacities (Recordable Images)..145 Photo Tips and Information 150 INDEX 152 &#...
Menu Settings and Default Settings 69 Resetting the Settings to a Computer 108 Computer System Requirements 109 Viewing Images on a TV Set 117 Resetting the File Number 118 Customizing the Camera (My Camera Settings) ..120 Registering My Camera Settings 121 List of Messages 124 Troubleshooting 126 Appendix 132 Using the Power Kits (Sold Separately) ....... 132 Using the Lenses (Sold Separately 135 Camera Care and Maintenance 139 Specifications 140 Battery Performance 144 CF Cards and Estimated Capacities (Recordable Images)..145 Photo Tips and Information 150 INDEX 152 &#...

User Guide
Page 6
...Help Desk. Warranty Limitations This camera's warranty is operating and being operated correctly. Warning Against Copyright Infringement Please note that Canon digital cameras are not liable for any malfunction of a camera or accessory, including CompactFlashTM cards, that results in the failure... of an image to be recorded or to be recorded in a format that Canon Inc., its subsidiaries and affiliates, and its distributors are intended for personal use. If a problem arises while the camera is machine readable...
...Help Desk. Warranty Limitations This camera's warranty is operating and being operated correctly. Warning Against Copyright Infringement Please note that Canon digital cameras are not liable for any malfunction of a camera or accessory, including CompactFlashTM cards, that results in the failure... of an image to be recorded or to be recorded in a format that Canon Inc., its subsidiaries and affiliates, and its distributors are intended for personal use. If a problem arises while the camera is machine readable...

User Guide
Page 7
This has no effect on , it as red or black dots. Language Setting Please see page 22 to specification. About the LCD Monitor The LCD monitor is depleted. Charging the Date/Time Battery • The camera has a built-in rechargeable lithium battery that the date/time battery charge is produced with a TV monitor (p. 118). It will charge even when the camera power is set the camera's video signal format to the one used in it with extremely high-precision manufacturing techniques. More than 0.01% of the pixels may become warm. When you first purchase the camera, ...
This has no effect on , it as red or black dots. Language Setting Please see page 22 to specification. About the LCD Monitor The LCD monitor is depleted. Charging the Date/Time Battery • The camera has a built-in rechargeable lithium battery that the date/time battery charge is produced with a TV monitor (p. 118). It will charge even when the camera power is set the camera's video signal format to the one used in it with extremely high-precision manufacturing techniques. More than 0.01% of the pixels may become warm. When you first purchase the camera, ...

User Guide
Page 8
Accidental damage to the camera or batteries by your camera distributor or a Canon Customer Support Help Desk. Internal inspections, alterations and repairs should be conducted by qualified service personnel authorized by a child could result in serious ... for power supply accessory details). Always ensure that the camera is a risk of the strap around a child's neck could damage your camera distributor or a Canon Customer Support Help Desk. 6 z Do not trigger the flash in close proximity to consult your eyesight. Read This First Safety Precautions z Before using the...
Accidental damage to the camera or batteries by your camera distributor or a Canon Customer Support Help Desk. Internal inspections, alterations and repairs should be conducted by qualified service personnel authorized by a child could result in serious ... for power supply accessory details). Always ensure that the camera is a risk of the strap around a child's neck could damage your camera distributor or a Canon Customer Support Help Desk. 6 z Do not trigger the flash in close proximity to consult your eyesight. Read This First Safety Precautions z Before using the...

User Guide
Page 9
...use substances containing alcohol, benzene, thinners or other liquids. z Do not handle the power cord if your camera distributor or the closest Canon Customer Support Help Desk. Failure to fire or electrical shock. The camera has not been waterproofed. Read This First z Stop operating the...cord from the power outlet. Please consult your camera distributor or the closest Canon Customer Support Help Desk. z Do not allow liquids to fire. Please consult your camera distributor or the closest Canon Customer Support Help Desk. In dusty, humid or greasy environments, the dust...
...use substances containing alcohol, benzene, thinners or other liquids. z Do not handle the power cord if your camera distributor or the closest Canon Customer Support Help Desk. Failure to fire or electrical shock. The camera has not been waterproofed. Read This First z Stop operating the...cord from the power outlet. Please consult your camera distributor or the closest Canon Customer Support Help Desk. z Do not allow liquids to fire. Please consult your camera distributor or the closest Canon Customer Support Help Desk. In dusty, humid or greasy environments, the dust...

User Guide
Page 10
... camera and power outlet after recharging and when the camera is serious risk of the equipment, fire, electrical shock or other hazards. Continuous use only Canon AA-size NiMH batteries and the charger recommended for this equipment may cause explosions or leaks, resulting in fire. 8 z Do not place the batteries near...
... camera and power outlet after recharging and when the camera is serious risk of the equipment, fire, electrical shock or other hazards. Continuous use only Canon AA-size NiMH batteries and the charger recommended for this equipment may cause explosions or leaks, resulting in fire. 8 z Do not place the batteries near...

User Guide
Page 11
If they loosen, fall off and shatter, the glass shards may lose data or stop working. Caution about magnetic fields Keep objects that are sensitive to magnetic fields (such as the dashboard or trunk (boot) of the camera (p. 12). z Exercise due caution when screwing on the separately sold wide converter, tele-converter, close-up could lead to charge the batteries or power the camera. Such items may cause an injury. CAUTIONS z Avoid using the battery charger to injury or damage the equipment when wearing or holding it with your fingers or clothing when shooting. z Do ...
If they loosen, fall off and shatter, the glass shards may lose data or stop working. Caution about magnetic fields Keep objects that are sensitive to magnetic fields (such as the dashboard or trunk (boot) of the camera (p. 12). z Exercise due caution when screwing on the separately sold wide converter, tele-converter, close-up could lead to charge the batteries or power the camera. Such items may cause an injury. CAUTIONS z Avoid using the battery charger to injury or damage the equipment when wearing or holding it with your fingers or clothing when shooting. z Do ...

User Guide
Page 12
z Do not use the battery charger or compact power adapter if the cable or plug is damaged, or if the plug is used for an extended period as pins or keys) or dirt to region. The plug of the specified rating, not over the specified rating. Please take care when operating the camera for prolonged periods, the camera body may experience a burning sensation. 10 z If your hands may become warm. Read This First z Ensure that the battery charger or compact power adapter is plugged into the power outlet. z Do not allow metal objects (such as your camera is not fully inserted into ...
z Do not use the battery charger or compact power adapter if the cable or plug is damaged, or if the plug is used for an extended period as pins or keys) or dirt to region. The plug of the specified rating, not over the specified rating. Please take care when operating the camera for prolonged periods, the camera body may experience a burning sensation. 10 z If your hands may become warm. Read This First z Ensure that the battery charger or compact power adapter is plugged into the power outlet. z Do not allow metal objects (such as your camera is not fully inserted into ...

User Guide
Page 13
Continued use . Remove the CF card, batteries or other equipment generating strong electromagnetic fields. However, the date, time and other camera settings may cause malfunctions or corrupt image data. Preventing Malfunctions Read This First Avoid Strong Magnetic Fields Never place the camera in close proximity to default settings if the batteries have been removed for more than three weeks. 11 Avoid Condensation Related Problems Moving the equipment rapidly between hot and cold temperatures may cause condensation (water droplets) to strong magnetic fields may reset to ...
Continued use . Remove the CF card, batteries or other equipment generating strong electromagnetic fields. However, the date, time and other camera settings may cause malfunctions or corrupt image data. Preventing Malfunctions Read This First Avoid Strong Magnetic Fields Never place the camera in close proximity to default settings if the batteries have been removed for more than three weeks. 11 Avoid Condensation Related Problems Moving the equipment rapidly between hot and cold temperatures may cause condensation (water droplets) to strong magnetic fields may reset to ...
User Guide
Page 14
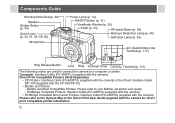
... connect the camera to your Bubble Jet printer user guide. - PictBridge Compliant Printers: Interface Cable IFC-400PCU (supplied with the camera) • PictBridge Compliant Non-Canon Printers: Interface Cable IFC-400PCU (supplied with the camera) Please refer to the System Map or the Direct Print User Guide supplied with the CP...
... connect the camera to your Bubble Jet printer user guide. - PictBridge Compliant Printers: Interface Cable IFC-400PCU (supplied with the camera) • PictBridge Compliant Non-Canon Printers: Interface Cable IFC-400PCU (supplied with the camera) Please refer to the System Map or the Direct Print User Guide supplied with the CP...

User Guide
Page 15
Preparing the Camera, Basic Functions Components Guide LCD Monitor (p. 26, 28) Indicators (p. 14) Viewfinder Strap Mount Mode Switch (p. 32) Attaching the wrist strap* DC IN Terminal (p. 134) SET / (AF Frame Selector) Button (p. 81) MENU Button (p. 67) Tripod Socket CF Card Slot Cover (p. 18) (Flash) / Up Button (p. 43, 66) Right Button (p. 66) Left Button (p. 66) (Macro)/ MF(Manual Focus)/ Down Button (p. 45, 66, 93) FUNC. (Function)/ (Single Image Erase) Button (p. 64, 66) Battery Cover (p. 15) (Print/Share) Button (p. 101, 113) Battery Cover Lock (p. 15) DISP. (Display) Button (p. 26...
Preparing the Camera, Basic Functions Components Guide LCD Monitor (p. 26, 28) Indicators (p. 14) Viewfinder Strap Mount Mode Switch (p. 32) Attaching the wrist strap* DC IN Terminal (p. 134) SET / (AF Frame Selector) Button (p. 81) MENU Button (p. 67) Tripod Socket CF Card Slot Cover (p. 18) (Flash) / Up Button (p. 43, 66) Right Button (p. 66) Left Button (p. 66) (Macro)/ MF(Manual Focus)/ Down Button (p. 45, 66, 93) FUNC. (Function)/ (Single Image Erase) Button (p. 64, 66) Battery Cover (p. 15) (Print/Share) Button (p. 101, 113) Battery Cover Lock (p. 15) DISP. (Display) Button (p. 26...

User Guide
Page 16
Auto Image Zone • : Auto (p. 34) The camera automatically selects settings. • Image Zone The camera automatically selects settings according to the image composition type. : Portrait (p. 39) : Landscape (p. 39) : Night Scene (p. 39) : Fast Shutter (p. 39) : Slow Shutter (p. 39) : Special Scene (p. 39, 51) : Stitch Assist (p. 39, 49) : Movie (p. 56) • Creative Zone The user selects exposure, aperture or other settings to shoot using focus lock (p. 92)) Power Lamp Green: Power is pressed. Upper Indicator Green: Ready to record/Ready to communicate (during a computer ...
Auto Image Zone • : Auto (p. 34) The camera automatically selects settings. • Image Zone The camera automatically selects settings according to the image composition type. : Portrait (p. 39) : Landscape (p. 39) : Night Scene (p. 39) : Fast Shutter (p. 39) : Slow Shutter (p. 39) : Special Scene (p. 39, 51) : Stitch Assist (p. 39, 49) : Movie (p. 56) • Creative Zone The user selects exposure, aperture or other settings to shoot using focus lock (p. 92)) Power Lamp Green: Power is pressed. Upper Indicator Green: Ready to record/Ready to communicate (during a computer ...

User Guide
Page 17
...). z The separately sold battery charger kit lets you use of the arrow, and open the battery cover. Proper Battery Handling z Use AA-size alkaline or Canon AA-size NiMH batteries (sold separately) only. z The use rechargeable NiMH batteries to power the camera during long usage sessions (p. 134). Negative end (-) 4 Close the...
...). z The separately sold battery charger kit lets you use of the arrow, and open the battery cover. Proper Battery Handling z Use AA-size alkaline or Canon AA-size NiMH batteries (sold separately) only. z The use rechargeable NiMH batteries to power the camera during long usage sessions (p. 134). Negative end (-) 4 Close the...

User Guide
Page 18
... batteries from different manufacturers. But be careful that came with a dry cloth. z If you are using the camera in cold areas and batteries are using Canon AA-size NiMH Battery Kit (a four-piece set). z While it is possible to use . Always load four fresh (or fully recharged) batteries at low temperatures...
... batteries from different manufacturers. But be careful that came with a dry cloth. z If you are using the camera in cold areas and batteries are using Canon AA-size NiMH Battery Kit (a four-piece set). z While it is possible to use . Always load four fresh (or fully recharged) batteries at low temperatures...

User Guide
Page 19
Batteries with defective seals. Power lamp Replace or recharge the batteries if blinks green you wish to run low. Batteries are beginning to continue using the camera. Never use batteries that such batteries may come with defective seals. Do not use batteries with all or part of the seal (electrical insulation sheath) peeled off , this . If the LCD monitor is risk that look like this icon will appear when you know when batteries are fully depleted and the Change the camera can no longer operate. Preparing the Camera, Basic Functions WARNING Never use damaged ...
Batteries with defective seals. Power lamp Replace or recharge the batteries if blinks green you wish to run low. Batteries are beginning to continue using the camera. Never use batteries that such batteries may come with defective seals. Do not use batteries with all or part of the seal (electrical insulation sheath) peeled off , this . If the LCD monitor is risk that look like this icon will appear when you know when batteries are fully depleted and the Change the camera can no longer operate. Preparing the Camera, Basic Functions WARNING Never use damaged ...

User Guide
Page 20
Subject the camera body to use CF cards that have been formatted in your camera (see Formatting a CF Card (p. 19)). z You are recommended to vibration or shocks. - Preparing the Camera Installing a CF Card 1 Be sure that the camera is writing, reading, erasing or transmitting an image to the CF card or may be lost or corrupted: - Mark CF card eject button Card label z To remove the CF card, press the CF card eject button and pull the card out. 4 Close the CF card slot cover securely. z When the upper indicator blinks green, the camera is turned off , or open it. 3 Insert ...
Subject the camera body to use CF cards that have been formatted in your camera (see Formatting a CF Card (p. 19)). z You are recommended to vibration or shocks. - Preparing the Camera Installing a CF Card 1 Be sure that the camera is writing, reading, erasing or transmitting an image to the CF card or may be lost or corrupted: - Mark CF card eject button Card label z To remove the CF card, press the CF card eject button and pull the card out. 4 Close the CF card slot cover securely. z When the upper indicator blinks green, the camera is turned off , or open it. 3 Insert ...