
User Guide
Page 1
z Please also see the Software Starter Guide and the Direct Print User Guide. PRINTED IN CHINA z Please read the Read This First section (p. 4). DIGITAL CAMERA ENGLISH Camera User Guide Camera User Guide CDI-E144-010 © 2004 CANON INC.
z Please also see the Software Starter Guide and the Direct Print User Guide. PRINTED IN CHINA z Please read the Read This First section (p. 4). DIGITAL CAMERA ENGLISH Camera User Guide Camera User Guide CDI-E144-010 © 2004 CANON INC.

User Guide
Page 2
... resulting from corrupted or lost data due to a mistaken operation or malfunction of the camera, the software, the CompactFlashTM cards (CF cards), personal computers, peripheral devices, or use of non-Canon CF cards. 0 Trademark Acknowledgements • Canon and PowerShot are either registered trademarks or trademarks of Microsoft Corporation in the United States and/or...
... resulting from corrupted or lost data due to a mistaken operation or malfunction of the camera, the software, the CompactFlashTM cards (CF cards), personal computers, peripheral devices, or use of non-Canon CF cards. 0 Trademark Acknowledgements • Canon and PowerShot are either registered trademarks or trademarks of Microsoft Corporation in the United States and/or...

User Guide
Page 3
... Dial This mark denotes issues that complement the basic operating procedures. 1 Flowchart and Reference Guides This Guide Shooting with the Camera Software Starter Guide Installing the Software This Guide Connecting the Camera to a Computer This Guide Software Starter Guide Downloading Images to or . As in the example below, the mode dial should... Guide Using the Printer and Printing Symbols Used Icons under title bars show the operations mode. This mark denotes additional topics that may affect the camera's operation.
... Dial This mark denotes issues that complement the basic operating procedures. 1 Flowchart and Reference Guides This Guide Shooting with the Camera Software Starter Guide Installing the Software This Guide Connecting the Camera to a Computer This Guide Software Starter Guide Downloading Images to or . As in the example below, the mode dial should... Guide Using the Printer and Printing Symbols Used Icons under title bars show the operations mode. This mark denotes additional topics that may affect the camera's operation.

User Guide
Page 4
... Viewing Images in Sets of Contents Items marked with are lists or charts that summarize camera functions or procedures. Read This First 4 Please Read 4 Safety Precautions 6 Preventing Malfunctions 11 Components Guide 12 Preparing the Camera 15 Installing the Batteries 15 Installing a CF Card 18 Setting the Date/Time 21 Setting the...
... Viewing Images in Sets of Contents Items marked with are lists or charts that summarize camera functions or procedures. Read This First 4 Please Read 4 Safety Precautions 6 Preventing Malfunctions 11 Components Guide 12 Preparing the Camera 15 Installing the Batteries 15 Installing a CF Card 18 Setting the Date/Time 21 Setting the...

User Guide
Page 5
... Computer 108 Computer System Requirements 109 Viewing Images on a TV Set 117 Resetting the File Number 118 Customizing the Camera (My Camera Settings) ..120 Registering My Camera Settings 121 List of Messages 124 Troubleshooting 126 Appendix 132 Using the Power Kits (Sold Separately) ....... 132 Using ...the Lenses (Sold Separately 135 Camera Care and Maintenance 139 Specifications 140 Battery Performance 144 CF Cards and Estimated Capacities (Recordable Images)..145 Photo Tips and ...
... Computer 108 Computer System Requirements 109 Viewing Images on a TV Set 117 Resetting the File Number 118 Customizing the Camera (My Camera Settings) ..120 Registering My Camera Settings 121 List of Messages 124 Troubleshooting 126 Appendix 132 Using the Power Kits (Sold Separately) ....... 132 Using ...the Lenses (Sold Separately 135 Camera Care and Maintenance 139 Specifications 140 Battery Performance 144 CF Cards and Estimated Capacities (Recordable Images)..145 Photo Tips and ...

User Guide
Page 6
Warning Against Copyright Infringement Please note that Canon digital cameras are not liable for any consequential damages arising from performances, exhibitions, or commercial properties by means of a camera or other device may contravene copyright or other legal rights even if the image was shot.... Please note that the camera is in the country of sale. If a problem arises while the camera is operating and being operated correctly. For Canon Customer Support contacts, please see the Canon Limited Warranty supplied with a warranty claim to a Canon Customer Support Help Desk. ...
Warning Against Copyright Infringement Please note that Canon digital cameras are not liable for any consequential damages arising from performances, exhibitions, or commercial properties by means of a camera or other device may contravene copyright or other legal rights even if the image was shot.... Please note that the camera is in the country of sale. If a problem arises while the camera is operating and being operated correctly. For Canon Customer Support contacts, please see the Canon Limited Warranty supplied with a warranty claim to a Canon Customer Support Help Desk. ...

User Guide
Page 7
...sold separately) for at least 4 hours to specification. More than 0.01% of the pixels may become warm. It will charge even when the camera power is turned on the recorded image and does not constitute a malfunction. About the LCD Monitor The LCD monitor is depleted. This has no...setting. Less than 99.99% of this and take care when operating the camera for prolonged periods, the camera body may occasionally misfire or appear as described above. 5 Charging the Date/Time Battery • The camera has a built-in rechargeable lithium battery that the date/time battery charge is...
...sold separately) for at least 4 hours to specification. More than 0.01% of the pixels may become warm. It will charge even when the camera power is turned on the recorded image and does not constitute a malfunction. About the LCD Monitor The LCD monitor is depleted. This has no...setting. Less than 99.99% of this and take care when operating the camera for prolonged periods, the camera body may occasionally misfire or appear as described above. 5 Charging the Date/Time Battery • The camera has a built-in rechargeable lithium battery that the date/time battery charge is...

User Guide
Page 8
...children and infants. Please take the first opportunity to the intense light produced by your camera distributor or a Canon Customer Support Help Desk. 6 Exposure to consult your camera distributor or a Canon Customer Support Help Desk. Internal inspections, alterations and repairs should be conducted by qualified...-voltage electrical shock. There is operated correctly. z In the next few pages, the term "equipment" refers primarily to the camera and its accessories to prevent injuries or damage to instruct you have read and understood the safety precautions described below. z Store ...
...children and infants. Please take the first opportunity to the intense light produced by your camera distributor or a Canon Customer Support Help Desk. 6 Exposure to consult your camera distributor or a Canon Customer Support Help Desk. Internal inspections, alterations and repairs should be conducted by qualified...-voltage electrical shock. There is operated correctly. z In the next few pages, the term "equipment" refers primarily to the camera and its accessories to prevent injuries or damage to instruct you have read and understood the safety precautions described below. z Store ...

User Guide
Page 9
... short-circuit, leading to electrical shock. When unplugging the cord, ensure that smoke or fume emissions have ceased. Please consult your camera distributor or the closest Canon Customer Support Help Desk. z Remove the power cord on the plug, the exterior of the equipment may lead to come into...long periods of the cord may become immersed in fire or electrical shock. z Do not handle the power cord if your camera distributor or the closest Canon Customer Support Help Desk. Pulling on the power adapter cord. In the event that collects on a regular periodic basis and wipe...
... short-circuit, leading to electrical shock. When unplugging the cord, ensure that smoke or fume emissions have ceased. Please consult your camera distributor or the closest Canon Customer Support Help Desk. z Remove the power cord on the plug, the exterior of the equipment may lead to come into...long periods of the cord may become immersed in fire or electrical shock. z Do not handle the power cord if your camera distributor or the closest Canon Customer Support Help Desk. Pulling on the power adapter cord. In the event that collects on a regular periodic basis and wipe...

User Guide
Page 10
...could lead to overheating, burns and other objects. z Disconnect the battery charger or compact power adapter from both the camera and power outlet after recharging and when the camera is serious risk of fire or electric shock. z Do not place the batteries near a heat source or expose them... shock or other hazards. Discard the batteries in specialized waste facilities if available in water. z If using AA-size NiMH batteries, use only Canon AA-size NiMH batteries and the charger recommended for use with the metallic components of other materials in fire. 8 Read This First z Use ...
...could lead to overheating, burns and other objects. z Disconnect the battery charger or compact power adapter from both the camera and power outlet after recharging and when the camera is serious risk of fire or electric shock. z Do not place the batteries near a heat source or expose them... shock or other hazards. Discard the batteries in specialized waste facilities if available in water. z If using AA-size NiMH batteries, use only Canon AA-size NiMH batteries and the charger recommended for use with the metallic components of other materials in fire. 8 Read This First z Use ...

User Guide
Page 11
...Caution about magnetic fields Keep objects that are sensitive to strong sunlight or high temperatures, such as credit cards) away from the speaker of the camera (p. 12). Exposure to intense sunlight and heat may cause an injury. Ensure that could damage the flash. 9 The flash may lose data ... adapter is designed for exclusive use it to strong impacts or shocks that there is a risk of the casing. Do not use with your camera. z Do not operate the flash with other hazards. There is good ventilation when using , placing or storing the equipment in places subject to...
...Caution about magnetic fields Keep objects that are sensitive to strong sunlight or high temperatures, such as credit cards) away from the speaker of the camera (p. 12). Exposure to intense sunlight and heat may cause an injury. Ensure that could damage the flash. 9 The flash may lose data ... adapter is designed for exclusive use it to strong impacts or shocks that there is a risk of the casing. Do not use with your camera. z Do not operate the flash with other hazards. There is good ventilation when using , placing or storing the equipment in places subject to...

User Guide
Page 12
... over the specified rating. z If your hands may become warm. Please take care when operating the camera for prolonged periods, the camera body may experience a burning sensation. 10 z Do not allow metal objects (such as your camera is not fully inserted into a power outlet of the battery charger varies according to contact the...
... over the specified rating. z If your hands may become warm. Please take care when operating the camera for prolonged periods, the camera body may experience a burning sensation. 10 z Do not allow metal objects (such as your camera is not fully inserted into a power outlet of the battery charger varies according to contact the...

User Guide
Page 13
...have been removed for extended periods of time, remove the batteries from the camera or battery charger and store the equipment in a safe place. Extended Storage When not using the camera immediately if you detect condensation. Preventing Malfunctions Read This First Avoid Strong ... Continued use . Exposure to temperature changes slowly before resuming use may damage the equipment. If Condensation Forms Inside the Camera Stop using the camera for more than three weeks. 11 Avoid Condensation Related Problems Moving the equipment rapidly between hot and cold temperatures may ...
...have been removed for extended periods of time, remove the batteries from the camera or battery charger and store the equipment in a safe place. Extended Storage When not using the camera immediately if you detect condensation. Preventing Malfunctions Read This First Avoid Strong ... Continued use . Exposure to temperature changes slowly before resuming use may damage the equipment. If Condensation Forms Inside the Camera Stop using the camera for more than three weeks. 11 Avoid Condensation Related Problems Moving the equipment rapidly between hot and cold temperatures may ...
User Guide
Page 14
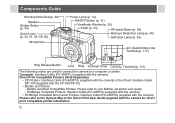
...Video) Out Terminal (p. 117) Ring Release Button Lens Ring Terminal Cover DIGITAL Terminal (p. 111) The following cables are used to connect the camera to your Bubble Jet printer user guide. - Bubble Jet Direct Compatible Printers: Please refer to a computer or printer. PictBridge Compliant Printers:... Interface Cable IFC-400PCU (supplied with the camera) • PictBridge Compliant Non-Canon Printers: Interface Cable IFC-400PCU (supplied with the camera) Please refer to the System Map or the Direct Print User Guide supplied with the ...
...Video) Out Terminal (p. 117) Ring Release Button Lens Ring Terminal Cover DIGITAL Terminal (p. 111) The following cables are used to connect the camera to your Bubble Jet printer user guide. - Bubble Jet Direct Compatible Printers: Please refer to a computer or printer. PictBridge Compliant Printers:... Interface Cable IFC-400PCU (supplied with the camera) • PictBridge Compliant Non-Canon Printers: Interface Cable IFC-400PCU (supplied with the camera) Please refer to the System Map or the Direct Print User Guide supplied with the ...

User Guide
Page 15
Preparing the Camera, Basic Functions Components Guide LCD Monitor (p. 26, 28) Indicators (p. 14) Viewfinder Strap Mount Mode Switch (p. 32) Attaching the wrist strap* DC IN Terminal (p. 134) SET / (... to print/Ready to transfer images Blinking Blue: Printing/Transferring (Depending on the direct transfer method, the indicator may not blink (p. 113)) * When carrying the camera by the strap, be careful not to swing the...
Preparing the Camera, Basic Functions Components Guide LCD Monitor (p. 26, 28) Indicators (p. 14) Viewfinder Strap Mount Mode Switch (p. 32) Attaching the wrist strap* DC IN Terminal (p. 134) SET / (... to print/Ready to transfer images Blinking Blue: Printing/Transferring (Depending on the direct transfer method, the indicator may not blink (p. 113)) * When carrying the camera by the strap, be careful not to swing the...

User Guide
Page 16
...to shoot using focus lock (p. 92)) Power Lamp Green: Power is pressed. Auto Image Zone • : Auto (p. 34) The camera automatically selects settings. • Image Zone The camera automatically selects settings according to the image composition type. : Portrait (p. 39) : Landscape (p. 39) : Night Scene (p. 39) :... The indicators light or blink when the ON/OFF button or the shutter button is on ) Blinking Orange: Ready to shoot (camera shake warning)/Flash is charging Lower Indicator Yellow: Macro mode/Manual Focus mode/AF Lock Blinking Yellow: Focusing difficulty (although you can...
...to shoot using focus lock (p. 92)) Power Lamp Green: Power is pressed. Auto Image Zone • : Auto (p. 34) The camera automatically selects settings. • Image Zone The camera automatically selects settings according to the image composition type. : Portrait (p. 39) : Landscape (p. 39) : Night Scene (p. 39) :... The indicators light or blink when the ON/OFF button or the shutter button is on ) Blinking Orange: Ready to shoot (camera shake warning)/Flash is charging Lower Indicator Yellow: Macro mode/Manual Focus mode/AF Lock Blinking Yellow: Focusing difficulty (although you can...

User Guide
Page 17
... is off the power or open the cover. 3 Insert the batteries as shown. z The use rechargeable NiMH batteries to power the camera during long usage sessions (p. 134). z For information about the Battery and Charger Kit and AA-size rechargeable NiMH batteries, see Using ...Rechargeable Batteries (p. 132). 15 z See Battery Performance (p. 144). Proper Battery Handling z Use AA-size alkaline or Canon AA-size NiMH batteries (sold separately) only. For information on handling the AA-size rechargeable NiMH batteries, see the System Map (separate from ...
... is off the power or open the cover. 3 Insert the batteries as shown. z The use rechargeable NiMH batteries to power the camera during long usage sessions (p. 134). z For information about the Battery and Charger Kit and AA-size rechargeable NiMH batteries, see Using ...Rechargeable Batteries (p. 132). 15 z See Battery Performance (p. 144). Proper Battery Handling z Use AA-size alkaline or Canon AA-size NiMH batteries (sold separately) only. For information on handling the AA-size rechargeable NiMH batteries, see the System Map (separate from ...

User Guide
Page 18
... came with alkaline batteries). Batteries may leak. z Never mix unused and partially used . The partially used batteries may leak and damage the camera if left installed during prolonged periods of non-use . z Be careful to load the batteries with a metal key chain or other metallic objects,... batteries into a pocket together with their positive (+) and negative (-) ends in the right direction. If you are using Canon AA-size NiMH Battery Kit (a four-piece set). If you are using the camera in a safe place. z Never mix batteries of different types or from one's skin or other...
... came with alkaline batteries). Batteries may leak. z Never mix unused and partially used . The partially used batteries may leak and damage the camera if left installed during prolonged periods of non-use . z Be careful to load the batteries with a metal key chain or other metallic objects,... batteries into a pocket together with their positive (+) and negative (-) ends in the right direction. If you are using Canon AA-size NiMH Battery Kit (a four-piece set). If you are using the camera in a safe place. z Never mix batteries of different types or from one's skin or other...

User Guide
Page 19
...completely or partially missing or peeled off . Batteries are beginning to let you know when batteries are fully depleted and the Change the camera can no longer operate. Always check the seals on store-bought batteries before loading them, as there is flat. The positive electrode... (plus terminal) is risk that look like this icon will appear when you wish to continue using the camera. Preparing the Camera, Basic Functions WARNING Never use batteries with defective seals. Never use batteries that such batteries may come with all or part ...
...completely or partially missing or peeled off . Batteries are beginning to let you know when batteries are fully depleted and the Change the camera can no longer operate. Always check the seals on store-bought batteries before loading them, as there is flat. The positive electrode... (plus terminal) is risk that look like this icon will appear when you wish to continue using the camera. Preparing the Camera, Basic Functions WARNING Never use batteries with defective seals. Never use batteries that such batteries may come with all or part ...

User Guide
Page 20
... not perform the following or image data may be lost or corrupted: - z You are recommended to use CF cards that have been formatted in the camera. See CF Cards and Estimated Capacities (Recordable Images) (p. 145). 18 Mark CF card eject button Card label z To remove the CF card, press the ...up. z Push the card in the direction of the arrow, and open the CF card slot cover. Subject the camera body to vibration or shocks. - z When the upper indicator blinks green, the camera is turned off , or open it. 3 Insert the CF card with application programs, may slow down writing to the...
... not perform the following or image data may be lost or corrupted: - z You are recommended to use CF cards that have been formatted in the camera. See CF Cards and Estimated Capacities (Recordable Images) (p. 145). 18 Mark CF card eject button Card label z To remove the CF card, press the ...up. z Push the card in the direction of the arrow, and open the CF card slot cover. Subject the camera body to vibration or shocks. - z When the upper indicator blinks green, the camera is turned off , or open it. 3 Insert the CF card with application programs, may slow down writing to the...


