User Guide
Page 3
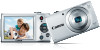
...images. • The LCD monitor may be defective or may appear as red or black dots. If covered, remove the film before contacting a Canon Customer Support Help Desk. • Although the LCD monitor is produced under extremely high-precision manufacturing conditions and more than 99.99% of the ... be recorded in some pixels may be covered with a thin plastic film for personal use . Preliminary Notes and Legal Information • Take and review some test shots initially to the area of purchase before using the camera. • When the camera is used over an extended period, it ...
...images. • The LCD monitor may be defective or may appear as red or black dots. If covered, remove the film before contacting a Canon Customer Support Help Desk. • Although the LCD monitor is produced under extremely high-precision manufacturing conditions and more than 99.99% of the ... be recorded in some pixels may be covered with a thin plastic film for personal use . Preliminary Notes and Legal Information • Take and review some test shots initially to the area of purchase before using the camera. • When the camera is used over an extended period, it ...

User Guide
Page 59
zzPress the button, choose [Review image after shooting] on the [4] tab cannot be changed . - Displays images for the specified time. Press the buttons to choose [Display Time]. Displays shooting details (=...] and cannot be changed . • By pressing the button while an image is displayed after shooting. Changing the Image Display Period After Shots 1 Access the [Review image after shots. Displays images until you press the shutter button halfway.
zzPress the button, choose [Review image after shooting] on the [4] tab cannot be changed . - Displays images for the specified time. Press the buttons to choose [Display Time]. Displays shooting details (=...] and cannot be changed . • By pressing the button while an image is displayed after shooting. Changing the Image Display Period After Shots 1 Access the [Review image after shots. Displays images until you press the shutter button halfway.
User Guide
Page 60
... Images 69 Browsing and Filtering Images 62 Image Viewing Options 64 Protecting Images 65 Erasing Images 67 Rotating Images 68 60 4 5 Playback Mode Have fun reviewing your shots, and browse or edit them in many ways • To prepare the camera for these operations, press the button to enter Playback mode...
... Images 69 Browsing and Filtering Images 62 Image Viewing Options 64 Protecting Images 65 Erasing Images 67 Rotating Images 68 60 4 5 Playback Mode Have fun reviewing your shots, and browse or edit them in many ways • To prepare the camera for these operations, press the button to enter Playback mode...

User Guide
Page 70
... new image. Choose from four correction levels, and then save the image as a new image and review. zzPress the buttons to choose an option, and then press the button. 4 Save as a separate file. 1 Choose [i-Contrast]. zzPress the buttons to choose [Yes], and ...
... new image. Choose from four correction levels, and then save the image as a new image and review. zzPress the buttons to choose an option, and then press the button. 4 Save as a separate file. 1 Choose [i-Contrast]. zzPress the buttons to choose [Yes], and ...

User Guide
Page 71
..., and frames are displayed around corrected image areas. zzEnlarge or reduce images as a new file. You can save the corrected image as a new image and review. Follow the steps in "Magnifying Images" (= 64). 4 Save as a separate file. 1 Choose [Red-Eye Correction]. Cover Preliminary Notes and Legal Information Contents: Basic Operations Basic...
..., and frames are displayed around corrected image areas. zzEnlarge or reduce images as a new file. You can save the corrected image as a new image and review. Follow the steps in "Magnifying Images" (= 64). 4 Save as a separate file. 1 Choose [Red-Eye Correction]. Cover Preliminary Notes and Legal Information Contents: Basic Operations Basic...
User Guide
Page 101
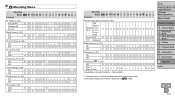
... AF Center O O O OOOO - - O - - - O - OOOOOOO Digital Zoom (=32) On O O O - O O O O O O O O O O O O O O O Blink Detection (=37) On O O O - O O OOOO - - - OOOOOOOOOO Lamp Setting (=38) On O O O OOOOOOOOOOO - 4 Shooting Menu Shooting Mode G I Function PtN Review image after shooting (=59) Off/ Quick/ Display 2 sec./ Time 4 sec./ 8 sec./ Hold O O O OOOOOOOOOOOOO Display Off O O O OOOOOOOOOOOOO Info Detailed - OO OOO Off - Not available. *1 Operation when...
... AF Center O O O OOOO - - O - - - O - OOOOOOO Digital Zoom (=32) On O O O - O O O O O O O O O O O O O O O Blink Detection (=37) On O O O - O O OOOO - - - OOOOOOOOOO Lamp Setting (=38) On O O O OOOOOOOOOOO - 4 Shooting Menu Shooting Mode G I Function PtN Review image after shooting (=59) Off/ Quick/ Display 2 sec./ Time 4 sec./ 8 sec./ Hold O O O OOOOOOOOOOOOO Display Off O O O OOOOOOOOOOOOO Info Detailed - OO OOO Off - Not available. *1 Operation when...


