
ImageBrowser 6.5 for Macintosh Instruction Manual
Page 4
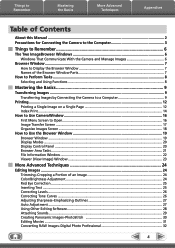
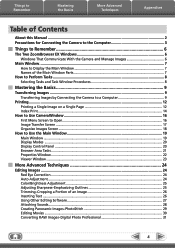
... Window...22 Viewer (View Image) Window...23 More Advanced Techniques 24 Editing Images...24 Trimming-Cropping a Portion of an Image 24 Color/Brightness Adjustment...24 Red Eye Correction...25 Inserting Text...25 Correcting Levels...26 Correcting Tone Curves...26 Adjusting Sharpness-Emphasizing Outlines 27 Auto Adjustment...27 Using Other Editing Software...
... Window...22 Viewer (View Image) Window...23 More Advanced Techniques 24 Editing Images...24 Trimming-Cropping a Portion of an Image 24 Color/Brightness Adjustment...24 Red Eye Correction...25 Inserting Text...25 Correcting Levels...26 Correcting Tone Curves...26 Adjusting Sharpness-Emphasizing Outlines 27 Auto Adjustment...27 Using Other Editing Software...

ImageBrowser 6.5 for Macintosh Instruction Manual
Page 24
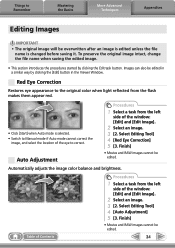
... Mastering the Basics More Advanced Techniques Appendices Editing Images IMPORTANT • The original image will be edited. Color/Brightness Adjustment Adjusts the images' RGB values (red, green, blue) and the saturation and brightness. Saturation, Brightness Procedures 1 Double-click an image. 2 [Edit] and [Color/ Brightness Adjustment]. • Movies and RAW images cannot...
... Mastering the Basics More Advanced Techniques Appendices Editing Images IMPORTANT • The original image will be edited. Color/Brightness Adjustment Adjusts the images' RGB values (red, green, blue) and the saturation and brightness. Saturation, Brightness Procedures 1 Double-click an image. 2 [Edit] and [Color/ Brightness Adjustment]. • Movies and RAW images cannot...
ImageBrowser 6.5 for Macintosh Instruction Manual
Page 25
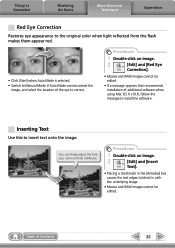
... that recommends installation of Contents 25 Things to Remember Mastering the Basics More Advanced Techniques Appendices Red Eye Correction Restores eye appearance to the original color when light reflected from the flash makes them appear red. • Click [Start] when Auto Mode is selected. • Switch to Manual Mode if Auto Mode... in the [Antialias] box causes the text edges to correct. Inserting Text Use this to install the software. Procedures 1 Double-click an image. 2 [Edit] and [Red Eye Correction]. • Movies and RAW images cannot be edited.
... that recommends installation of Contents 25 Things to Remember Mastering the Basics More Advanced Techniques Appendices Red Eye Correction Restores eye appearance to the original color when light reflected from the flash makes them appear red. • Click [Start] when Auto Mode is selected. • Switch to Manual Mode if Auto Mode... in the [Antialias] box causes the text edges to correct. Inserting Text Use this to install the software. Procedures 1 Double-click an image. 2 [Edit] and [Red Eye Correction]. • Movies and RAW images cannot be edited.
ZoomBrowser EX 6.5 for Windows Instruction Manual
Page 4
......19 Display Modes ...20 Display Control Panel...20 Browser Area Tasks...21 Properties Window...22 Viewer Window...23 More Advanced Techniques 24 Editing Images...24 Red Eye Correction...24 Auto Adjustment...24 Color/Brightness Adjustment...25 Adjusting Sharpness-Emphasizing Outlines 25 Trimming-Cropping a Portion of an Image 26 Inserting Text...26...
......19 Display Modes ...20 Display Control Panel...20 Browser Area Tasks...21 Properties Window...22 Viewer Window...23 More Advanced Techniques 24 Editing Images...24 Red Eye Correction...24 Auto Adjustment...24 Color/Brightness Adjustment...25 Adjusting Sharpness-Emphasizing Outlines 25 Trimming-Cropping a Portion of an Image 26 Inserting Text...26...
ZoomBrowser EX 6.5 for Windows Instruction Manual
Page 24
...side of the window: [Edit] and [Edit Image]. 2 Select an image. 3 [2. Procedures 1 Select a task from the flash makes them appear red. • Click [Start] when Auto mode is changed before saving it. To preserve the original image intact, change the file name when saving the ...edited image. • This section introduces the procedures started by clicking the [Edit] button in the Viewer Window. Select Editing Tool] 4 [Red Eye Correction] 5 [3. Select Editing Tool] 4 [Auto Adjustment] 5 [3. Finish] • Movies and RAW images cannot be edited. Automatically adjusts the ...
...side of the window: [Edit] and [Edit Image]. 2 Select an image. 3 [2. Procedures 1 Select a task from the flash makes them appear red. • Click [Start] when Auto mode is changed before saving it. To preserve the original image intact, change the file name when saving the ...edited image. • This section introduces the procedures started by clicking the [Edit] button in the Viewer Window. Select Editing Tool] 4 [Red Eye Correction] 5 [3. Select Editing Tool] 4 [Auto Adjustment] 5 [3. Finish] • Movies and RAW images cannot be edited. Automatically adjusts the ...
ZoomBrowser EX 6.5 for Windows Instruction Manual
Page 53
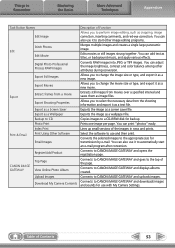
...a Screen Saver Export as a Wallpaper Backup to CD Photo Print Index Print Print Using Other Software Email Images Register/Add Product CANON iMAGE GATEWAY Top Page View Online Photo Album Upload Images Download My Camera Contents Description of Function Allows you to select the necessary... into JPEG or TIFF images. Connects to CANON iMAGE GATEWAY and downloads images and sounds for transmission by e-mail. You can also use and then print. Select the software to use it as cropping, image correction, inserting comments, and red-eye correction. You can print "photos" easily...
...a Screen Saver Export as a Wallpaper Backup to CD Photo Print Index Print Print Using Other Software Email Images Register/Add Product CANON iMAGE GATEWAY Top Page View Online Photo Album Upload Images Download My Camera Contents Description of Function Allows you to select the necessary... into JPEG or TIFF images. Connects to CANON iMAGE GATEWAY and downloads images and sounds for transmission by e-mail. You can also use and then print. Select the software to use it as cropping, image correction, inserting comments, and red-eye correction. You can print "photos" easily...
Software Starter Guide DC SD Ver.9
Page 76
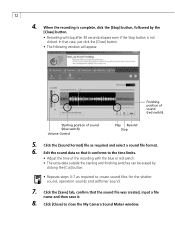
72 4. Starting position of the recording with the blue or red switch. • The extra data outside the starting and finishing switches can be erased by the [Close] button. • Recording will appear. Click [Close] to ..., followed by clicking the [Cut] button. • Repeats steps 3-7 as required and select a sound file format. 6. Volume Control Play Rewind Stop 5. Finishing position of sound (red switch).
72 4. Starting position of the recording with the blue or red switch. • The extra data outside the starting and finishing switches can be erased by the [Close] button. • Recording will appear. Click [Close] to ..., followed by clicking the [Cut] button. • Repeats steps 3-7 as required and select a sound file format. 6. Volume Control Play Rewind Stop 5. Finishing position of sound (red switch).

Software Starter Guide DC SD Ver.9
Page 90
... them on the Browser area or the Explorer View Section. Explorer View Section To disconnect the camera, click the close box (Mac OS 8.6-9.2) or the red close . Select images in the Browser area. • You can also download images to select multiple thumbnails. The movie icon displays on RAW images. The...
... them on the Browser area or the Explorer View Section. Explorer View Section To disconnect the camera, click the close box (Mac OS 8.6-9.2) or the red close . Select images in the Browser area. • You can also download images to select multiple thumbnails. The movie icon displays on RAW images. The...

PowerShot A200/A100 Camera User Guide
Page 3
... (p. 29) * Be careful when carrying the camera by the strap. Components Guide Front View Shutter Button (p. 34) Optical Viewfinder Window (p. 33) AF-assist Beam (p. 34) Red-Eye Reduction Lamp (p. 43) Self-Timer Lamp (p. 46) Flash (p. 43) Date Battery Holder (p. 95) Terminal Cover (p. 85) DIGITAL Terminal* (p. 85) DC IN Terminal (p. 99) Lens...
... (p. 29) * Be careful when carrying the camera by the strap. Components Guide Front View Shutter Button (p. 34) Optical Viewfinder Window (p. 33) AF-assist Beam (p. 34) Red-Eye Reduction Lamp (p. 43) Self-Timer Lamp (p. 46) Flash (p. 43) Date Battery Holder (p. 95) Terminal Cover (p. 85) DIGITAL Terminal* (p. 85) DC IN Terminal (p. 99) Lens...
PowerShot A200/A100 Camera User Guide
Page 6
... camera accessories ("Canon Brand Accessories"). Camera Body Temperature If your camera is not responsible for prolonged periods, the camera body may become warm. Less than 99.99% of the pixels operate to change the language setting. 11 You may occasionally misfire or appear as red or black dots.... Please be aware of non Canon Brand Accessories. About the LCD Monitor The LCD monitor is designed to perform optimally when used for damages resulting from...
... camera accessories ("Canon Brand Accessories"). Camera Body Temperature If your camera is not responsible for prolonged periods, the camera body may become warm. Less than 99.99% of the pixels operate to change the language setting. 11 You may occasionally misfire or appear as red or black dots.... Please be aware of non Canon Brand Accessories. About the LCD Monitor The LCD monitor is designed to perform optimally when used for damages resulting from...

PowerShot A200/A100 Camera User Guide
Page 16
... images or recordable time for movies (sec.) Shooting Mode Exposure Compensation White Balance Photo Effect Compression Resolution ISO Speed A200 ISO 50 100 200 400 A100 ISO 64 100 200 400 Flash p. 40 p. 52 p. 53 p. 54 p. 41 p. 41 p. 55 p. 43 ● Basic Functions ● ...Shooting Method Macro / Infinity Movie Recording Mode (red) Digital Zoom A200 x1.3 x1.6 x2.0 x2.5 x3.2 x4.0 Setting* A100 x1.3 x1.6 x2.0 x2.5 x3.2 Camera Shake Warning Low Battery p. 46 p. 45 p. 49 p. 35 p. 30 p. 23 *Displayed during ...
... images or recordable time for movies (sec.) Shooting Mode Exposure Compensation White Balance Photo Effect Compression Resolution ISO Speed A200 ISO 50 100 200 400 A100 ISO 64 100 200 400 Flash p. 40 p. 52 p. 53 p. 54 p. 41 p. 41 p. 55 p. 43 ● Basic Functions ● ...Shooting Method Macro / Infinity Movie Recording Mode (red) Digital Zoom A200 x1.3 x1.6 x2.0 x2.5 x3.2 x4.0 Setting* A100 x1.3 x1.6 x2.0 x2.5 x3.2 Camera Shake Warning Low Battery p. 46 p. 45 p. 49 p. 35 p. 30 p. 23 *Displayed during ...

PowerShot A200/A100 Camera User Guide
Page 20
... modes. • The default for each menu and the default settings. Menu (Red) Resolution (Movies) 320 × 240* / 160 × 120 Compression Superfine / Fine* / Normal ISO Speed PowerShot A200 50* / 100 / 200 / 400 / AUTO PowerShot A100 64* / 100 / 200 / 400 / AUTO AiAF On* / Off Digital...sec.* / 10 sec. AF-assist Beam On* / Off File No. Menu Items Available Settings Resolution (Still pictures) PowerShot A200 1600 × 1200* / 1024 × 768 / 640 × 480 PowerShot A100 1280 × 960* / 1024 × 768 / 640 × 480 Rec. ● Basic Functions ● ...
... modes. • The default for each menu and the default settings. Menu (Red) Resolution (Movies) 320 × 240* / 160 × 120 Compression Superfine / Fine* / Normal ISO Speed PowerShot A200 50* / 100 / 200 / 400 / AUTO PowerShot A100 64* / 100 / 200 / 400 / AUTO AiAF On* / Off Digital...sec.* / 10 sec. AF-assist Beam On* / Off File No. Menu Items Available Settings Resolution (Still pictures) PowerShot A200 1600 × 1200* / 1024 × 768 / 640 × 480 PowerShot A100 1280 × 960* / 1024 × 768 / 640 × 480 Rec. ● Basic Functions ● ...

PowerShot A200/A100 Camera User Guide
Page 22
PowerShot A100 Compression See "Functions Available in rooms with artificial lighting. Resolution 2 Press or button to select the desired flash mode. : Available : Available only for the first ...). For information on necessary space per image (approximate), types of CF cards and the number of a tripod is adjusted to slow shutter speeds. Auto The red-eye reduction lamp fires with each shot. The flash will be fired when the indicator glows orange. 43 The flash timing is recommended. 1 Press the...
PowerShot A100 Compression See "Functions Available in rooms with artificial lighting. Resolution 2 Press or button to select the desired flash mode. : Available : Available only for the first ...). For information on necessary space per image (approximate), types of CF cards and the number of a tripod is adjusted to slow shutter speeds. Auto The red-eye reduction lamp fires with each shot. The flash will be fired when the indicator glows orange. 43 The flash timing is recommended. 1 Press the...

PowerShot A200/A100 Camera User Guide
Page 23
...: approx. 46 x 34mm (1.81 x 1.34 in.) PowerShot A100: approx. 47 x 35mm (1.85 x 1.38 in.) 45 For this mode to improve the effect. Macro / Infinity Modes ● Shooting ● Macro Infinity Use this mode for compositions combining both near and distant objects. 1 Press the / button to 7.9 in.). Red-Eye Reduction Light reflecting back from...
...: approx. 46 x 34mm (1.81 x 1.34 in.) PowerShot A100: approx. 47 x 35mm (1.85 x 1.38 in.) 45 For this mode to improve the effect. Macro / Infinity Modes ● Shooting ● Macro Infinity Use this mode for compositions combining both near and distant objects. 1 Press the / button to 7.9 in.). Red-Eye Reduction Light reflecting back from...
PowerShot A200/A100 Camera User Guide
Page 25
...image so that it parallel as you want to start recording movie images. • The recording time (in seconds) and a red circle appear in Each Shooting Mode" (p. 57). You cannot shoot images at this time. The exposure, focus and white balance ...individual movie clips (A200: approx. 20 frames / second, A100: approx. 15 frames / second) PowerShot A200: approx. 9 seconds PowerShot A100: approx. 14 seconds PowerShot A200: approx. 26 seconds PowerShot A100: approx. 30 seconds (based on standard conditions established by Canon) These items may change depending on the subject or landscape...
...image so that it parallel as you want to start recording movie images. • The recording time (in seconds) and a red circle appear in Each Shooting Mode" (p. 57). You cannot shoot images at this time. The exposure, focus and white balance ...individual movie clips (A200: approx. 20 frames / second, A100: approx. 15 frames / second) PowerShot A200: approx. 9 seconds PowerShot A100: approx. 14 seconds PowerShot A200: approx. 26 seconds PowerShot A100: approx. 30 seconds (based on standard conditions established by Canon) These items may change depending on the subject or landscape...

PowerShot A200/A100 Camera User Guide
Page 29
... remain unique over the range 0001 to 9900. Function Large Reference Pages Medium Resolution Small p. 41 Movie Movie SuperFine Compression Fine p. 41 Normal Auto Flash Red-eye reduction, Auto p. 43 On Continues on next page 57 The camera resets the file number to 1000001 each time you insert a new CF card...
... remain unique over the range 0001 to 9900. Function Large Reference Pages Medium Resolution Small p. 41 Movie Movie SuperFine Compression Fine p. 41 Normal Auto Flash Red-eye reduction, Auto p. 43 On Continues on next page 57 The camera resets the file number to 1000001 each time you insert a new CF card...

PowerShot A200/A100 Camera User Guide
Page 54
... PowerShot A100 Camera Effective Pixels Approx. 2 million Approx. 1.2 million Image Sensor 1 / 3.2 in the range of ISO 64 to ISO 150 equivalent) TTL auto / preset (daylight, cloudy, tungsten, fluorescent, fluorescent H) Red-eye reduction auto / ...auto / on / off ) Shoots after approx. 10 sec. in manual mode with the flash off or in . Specifications All data is based on speeds between 1 - 1 / 6 sec. Available (USB connection only. CCD (Total number of pixels: approx. 2.1 million) 1 / 3.2 in slow synchro mode. • Noise reduction processing on Canon...
... PowerShot A100 Camera Effective Pixels Approx. 2 million Approx. 1.2 million Image Sensor 1 / 3.2 in the range of ISO 64 to ISO 150 equivalent) TTL auto / preset (daylight, cloudy, tungsten, fluorescent, fluorescent H) Red-eye reduction auto / ...auto / on / off ) Shoots after approx. 10 sec. in manual mode with the flash off or in . Specifications All data is based on speeds between 1 - 1 / 6 sec. Available (USB connection only. CCD (Total number of pixels: approx. 2.1 million) 1 / 3.2 in slow synchro mode. • Noise reduction processing on Canon...

PowerShot A200/A100 Camera User Guide
Page 59
...) ... 72 Print Style 72, 78 Printing 71 Printing with DPOF Print Settings ....... 80 Resetting the Print Settings 79 Selecting Images for Printing 76 Protecting 64 R Red-Eye Reduction 43, 44 Replacing the Date Battery 95 Replaying Auto Play 63 Displaying Images Individually 59 Rotating Images in the Display 62 Viewing Images...
...) ... 72 Print Style 72, 78 Printing 71 Printing with DPOF Print Settings ....... 80 Resetting the Print Settings 79 Selecting Images for Printing 76 Protecting 64 R Red-Eye Reduction 43, 44 Replacing the Date Battery 95 Replaying Auto Play 63 Displaying Images Individually 59 Rotating Images in the Display 62 Viewing Images...


