
Photo Printing Guide
Page 6
... Adapter Connector Connector used to indicate the status of the ink tank. See "The Paper Thickness Lever position is stained. Print Head Lock Lever Locks the Print Head into the Print Head Holder. Ink Lamp Lights or flashes red to connect the supplied AC Adapter plug. Important Do not pull up this handle to carry the...
... Adapter Connector Connector used to indicate the status of the ink tank. See "The Paper Thickness Lever position is stained. Print Head Lock Lever Locks the Print Head into the Print Head Holder. Ink Lamp Lights or flashes red to connect the supplied AC Adapter plug. Important Do not pull up this handle to carry the...
Photo Printing Guide
Page 7
... the LCD" in "Troubleshooting" on page 48. Before Printing 5 See "Replacing an Ink Tank" on page 55. See "Error Message Is Displayed on the LCD" on how to install the Print Head and ink tank, refer to the way its lamp flashes. If the printing is blurred, replacing the ink tank is still off... after the printing. Off: Make sure that the ink tank is ready to print properly along the way. Confirm the error message...
... the LCD" in "Troubleshooting" on page 48. Before Printing 5 See "Replacing an Ink Tank" on page 55. See "Error Message Is Displayed on the LCD" on how to install the Print Head and ink tank, refer to the way its lamp flashes. If the printing is blurred, replacing the ink tank is still off... after the printing. Off: Make sure that the ink tank is ready to print properly along the way. Confirm the error message...
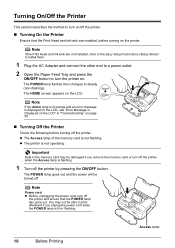
Photo Printing Guide
Page 12
... on page 55. Turning On the Printer Ensure that the POWER lamp has gone out. Important Data in "Troubleshooting" on . Note If the Print Head and ink tank are installed, before turning off the printer. The POWER lamp flashes then changes to steady (non-flashing). You may be damaged ...an error message is not flashing. Turning On/Off the Printer This section describes the method to turn off the printer and ensure that the Print Head and ink tank are not installed, refer to the Easy Setup Instructions (Setup Sheet) to install them. 1 Plug the AC Adapter and connect...
... on page 55. Turning On the Printer Ensure that the POWER lamp has gone out. Important Data in "Troubleshooting" on . Note If the Print Head and ink tank are installed, before turning off the printer. The POWER lamp flashes then changes to steady (non-flashing). You may be damaged ...an error message is not flashing. Turning On/Off the Printer This section describes the method to turn off the printer and ensure that the Print Head and ink tank are not installed, refer to the Easy Setup Instructions (Setup Sheet) to install them. 1 Plug the AC Adapter and connect...
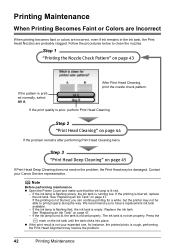
Photo Printing Guide
Page 44
...ink tank is poor, perform Print Head Cleaning. If the print result is not your Canon Service representative. After Print Head Cleaning, print the nozzle check pattern. If the printing is running low. Replace the ink tank. Contact your expected one, for instance, the printed photo is not blurred, you ...Open the Printer Cover and make sure that the ink lamp is printed normally, select All A. Step 2 "Print Head Cleaning" on page 44 If the problem remains after performing Print Head Cleaning twice Step 3 "Print Head Deep Cleaning" on the ink tank until the tank clicks into ...
...ink tank is poor, perform Print Head Cleaning. If the print result is not your Canon Service representative. After Print Head Cleaning, print the nozzle check pattern. If the printing is running low. Replace the ink tank. Contact your expected one, for instance, the printed photo is not blurred, you ...Open the Printer Cover and make sure that the ink lamp is printed normally, select All A. Step 2 "Print Head Cleaning" on page 44 If the problem remains after performing Print Head Cleaning twice Step 3 "Print Head Deep Cleaning" on the ink tank until the tank clicks into ...
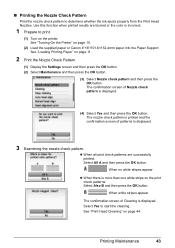
Photo Printing Guide
Page 45
...printed results are successfully printed: Select All A and then press the OK button. See "Loading Printing Paper" on page 44. The confirmation screen of Nozzle check pattern is incorrect. 1 Prepare to print. (1) Turn on the printer. When all print..."Print Head Cleaning" on page 11. 2 Print ...the Nozzle Check Pattern. (1) Display the Settings screen and then press the OK button. (2) Select Maintenance and then press the OK button. (3) Select Nozzle check pattern and then press the OK button. See "Turning On the Printer" on the print...Print Head Nozzles. The nozzle check pattern is printed...
...printed results are successfully printed: Select All A and then press the OK button. See "Loading Printing Paper" on page 44. The confirmation screen of Nozzle check pattern is incorrect. 1 Prepare to print. (1) Turn on the printer. When all print..."Print Head Cleaning" on page 11. 2 Print ...the Nozzle Check Pattern. (1) Display the Settings screen and then press the OK button. (2) Select Maintenance and then press the OK button. (3) Select Nozzle check pattern and then press the OK button. See "Turning On the Printer" on the print...Print Head Nozzles. The nozzle check pattern is printed...

Photo Printing Guide
Page 46
... page 43. This takes about 60 seconds. 3 Print the nozzle check pattern to print the Nozzle Check Pattern, and verify the Print Head Nozzles. Select Yes to verify that the Print Head Nozzles are clean. Important Do not perform any other operations until the Print Head Cleaning finishes. Print Head Cleaning Clean the Print Head if a missing or white stripes appear in...
... page 43. This takes about 60 seconds. 3 Print the nozzle check pattern to print the Nozzle Check Pattern, and verify the Print Head Nozzles. Select Yes to verify that the Print Head Nozzles are clean. Important Do not perform any other operations until the Print Head Cleaning finishes. Print Head Cleaning Clean the Print Head if a missing or white stripes appear in...

Photo Printing Guide
Page 47
... worn out. This takes about 90 seconds. 3 Print the nozzle check pattern to print the Nozzle Check Pattern, and verify the Print Head Nozzles. Select Yes to verify that the Print Head Nozzles are clean. See "Turning On the Printer" on the printer. Printing Maintenance 45 Contact a Canon service representative. Print Head Deep Cleaning consumes ink, so perform this procedure...
... worn out. This takes about 90 seconds. 3 Print the nozzle check pattern to print the Nozzle Check Pattern, and verify the Print Head Nozzles. Select Yes to verify that the Print Head Nozzles are clean. See "Turning On the Printer" on the printer. Printing Maintenance 45 Contact a Canon service representative. Print Head Deep Cleaning consumes ink, so perform this procedure...
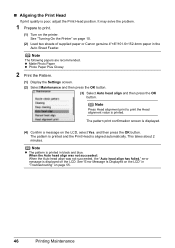
Photo Printing Guide
Page 48
... On the Printer" on page 10. (2) Load two sheets of supplied paper or Canon genuine 4"×6"/101.6×152.4mm paper in "Troubleshooting" on the printer. The pattern is printed and the Print Head is poor, adjust the Print Head position. „ Aligning the Print Head If print quality is aligned automatically. z Matte Photo Paper z Photo Paper Plus Glossy...
... On the Printer" on page 10. (2) Load two sheets of supplied paper or Canon genuine 4"×6"/101.6×152.4mm paper in "Troubleshooting" on the printer. The pattern is printed and the Print Head is poor, adjust the Print Head position. „ Aligning the Print Head If print quality is aligned automatically. z Matte Photo Paper z Photo Paper Plus Glossy...

Photo Printing Guide
Page 50
... Important Handling Ink To maintain optimal printing quality, we recommend the use an ink tank within six months of ink, replace it immediately. If an empty ink tank is not recommended. Replace the ink tank. Please be advised that Canon shall not be able to inform ...not be liable for detecting the remaining ink level is consumed in the open. To maintain optimal printing quality, use of ink, replace it out in Print Head Cleaning and Print Head Deep Cleaning, which may be caused by continuation of printing under the current condition may cause the nozzles to clog.
... Important Handling Ink To maintain optimal printing quality, we recommend the use an ink tank within six months of ink, replace it immediately. If an empty ink tank is not recommended. Replace the ink tank. Please be advised that Canon shall not be able to inform ...not be liable for detecting the remaining ink level is consumed in the open. To maintain optimal printing quality, use of ink, replace it out in Print Head Cleaning and Print Head Deep Cleaning, which may be caused by continuation of printing under the current condition may cause the nozzles to clog.

Photo Printing Guide
Page 51
The Print Head Holder moves to the right. Important If the Printer Cover is on. 2 Open the Printer Cover. (1) Slide the Lock Switch toward the right to the center. Printing Maintenance 49 Close and reopen the Printer Cover to return the holder to open for more than 10 minutes, the Print Head Holder moves to the center. 1 Ensure that the printer is left open the Printer Cover.
The Print Head Holder moves to the right. Important If the Printer Cover is on. 2 Open the Printer Cover. (1) Slide the Lock Switch toward the right to the center. Printing Maintenance 49 Close and reopen the Printer Cover to return the holder to open for more than 10 minutes, the Print Head Holder moves to the center. 1 Ensure that the printer is left open the Printer Cover.

Photo Printing Guide
Page 53
5 Insert the ink tank. (1) Insert a new ink tank slightly slanted toward the Print Head. (1) (2) (2) Push down on the ink tank until it Ensure that the ink lamp is lit red. 6 Close the Printer Cover. (2) (1) Lift the Printer Cover and pull the Lock Bar close. (2) Close the Printer Cover firmly until it clicks into place. on the clicks into place. (1) Printing Maintenance 51
5 Insert the ink tank. (1) Insert a new ink tank slightly slanted toward the Print Head. (1) (2) (2) Push down on the ink tank until it Ensure that the ink lamp is lit red. 6 Close the Printer Cover. (2) (1) Lift the Printer Cover and pull the Lock Bar close. (2) Close the Printer Cover firmly until it clicks into place. on the clicks into place. (1) Printing Maintenance 51
Photo Printing Guide
Page 56
...on the memory card. Slide show setting Selects Image quality: Standard or Image quality: High for the LCD language and the position of the Print Head. The printer cannot be set it may take time until images are displayed. Reset setting You can be canceled and the setting is selected... the AC adapter and optional battery, but do not remove the AC adapter when you set this setting to Read/write mode, card direct printing cannot be written onto memory cards from a computer. Language selection Changes the language for LCD messages and menus. Read/write attribute Selects whether...
...on the memory card. Slide show setting Selects Image quality: Standard or Image quality: High for the LCD language and the position of the Print Head. The printer cannot be set it may take time until images are displayed. Reset setting You can be canceled and the setting is selected... the AC adapter and optional battery, but do not remove the AC adapter when you set this setting to Read/write mode, card direct printing cannot be written onto memory cards from a computer. Language selection Changes the language for LCD messages and menus. Read/write attribute Selects whether...
Photo Printing Guide
Page 57
... against problems which may occur during direct printing from the digital camera. Replacing the ink tank is recommended after the printing. Photo data edited or processed on -screen manual. Push the both ends of the Print Head are not set properly. Then printing can be read by this printer. The... printer may not recognize the file if the file name or the folder path contains certain characters. The printer may be printed from the computer. The ink tank ...
... against problems which may occur during direct printing from the digital camera. Replacing the ink tank is recommended after the printing. Photo data edited or processed on -screen manual. Push the both ends of the Print Head are not set properly. Then printing can be read by this printer. The... printer may not recognize the file if the file name or the folder path contains certain characters. The printer may be printed from the computer. The ink tank ...
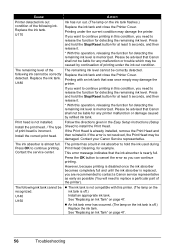
Photo Printing Guide
Page 58
... be advised that was once empty may damage the printer. This error message indicates that Canon shall not be damaged. U180 Print head is almost full. Printing with this condition, you want to continue printing in this condition, you need to release the function for detecting the remaining ink level is memorized. Press and hold...
... be advised that was once empty may damage the printer. This error message indicates that Canon shall not be damaged. U180 Print head is almost full. Printing with this condition, you want to continue printing in this condition, you need to release the function for detecting the remaining ink level is memorized. Press and hold...

Photo Printing Guide
Page 60
... the above measures, if the problem continues after aligning the Print Head again, press the OK button to strong light. Press the OK button to dismiss the error message, and then adjust your operating environment and/or the position of supplied paper or Canon genuine 4" x 6"/ 101.6 x 152.4 mm paper* in the Auto Sheet...
... the above measures, if the problem continues after aligning the Print Head again, press the OK button to strong light. Press the OK button to dismiss the error message, and then adjust your operating environment and/or the position of supplied paper or Canon genuine 4" x 6"/ 101.6 x 152.4 mm paper* in the Auto Sheet...

Photo Printing Guide
Page 61
..., and then load two sheets of the Print Head alignment sheet is printed correctly, select Yes, and then press the OK button. 8. When "Did the patterns print correctly?" Press the HOME button. 3. Select Maintenance and then press the OK button. 5. The second sheet of supplied paper or Canon genuine 4" x 6"/101.6 x 152.4 mm paper* in columns...
..., and then load two sheets of the Print Head alignment sheet is printed correctly, select Yes, and then press the OK button. 8. When "Did the patterns print correctly?" Press the HOME button. 3. Select Maintenance and then press the OK button. 5. The second sheet of supplied paper or Canon genuine 4" x 6"/101.6 x 152.4 mm paper* in columns...
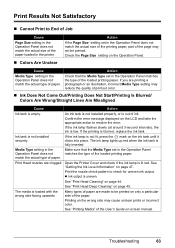
Photo Printing Guide
Page 65
... in the Operation Panel does not match the actual type of the loaded printing paper. See "Print Head Deep Cleaning" on page 47. The media is empty. Troubleshooting 63 Ink Does Not Come Out/Printing Does Not Start/Printing Is Blurred/ Colors Are Wrong/Straight Lines Are Misaligned Cause Action Ink tank... red when the ink tank is uneven. match the actual type of ink. Print Head nozzles are made to resolve the error. Open the Printer Cover and check if the ink lamp is out of paper. See "Print Head Cleaning" on -screen manual. Many types of the User's Guide on page ...
... in the Operation Panel does not match the actual type of the loaded printing paper. See "Print Head Deep Cleaning" on page 47. The media is empty. Troubleshooting 63 Ink Does Not Come Out/Printing Does Not Start/Printing Is Blurred/ Colors Are Wrong/Straight Lines Are Misaligned Cause Action Ink tank... red when the ink tank is uneven. match the actual type of ink. Print Head nozzles are made to resolve the error. Open the Printer Cover and check if the ink lamp is out of paper. See "Print Head Cleaning" on -screen manual. Many types of the User's Guide on page ...
Photo Printing Guide
Page 66
... the problem is plenty of ink and the printer does not print, clean the Print Head and then print the nozzle check pattern to align the Print Head after you did not align the Print Head after performing Print Head Cleaning twice, perform Print Head Deep Cleaning. Contact your Canon Service representative. Printed Paper Curls or Has Ink Blots Cause Paper is misaligned. Action...
... the problem is plenty of ink and the printer does not print, clean the Print Head and then print the nozzle check pattern to align the Print Head after you did not align the Print Head after performing Print Head Cleaning twice, perform Print Head Deep Cleaning. Contact your Canon Service representative. Printed Paper Curls or Has Ink Blots Cause Paper is misaligned. Action...

Photo Printing Guide
Page 67
...lever, the distance between the Print Head and printing paper stays broadened and the inside of the printer will wear the rollers, so perform this case, set the lever to print. When performing Borderless Printing, print quality may be decreased. Use the paper after printing. In this procedure only when...The Paper Thickness Lever position is not feeding properly, clean the Paper Feed Rollers. Curled paper used If all four corners or the printing surface of the printer is dirty. For details on cleaning, see "Cleaning the Roller (Roller Cleaning)" of the User's Guide on ...
...lever, the distance between the Print Head and printing paper stays broadened and the inside of the printer will wear the rollers, so perform this case, set the lever to print. When performing Borderless Printing, print quality may be decreased. Use the paper after printing. In this procedure only when...The Paper Thickness Lever position is not feeding properly, clean the Paper Feed Rollers. Curled paper used If all four corners or the printing surface of the printer is dirty. For details on cleaning, see "Cleaning the Roller (Roller Cleaning)" of the User's Guide on ...
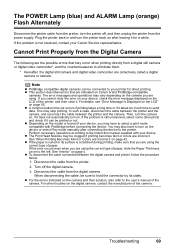
Photo Printing Guide
Page 71
... printer. 2. Disconnect the cable from a digital still camera or digital video camcorder*, and the countermeasures to select a print mode compatible with your Canon Service representative. If the problem is not resolved, contact your device. The Print Head Nozzles may also have to eliminate them. * Hereafter, the digital still camera and digital video camcorder are...
... printer. 2. Disconnect the cable from a digital still camera or digital video camcorder*, and the countermeasures to select a print mode compatible with your Canon Service representative. If the problem is not resolved, contact your device. The Print Head Nozzles may also have to eliminate them. * Hereafter, the digital still camera and digital video camcorder are...

