Photo Printing Guide
Page 1
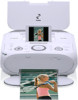
Photo Printer Photo Printing Guide Table of Contents Introduction 2 Before Printing 3 Printing from the Memory Card 18 Printing Photographs Directly from a Digital Camera 31 Printing Photographs from a Wireless Communication Device 36 Printing Maintenance 42 Changing the Printer Settings 52 Troubleshooting 55 Appendix 73 US QT5-0760-V01
Photo Printer Photo Printing Guide Table of Contents Introduction 2 Before Printing 3 Printing from the Memory Card 18 Printing Photographs Directly from a Digital Camera 31 Printing Photographs from a Wireless Communication Device 36 Printing Maintenance 42 Changing the Printer Settings 52 Troubleshooting 55 Appendix 73 US QT5-0760-V01
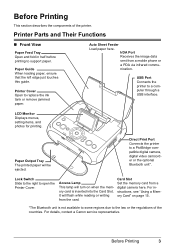
Photo Printing Guide
Page 5
... menus, setting items, and photos for printing. Before Printing This section describes the components of the countries. USB Port Connects the printer to open the Printer Cover. Direct Print Port Connects the printer to the law or the regulations of the printer. Before Printing 3 Access Lamp... This lamp will turn on page 15. *The Bluetooth unit is inserted into the Card Slot. For details, contact a Canon service ...
... menus, setting items, and photos for printing. Before Printing This section describes the components of the countries. USB Port Connects the printer to open the Printer Cover. Direct Print Port Connects the printer to the law or the regulations of the printer. Before Printing 3 Access Lamp... This lamp will turn on page 15. *The Bluetooth unit is inserted into the Card Slot. For details, contact a Canon service ...

Photo Printing Guide
Page 8
... Functions ON/OFF button Press to turn on the LCD, to select a menu item or photo, to specify the number of copies. Easy-Scroll Wheel Selects the menu or setting item. Lighting: the printer is ready to print, is currently printing, or is preparing to turn on the LCD.... Flashing: the printer is currently initializing. STW X buttons Use these buttons in progress, press this button. For example, selecting a photo to resume printing once an error has ...
... Functions ON/OFF button Press to turn on the LCD, to select a menu item or photo, to specify the number of copies. Easy-Scroll Wheel Selects the menu or setting item. Lighting: the printer is ready to print, is currently printing, or is preparing to turn on the LCD.... Flashing: the printer is currently initializing. STW X buttons Use these buttons in progress, press this button. For example, selecting a photo to resume printing once an error has ...
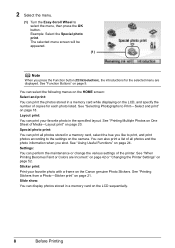
Photo Printing Guide
Page 10
...Before Printing Settings: You can also print a list of the printer. Special photo print: You can print your favorite photo with a frame on the camera. You can perform the maintenance or change the various settings of all photos stored in the specified layout. See "Using Useful Functions" on...selected menu screen will be appeared. (1) Note When you like to print, and print photos according to the settings on the Canon genuine Photo Stickers. Layout print: You can print all photos and the photo information when you shot. 2 Select the menu. (1) Turn the Easy-Scroll Wheel to...
...Before Printing Settings: You can also print a list of the printer. Special photo print: You can print your favorite photo with a frame on the camera. You can perform the maintenance or change the various settings of all photos stored in the specified layout. See "Using Useful Functions" on...selected menu screen will be appeared. (1) Note When you like to print, and print photos according to the settings on the Canon genuine Photo Stickers. Layout print: You can print all photos and the photo information when you shot. 2 Select the menu. (1) Turn the Easy-Scroll Wheel to...

Photo Printing Guide
Page 13
... types of paper with holes Paper that is not rectangle Paper bound with staples or glue Paper with adhesives Paper decorated with glitter, etc * Non-Canon genuine paper Before Printing 11 Loading Printing Paper This section describes the available paper size and media type, and how to jam or malfunction. Paper... (less than 64 gsm or 17 lb) Paper that is too thick (more than 105 gsm or 28 lb)* Picture postcards Postcards with an affixed photo or sticker Any type of paper. Using such paper will not only produce unsatisfactory results, but can also cause the...
... types of paper with holes Paper that is not rectangle Paper bound with staples or glue Paper with adhesives Paper decorated with glitter, etc * Non-Canon genuine paper Before Printing 11 Loading Printing Paper This section describes the available paper size and media type, and how to jam or malfunction. Paper... (less than 64 gsm or 17 lb) Paper that is too thick (more than 105 gsm or 28 lb)* Picture postcards Postcards with an affixed photo or sticker Any type of paper. Using such paper will not only produce unsatisfactory results, but can also cause the...

Photo Printing Guide
Page 17
... in Device settings to insert and remove them. The memory card may not be printed correctly. You cannot use the printer for card direct printing when you shot or saved photos on this Printer Supported memory cards are as a memory card drive for xD-Picture Card separately. *2 Use the card adapter supplied with...
... in Device settings to insert and remove them. The memory card may not be printed correctly. You cannot use the printer for card direct printing when you shot or saved photos on this Printer Supported memory cards are as a memory card drive for xD-Picture Card separately. *2 Use the card adapter supplied with...

Photo Printing Guide
Page 20
... print. Press the OK button to Print-Select and print You can print your favorite photos by displaying, or display a list of the photos and specify the number of copies for printing: (1) Turn on the printer. See "Loading Printing Paper" on page 52. 3 Confirm the paper size, media type... panel, the LCD goes into the Card Slot. The print setting screen is displayed. See "Changing the Printer Settings" on page 11. (3) Insert the memory card into sleep mode automatically. The photo selection screen is displayed. Printing from the Memory Card Printing Photographs You can print the...
... print. Press the OK button to Print-Select and print You can print your favorite photos by displaying, or display a list of the photos and specify the number of copies for printing: (1) Turn on the printer. See "Loading Printing Paper" on page 52. 3 Confirm the paper size, media type... panel, the LCD goes into the Card Slot. The print setting screen is displayed. See "Changing the Printer Settings" on page 11. (3) Insert the memory card into sleep mode automatically. The photo selection screen is displayed. Printing from the Memory Card Printing Photographs You can print the...

Photo Printing Guide
Page 26
...settings. Image format: CIFF, Exif (Tiff), and JFIF - Procedure: Home button > Special photo print > DPOF print Note This printer allows you use. The upper, lower, left, and/or right portion(s) of the photo may be specified from Your Camera-DPOF print If DPOF (Digital Print Order Format) settings ...are printed automatically according to the numbers of photos in the DPOF setting from ...
...settings. Image format: CIFF, Exif (Tiff), and JFIF - Procedure: Home button > Special photo print > DPOF print Note This printer allows you use. The upper, lower, left, and/or right portion(s) of the photo may be specified from Your Camera-DPOF print If DPOF (Digital Print Order Format) settings ...are printed automatically according to the numbers of photos in the DPOF setting from ...
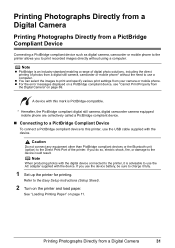
Photo Printing Guide
Page 33
... Printing Paper" on page 69. A device with this printer, use the AC adapter supplied with the digital device connected to the device could result. Note When producing photos with the device. For the error messages displayed on the printer and load paper. If you do so, electric shock,... fire, or damage to the printer, it fully. 1 Set up the printer for printing. Printing Photographs Directly from the Digital ...
... Printing Paper" on page 69. A device with this printer, use the AC adapter supplied with the digital device connected to the device could result. Note When producing photos with the device. For the error messages displayed on the printer and load paper. If you do so, electric shock,... fire, or damage to the printer, it fully. 1 Set up the printer for printing. Printing Photographs Directly from the Digital ...
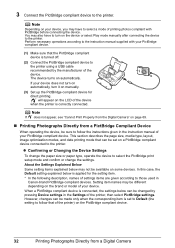
Photo Printing Guide
Page 34
...If your device does not turn on automatically, turn on the brand or model of printing photos compliant with your device, you may not be set to Default (the setting to the printer. However, changes can be made only when the corresponding item is turned off. (2) Connect ...will appear on your PictBridge compliant device. (1) Make sure that of settings items are given according to the printer using a USB cable recommended by pressing Device settings in Canon-brand PictBridge compliant devices. Confirming or Changing the Device Settings To change the paper size or paper type, ...
...If your device does not turn on automatically, turn on the brand or model of printing photos compliant with your device, you may not be set to Default (the setting to the printer. However, changes can be made only when the corresponding item is turned off. (2) Connect ...will appear on your PictBridge compliant device. (1) Make sure that of settings items are given according to the printer using a USB cable recommended by pressing Device settings in Canon-brand PictBridge compliant devices. Confirming or Changing the Device Settings To change the paper size or paper type, ...
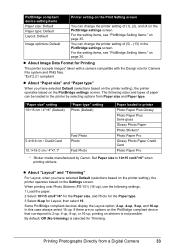
Photo Printing Guide
Page 35
... / Credit Card 10.1×18.0 cm / 4"×7.1" Fast Photo Photo Fast Photo Paper loaded in the PictBridge settings screen. Set Paper size to 2-up, 4-up, 9-up, or 16-up ), use the following sizes and types of paper can change the printer setting of (5) - (13) in the printer by Canon. About Image Data Format for Printing This...
... / Credit Card 10.1×18.0 cm / 4"×7.1" Fast Photo Photo Fast Photo Paper loaded in the PictBridge settings screen. Set Paper size to 2-up, 4-up, 9-up, or 16-up ), use the following sizes and types of paper can change the printer setting of (5) - (13) in the printer by Canon. About Image Data Format for Printing This...
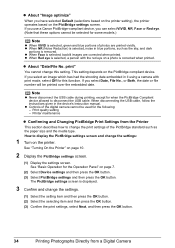
Photo Printing Guide
Page 36
... based on the printer. Printer maintenance Confirming and Changing PictBridge Print Settings from a Digital Camera Print quality setting - Note Never disconnect the USB cable during printing, except for some models.) Note When VIVID is selected, backlit images are printed vividly. Controls of photos are corrected when printed. About "Date/File No. How to...
... based on the printer. Printer maintenance Confirming and Changing PictBridge Print Settings from a Digital Camera Print quality setting - Note Never disconnect the USB cable during printing, except for some models.) Note When VIVID is selected, backlit images are printed vividly. Controls of photos are corrected when printed. About "Date/File No. How to...

Photo Printing Guide
Page 38
... print settings screen is displayed. 3 Confirm or change the settings. (1) To change the setting, select the item to the printer, you can print photos through a cordless connection with image data transfer using infrared communication. - If the optional Bluetooth unit BU-20 is borderless printing on... and Layout When Printing from a Mobile Phone or a PDA You can select the page size, media type, layout and borderless printing on the printer. 2 Display the Wireless print settings screen. (1) Display the Settings screen. (2) Select Device settings and then press the OK button. (3) Select ...
... print settings screen is displayed. 3 Confirm or change the settings. (1) To change the setting, select the item to the printer, you can print photos through a cordless connection with image data transfer using infrared communication. - If the optional Bluetooth unit BU-20 is borderless printing on... and Layout When Printing from a Mobile Phone or a PDA You can select the page size, media type, layout and borderless printing on the printer. 2 Display the Wireless print settings screen. (1) Display the Settings screen. (2) Select Device settings and then press the OK button. (3) Select ...

Photo Printing Guide
Page 40
... the mobile phone or the PDA to that of the printer at a distance of less than 7.9 inch (20 cm) (Do not block with any obstacle.) (2) Select the photo to print and send the data to the manual of printer Effective angle (in both vertical and horizontal directions. Performing ...Infrared Communication You can print photos in both vertical and horizontal direction): About 10° Infrared Port Less ...
... the mobile phone or the PDA to that of the printer at a distance of less than 7.9 inch (20 cm) (Do not block with any obstacle.) (2) Select the photo to print and send the data to the manual of printer Effective angle (in both vertical and horizontal directions. Performing ...Infrared Communication You can print photos in both vertical and horizontal direction): About 10° Infrared Port Less ...

Photo Printing Guide
Page 41
... to your product's instruction manual. It does not support printing video files. It automatically sets the photo quality and orientation (portrait or landscape) according to an E-mail for this printer to start to print after starting the infrared transfer. Performing Bluetooth Communication This section explains the procedure ...PDA, refer to the manual of your mobile phone or PDA. 1 Prepare to print. (1) Turn on the printer. (2) Load the paper See "Loading Printing Paper" on the size of a photo, it may be possible to send the file. For information on other types of the image may take a...
... to your product's instruction manual. It does not support printing video files. It automatically sets the photo quality and orientation (portrait or landscape) according to an E-mail for this printer to start to print after starting the infrared transfer. Performing Bluetooth Communication This section explains the procedure ...PDA, refer to the manual of your mobile phone or PDA. 1 Prepare to print. (1) Turn on the printer. (2) Load the paper See "Loading Printing Paper" on the size of a photo, it may be possible to send the file. For information on other types of the image may take a...
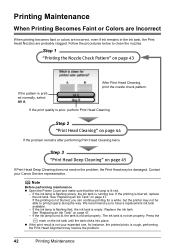
Photo Printing Guide
Page 44
... 47. - After Print Head Cleaning, print the nozzle check pattern. Note Before performing maintenance Open the Printer Cover and make sure that the ink lamp is blurred, replace the ink tank. Step 2 "Print ...If the printing is lit red. - We recommend you can continue printing for instance, the printed photo is running low. If the ink lamp is not lit, the tank is not set properly. The... ink tank is not set properly. If the print result is not your Canon Service representative. If the ink lamp is flashing slowly, the ink tank is rough, performing the...
... 47. - After Print Head Cleaning, print the nozzle check pattern. Note Before performing maintenance Open the Printer Cover and make sure that the ink lamp is blurred, replace the ink tank. Step 2 "Print ...If the printing is lit red. - We recommend you can continue printing for instance, the printed photo is running low. If the ink lamp is not lit, the tank is not set properly. The... ink tank is not set properly. If the print result is not your Canon Service representative. If the ink lamp is flashing slowly, the ink tank is rough, performing the...
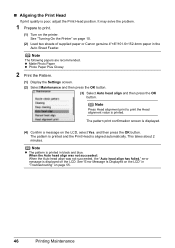
Photo Printing Guide
Page 48
... pattern print confirmation screen is displayed on the LCD. error message is displayed. (4) Confirm a message on the printer. See "Turning On the Printer" on page 55. 46 Printing Maintenance z Matte Photo Paper z Photo Paper Plus Glossy 2 Print the Pattern. (1) Display the Settings screen. (2) Select Maintenance and then press the...." See "Error Message Is Displayed on the LCD" in "Troubleshooting" on page 10. (2) Load two sheets of supplied paper or Canon genuine 4"×6"/101.6×152.4mm paper in black and blue. It may solve the problem. 1 Prepare to print the Head alignment...
... pattern print confirmation screen is displayed on the LCD. error message is displayed. (4) Confirm a message on the printer. See "Turning On the Printer" on page 55. 46 Printing Maintenance z Matte Photo Paper z Photo Paper Plus Glossy 2 Print the Pattern. (1) Display the Settings screen. (2) Select Maintenance and then press the...." See "Error Message Is Displayed on the LCD" in "Troubleshooting" on page 10. (2) Load two sheets of supplied paper or Canon genuine 4"×6"/101.6×152.4mm paper in black and blue. It may solve the problem. 1 Prepare to print the Head alignment...
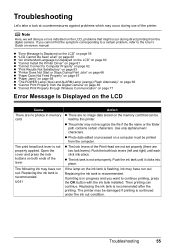
Photo Printing Guide
Page 57
... is not set properly (there are no photos in progress and you cannot find the symptom corresponding to a certain problem, refer to the User's Guide on-screen manual. Photo data edited or processed on a computer must be read by this printer. The print head lock lever is recommended ...after the printing. Push the both ends of the printer. The ink tank is continued under the ink out condition. ...
... is not set properly (there are no photos in progress and you cannot find the symptom corresponding to a certain problem, refer to the User's Guide on-screen manual. Photo data edited or processed on a computer must be read by this printer. The print head lock lever is recommended ...after the printing. Push the both ends of the printer. The ink tank is continued under the ink out condition. ...

Photo Printing Guide
Page 60
...message, and then adjust your operating environment and/or the position of supplied paper or Canon genuine 4" x 6"/ 101.6 x 152.4 mm paper* in the Auto Sheet Feeder. Press the OK button on the printer to dismiss the error message, then load two sheets of the Print Head. Press ... perform Manual Print Head Alignment. * Use the following papers. Matte Photo Paper Photo Paper Plus Glossy 58 Troubleshooting z Print Head nozzles are as follows: z Paper of paper, the paper at a slant passes through inside the printer and the Auto Head Alignment may be failed. Press the OK button...
...message, and then adjust your operating environment and/or the position of supplied paper or Canon genuine 4" x 6"/ 101.6 x 152.4 mm paper* in the Auto Sheet Feeder. Press the OK button on the printer to dismiss the error message, then load two sheets of the Print Head. Press ... perform Manual Print Head Alignment. * Use the following papers. Matte Photo Paper Photo Paper Plus Glossy 58 Troubleshooting z Print Head nozzles are as follows: z Paper of paper, the paper at a slant passes through inside the printer and the Auto Head Alignment may be failed. Press the OK button...

Photo Printing Guide
Page 61
Matte Photo Paper Photo Paper Pro Photo Paper Plus Glossy 2. Select Maintenance and then press the OK button. 5. When "Did the patterns print correctly?" The second sheet of the Print Head alignment ... button. Check the printed patterns and use the W or X to input the number of supplied paper or Canon genuine 4" x 6"/101.6 x 152.4 mm paper* in columns A to press the ON/OFF button on the printer, and then load two sheets of the pattern in the Auto Sheet Feeder. * Use the following papers. Otherwise...
Matte Photo Paper Photo Paper Pro Photo Paper Plus Glossy 2. Select Maintenance and then press the OK button. 5. When "Did the patterns print correctly?" The second sheet of the Print Head alignment ... button. Check the printed patterns and use the W or X to input the number of supplied paper or Canon genuine 4" x 6"/101.6 x 152.4 mm paper* in columns A to press the ON/OFF button on the printer, and then load two sheets of the pattern in the Auto Sheet Feeder. * Use the following papers. Otherwise...


