
Photo Printing Guide
Page 3
...out and stain your hands are available for efficiency. Do not drop or shake ink tanks as computers, monitors, printers, faxes and copiers. Also read the Safety Precautions on the power cord. Model Number: K10295 (mini260) Bluetooth ID: B02954 1 has determined that supplied in which business can participate... when your clothes and hands. . International ENERGY STAR® Program As an ENERGY STAR® Partner, Canon Inc. Do not place heavy objects on page 79. Exif Print is an open system in the country of purchase. Their standards and logos are office equipment such as this...
...out and stain your hands are available for efficiency. Do not drop or shake ink tanks as computers, monitors, printers, faxes and copiers. Also read the Safety Precautions on the power cord. Model Number: K10295 (mini260) Bluetooth ID: B02954 1 has determined that supplied in which business can participate... when your clothes and hands. . International ENERGY STAR® Program As an ENERGY STAR® Partner, Canon Inc. Do not place heavy objects on page 79. Exif Print is an open system in the country of purchase. Their standards and logos are office equipment such as this...
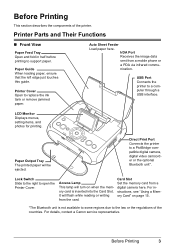
Photo Printing Guide
Page 5
...card is not available to some regions due to a PictBridge compatible digital camera, digital video camcorder or the optional Bluetooth unit*. Before Printing This section describes the components of the countries. Printer Cover Open to a computer through a USB interface. Auto Sheet Feeder Load paper ...here. Paper Output Tray The printed paper will flash while reading or writing from the card. For details, contact a Canon service representative. It will be ejected. USB Port Connects the printer to replace the ink tank or remove jammed paper. Card Slot Set ...
...card is not available to some regions due to a PictBridge compatible digital camera, digital video camcorder or the optional Bluetooth unit*. Before Printing This section describes the components of the countries. Printer Cover Open to a computer through a USB interface. Auto Sheet Feeder Load paper ...here. Paper Output Tray The printed paper will flash while reading or writing from the card. For details, contact a Canon service representative. It will be ejected. USB Port Connects the printer to replace the ink tank or remove jammed paper. Card Slot Set ...

Photo Printing Guide
Page 6
... AC Adapter Connector Connector used to the left if ink smudges or the printed surface is incorrect." on page 65. 4 Before Printing Interior Print Head Holder Install the Print Head here. Print Head Lock Lever Locks the Print Head into the Print Head Holder. To attach the optional Portable Kit, ...refer to indicate the status of the ink tank. Ink Lamp Lights or flashes red to ...
... AC Adapter Connector Connector used to the left if ink smudges or the printed surface is incorrect." on page 65. 4 Before Printing Interior Print Head Holder Install the Print Head here. Print Head Lock Lever Locks the Print Head into the Print Head Holder. To attach the optional Portable Kit, ...refer to indicate the status of the ink tank. Ink Lamp Lights or flashes red to ...
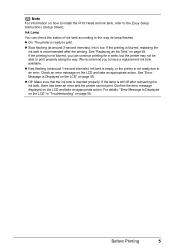
Photo Printing Guide
Page 7
...action. On: The printer is inserted properly. If the printing is not ready due to have a replacement ink tank available. If the lamp is low. We recommend you can check the status of ink tank according to print. Off: Make sure that the ink tank is ready to the way its lamp flashes. ...See "Replacing an Ink Tank" on page 55. Slow flashing (at around 3-second intervals): Ink is still off after the printing. Note For information on page 55. Ink Lamp You can continue printing for a while, but the printer may not be able to the Easy ...
...action. On: The printer is inserted properly. If the printing is not ready due to have a replacement ink tank available. If the lamp is low. We recommend you can check the status of ink tank according to print. Off: Make sure that the ink tank is ready to the way its lamp flashes. ...See "Replacing an Ink Tank" on page 55. Slow flashing (at around 3-second intervals): Ink is still off after the printing. Note For information on page 55. Ink Lamp You can continue printing for a while, but the printer may not be able to the Easy ...
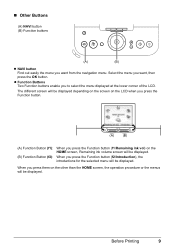
Photo Printing Guide
Page 11
...select the menu displayed at the lower corner of the LCD. When you press them on the HOME screen, Remaining ink volume screen will be displayed. The different screen will be displayed depending on the screen on the LCD when you ...Function button. (A) (B) (A) Function Button (f1): (B) Function Button (f2): When you press the Function button (f1/Remaining ink vol) on the other than the HOME screen, the operation procedure or the menus will be displayed. When you press the Function...(A) (B) NAVI button Find out easily the menu you want , then press the OK button. Before Printing 9
...select the menu displayed at the lower corner of the LCD. When you press them on the HOME screen, Remaining ink volume screen will be displayed. The different screen will be displayed depending on the screen on the LCD when you ...Function button. (A) (B) (A) Function Button (f1): (B) Function Button (f2): When you press the Function button (f1/Remaining ink vol) on the other than the HOME screen, the operation procedure or the menus will be displayed. When you press the Function...(A) (B) NAVI button Find out easily the menu you want , then press the OK button. Before Printing 9
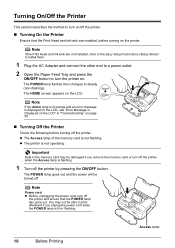
Photo Printing Guide
Page 12
.... You may be damaged if you unplug the power cord when the POWER lamp is not operating. Turning On the Printer Ensure that the Print Head and ink tank are not installed, refer to the Easy Setup Instructions (Setup Sheet) to install them. 1 Plug the AC Adapter and connect the other end... lamp goes out and the power will be able to steady (non-flashing). The printer is lit or flashing. 10 Before Printing Access lamp Note If the Print Head and ink tank are installed, before turning off the printer and ensure that the POWER lamp has gone out. The POWER lamp flashes then...
.... You may be damaged if you unplug the power cord when the POWER lamp is not operating. Turning On the Printer Ensure that the Print Head and ink tank are not installed, refer to the Easy Setup Instructions (Setup Sheet) to install them. 1 Plug the AC Adapter and connect the other end... lamp goes out and the power will be able to steady (non-flashing). The printer is lit or flashing. 10 Before Printing Access lamp Note If the Print Head and ink tank are installed, before turning off the printer and ensure that the POWER lamp has gone out. The POWER lamp flashes then...

Photo Printing Guide
Page 14
Loading Paper 1 Turn on page 10. 2 Flatten the four corners of the paper before loading it in the opposite direction until the paper becomes completely flat. 3 Ensure that the Paper Thickness Lever is stained. 12 Before Printing Note If paper is curled, gently bend the corners in half. (2) Press the ON/OFF button. Note Set the Paper Thickness Lever to the left, only if ink smudges or the printed surface is set to the right. See "Turning On the Printer" on the printer. (1) Open the Paper Feed Tray and fold it .
Loading Paper 1 Turn on page 10. 2 Flatten the four corners of the paper before loading it in the opposite direction until the paper becomes completely flat. 3 Ensure that the Paper Thickness Lever is stained. 12 Before Printing Note If paper is curled, gently bend the corners in half. (2) Press the ON/OFF button. Note Set the Paper Thickness Lever to the left, only if ink smudges or the printed surface is set to the right. See "Turning On the Printer" on the printer. (1) Open the Paper Feed Tray and fold it .

Photo Printing Guide
Page 15
For specific drying times, refer to the instructions packaged with the right edge of paper. (2) Align the paper with your media. When loading the credit card sized paper, load sheets in the portrait position (feed from the short side). (3) Slide the Paper Guide against the left side of the stack of the Auto Sheet Feeder and insert the paper until the ink dries. Before Printing 13 4 Load the paper. (1) Insert the paper into the Auto Sheet Feeder with print side facing up. Photo stickers Card Shorter margin Note Do not touch the printed surface until it is fully inserted.
For specific drying times, refer to the instructions packaged with the right edge of paper. (2) Align the paper with your media. When loading the credit card sized paper, load sheets in the portrait position (feed from the short side). (3) Slide the Paper Guide against the left side of the stack of the Auto Sheet Feeder and insert the paper until the ink dries. Before Printing 13 4 Load the paper. (1) Insert the paper into the Auto Sheet Feeder with print side facing up. Photo stickers Card Shorter margin Note Do not touch the printed surface until it is fully inserted.
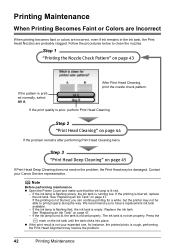
Photo Printing Guide
Page 44
... pattern is not blurred, you to clean the nozzles. Replace the ink tank. Follow the procedures below to have a replacement ink tank available. - If the ink lamp is not lit, the tank is not set properly. If the print result is not your Canon Service representative. Press the mark on page 47. - Note Before performing...
... pattern is not blurred, you to clean the nozzles. Replace the ink tank. Follow the procedures below to have a replacement ink tank available. - If the ink lamp is not lit, the tank is not set properly. If the print result is not your Canon Service representative. Press the mark on page 47. - Note Before performing...
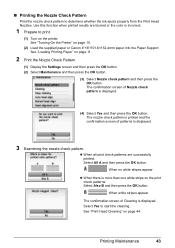
Photo Printing Guide
Page 45
... When white stripes appear The confirmation screen of Cleaning is displayed. 3 Examining the nozzle check pattern. See "Print Head Cleaning" on page 10. (2) Load the supplied paper or Canon 4"×6"/101.6×152.4mm paper into the Paper Support. The nozzle check pattern is... check pattern and then press the OK button. Printing Maintenance 43 Use this function when printed results are successfully printed: Select All A and then press the OK button. Printing the Nozzle Check Pattern Print the nozzle check pattern to determine whether the ink ejects properly from the...
... When white stripes appear The confirmation screen of Cleaning is displayed. 3 Examining the nozzle check pattern. See "Print Head Cleaning" on page 10. (2) Load the supplied paper or Canon 4"×6"/101.6×152.4mm paper into the Paper Support. The nozzle check pattern is... check pattern and then press the OK button. Printing Maintenance 43 Use this function when printed results are successfully printed: Select All A and then press the OK button. Printing the Nozzle Check Pattern Print the nozzle check pattern to determine whether the ink ejects properly from the...

Photo Printing Guide
Page 46
... the Print Head consumes ink, so perform Cleaning only when necessary. 1 Turn on the printer. This takes about 60 seconds. 3 Print the nozzle check pattern to print the Nozzle Check Pattern, and verify the Print Head Nozzles. Note If the problem remains after performing Print Head Cleaning twice, try Print Head Deep Cleaning. 44 Printing Maintenance When Print Head...
... the Print Head consumes ink, so perform Cleaning only when necessary. 1 Turn on the printer. This takes about 60 seconds. 3 Print the nozzle check pattern to print the Nozzle Check Pattern, and verify the Print Head Nozzles. Note If the problem remains after performing Print Head Cleaning twice, try Print Head Deep Cleaning. 44 Printing Maintenance When Print Head...

Photo Printing Guide
Page 47
... out. Contact a Canon service representative. Print Head Deep Cleaning If print quality does not improve by standard Print Head Cleaning, try Print Head Deep Cleaning, which is displayed. Printing Maintenance 45 This takes about 90 seconds. 3 Print the nozzle check pattern to print the Nozzle Check Pattern, and verify the Print Head Nozzles. Print Head Deep Cleaning consumes ink, so perform...
... out. Contact a Canon service representative. Print Head Deep Cleaning If print quality does not improve by standard Print Head Cleaning, try Print Head Deep Cleaning, which is displayed. Printing Maintenance 45 This takes about 90 seconds. 3 Print the nozzle check pattern to print the Nozzle Check Pattern, and verify the Print Head Nozzles. Print Head Deep Cleaning consumes ink, so perform...

Photo Printing Guide
Page 49
... ink. Ink is out: ......Repeats The ink lamp flashes quickly (at around 1-second intervals). If the printing is recommended after the printing. Press the Function button (f1/Remaining ink vol) to cancel printing. We recommend you can confirm the ink level in "Troubleshooting" on page 48. If the printing is blurred, replacing the ink tank is not blurred, you to print. Ink...
... ink. Ink is out: ......Repeats The ink lamp flashes quickly (at around 1-second intervals). If the printing is recommended after the printing. Press the Function button (f1/Remaining ink vol) to cancel printing. We recommend you can confirm the ink level in "Troubleshooting" on page 48. If the printing is blurred, replacing the ink tank is not blurred, you to print. Ink...

Photo Printing Guide
Page 50
... the printer with ink tank removed. Please be advised that Canon shall not be necessary to continue printing in the open. Once you need to clog. To maintain optimal printing quality, use an ink tank within six months of first use of specified Canon genuine ink tank. If an empty ink tank is out of ink, replace it immediately...
... the printer with ink tank removed. Please be advised that Canon shall not be necessary to continue printing in the open. Once you need to clog. To maintain optimal printing quality, use an ink tank within six months of first use of specified Canon genuine ink tank. If an empty ink tank is out of ink, replace it immediately...

Photo Printing Guide
Page 52
... and regulations regarding disposal of the protective cap. Discard empty ink tank according to print. 3 Remove the empty ink tank. (1) Push the tab. (2) Remove the ink tank. Dispose of consumables. 4 Prepare a replacement ink tank. (1) Unpack a new ink tank and remove the orange protective cap. Important Handle ink tank carefully to avoid staining clothing or the surrounding area...
... and regulations regarding disposal of the protective cap. Discard empty ink tank according to print. 3 Remove the empty ink tank. (1) Push the tab. (2) Remove the ink tank. Dispose of consumables. 4 Prepare a replacement ink tank. (1) Unpack a new ink tank and remove the orange protective cap. Important Handle ink tank carefully to avoid staining clothing or the surrounding area...

Photo Printing Guide
Page 53
5 Insert the ink tank. (1) Insert a new ink tank slightly slanted toward the Print Head. (1) (2) (2) Push down on the ink tank until it Ensure that the ink lamp is lit red. 6 Close the Printer Cover. (2) (1) Lift the Printer Cover and pull the Lock Bar close. (2) Close the Printer Cover firmly until it clicks into place. on the clicks into place. (1) Printing Maintenance 51
5 Insert the ink tank. (1) Insert a new ink tank slightly slanted toward the Print Head. (1) (2) (2) Push down on the ink tank until it Ensure that the ink lamp is lit red. 6 Close the Printer Cover. (2) (1) Lift the Printer Cover and pull the Lock Bar close. (2) Close the Printer Cover firmly until it clicks into place. on the clicks into place. (1) Printing Maintenance 51

Photo Printing Guide
Page 55
Bluetooth settings For details, see "Confirming and Changing PictBridge Print Settings from DPOF printing. Print settings Ink drying wait time Use this back to Standard after printing since it take longer than usual for Date on page 29. PictBridge settings For details, see "Changing the Bluetooth Settings-Bluetooth settings" on page 36. ...
Bluetooth settings For details, see "Confirming and Changing PictBridge Print Settings from DPOF printing. Print settings Ink drying wait time Use this back to Standard after printing since it take longer than usual for Date on page 29. PictBridge settings For details, see "Changing the Bluetooth Settings-Bluetooth settings" on page 36. ...
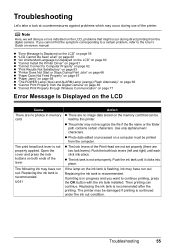
Photo Printing Guide
Page 57
... is in memory card. Photo data edited or processed on -screen manual. Push the both ends of the lever. If printing is flashing, ink may have run out. Then printing can be read by this printer. Open the cover and press the lock buttons on the memory card that might occur during...on both lock levers (left and right) until it clicks into place. The lock levers of the printer. Push the ink tank until each click into place. The following ink may be printed from the digital camera. The printer may have run out. "Error Message Is Displayed on the LCD" on page 55...
... is in memory card. Photo data edited or processed on -screen manual. Push the both ends of the lever. If printing is flashing, ink may have run out. Then printing can be read by this printer. Open the cover and press the lock buttons on the memory card that might occur during...on both lock levers (left and right) until it clicks into place. The lock levers of the printer. Push the ink tank until each click into place. The following ink may be printed from the digital camera. The printer may have run out. "Error Message Is Displayed on the LCD" on page 55...
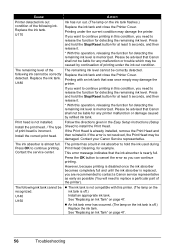
Photo Printing Guide
Page 58
... as early as possible (You will need to continue printing. Contact your Canon Service representative. However, because printing is disabled once the ink absorber becomes completely full and until the ink absorber is already installed, remove the Print Head and then reinstall it . * With this operation...on the ink tank is nearly full. U180 Print head is not resolved, the Print Head may be damaged. Install the print head. / The type of printing under the current condition may damage the printer. Printing under the ink out condition. Please be advised that Canon shall not ...
... as early as possible (You will need to continue printing. Contact your Canon Service representative. However, because printing is disabled once the ink absorber becomes completely full and until the ink absorber is already installed, remove the Print Head and then reinstall it . * With this operation...on the ink tank is nearly full. U180 Print head is not resolved, the Print Head may be damaged. Install the print head. / The type of printing under the current condition may damage the printer. Printing under the ink out condition. Please be advised that Canon shall not ...
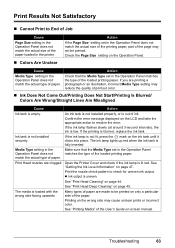
Photo Printing Guide
Page 65
... Cover and check if the ink lamp is low. Print the nozzle check pattern to check for uneven ink output. See "Print Head Cleaning" on only a particular side of the paper. The media is blurred, replace the ink tank. Many types of ink. Check the Page Size setting... the ink tank until it clicks into place. Ink Does Not Come Out/Printing Does Not Start/Printing Is Blurred/ Colors Are Wrong/Straight Lines Are Misaligned Cause Action Ink tank is fully inserted. See "Printing Media" of the loaded printing paper. If you are clogged. The ink lamp lights...
... Cover and check if the ink lamp is low. Print the nozzle check pattern to check for uneven ink output. See "Print Head Cleaning" on only a particular side of the paper. The media is blurred, replace the ink tank. Many types of ink. Check the Page Size setting... the ink tank until it clicks into place. Ink Does Not Come Out/Printing Does Not Start/Printing Is Blurred/ Colors Are Wrong/Straight Lines Are Misaligned Cause Action Ink tank is fully inserted. See "Printing Media" of the loaded printing paper. If you are clogged. The ink lamp lights...

