Quick Start Guide
Page 5
...47 Print Head Deep Cleaning 52 Aligning the Print Head 57 Replacing an Ink Tank 61 Troubleshooting Cannot Install the Printer Driver 70 Print Quality is Poor or Contains Errors 72 Troubleshooting Printer Hardware 74 Paper Does Not Feed Properly 75 Handling Error Messages 76 An...81 Cannot Print Properly from the Digital Camera 82 Appendix Printing Photographs Directly from Canon Bubble Jet Direct Compatible Digital Cameras 84 User's Guide Table of Contents 86 Accessory Options 87 Traveling Abroad with the Printer 89 Specifications 91 Safety Precautions 94 Regulatory Information 96...
...47 Print Head Deep Cleaning 52 Aligning the Print Head 57 Replacing an Ink Tank 61 Troubleshooting Cannot Install the Printer Driver 70 Print Quality is Poor or Contains Errors 72 Troubleshooting Printer Hardware 74 Paper Does Not Feed Properly 75 Handling Error Messages 76 An...81 Cannot Print Properly from the Digital Camera 82 Appendix Printing Photographs Directly from Canon Bubble Jet Direct Compatible Digital Cameras 84 User's Guide Table of Contents 86 Accessory Options 87 Traveling Abroad with the Printer 89 Specifications 91 Safety Precautions 94 Regulatory Information 96...
Quick Start Guide
Page 10
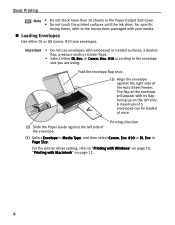
Env. #10 or DL Env. in the Paper Output Slot Cover. • Do not touch the printed surfaces until the ink dries. Basic Printing Note • Do not stack more than 10 sheets in Page Size. For specific drying times, refer to the instructions packaged with ... or US Comm. #10 size envelopes. Loading Envelopes Use either DL Env. Printing direction (3) Select Envelope in Media Type, and then select Comm. For the printer driver setting, refer to the envelope size you are using.
Env. #10 or DL Env. in the Paper Output Slot Cover. • Do not touch the printed surfaces until the ink dries. Basic Printing Note • Do not stack more than 10 sheets in Page Size. For specific drying times, refer to the instructions packaged with ... or US Comm. #10 size envelopes. Loading Envelopes Use either DL Env. Printing direction (3) Select Envelope in Media Type, and then select Comm. For the printer driver setting, refer to the envelope size you are using.
Quick Start Guide
Page 34
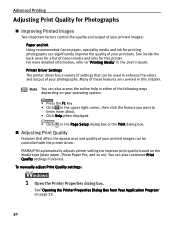
... Many of these features are covered in the User's Guide. You can be used to "Printing Media" in this printer. PIXMA iP90 automatically adjusts printer settings to improve print quality based on the media type (plain paper, Photo Paper Pro, and so on your operating... printed images: Paper and Ink Using recommended Canon paper, speciality media and ink for printing photographs can be controlled with the printer driver. Printer Driver Settings The printer driver has a variety of settings that affect the appearance and quality of Canon media and inks for a list of your...
... Many of these features are covered in the User's Guide. You can be used to "Printing Media" in this printer. PIXMA iP90 automatically adjusts printer settings to improve print quality based on the media type (plain paper, Photo Paper Pro, and so on your operating... printed images: Paper and Ink Using recommended Canon paper, speciality media and ink for printing photographs can be controlled with the printer driver. Printer Driver Settings The printer driver has a variety of settings that affect the appearance and quality of Canon media and inks for a list of your...
Quick Start Guide
Page 46
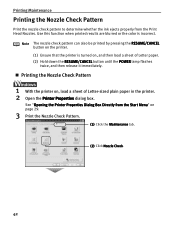
Note The nozzle check pattern can also be printed by pressing the RESUME/CANCEL button on the printer. (1) Ensure that the printer is incorrect. Printing the Nozzle Check Pattern 1 With the printer on page 29. 3 Print the Nozzle Check Pattern. (1) Click the Maintenance tab. (2) Click Nozzle ...Check. 42 Printing Maintenance Printing the Nozzle Check Pattern Print the nozzle check pattern to determine whether the ink ejects properly from the Start Menu" on...
Note The nozzle check pattern can also be printed by pressing the RESUME/CANCEL button on the printer. (1) Ensure that the printer is incorrect. Printing the Nozzle Check Pattern 1 With the printer on page 29. 3 Print the Nozzle Check Pattern. (1) Click the Maintenance tab. (2) Click Nozzle ...Check. 42 Printing Maintenance Printing the Nozzle Check Pattern Print the nozzle check pattern to determine whether the ink ejects properly from the Start Menu" on...
Quick Start Guide
Page 49
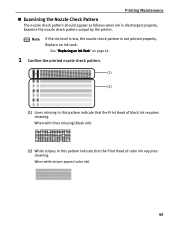
... nozzle check pattern. (1) (2) (1) Lines missing in this pattern indicate that the Print Head of black ink requires cleaning. When white stripes appear (color ink) 45 Examine the nozzle check pattern output by the printer. Note If the ink level is low, the nozzle check pattern is discharged properly. Printing Maintenance Examining the Nozzle Check...
... nozzle check pattern. (1) (2) (1) Lines missing in this pattern indicate that the Print Head of black ink requires cleaning. When white stripes appear (color ink) 45 Examine the nozzle check pattern output by the printer. Note If the ink level is low, the nozzle check pattern is discharged properly. Printing Maintenance Examining the Nozzle Check...
Quick Start Guide
Page 51
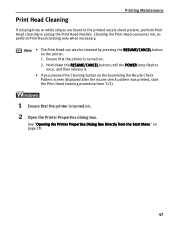
... Print Head cleaning to unclog the Print Head Nozzles. Cleaning the Print Head consumes ink, so perform Print Head cleaning only when necessary. See "Opening the Printer Properties Dialog Box Directly from 3-(3). 1 Ensure that the printer is turned on . 2. Note • The Print Head can also be cleaned... by pressing the RESUME/CANCEL button on page 29. 47 Ensure that the printer is turned on . 2 Open the Printer Properties dialog box. Hold down the RESUME/CANCEL button until the POWER lamp flashes once, and then release it. • ...
... Print Head cleaning to unclog the Print Head Nozzles. Cleaning the Print Head consumes ink, so perform Print Head cleaning only when necessary. See "Opening the Printer Properties Dialog Box Directly from 3-(3). 1 Ensure that the printer is turned on . 2. Note • The Print Head can also be cleaned... by pressing the RESUME/CANCEL button on page 29. 47 Ensure that the printer is turned on . 2 Open the Printer Properties dialog box. Hold down the RESUME/CANCEL button until the POWER lamp flashes once, and then release it. • ...
Quick Start Guide
Page 56
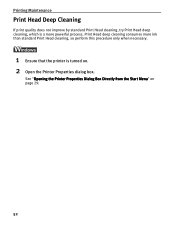
Printing Maintenance Print Head Deep Cleaning If print quality does not improve by standard Print Head cleaning, try Print Head deep cleaning, which is turned on page 29. 52 See "Opening the Printer Properties Dialog Box Directly from the Start Menu" on . 2 Open the Printer Properties dialog box. Print Head deep cleaning consumes more ink than standard Print Head cleaning, so perform this procedure only when necessary. 1 Ensure that the printer is a more powerful process.
Printing Maintenance Print Head Deep Cleaning If print quality does not improve by standard Print Head cleaning, try Print Head deep cleaning, which is turned on page 29. 52 See "Opening the Printer Properties Dialog Box Directly from the Start Menu" on . 2 Open the Printer Properties dialog box. Print Head deep cleaning consumes more ink than standard Print Head cleaning, so perform this procedure only when necessary. 1 Ensure that the printer is a more powerful process.
Quick Start Guide
Page 58
... (4) If the problem persists, the Print Head may have run out of ink. See "Replacing an Ink Tank" on page 42. (2) If the problem persists, perform step 3 again. (3) If the problem persists, the printer may be used with Bluetooth communication. (1) Double-click the hard disk icon where...and click Utility or Configure. (4) Select iP90 from the Product list and click Maintenance. 54 Contact the Canon Customer Care Center. 1 Ensure that the printer is turned on. 2 Open the BJ Printer Utility dialog box. Printing Maintenance 4 Check the Print Head condition. (1) Print a nozzle check pattern ...
... (4) If the problem persists, the Print Head may have run out of ink. See "Replacing an Ink Tank" on page 42. (2) If the problem persists, perform step 3 again. (3) If the problem persists, the printer may be used with Bluetooth communication. (1) Double-click the hard disk icon where...and click Utility or Configure. (4) Select iP90 from the Product list and click Maintenance. 54 Contact the Canon Customer Care Center. 1 Ensure that the printer is turned on. 2 Open the BJ Printer Utility dialog box. Printing Maintenance 4 Check the Print Head condition. (1) Print a nozzle check pattern ...
Quick Start Guide
Page 60
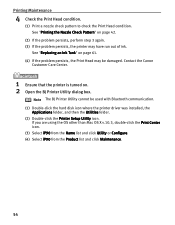
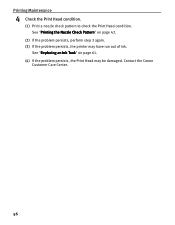
Printing Maintenance 4 Check the Print Head condition. (1) Print a nozzle check pattern to check the Print Head condition. Contact the Canon Customer Care Center. 56 See "Replacing an Ink Tank" on page 42. (2) If the problem persists, perform step 3 again. (3) If the problem persists, the printer may be damaged. See "Printing the Nozzle Check Pattern" on page 61. (4) If the problem persists, the Print Head may have run out of ink.
Printing Maintenance 4 Check the Print Head condition. (1) Print a nozzle check pattern to check the Print Head condition. Contact the Canon Customer Care Center. 56 See "Replacing an Ink Tank" on page 42. (2) If the problem persists, perform step 3 again. (3) If the problem persists, the printer may be damaged. See "Printing the Nozzle Check Pattern" on page 61. (4) If the problem persists, the Print Head may have run out of ink.
Quick Start Guide
Page 65
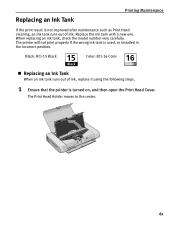
...Black: BCI-15 Black Color: BCI-16 Color Replacing an Ink Tank When an ink tank runs out of ink. The printer will not print properly if the wrong ink tank is turned on, and then open the Print Head Cover. Replacing an Ink Tank Printing Maintenance If the print result is not improved after... maintenance such as Print Head cleaning, an ink tank runs out of ink, replace it using the following steps. 1 Ensure that the printer is used, or installed in the incorrect position. The Print Head Holder moves to the center. 61 When ...
...Black: BCI-15 Black Color: BCI-16 Color Replacing an Ink Tank When an ink tank runs out of ink. The printer will not print properly if the wrong ink tank is turned on, and then open the Print Head Cover. Replacing an Ink Tank Printing Maintenance If the print result is not improved after... maintenance such as Print Head cleaning, an ink tank runs out of ink, replace it using the following steps. 1 Ensure that the printer is used, or installed in the incorrect position. The Print Head Holder moves to the center. 61 When ...
Quick Start Guide
Page 67
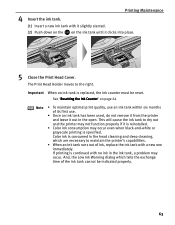
...properly if it clicks into place. 5 Close the Print Head Cover. And, the Low Ink Warning dialog which are necessary to maintain the printer's capabilities. • When an ink tank runs out of the ink tank cannot be reset. If printing is consumed in the head cleaning and deep cleaning,...not remove it from the printer and leave it out in the ink tank, a problem may occur. Important When an ink tank is specified. Printing Maintenance (1) Insert a new ink tank with no ink in the open. This will cause the ink tank to the right. 4 Insert the ink tank. The Print Head Holder...
...properly if it clicks into place. 5 Close the Print Head Cover. And, the Low Ink Warning dialog which are necessary to maintain the printer's capabilities. • When an ink tank runs out of the ink tank cannot be reset. If printing is consumed in the head cleaning and deep cleaning,...not remove it from the printer and leave it out in the ink tank, a problem may occur. Important When an ink tank is specified. Printing Maintenance (1) Insert a new ink tank with no ink in the open. This will cause the ink tank to the right. 4 Insert the ink tank. The Print Head Holder...
Quick Start Guide
Page 68
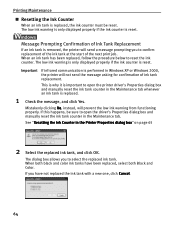
... prompting you have been replaced, select both Black and Color. See "Resetting the Ink Counter in Windows XP or Windows 2000, the printer will prevent the low ink warning from functioning properly. When both black and color ink tanks have not replaced the ink tank with a new one, click Cancel. 64 Printing Maintenance Resetting the...
... prompting you have been replaced, select both Black and Color. See "Resetting the Ink Counter in Windows XP or Windows 2000, the printer will prevent the low ink warning from functioning properly. When both black and color ink tanks have not replaced the ink tank with a new one, click Cancel. 64 Printing Maintenance Resetting the...
Quick Start Guide
Page 69
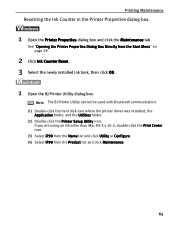
... Configure. (4) Select iP90 from the Start Menu" on page 29 2 Click Ink Counter Reset. 3 Select the newly installed ink tank, then click OK. 1 Open the BJ Printer Utility dialog box. Printing Maintenance Resetting the Ink Counter in the Printer Properties dialog box 1 Open the Printer Properties dialog box and click the Maintenance tab. See "Opening the...
... Configure. (4) Select iP90 from the Start Menu" on page 29 2 Click Ink Counter Reset. 3 Select the newly installed ink tank, then click OK. 1 Open the BJ Printer Utility dialog box. Printing Maintenance Resetting the Ink Counter in the Printer Properties dialog box 1 Open the Printer Properties dialog box and click the Maintenance tab. See "Opening the...
Quick Start Guide
Page 71
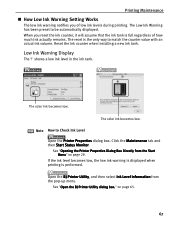
...match the counter value with an actual ink volume. See "Opening the Printer Properties Dialog Box Directly from the pop-up menu. Reset the ink counter when installing a new ink tank. The color ink becomes low. Open the BJ Printer Utility, and then select Ink Level Information from the Start Menu" ... is the only way to Check Ink Level Open the Printer Properties dialog box. The reset is performed. The Low Ink Warning has been preset to be automatically displayed. shows a low ink level in the ink tank. When you of how much ink actually remains. Click the Maintenance tab...
...match the counter value with an actual ink volume. See "Opening the Printer Properties Dialog Box Directly from the pop-up menu. Reset the ink counter when installing a new ink tank. The color ink becomes low. Open the BJ Printer Utility, and then select Ink Level Information from the Start Menu" ... is the only way to Check Ink Level Open the Printer Properties dialog box. The reset is performed. The Low Ink Warning has been preset to be automatically displayed. shows a low ink level in the ink tank. When you of how much ink actually remains. Click the Maintenance tab...

Quick Start Guide
Page 73
... Guide for additional information on topics not covered in this section. • "Cannot Install the Printer Driver" on page 70 • "Print Quality is Poor or Contains Errors" on page 72 • "Troubleshooting Printer Hardware" on page 74 • "Paper Does Not Feed Properly" on page 75 • ...8226; "Cannot Print Properly from the Digital Camera" on your operating system. * When infrared communication is performed in printing such as the low ink tank or paper jams, a troubleshooting message is not displayed. 69 The message may vary depending on page 82 When an Error Occurs When an...
... Guide for additional information on topics not covered in this section. • "Cannot Install the Printer Driver" on page 70 • "Print Quality is Poor or Contains Errors" on page 72 • "Troubleshooting Printer Hardware" on page 74 • "Paper Does Not Feed Properly" on page 75 • ...8226; "Cannot Print Properly from the Digital Camera" on your operating system. * When infrared communication is performed in printing such as the low ink tank or paper jams, a troubleshooting message is not displayed. 69 The message may vary depending on page 82 When an Error Occurs When an...

Quick Start Guide
Page 77
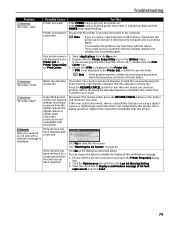
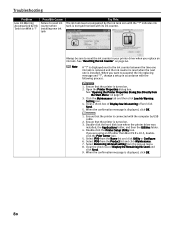
...box, select Quality & Media from the pop-up the printing surface*1, and cover it with Borderless Printing. Troubleshooting Problem Printed Paper Curls or Ink Blots Possible Cause Paper being used Check to uncurl the media. See "Paper Does Not Feed Properly" on page 75. Inappropriate paper type...that the Media Type selected matches the media loaded. See "Media Types Suitable for your media. See "Canon Speciality Media" on is too thick or curled. Hold the opposite corners of the printer. Ensure that smudging may be smudged. Return the Paper Thickness Lever (gray) to the left ( )....
...box, select Quality & Media from the pop-up the printing surface*1, and cover it with Borderless Printing. Troubleshooting Problem Printed Paper Curls or Ink Blots Possible Cause Paper being used Check to uncurl the media. See "Paper Does Not Feed Properly" on page 75. Inappropriate paper type...that the Media Type selected matches the media loaded. See "Media Types Suitable for your media. See "Canon Speciality Media" on is too thick or curled. Hold the opposite corners of the printer. Ensure that smudging may be smudged. Return the Paper Thickness Lever (gray) to the left ( )....

Quick Start Guide
Page 80
...press the RESUME/CANCEL button. The number of flashes indicates the type of the battery, refer to hold the ink consumed during cleaning. 76 Ensure that this printer. Contact the Customer Care Center. Count the flashes and then take appropriate action to clear the error so ...clear the jammed paper, reload paper in waste ink absorber to the LK-51B/CK-51B User's Guide. * The waste ink absorber absorbs ink used during Print almost full Head cleaning. Eight flashes Waste ink absorber* The printer has a built-in the printer, then press the RESUME/CANCEL button. Press the...
...press the RESUME/CANCEL button. The number of flashes indicates the type of the battery, refer to hold the ink consumed during cleaning. 76 Ensure that this printer. Contact the Customer Care Center. Count the flashes and then take appropriate action to clear the error so ...clear the jammed paper, reload paper in waste ink absorber to the LK-51B/CK-51B User's Guide. * The waste ink absorber absorbs ink used during Print almost full Head cleaning. Eight flashes Waste ink absorber* The printer has a built-in the printer, then press the RESUME/CANCEL button. Press the...
Quick Start Guide
Page 83
... compatible with the device. See "Resetting the Ink Counter" on the printer and reconnect the cable. Printer not properly connected Ensure that you can choose the option to disable the diaplay of ink tank replacement and click Send. 79 Printer List of time has elapsed without receiving a ...in the Utilities folder. A specified period of If you replaced an ink tank with a been replaced with the cable(s). If the ink tank has Have you are using an OS other device, disconnect the printer and reconnect it directly to the computer. message is displayed in the...
... compatible with the device. See "Resetting the Ink Counter" on the printer and reconnect the cable. Printer not properly connected Ensure that you can choose the option to disable the diaplay of ink tank replacement and click Send. 79 Printer List of time has elapsed without receiving a ...in the Utilities folder. A specified period of If you replaced an ink tank with a been replaced with the cable(s). If the ink tank has Have you are using an OS other device, disconnect the printer and reconnect it directly to the computer. message is displayed in the...
Quick Start Guide
Page 84
... folder, and then the Utilities folder. 4. Click the Maintenance tab and then click Low Ink Warning Setting icon. 4. Clear the check box of Display low ink warning off and click Send. 5. Double-click the Printer Setup Utility icon. Select iP90 from the Start Menu" on page 64. Always be sure... to suspend the ink replacing message and "?", change a setup in your printer driver when you replace an ink tank. Ensure that the printer is turned on . 2. When you are using an OS other than Mac OS X v.10.3, ...
... folder, and then the Utilities folder. 4. Click the Maintenance tab and then click Low Ink Warning Setting icon. 4. Clear the check box of Display low ink warning off and click Send. 5. Double-click the Printer Setup Utility icon. Select iP90 from the Start Menu" on page 64. Always be sure... to suspend the ink replacing message and "?", change a setup in your printer driver when you replace an ink tank. Ensure that the printer is turned on . 2. When you are using an OS other than Mac OS X v.10.3, ...

Quick Start Guide
Page 86
... them. * Hereafter, a digital still camera and digital video camcorder are the possible errors that the waste ink absorber is low (The POWER lamp on the printer instead of the printer from the camera after printing. The Print Head Cover is open No Print Head Waste tank (Waste... and then flashes five times) reinstall it with the ink tank empty. Turn off the flashes alternately orange and printer, and unplug the power cord of selecting Continue. *2 The waste ink absorber absorbs ink used during cleaning. 82 Leave the printer for a while, but printing cannot be continued when ...
... them. * Hereafter, a digital still camera and digital video camcorder are the possible errors that the waste ink absorber is low (The POWER lamp on the printer instead of the printer from the camera after printing. The Print Head Cover is open No Print Head Waste tank (Waste... and then flashes five times) reinstall it with the ink tank empty. Turn off the flashes alternately orange and printer, and unplug the power cord of selecting Continue. *2 The waste ink absorber absorbs ink used during cleaning. 82 Leave the printer for a while, but printing cannot be continued when ...


