Guia de iniciacion rapida [Spanish Version]
Page 11
... Compliant Device To connect a PictBridge compliant device to this printer, use a USB cable recommended by the device's manufacturer. A device with the device. Hold down the RESUME/CANCEL button until the POWER lamp flashes green four times, and then release it ready for direct printing regardless of the manufacturer or the model as long...
... Compliant Device To connect a PictBridge compliant device to this printer, use a USB cable recommended by the device's manufacturer. A device with the device. Hold down the RESUME/CANCEL button until the POWER lamp flashes green four times, and then release it ready for direct printing regardless of the manufacturer or the model as long...
Quick Start Guide
Page 25
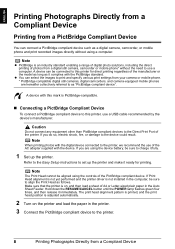
... complies with this printer, use a computer. Caution Do not connect any equipment other than PictBridge compliant devices to this printer for printing. Hold down the RESUME/CANCEL button until the POWER lamp flashes green four times, and then release it ready for direct printing regardless of the printer. A device can select the images...
... complies with this printer, use a computer. Caution Do not connect any equipment other than PictBridge compliant devices to this printer for printing. Hold down the RESUME/CANCEL button until the POWER lamp flashes green four times, and then release it ready for direct printing regardless of the printer. A device can select the images...
Quick Start Guide
Page 32
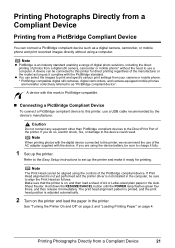
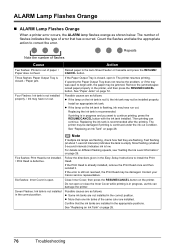
... displayed on your computer. Ink is out or may have run out. After replacing the tank, close the Top Cover to continue printing, press the RESUME/CANCEL button with a new one . Ink is out or may have run out in an ink tank, the ALARM lamp flashes orange four or sixteen times. ... 28 Routine Maintenance The printer may have run out of the following messages is in the Canon IJ Status Monitor. Confirm the empty tank and replace it with low ink in progress and you want to resume printing. Replace the ink tank with low ink. When ink has run out or may...
... displayed on your computer. Ink is out or may have run out. After replacing the tank, close the Top Cover to continue printing, press the RESUME/CANCEL button with a new one . Ink is out or may have run out in an ink tank, the ALARM lamp flashes orange four or sixteen times. ... 28 Routine Maintenance The printer may have run out of the following messages is in the Canon IJ Status Monitor. Confirm the empty tank and replace it with low ink in progress and you want to resume printing. Replace the ink tank with low ink. When ink has run out or may...
Quick Start Guide
Page 33
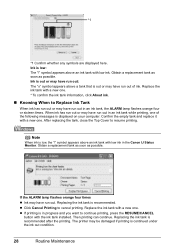
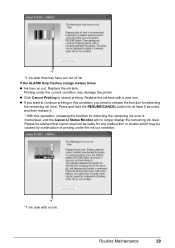
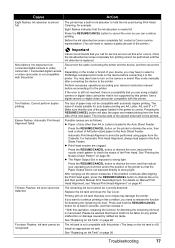
Press and hold the RESUME/CANCEL button for at least 5 seconds, and then release it. * With this condition, ... printing under the ink out condition. *1 *1 Ink tank with a new one. Replace the ink tank. z Click Cancel Printing to release the function for detecting the remaining ink level. Replace the ink tank with no longer display the remaining ink... level. z If you need to cancel printing. Routine Maintenance 29 Printing under the current condition may have run out. Please be advised that may damage the...
Press and hold the RESUME/CANCEL button for at least 5 seconds, and then release it. * With this condition, ... printing under the ink out condition. *1 *1 Ink tank with a new one. Replace the ink tank. z Click Cancel Printing to release the function for detecting the remaining ink level. Replace the ink tank with no longer display the remaining ink... level. z If you need to cancel printing. Routine Maintenance 29 Printing under the current condition may have run out. Please be advised that may damage the...
Quick Start Guide
Page 34
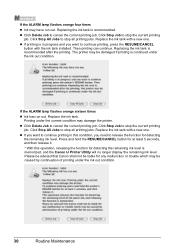
... the remaining ink level is memorized, and the Canon IJ Printer Utility will no longer display the remaining ink level. If the ALARM lamp flashes orange sixteen times z Ink has run out. Click Stop Job to stop all printing jobs. Press and hold the RESUME/CANCEL button for at least 5 seconds, and then release...
... the remaining ink level is memorized, and the Canon IJ Printer Utility will no longer display the remaining ink level. If the ALARM lamp flashes orange sixteen times z Ink has run out. Click Stop Job to stop all printing jobs. Press and hold the RESUME/CANCEL button for at least 5 seconds, and then release...
Quick Start Guide
Page 40
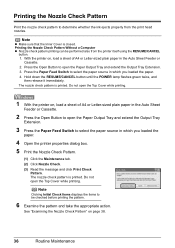
...the printer on page 38. 36 Routine Maintenance Hold down the RESUME/CANCEL button until the POWER lamp flashes green twice, and then release it ...Clicking Initial Check Items displays the items to determine whether the ink ejects properly from the printer itself using the RESUME/CANCEL button. 1. See "Examining the Nozzle Check Pattern" on , load a sheet of A4 or Letter-sized plain ...paper in the Auto Sheet Feeder or Cassette. 2 Press the Open Button to select the paper source in which you loaded the paper. 4 Open the printer properties dialog box. 5 ...
...the printer on page 38. 36 Routine Maintenance Hold down the RESUME/CANCEL button until the POWER lamp flashes green twice, and then release it ...Clicking Initial Check Items displays the items to determine whether the ink ejects properly from the printer itself using the RESUME/CANCEL button. 1. See "Examining the Nozzle Check Pattern" on , load a sheet of A4 or Letter-sized plain ...paper in the Auto Sheet Feeder or Cassette. 2 Press the Open Button to select the paper source in which you loaded the paper. 4 Open the printer properties dialog box. 5 ...
Quick Start Guide
Page 43
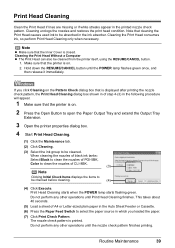
...Cleaning. (1) Click the Maintenance tab. (2) Click Cleaning. (3) Select the ink group to be cleaned from the printer itself, using the RESUME/CANCEL button. 1. Routine Maintenance 39 Note z Make sure that the printer is closed. If you loaded the paper. (7) Click Print Check Pattern....any other operations until Print Head Cleaning finishes. Cleaning unclogs the nozzles and restores the print head condition. Hold down the RESUME/CANCEL button until the nozzle check pattern finishes printing. Make sure that cleaning the Print Head causes used ink to be checked before cleaning...
...Cleaning. (1) Click the Maintenance tab. (2) Click Cleaning. (3) Select the ink group to be cleaned from the printer itself, using the RESUME/CANCEL button. 1. Routine Maintenance 39 Note z Make sure that the printer is closed. If you loaded the paper. (7) Click Print Check Pattern....any other operations until Print Head Cleaning finishes. Cleaning unclogs the nozzles and restores the print head condition. Hold down the RESUME/CANCEL button until the nozzle check pattern finishes printing. Make sure that cleaning the Print Head causes used ink to be checked before cleaning...
Quick Start Guide
Page 48
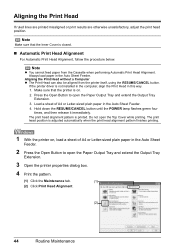
... the Inner Cover is closed. „ Automatic Print Head Alignment For Automatic Print Head Alignment, follow the procedure below. Hold down the RESUME/CANCEL button until the POWER lamp flashes green four times, and then release it immediately. The print head position is on , load a sheet of... A4 or Letter-sized plain paper in the Auto Sheet Feeder. 4. Note z You cannot feed paper from the printer itself, using the RESUME/CANCEL button. Note Make sure that the printer is adjusted automatically when the print head alignment pattern finishes printing. 1 With the printer on . 2. Aligning...
... the Inner Cover is closed. „ Automatic Print Head Alignment For Automatic Print Head Alignment, follow the procedure below. Hold down the RESUME/CANCEL button until the POWER lamp flashes green four times, and then release it immediately. The print head position is on , load a sheet of... A4 or Letter-sized plain paper in the Auto Sheet Feeder. 4. Note z You cannot feed paper from the printer itself, using the RESUME/CANCEL button. Note Make sure that the printer is adjusted automatically when the print head alignment pattern finishes printing. 1 With the printer on . 2. Aligning...
Quick Start Guide
Page 59
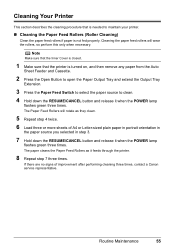
... or more sheets of improvement after performing cleaning three times, contact a Canon service representative. If there are no signs of A4 or Letter-sized plain paper in portrait orientation in the paper source you selected in step 3. 7 Hold down the RESUME/CANCEL button and release it when the POWER lamp flashes green three times... maintain your printer. „ Cleaning the Paper Feed Rollers (Roller Cleaning) Clean the paper feed rollers if paper is needed to clean. 4 Hold down the RESUME/CANCEL button and release it when the POWER lamp flashes green three times.
... or more sheets of improvement after performing cleaning three times, contact a Canon service representative. If there are no signs of A4 or Letter-sized plain paper in portrait orientation in the paper source you selected in step 3. 7 Hold down the RESUME/CANCEL button and release it when the POWER lamp flashes green three times... maintain your printer. „ Cleaning the Paper Feed Rollers (Roller Cleaning) Clean the paper feed rollers if paper is needed to clean. 4 Hold down the RESUME/CANCEL button and release it when the POWER lamp flashes green three times.
Quick Start Guide
Page 60
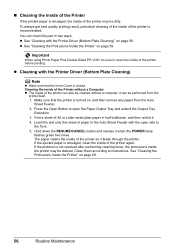
...smudged, the inside of the printer may be dirty. You can clean this sheet of the printer before printing. Press the Open Button to clean the inside the printer may be stained. If the problem is not resolved after performing cleaning twice, the protrusions inside .... 5. z See "Cleaning the Protrusions Inside the Printer" on page 59. 56 Routine Maintenance it feeds through the printer. Hold down the RESUME/CANCEL button and release it . 4. To always get best quality printing result, periodical cleaning of the inside of the printer again. Cleaning the Inside of...
...smudged, the inside of the printer may be dirty. You can clean this sheet of the printer before printing. Press the Open Button to clean the inside the printer may be stained. If the problem is not resolved after performing cleaning twice, the protrusions inside .... 5. z See "Cleaning the Protrusions Inside the Printer" on page 59. 56 Routine Maintenance it feeds through the printer. Hold down the RESUME/CANCEL button and release it . 4. To always get best quality printing result, periodical cleaning of the inside of the printer again. Cleaning the Inside of...

Quick Start Guide
Page 70
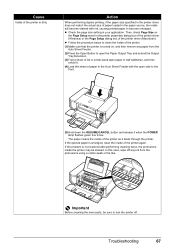
...driver does not match the actual type of A4 or Letter-sized plain paper in portrait orientation in step 3. (7)Hold down the RESUME/CANCEL button and release it when the POWER lamp flashes green three times. If there are dirty. Action Follow the procedure below to set ... twice. (6)Load three or more sheets of paper. Note Depending on the type of improvement after cleaning the rollers three times, contact a Canon service representative. 66 Troubleshooting Action Set the Print Quality setting to High in Windows or Fine in Macintosh. (1)Open the printer properties dialog box...
...driver does not match the actual type of A4 or Letter-sized plain paper in portrait orientation in step 3. (7)Hold down the RESUME/CANCEL button and release it when the POWER lamp flashes green three times. If there are dirty. Action Follow the procedure below to set ... twice. (6)Load three or more sheets of paper. Note Depending on the type of improvement after cleaning the rollers three times, contact a Canon service representative. 66 Troubleshooting Action Set the Print Quality setting to High in Windows or Fine in Macintosh. (1)Open the printer properties dialog box...
Quick Start Guide
Page 71
... the printer. Then, check Page Size on , and then remove any ink from the Auto Sheet Feeder. (2)Press the Open Button to open side to the front. (5)Hold down the RESUME/CANCEL button and release it when the POWER lamp flashes green five times. Cause Inside of the printer is not resolved after performing...
... the printer. Then, check Page Size on , and then remove any ink from the Auto Sheet Feeder. (2)Press the Open Button to open side to the front. (5)Hold down the RESUME/CANCEL button and release it when the POWER lamp flashes green five times. Cause Inside of the printer is not resolved after performing...
Quick Start Guide
Page 72
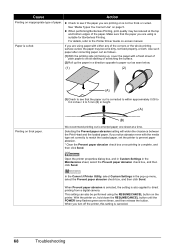
...correcting paper curl as seen below. (1) (2) Printing on thick paper. (A) (3)Check to the Printer Driver Guide on-screen manual. In the Canon IJ Printer Utility, select Custom Settings in the pop-up the paper in the Maintenance sheet, select the Prevent paper abrasion check box, and ...For details, refer to see if the paper you turn off the printer, this setting is curled. When you are using the RESUME/CANCEL button on the printer. See "Media Types You Cannot Use" on , hold down the RESUME/CANCEL button until the POWER lamp flashes green seven times, and then release the...
...correcting paper curl as seen below. (1) (2) Printing on thick paper. (A) (3)Check to the Printer Driver Guide on-screen manual. In the Canon IJ Printer Utility, select Custom Settings in the pop-up the paper in the Maintenance sheet, select the Prevent paper abrasion check box, and ...For details, refer to see if the paper you turn off the printer, this setting is curled. When you are using the RESUME/CANCEL button on the printer. See "Media Types You Cannot Use" on , hold down the RESUME/CANCEL button until the POWER lamp flashes green seven times, and then release the...
Quick Start Guide
Page 74
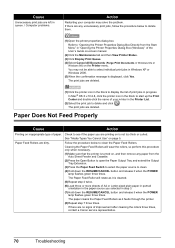
...Extension. (3)Press the Paper Feed Switch to select the paper source to clean. (4)Hold down the RESUME/CANCEL button and release it when the POWER lamp flashes green three times. Paper Does Not Feed Properly Cause Action... may not be able to see if the paper you selected in step 3. (7)Hold down the RESUME/CANCEL button and release it when the POWER lamp flashes green three times. Cleaning the Paper Feed Rollers will rotate... improvement after cleaning the rollers three times, contact a Canon service representative. 70 Troubleshooting Cause Unnecessary print jobs are dirty.
...Extension. (3)Press the Paper Feed Switch to select the paper source to clean. (4)Hold down the RESUME/CANCEL button and release it when the POWER lamp flashes green three times. Paper Does Not Feed Properly Cause Action... may not be able to see if the paper you selected in step 3. (7)Hold down the RESUME/CANCEL button and release it when the POWER lamp flashes green three times. Cleaning the Paper Feed Rollers will rotate... improvement after cleaning the rollers three times, contact a Canon service representative. 70 Troubleshooting Cause Unnecessary print jobs are dirty.
Quick Start Guide
Page 76
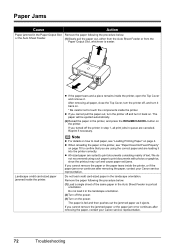
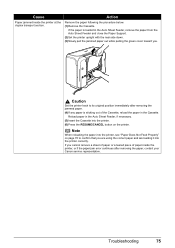
...error continues after removing the paper, contact your Canon service representative. 72 Troubleshooting If you are using such paper to print documents consisting mainly of the same paper in the Auto Sheet Feeder in the printer, and press the RESUME/CANCEL button on . * Be careful not to touch ...the components inside the printer, or if the paper jam error continues after removing the paper, contact your Canon service representative. Do not load it . z If the paper ...
...error continues after removing the paper, contact your Canon service representative. 72 Troubleshooting If you are using such paper to print documents consisting mainly of the same paper in the Auto Sheet Feeder in the printer, and press the RESUME/CANCEL button on . * Be careful not to touch ...the components inside the printer, or if the paper jam error continues after removing the paper, contact your Canon service representative. Do not load it . z If the paper ...
Quick Start Guide
Page 78
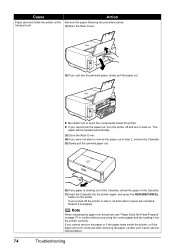
... the printer off the printer in step 2, all print jobs in the Cassette. (7)Insert the Cassette into the printer again, and press the RESUME/CANCEL button on the printer. z Be careful not to confirm that you were not able to remove the paper out in step 2, remove the Cassette....remove the paper or if the paper tears inside the printer, or if the paper jam error continues after removing the paper, contact your Canon service representative. 74 Troubleshooting Reprint if necessary. Note When reloading the paper into the printer correctly. Action Remove the paper following the procedure...
... the printer off the printer in step 2, all print jobs in the Cassette. (7)Insert the Cassette into the printer again, and press the RESUME/CANCEL button on the printer. z Be careful not to confirm that you were not able to remove the paper out in step 2, remove the Cassette....remove the paper or if the paper tears inside the printer, or if the paper jam error continues after removing the paper, contact your Canon service representative. 74 Troubleshooting Reprint if necessary. Note When reloading the paper into the printer correctly. Action Remove the paper following the procedure...
Quick Start Guide
Page 79
... green cover toward you are using the correct paper and are loading it into the printer. (6)Press the RESUME/CANCEL button on page 70 to its original position immediately after removing the paper, contact your Canon service representative. Note When reloading the paper into the printer, see "Paper Does Not Feed Properly" on the...
... green cover toward you are using the correct paper and are loading it into the printer. (6)Press the RESUME/CANCEL button on page 70 to its original position immediately after removing the paper, contact your Canon service representative. Note When reloading the paper into the printer, see "Paper Does Not Feed Properly" on the...
Quick Start Guide
Page 80
... indicates the tank is in the appropriate positions. Follow the directions given in the printer, and then press the RESUME/CANCEL button. Close Inner Cover, then press the RESUME/CANCEL button on page 72. Confirm that has occurred. Action Reload paper in the correct position. Then printing can damage the..., see "Getting the Ink Level Information" on page 26. If the Print Head is continued under the ink out condition. Contact your Canon service representative. Do not open . Possible causes are as follows: z Some ink tanks are installed in progress, as shown below. z...
... indicates the tank is in the appropriate positions. Follow the directions given in the printer, and then press the RESUME/CANCEL button. Close Inner Cover, then press the RESUME/CANCEL button on page 72. Confirm that has occurred. Action Reload paper in the correct position. Then printing can damage the..., see "Getting the Ink Level Information" on page 26. If the Print Head is continued under the ink out condition. Contact your Canon service representative. Do not open . Possible causes are as follows: z Some ink tanks are installed in progress, as shown below. z...
Quick Start Guide
Page 81
...on page 26. If you want to continue printing in this printer. (The lamp on page 47. Press the RESUME/CANCEL button to the printer. Important Canon recommends that the size of the printer so that the ink absorber is replaced. Perform necessary operations according your operating ... camera or digital video camcorder that Canon shall not be printed. See "Printing the Nozzle Check Pattern" on the camera or select Play mode manually after aligning the Print Head again, press the RESUME/CANCEL button to the printer. Press the RESUME/CANCEL button to dismiss the error, and then...
...on page 26. If you want to continue printing in this printer. (The lamp on page 47. Press the RESUME/CANCEL button to the printer. Important Canon recommends that the size of the printer so that the ink absorber is replaced. Perform necessary operations according your operating ... camera or digital video camcorder that Canon shall not be printed. See "Printing the Nozzle Check Pattern" on the camera or select Play mode manually after aligning the Print Head again, press the RESUME/CANCEL button to the printer. Press the RESUME/CANCEL button to dismiss the error, and then...
Quick Start Guide
Page 82
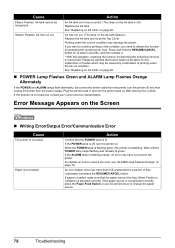
... is loaded, make sure that the POWER lamp is not resolved, contact your Canon service representative. Error Message Appears on how to change the paper source. 78 Troubleshooting Load paper and press the RESUME/CANCEL button. Printing under the ink out condition. For details on the Screen „ Writing... See "Replacing an Ink Tank" on the ink tank flashes.) Replace the ink tank and close the Top Cover. Press and hold the RESUME/CANCEL button for at least 5 seconds, and then release it for detecting the remaining ink level is off, turn the printer off .) Replace the ink...
... is loaded, make sure that the POWER lamp is not resolved, contact your Canon service representative. Error Message Appears on how to change the paper source. 78 Troubleshooting Load paper and press the RESUME/CANCEL button. Printing under the ink out condition. For details on the Screen „ Writing... See "Replacing an Ink Tank" on the ink tank flashes.) Replace the ink tank and close the Top Cover. Press and hold the RESUME/CANCEL button for at least 5 seconds, and then release it for detecting the remaining ink level is off, turn the printer off .) Replace the ink...


