
Quick Start Guide
Page 5
Table of Contents Before Printing 2 Turning the Printer On and Off 2 Loading Printing Paper 4 Basic Printing 15 Printing with Windows 15 Printing with Macintosh 16 Printing Photographs Directly from a Compliant Device ...
Table of Contents Before Printing 2 Turning the Printer On and Off 2 Loading Printing Paper 4 Basic Printing 15 Printing with Windows 15 Printing with Macintosh 16 Printing Photographs Directly from a Compliant Device ...
Quick Start Guide
Page 6
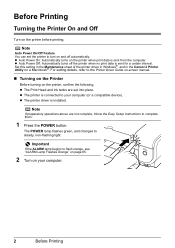
.../Off Feature You can set into place. The POWER lamp flashes green, and changes to flash orange, see "ALARM Lamp Flashes Orange" on page 65. 2 Turn on and off the printer when no print data is sent from the computer. Important If the ALARM lamp begins to steady, non-flashing light.... Set this setting in the Maintenance sheet of the printer driver in Windows®, and in the Canon IJ Printer Utility on the printer before printing. Before Printing Turning the Printer On and Off...
.../Off Feature You can set into place. The POWER lamp flashes green, and changes to flash orange, see "ALARM Lamp Flashes Orange" on page 65. 2 Turn on and off the printer when no print data is sent from the computer. Important If the ALARM lamp begins to steady, non-flashing light.... Set this setting in the Maintenance sheet of the printer driver in Windows®, and in the Canon IJ Printer Utility on the printer before printing. Before Printing Turning the Printer On and Off...
Quick Start Guide
Page 7
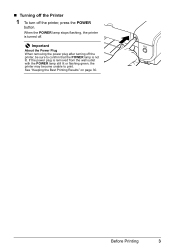
„ Turning off the Printer 1 To turn off . Important About the Power Plug When removing the power plug after turning off the printer, be sure to print. If the power plug is removed from the wall outlet with the POWER lamp still lit or flashing green, the printer may become unable to confirm that the POWER lamp is turned off the printer, press the POWER button. When the POWER lamp stops flashing, the printer is not lit. See "Keeping the Best Printing Results" on page 30. Before Printing 3
„ Turning off the Printer 1 To turn off . Important About the Power Plug When removing the power plug after turning off the printer, be sure to print. If the power plug is removed from the wall outlet with the POWER lamp still lit or flashing green, the printer may become unable to confirm that the POWER lamp is turned off the printer, press the POWER button. When the POWER lamp stops flashing, the printer is not lit. See "Keeping the Best Printing Results" on page 30. Before Printing 3

Quick Start Guide
Page 10
... clearer after approximately 30 minutes. Note that some types of clear plastic folders and albums may cause the edges of the paper to turn yellow. „ Using Specialty Media Canon recommends that you may not be able to dry for Business Documents z High Resolution Paper 6 Before Printing We recommend to allow the... print quality. z Do not mount printouts in hot or humid conditions. z Do not store or display printouts in an adhesive-type album as you use Canon genuine media to dry the ink with glitter, etc.
... clearer after approximately 30 minutes. Note that some types of clear plastic folders and albums may cause the edges of the paper to turn yellow. „ Using Specialty Media Canon recommends that you may not be able to dry for Business Documents z High Resolution Paper 6 Before Printing We recommend to allow the... print quality. z Do not mount printouts in hot or humid conditions. z Do not store or display printouts in an adhesive-type album as you use Canon genuine media to dry the ink with glitter, etc.

Quick Start Guide
Page 19
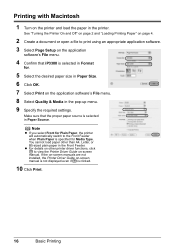
z For details on other than A4, Letter, or B5-sized plain paper in the Front Feeder. See "Turning the Printer On and Off" on page 2 and "Loading Printing Paper" on page 4. 2 Create a document or open a file to print using an appropriate application software.... Basic Printing 15 Basic Printing This section describes the procedure for Media Type. Make sure that Canon iP3300 is only displayed when the onscreen manuals are installed. 6 Click Print (or OK). Printing with Windows 1 Turn on the printer and load the paper in Paper Source. Instructions is selected, and click Preferences ...
z For details on other than A4, Letter, or B5-sized plain paper in the Front Feeder. See "Turning the Printer On and Off" on page 2 and "Loading Printing Paper" on page 4. 2 Create a document or open a file to print using an appropriate application software.... Basic Printing 15 Basic Printing This section describes the procedure for Media Type. Make sure that Canon iP3300 is only displayed when the onscreen manuals are installed. 6 Click Print (or OK). Printing with Windows 1 Turn on the printer and load the paper in Paper Source. Instructions is selected, and click Preferences ...
Quick Start Guide
Page 20
...on the printer and load the paper in Format for Media Type. Printing with Macintosh 1 Turn on -screen manual is not displayed even if is clicked. 10 Click Print. 16 Basic Printing Make sure that iP3300 is selected in the printer. Note z If you select Front for Plain Paper, the...other printer driver functions, click to view the Printer Driver Guide on the application software's File menu. 8 Select Quality & Media in the Front Feeder. See "Turning the Printer On and Off" on page 2 and "Loading Printing Paper" on page 4. 2 Create a document or open a file to the Front Feeder when...
...on the printer and load the paper in Format for Media Type. Printing with Macintosh 1 Turn on -screen manual is not displayed even if is clicked. 10 Click Print. 16 Basic Printing Make sure that iP3300 is selected in the printer. Note z If you select Front for Plain Paper, the...other printer driver functions, click to view the Printer Driver Guide on the application software's File menu. 8 Select Quality & Media in the Front Feeder. See "Turning the Printer On and Off" on page 2 and "Loading Printing Paper" on page 4. 2 Create a document or open a file to the Front Feeder when...
Quick Start Guide
Page 21
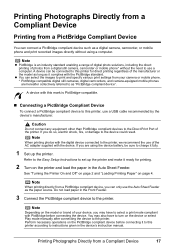
...your camera or mobile phone. * PictBridge compatible digital still cameras, digital camcorders, and camera-equipped mobile phones are using a computer. See "Turning the Printer On and Off" on page 2 and "Loading Printing Paper" on the PictBridge compliant device before connecting the device. A device... can select the images to turn on the printer and load the paper in the device's instruction manual. Caution Do not connect any equipment other than PictBridge compliant ...
...your camera or mobile phone. * PictBridge compatible digital still cameras, digital camcorders, and camera-equipped mobile phones are using a computer. See "Turning the Printer On and Off" on page 2 and "Loading Printing Paper" on the PictBridge compliant device before connecting the device. A device... can select the images to turn on the printer and load the paper in the device's instruction manual. Caution Do not connect any equipment other than PictBridge compliant ...

Quick Start Guide
Page 22
If your device does not turn on automatically, turn it on page 70. 18 Printing Photographs Directly from a Digital Camera" on manually. (3) Set up the PictBridge compliant device for direct printing. will appear on the LCD of the device. (1) Make sure that the PictBridge compliant device is turned off. (2) Connect the PictBridge compliant device to the printer using a USB cable recommended by the manufacturer of the device when the printer is correctly connected. (2) Note If does not appear, see "Cannot Print Properly from a Compliant Device The device turns on automatically.
If your device does not turn on automatically, turn it on page 70. 18 Printing Photographs Directly from a Digital Camera" on manually. (3) Set up the PictBridge compliant device for direct printing. will appear on the LCD of the device. (1) Make sure that the PictBridge compliant device is turned off. (2) Connect the PictBridge compliant device to the printer using a USB cable recommended by the manufacturer of the device when the printer is correctly connected. (2) Note If does not appear, see "Cannot Print Properly from a Compliant Device The device turns on automatically.
Quick Start Guide
Page 34
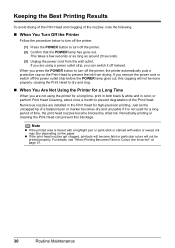
... to prevent degradation of the Print Head. Note z If the printed area is not used for a Long Time When you press the POWER button to turn off the printer, the printer automatically puts a protective cap on the paper. Numerous nozzles are using the printer for a long time, print in both ... avoid drying of the Print Head and clogging of the nozzles, note the following. „ When You Turn Off the Printer Follow the procedure below to turn off the printer. (1) Press the POWER button to turn off the printer. (2) Confirm that the POWER lamp has gone out. This takes a few seconds or...
... to prevent degradation of the Print Head. Note z If the printed area is not used for a Long Time When you press the POWER button to turn off the printer, the printer automatically puts a protective cap on the paper. Numerous nozzles are using the printer for a long time, print in both ... avoid drying of the Print Head and clogging of the nozzles, note the following. „ When You Turn Off the Printer Follow the procedure below to turn off the printer. (1) Press the POWER button to turn off the printer. (2) Confirm that the POWER lamp has gone out. This takes a few seconds or...
Quick Start Guide
Page 42
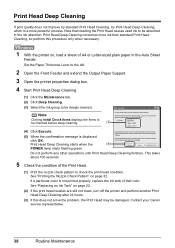
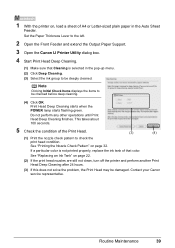
.... (5) When the confirmation message is displayed, click OK. See "Printing the Nozzle Check Pattern" on page 32. Note that color. Contact your Canon service representative. 38 Routine Maintenance Print Head Deep Cleaning If print quality does not improve by standard Print Head Cleaning, try Print Head Deep Cleaning...so perform this procedure only when necessary. 1 With the printer on page 22. (2) If the print head nozzles are still not clean, turn off the printer and perform another Print Head Deep Cleaning after 24 hours. (3) If this does not solve the problem, the Print Head ...
.... (5) When the confirmation message is displayed, click OK. See "Printing the Nozzle Check Pattern" on page 32. Note that color. Contact your Canon service representative. 38 Routine Maintenance Print Head Deep Cleaning If print quality does not improve by standard Print Head Cleaning, try Print Head Deep Cleaning...so perform this procedure only when necessary. 1 With the printer on page 22. (2) If the print head nozzles are still not clean, turn off the printer and perform another Print Head Deep Cleaning after 24 hours. (3) If this does not solve the problem, the Print Head ...
Quick Start Guide
Page 43
... takes about 100 seconds. 5 Check the condition of the Print Head. (3) (4) (1) Print the nozzle check pattern to be damaged. Contact your Canon service representative. If a particular color is not printed properly, replace the ink tank of that Cleaning is selected in the Auto Sheet Feeder. Routine Maintenance...the print head condition. See "Printing the Nozzle Check Pattern" on page 22. (2) If the print head nozzles are still not clean, turn off the printer and perform another Print Head Deep Cleaning after 24 hours. (3) If this does not solve the problem, the Print Head ...
... takes about 100 seconds. 5 Check the condition of the Print Head. (3) (4) (1) Print the nozzle check pattern to be damaged. Contact your Canon service representative. If a particular color is not printed properly, replace the ink tank of that Cleaning is selected in the Auto Sheet Feeder. Routine Maintenance...the print head condition. See "Printing the Nozzle Check Pattern" on page 22. (2) If the print head nozzles are still not clean, turn off the printer and perform another Print Head Deep Cleaning after 24 hours. (3) If this does not solve the problem, the Print Head ...

Quick Start Guide
Page 46
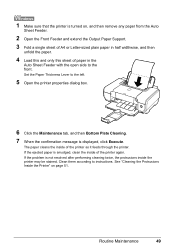
... use A4 or Letter-sized plain paper. 2 Open the Front Feeder and extend the Output Paper Support. 3 Open the Canon IJ Printer Utility dialog box. 42 Routine Maintenance Note When you turn off the printer, be saved. 1 Make sure that the printer is on the printer. Important You cannot print the print...
... use A4 or Letter-sized plain paper. 2 Open the Front Feeder and extend the Output Paper Support. 3 Open the Canon IJ Printer Utility dialog box. 42 Routine Maintenance Note When you turn off the printer, be saved. 1 Make sure that the printer is on the printer. Important You cannot print the print...
Quick Start Guide
Page 48
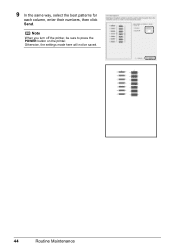
9 In the same way, select the best patterns for each column, enter their numbers, then click Send. Otherwise, the settings made here will not be sure to press the POWER button on the printer. Note When you turn off the printer, be saved. 44 Routine Maintenance
9 In the same way, select the best patterns for each column, enter their numbers, then click Send. Otherwise, the settings made here will not be sure to press the POWER button on the printer. Note When you turn off the printer, be saved. 44 Routine Maintenance
Quick Start Guide
Page 49
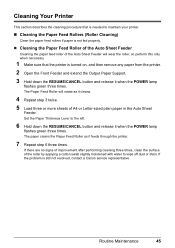
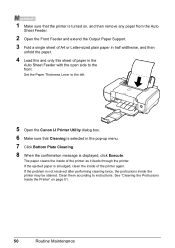
... sheets of A4 or Letter-sized plain paper in the Auto Sheet Feeder. Routine Maintenance 45 If the problem is still not resolved, contact a Canon service representative. Set the Paper Thickness Lever to wipe off dust or stain. z Cleaning the Paper Feed Roller of the Auto Sheet Feeder Cleaning... button and release it when the POWER lamp flashes green three times. Cleaning Your Printer This section describes the cleaning procedure that the printer is turned on, and then remove any paper from the printer. 2 Open the Front Feeder and extend the Output Paper Support. 3 Hold down the ...
... sheets of A4 or Letter-sized plain paper in the Auto Sheet Feeder. Routine Maintenance 45 If the problem is still not resolved, contact a Canon service representative. Set the Paper Thickness Lever to wipe off dust or stain. z Cleaning the Paper Feed Roller of the Auto Sheet Feeder Cleaning... button and release it when the POWER lamp flashes green three times. Cleaning Your Printer This section describes the cleaning procedure that the printer is turned on, and then remove any paper from the printer. 2 Open the Front Feeder and extend the Output Paper Support. 3 Hold down the ...
Quick Start Guide
Page 50
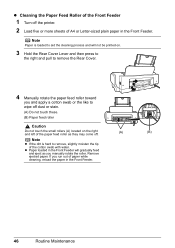
z Cleaning the Paper Feed Roller of the Front Feeder 1 Turn off . (A) (B) Note z If the dirt is hard to remove, slightly moisten the tip of A4 or Letter-sized plain paper in the Front Feeder. Note ...
z Cleaning the Paper Feed Roller of the Front Feeder 1 Turn off . (A) (B) Note z If the dirt is hard to remove, slightly moisten the tip of A4 or Letter-sized plain paper in the Front Feeder. Note ...
Quick Start Guide
Page 52
... the left. 6. See "Cleaning the Protrusions Inside the Printer" on , and then remove any paper from the printer itself. 1. Make sure that the printer is turned on page 51. 48 Routine Maintenance Open the Front Feeder and extend the Output Paper Support. 3. Fold a sheet of the printer can be performed from...
... the left. 6. See "Cleaning the Protrusions Inside the Printer" on , and then remove any paper from the printer itself. 1. Make sure that the printer is turned on page 51. 48 Routine Maintenance Open the Front Feeder and extend the Output Paper Support. 3. Fold a sheet of the printer can be performed from...
Quick Start Guide
Page 53
... the open side to instructions. If the ejected paper is smudged, clean the inside the printer may be stained. 1 Make sure that the printer is turned on page 51. Clean them according to the front. Set the Paper Thickness Lever to the left. 5 Open the printer properties dialog box. 6 Click the...
... the open side to instructions. If the ejected paper is smudged, clean the inside the printer may be stained. 1 Make sure that the printer is turned on page 51. Clean them according to the front. Set the Paper Thickness Lever to the left. 5 Open the printer properties dialog box. 6 Click the...
Quick Start Guide
Page 54
... twice, the protrusions inside the printer may be stained. Set the Paper Thickness Lever to the left. 5 Open the Canon IJ Printer Utility dialog box. 6 Make sure that the printer is turned on page 51. 50 Routine Maintenance The paper cleans the inside of the printer again. If the problem is displayed...
... twice, the protrusions inside the printer may be stained. Set the Paper Thickness Lever to the left. 5 Open the Canon IJ Printer Utility dialog box. 6 Make sure that the printer is turned on page 51. 50 Routine Maintenance The paper cleans the inside of the printer again. If the problem is displayed...
Quick Start Guide
Page 55
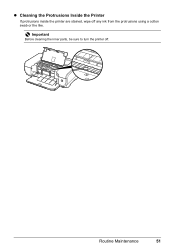
Important Before cleaning the inner parts, be sure to turn the printer off any ink from the protrusions using a cotton swab or the like. z Cleaning the Protrusions Inside the Printer If protrusions inside the printer are stained, wipe off . Routine Maintenance 51
Important Before cleaning the inner parts, be sure to turn the printer off any ink from the protrusions using a cotton swab or the like. z Cleaning the Protrusions Inside the Printer If protrusions inside the printer are stained, wipe off . Routine Maintenance 51

Quick Start Guide
Page 57
... Over on the Installation Failure screen. (3)Click Back on the screen that appears next. (4)Click Exit on the Welcome screen, then remove the CD-ROM. (5)Turn the printer off. (6)Restart the computer. (7)Make sure you have no application software running, including anti-virus software. (8)Follow the procedure described in the Easy...
... Over on the Installation Failure screen. (3)Click Back on the screen that appears next. (4)Click Exit on the Welcome screen, then remove the CD-ROM. (5)Turn the printer off. (6)Restart the computer. (7)Make sure you have no application software running, including anti-virus software. (8)Follow the procedure described in the Easy...


