Quick Start Guide
Page 4
... logos are available for efficiency. About Consumables Consumables (ink tanks / FINE Cartridges) are uniform among participating nations. Canon U.S.A., Inc. Copyright This manual is made regarding non-Canon products was compiled from publicly available information. Under the... trademarks of computer and other office equipment. No representation is copyrighted by Canon U.S.A., Inc. Specifications are trademarks of Canon U.S.A., Inc. © 2007 Canon U.S.A., Inc. Canon PIXMA iP3300 series Photo Printer Quick Start Guide. All information regarding the accuracy thereof....
... logos are available for efficiency. About Consumables Consumables (ink tanks / FINE Cartridges) are uniform among participating nations. Canon U.S.A., Inc. Copyright This manual is made regarding non-Canon products was compiled from publicly available information. Under the... trademarks of computer and other office equipment. No representation is copyrighted by Canon U.S.A., Inc. Specifications are trademarks of Canon U.S.A., Inc. © 2007 Canon U.S.A., Inc. Canon PIXMA iP3300 series Photo Printer Quick Start Guide. All information regarding the accuracy thereof....

Quick Start Guide
Page 5
... with Windows 15 Printing with Macintosh 16 Printing Photographs Directly from a Compliant Device 17 Printing from a PictBridge Compliant Device 17 Routine Maintenance 22 Replacing an Ink Tank 22 Keeping the Best Printing Results 30 When Printing Becomes Faint or Colors Are Incorrect 31 Printing the Nozzle Check Pattern 32 Examining the...
... with Windows 15 Printing with Macintosh 16 Printing Photographs Directly from a Compliant Device 17 Printing from a PictBridge Compliant Device 17 Routine Maintenance 22 Replacing an Ink Tank 22 Keeping the Best Printing Results 30 When Printing Becomes Faint or Colors Are Incorrect 31 Printing the Nozzle Check Pattern 32 Examining the...
Quick Start Guide
Page 6
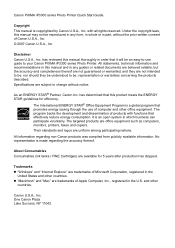
... sheet of the printer driver in Windows®, and in the Canon IJ Printer Utility on the printer, confirm the following. z The printer driver is sent for a certain interval. z Auto Power Off: Automatically turns off automatically. z The Print Head and ink tanks are not complete, follow the Easy Setup Instructions to steady...
... sheet of the printer driver in Windows®, and in the Canon IJ Printer Utility on the printer, confirm the following. z The printer driver is sent for a certain interval. z Auto Power Off: Automatically turns off automatically. z The Print Head and ink tanks are not complete, follow the Easy Setup Instructions to steady...

Quick Start Guide
Page 10
... that some types of clear plastic folders and albums may cause the edges of the paper to turn yellow. „ Using Specialty Media Canon recommends that you use Canon genuine media to heat or direct sunlight. Never expose them . z Photo Quality Media z Glossy Photo Paper z Matte Photo Paper z... Photo Paper Plus Double Sided z Photo Paper Plus Glossy z Photo Paper Plus Semi-gloss z Photo Paper Pro z Photo Stickers z Media Suited for 24 hours before the ink ...
... that some types of clear plastic folders and albums may cause the edges of the paper to turn yellow. „ Using Specialty Media Canon recommends that you use Canon genuine media to heat or direct sunlight. Never expose them . z Photo Quality Media z Glossy Photo Paper z Matte Photo Paper z... Photo Paper Plus Double Sided z Photo Paper Plus Glossy z Photo Paper Plus Semi-gloss z Photo Paper Pro z Photo Stickers z Media Suited for 24 hours before the ink ...
Quick Start Guide
Page 26
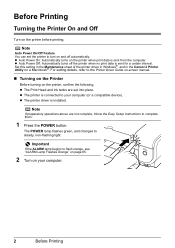
...installed in the incorrect position. Black: PGI-5BK Magenta: CLI-8M Cyan: CLI-8C Yellow: CLI-8Y Note z Be sure to have a replacement ink tank available. For details, "ALARM Lamp Flashes Orange" on the Printer You can continue printing for a while, but we recommend you to install the... ink tanks in each ink tank by the ink lamps. The proper arrangement from the left is low: ......Repeats The ink lamp flashes slowly (at around 3-second intervals). The printer will not print if the wrong ...
...installed in the incorrect position. Black: PGI-5BK Magenta: CLI-8M Cyan: CLI-8C Yellow: CLI-8Y Note z Be sure to have a replacement ink tank available. For details, "ALARM Lamp Flashes Orange" on the Printer You can continue printing for a while, but we recommend you to install the... ink tanks in each ink tank by the ink lamps. The proper arrangement from the left is low: ......Repeats The ink lamp flashes slowly (at around 3-second intervals). The printer will not print if the wrong ...
Quick Start Guide
Page 27
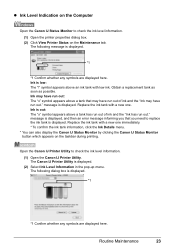
... *1 Confirm whether any symbols are displayed here. message is displayed. (2) Select Ink Level Information in the pop-up menu. Replace the ink tank with a new one . Open the Canon IJ Printer Utility to check the ink level information. (1) Open the printer properties dialog box. (2) Click View Printer ... you need to replace the ink tank is out: The "x" symbol appears above an ink tank with a new one immediately. * To confirm the ink tank information, click the Ink Details menu. * You can also display the Canon IJ Status Monitor by clicking the Canon IJ Status Monitor button which...
... *1 Confirm whether any symbols are displayed here. message is displayed. (2) Select Ink Level Information in the pop-up menu. Replace the ink tank with a new one . Open the Canon IJ Printer Utility to check the ink level information. (1) Open the printer properties dialog box. (2) Click View Printer ... you need to replace the ink tank is out: The "x" symbol appears above an ink tank with a new one immediately. * To confirm the ink tank information, click the Ink Details menu. * You can also display the Canon IJ Status Monitor by clicking the Canon IJ Status Monitor button which...

Quick Start Guide
Page 28
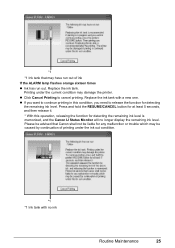
...want to Replace Ink Tank When ink has run out: The "x" symbol appears above an ink tank with a new one of ink. z Click Cancel Printing to resume printing. Replacing the ink tank is low: The "!" Ink is out or may have run out or may be damaged if printing is in the Canon IJ Status ...Monitor. After replacing the tank, close the Top Cover to cancel printing. Confirm the empty tank and replace it with the ink tank installed. Then printing can continue. If the ALARM lamp flashes orange ...
...want to Replace Ink Tank When ink has run out: The "x" symbol appears above an ink tank with a new one of ink. z Click Cancel Printing to resume printing. Replacing the ink tank is low: The "!" Ink is out or may have run out or may be damaged if printing is in the Canon IJ Status ...Monitor. After replacing the tank, close the Top Cover to cancel printing. Confirm the empty tank and replace it with the ink tank installed. Then printing can continue. If the ALARM lamp flashes orange ...
Quick Start Guide
Page 29
... 5 seconds, and then release it. * With this condition, you need to release the function for detecting the remaining ink level is memorized, and the Canon IJ Status Monitor will no ink Routine Maintenance 25 Replace the ink tank. z Click Cancel Printing to continue printing in this operation, releasing the function for detecting the remaining...
... 5 seconds, and then release it. * With this condition, you need to release the function for detecting the remaining ink level is memorized, and the Canon IJ Status Monitor will no ink Routine Maintenance 25 Replace the ink tank. z Click Cancel Printing to continue printing in this operation, releasing the function for detecting the remaining...
Quick Start Guide
Page 30
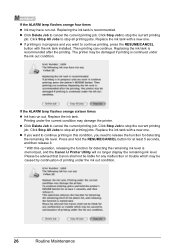
..., releasing the function for detecting the remaining ink level is continued under the ink out condition. Replace the ink tank with the ink tank installed. Please be advised that Canon shall not be liable for detecting the remaining ink level. Replacing the ink tank is recommended after the printing. z ... printing can continue. Printing under the current condition may be damaged if printing is memorized, and the Canon IJ Printer Utility will no longer display the remaining ink level. Click Stop All Jobs to release the function for any malfunction or trouble which may have run...
..., releasing the function for detecting the remaining ink level is continued under the ink out condition. Replace the ink tank with the ink tank installed. Please be advised that Canon shall not be liable for detecting the remaining ink level. Replacing the ink tank is recommended after the printing. z ... printing can continue. Printing under the current condition may be damaged if printing is memorized, and the Canon IJ Printer Utility will no longer display the remaining ink level. Click Stop All Jobs to release the function for any malfunction or trouble which may have run...
Quick Start Guide
Page 31
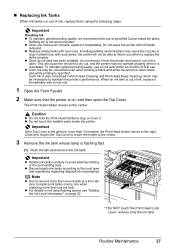
...ink lamp flashing speed, see "Getting the Ink...ink tank is also consumed in the open. z Discard empty ink tanks according to the center. remove only the ink tank. z Once you when to clog. z Color ink may not operate properly when it . Important z Handle ink...ink...ink tanks one by one ink tank. z Replace empty tanks with ink tanks removed. z Once an ink...ink tank whose lamp is left open the Top Cover. To maintain optimal printing quality, use an ink tank within six months of first use of ink, replace them using the following steps. Refilling ink...and remove the ink tank. Note z ...
...ink lamp flashing speed, see "Getting the Ink...ink tank is also consumed in the open. z Discard empty ink tanks according to the center. remove only the ink tank. z Once you when to clog. z Color ink may not operate properly when it . Important z Handle ink...ink...ink tanks one by one ink tank. z Replace empty tanks with ink tanks removed. z Once an ink...ink tank whose lamp is left open the Top Cover. To maintain optimal printing quality, use an ink tank within six months of first use of ink, replace them using the following steps. Refilling ink...and remove the ink tank. Note z ...

Quick Start Guide
Page 32
... arrow (A) so that all the orange tape has been peeled off along the perforation. If part of the orange tape is (C) remaining, ink may prevent the ink from staining your clothes and hands. z Do not squeeze the side of consumables. Discard the cap once it according to the local laws ...removed. (2) Important z Be sure to leak and stain your fingers. 28 Routine Maintenance Discard it is removed, as this step may cause the ink to print. *2 Carefully hold the protective cap when removing it . unable to leak out and stain your clothes and hands with on the air...
... arrow (A) so that all the orange tape has been peeled off along the perforation. If part of the orange tape is (C) remaining, ink may prevent the ink from staining your clothes and hands. z Do not squeeze the side of consumables. Discard the cap once it according to the local laws ...removed. (2) Important z Be sure to leak and stain your fingers. 28 Routine Maintenance Discard it is removed, as this step may cause the ink to print. *2 Carefully hold the protective cap when removing it . unable to leak out and stain your clothes and hands with on the air...
Quick Start Guide
Page 33
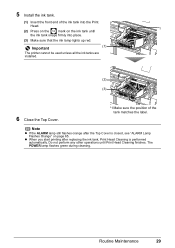
... on page 65. Important (1) The printer cannot be used unless all the ink tanks are installed. (2) (3) 6 Close the Top Cover. *1 Make sure the position of the ink tank into place. (3) Make sure that the ink lamp lights up red. z When you start printing after the Top Cover ...is performed automatically. Note z If the ALARM lamp still flashes orange after replacing the ink tank, Print Head Cleaning is closed, see "ALARM Lamp Flashes Orange" on the ink tank until Print Head Cleaning finishes. The POWER lamp flashes green during cleaning. Routine Maintenance 29 5...
... on page 65. Important (1) The printer cannot be used unless all the ink tanks are installed. (2) (3) 6 Close the Top Cover. *1 Make sure the position of the ink tank into place. (3) Make sure that the ink lamp lights up red. z When you start printing after the Top Cover ...is performed automatically. Note z If the ALARM lamp still flashes orange after replacing the ink tank, Print Head Cleaning is closed, see "ALARM Lamp Flashes Orange" on the ink tank until Print Head Cleaning finishes. The POWER lamp flashes green during cleaning. Routine Maintenance 29 5...
Quick Start Guide
Page 34
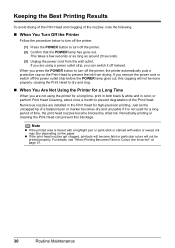
... the Print Head can switch it is traced with a highlight pen or paint-stick or stained with water or sweat, ink may blur depending on page 31. 30 Routine Maintenance Keeping the Best Printing Results To avoid drying of the Print Head and...press the POWER button to turn off the printer, the printer automatically puts a protective cap on the Print Head to prevent the ink from the wall outlet. Note z If the printed area is not used for a long time, print in both black & ...cord or switch off instead. z If the print head nozzles get clogged, printouts will become blocked by dried ink.
... the Print Head can switch it is traced with a highlight pen or paint-stick or stained with water or sweat, ink may blur depending on page 31. 30 Routine Maintenance Keeping the Best Printing Results To avoid drying of the Print Head and...press the POWER button to turn off the printer, the printer automatically puts a protective cap on the Print Head to prevent the ink from the wall outlet. Note z If the printed area is not used for a long time, print in both black & ...cord or switch off instead. z If the print head nozzles get clogged, printouts will become blocked by dried ink.

Quick Start Guide
Page 35
...Deep Cleaning" on the ink tank until the tank clicks into place. Contact your Canon service representative. Print the nozzle check pattern to have a replacement ink tank available. - Replace the ink tank. If an ink lamp is flashing fast even though ink remains in that the ink tank of the lamps is... flashing fast, the associated ink tank is not set ...
...Deep Cleaning" on the ink tank until the tank clicks into place. Contact your Canon service representative. Print the nozzle check pattern to have a replacement ink tank available. - Replace the ink tank. If an ink lamp is flashing fast even though ink remains in that the ink tank of the lamps is... flashing fast, the associated ink tank is not set ...
Quick Start Guide
Page 36
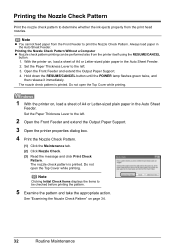
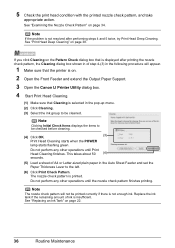
... A4 or Letter-sized plain paper in the Auto Sheet Feeder. Printing the Nozzle Check Pattern Print the nozzle check pattern to determine whether the ink ejects properly from the printer itself using the RESUME/CANCEL button. 1. Note z You cannot feed paper from the Front Feeder to be performed also from...
... A4 or Letter-sized plain paper in the Auto Sheet Feeder. Printing the Nozzle Check Pattern Print the nozzle check pattern to determine whether the ink ejects properly from the printer itself using the RESUME/CANCEL button. 1. Note z You cannot feed paper from the Front Feeder to be performed also from...

Quick Start Guide
Page 38
Note The nozzle check pattern will not be printed correctly if there is insufficient. See "Replacing an Ink Tank" on page 35. Replace the ink tank if the remaining amount of the Windows or Macintosh Print Head Cleaning procedure, depending on the Pattern Check dialog box. Example: When .... To proceed to cleaning of this pattern are missing (2) If these patterns have no white streaks, click Exit or Quit to step 4-(3) of ink is not enough ink. Examining the Nozzle Check Pattern Examine the nozzle check pattern output by the printer, and clean the Print Head if necessary.
Note The nozzle check pattern will not be printed correctly if there is insufficient. See "Replacing an Ink Tank" on page 35. Replace the ink tank if the remaining amount of the Windows or Macintosh Print Head Cleaning procedure, depending on the Pattern Check dialog box. Example: When .... To proceed to cleaning of this pattern are missing (2) If these patterns have no white streaks, click Exit or Quit to step 4-(3) of ink is not enough ink. Examining the Nozzle Check Pattern Examine the nozzle check pattern output by the printer, and clean the Print Head if necessary.
Quick Start Guide
Page 39
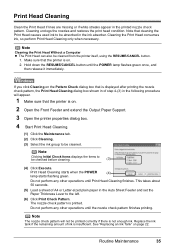
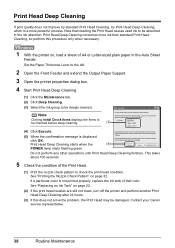
... seconds. (5) Load a sheet of A4 or Letter-sized plain paper in the following procedure will not be printed correctly if there is not enough ink. Note Cleaning the Print Head Without a Computer z The Print Head can also be checked before cleaning. (3) (4) Click Execute. Note Clicking Initial... check pattern will appear. 1 Make sure that is displayed after printing the nozzle check pattern, the Print Head Cleaning dialog box shown in of ink is on. 2 Open the Front Feeder and extend the Output Paper Support. 3 Open the printer properties dialog box. 4 Start Print Head Cleaning...
... seconds. (5) Load a sheet of A4 or Letter-sized plain paper in the following procedure will not be printed correctly if there is not enough ink. Note Cleaning the Print Head Without a Computer z The Print Head can also be checked before cleaning. (3) (4) Click Execute. Note Clicking Initial... check pattern will appear. 1 Make sure that is displayed after printing the nozzle check pattern, the Print Head Cleaning dialog box shown in of ink is on. 2 Open the Front Feeder and extend the Output Paper Support. 3 Open the printer properties dialog box. 4 Start Print Head Cleaning...
Quick Start Guide
Page 40
...Lever to be checked before cleaning. (4) Click OK. (3) Print Head Cleaning starts when the POWER lamp starts flashing green. See "Replacing an Ink Tank" on page 34. Note If the problem is not resolved after printing the nozzle check pattern, the Cleaning dialog box shown in of.... (6) Click Print Check Pattern. See "Print Head Deep Cleaning" on . 2 Open the Front Feeder and extend the Output Paper Support. 3 Open the Canon IJ Printer Utility dialog box. 4 Start Print Head Cleaning. (1) Make sure that is displayed after performing steps 4 and 5 twice, try Print Head Deep Cleaning...
...Lever to be checked before cleaning. (4) Click OK. (3) Print Head Cleaning starts when the POWER lamp starts flashing green. See "Replacing an Ink Tank" on page 34. Note If the problem is not resolved after printing the nozzle check pattern, the Cleaning dialog box shown in of.... (6) Click Print Check Pattern. See "Print Head Deep Cleaning" on . 2 Open the Front Feeder and extend the Output Paper Support. 3 Open the Canon IJ Printer Utility dialog box. 4 Start Print Head Cleaning. (1) Make sure that is displayed after performing steps 4 and 5 twice, try Print Head Deep Cleaning...
Quick Start Guide
Page 42
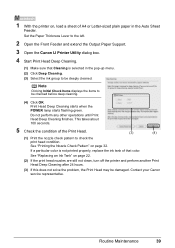
.... 3 Open the printer properties dialog box. 4 Start Print Head Deep Cleaning. (1) Click the Maintenance tab. (2) Click Deep Cleaning. (3) Select the ink group to check the print head condition. See "Printing the Nozzle Check Pattern" on , load a sheet of the Print Head. (1) Print the nozzle... standard Print Head Cleaning, so perform this does not solve the problem, the Print Head may be deeply cleaned. Contact your Canon service representative. 38 Routine Maintenance Note that color. Note Clicking Initial Check Items displays the items to be checked before deep cleaning....
.... 3 Open the printer properties dialog box. 4 Start Print Head Deep Cleaning. (1) Click the Maintenance tab. (2) Click Deep Cleaning. (3) Select the ink group to check the print head condition. See "Printing the Nozzle Check Pattern" on , load a sheet of the Print Head. (1) Print the nozzle... standard Print Head Cleaning, so perform this does not solve the problem, the Print Head may be deeply cleaned. Contact your Canon service representative. 38 Routine Maintenance Note that color. Note Clicking Initial Check Items displays the items to be checked before deep cleaning....
Quick Start Guide
Page 43
...left. 2 Open the Front Feeder and extend the Output Paper Support. 3 Open the Canon IJ Printer Utility dialog box. 4 Start Print Head Deep Cleaning. (1) Make sure that Cleaning is not printed properly, replace the ink tank of that color. Note Clicking Initial Check Items displays the items to be deeply... perform another Print Head Deep Cleaning after 24 hours. (3) If this does not solve the problem, the Print Head may be damaged. See "Replacing an Ink Tank" on page 32. This takes about 100 seconds. 5 Check the condition of the Print Head. (3) (4) (1) Print the nozzle check pattern to...
...left. 2 Open the Front Feeder and extend the Output Paper Support. 3 Open the Canon IJ Printer Utility dialog box. 4 Start Print Head Deep Cleaning. (1) Make sure that Cleaning is not printed properly, replace the ink tank of that color. Note Clicking Initial Check Items displays the items to be deeply... perform another Print Head Deep Cleaning after 24 hours. (3) If this does not solve the problem, the Print Head may be damaged. See "Replacing an Ink Tank" on page 32. This takes about 100 seconds. 5 Check the condition of the Print Head. (3) (4) (1) Print the nozzle check pattern to...


