
iP4000 Quick Start Guide
Page 5
... 21 Advanced Printing Printing Photographs Directly from a Digital Camera 22 Accessing the Printer Driver 28 Adjusting the Print Quality for Photographs 29 Using the Bundled Software 37... Print Head 61 Troubleshooting Cannot Install the Printer Driver 66 Print Quality is Poor or Contains Errors 67 Troubleshooting Printer Hardware 69 Paper Does Not Feed Properly ...the Printer Driver When Using Mac OS 9 82 User's Guide Table of Contents 84 Specifications 85 Safety Precautions 88 Regulatory Information 90 CANON U.S.A., INC. Contents Contents Basic Printing Turning on the Printer ...
... 21 Advanced Printing Printing Photographs Directly from a Digital Camera 22 Accessing the Printer Driver 28 Adjusting the Print Quality for Photographs 29 Using the Bundled Software 37... Print Head 61 Troubleshooting Cannot Install the Printer Driver 66 Print Quality is Poor or Contains Errors 67 Troubleshooting Printer Hardware 69 Paper Does Not Feed Properly ...the Printer Driver When Using Mac OS 9 82 User's Guide Table of Contents 84 Specifications 85 Safety Precautions 88 Regulatory Information 90 CANON U.S.A., INC. Contents Contents Basic Printing Turning on the Printer ...
iP4000 Quick Start Guide
Page 6
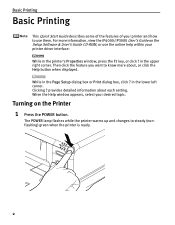
...to know more information, view the iP4000/iP3000 User's Guide on the Printer 1 Press the POWER button. in the upper right corner. provides detailed information about , or click the Help button when displayed. The POWER lamp flashes while the printer warms up and changes to use the... (nonflashing) green when the printer is ready. 2 While in the printer's Properties window, press the F1 key, or click ? Basic Printing Basic Printing This Quick Start Guide describes some of the features of your desired topic. For more about each setting. Turning on the Setup Software & ...
...to know more information, view the iP4000/iP3000 User's Guide on the Printer 1 Press the POWER button. in the upper right corner. provides detailed information about , or click the Help button when displayed. The POWER lamp flashes while the printer warms up and changes to use the... (nonflashing) green when the printer is ready. 2 While in the printer's Properties window, press the F1 key, or click ? Basic Printing Basic Printing This Quick Start Guide describes some of the features of your desired topic. For more about each setting. Turning on the Setup Software & ...
iP4000 Quick Start Guide
Page 7
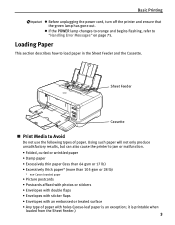
...• Excessively thin paper (less than 64 gsm or 17 lb) • Excessively thick paper* (more than 105 gsm or 28 lb) * non-Canon branded paper • Picture postcards • Postcards affixed with photos or stickers • Envelopes with double flaps • Envelopes with sticker flaps • ...Envelopes with holes (Loose-leaf paper is printable when loaded from the Sheet Feeder.) 3 Basic Printing z Before unplugging the power cord, turn off the printer and ensure that the green lamp has gone out. Using such paper will not only produce unsatisfactory results, but can also cause the...
...• Excessively thin paper (less than 64 gsm or 17 lb) • Excessively thick paper* (more than 105 gsm or 28 lb) * non-Canon branded paper • Picture postcards • Postcards affixed with photos or stickers • Envelopes with double flaps • Envelopes with sticker flaps • ...Envelopes with holes (Loose-leaf paper is printable when loaded from the Sheet Feeder.) 3 Basic Printing z Before unplugging the power cord, turn off the printer and ensure that the green lamp has gone out. Using such paper will not only produce unsatisfactory results, but can also cause the...
iP4000 Quick Start Guide
Page 19
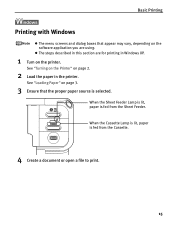
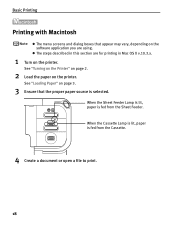
See "Loading Paper" on page 3. 3 Ensure that appear may vary, depending on the software application you are for printing in Windows XP. 1 Turn on page 2. 2 Load the paper in this section are using. When the Sheet Feeder Lamp is lit, paper is fed from the Sheet Feeder. Basic Printing Printing with Windows z The menu screens and dialog boxes that the proper paper source is selected. See "Turning on the Printer" on the printer. z The steps described in the printer. When the Cassette Lamp is lit, paper is fed from the Cassette. 4 Create a document or open a file to print. 15
See "Loading Paper" on page 3. 3 Ensure that appear may vary, depending on the software application you are for printing in Windows XP. 1 Turn on page 2. 2 Load the paper in this section are using. When the Sheet Feeder Lamp is lit, paper is fed from the Sheet Feeder. Basic Printing Printing with Windows z The menu screens and dialog boxes that the proper paper source is selected. See "Turning on the Printer" on the printer. z The steps described in the printer. When the Cassette Lamp is lit, paper is fed from the Cassette. 4 Create a document or open a file to print. 15
iP4000 Quick Start Guide
Page 22
When the Sheet Feeder Lamp is lit, paper is fed from the Cassette. 4 Create a document or open a file to print. 18 See "Turning on the Printer" on page 2. 2 Load the paper on page 3. 3 Ensure that appear may vary, depending on the software application you are for printing in this section are ... proper paper source is fed from the Sheet Feeder. When the Cassette Lamp is lit, paper is selected. z The steps described in Mac OS X v.10.3.x. 1 Turn on the printer. See "Loading Paper" on the...
When the Sheet Feeder Lamp is lit, paper is fed from the Cassette. 4 Create a document or open a file to print. 18 See "Turning on the Printer" on page 2. 2 Load the paper on page 3. 3 Ensure that appear may vary, depending on the software application you are for printing in this section are ... proper paper source is fed from the Sheet Feeder. When the Cassette Lamp is lit, paper is selected. z The steps described in Mac OS X v.10.3.x. 1 Turn on the printer. See "Loading Paper" on the...

iP4000 Quick Start Guide
Page 27
...your PC, be sure to unplug the cable connecting the digital camera. 1 Set up the printer. 2 Turn on page 2. 3 Load the paper in the printer. See "Loading Paper" on the printer, or by connecting the printer to the computer and then executing automatic print head alignment. If you use the AC adapter ...using the USB cable (for PictBridge or Canon Bubble Jet Direct to the Direct Print Port of the digital camera. The print head alignment can be performed simply by pressing the RESUME/CANCEL button on page 3. 4 Connect the digital camera to the printer. (1) Make sure the camera is ...
...your PC, be sure to unplug the cable connecting the digital camera. 1 Set up the printer. 2 Turn on page 2. 3 Load the paper in the printer. See "Loading Paper" on the printer, or by connecting the printer to the computer and then executing automatic print head alignment. If you use the AC adapter ...using the USB cable (for PictBridge or Canon Bubble Jet Direct to the Direct Print Port of the digital camera. The print head alignment can be performed simply by pressing the RESUME/CANCEL button on page 3. 4 Connect the digital camera to the printer. (1) Make sure the camera is ...

iP4000 Quick Start Guide
Page 28
A Canon Bubble Jet Direct compatible digital camera. „ Direct Printing from PictBridge-compatible Digital Cameras Default Camera Settings When a PictBridge-compatible camera is connected and printing is started with no printing option selected, this printer operates based on the following icons will display... the printer flashes once. * The power-on sequence may differ depending on and set up the camera for direct printing. Either of the following default settings: • Paper size 4" x 6" • Paper type Photo (Photo Paper Plus Glossy) 24 Advanced Printing (3) Turn on ...
A Canon Bubble Jet Direct compatible digital camera. „ Direct Printing from PictBridge-compatible Digital Cameras Default Camera Settings When a PictBridge-compatible camera is connected and printing is started with no printing option selected, this printer operates based on the following icons will display... the printer flashes once. * The power-on sequence may differ depending on and set up the camera for direct printing. Either of the following default settings: • Paper size 4" x 6" • Paper type Photo (Photo Paper Plus Glossy) 24 Advanced Printing (3) Turn on ...
iP4000 Quick Start Guide
Page 42
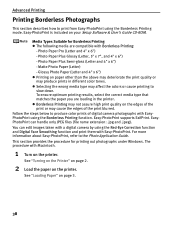
Photo Paper Pro (Letter and 4" x 6") - You can handle only JPEG files (file name extension: .jpg and .jpeg). See "Turning on the Printer" on page 2. 2 Load the paper on your Setup Software & User's Guide CD-ROM. Matte Photo Paper (Letter) - For more information about Easy-...PhotoPrint, refer to the Photo Application Guide. Easy-PhotoPrint is included on the printer. Glossy Photo Paper (Letter and 4" x 6") z Printing on paper other than the above may deteriorate the print quality or may affect the colors or...
Photo Paper Pro (Letter and 4" x 6") - You can handle only JPEG files (file name extension: .jpg and .jpeg). See "Turning on the Printer" on page 2. 2 Load the paper on your Setup Software & User's Guide CD-ROM. Matte Photo Paper (Letter) - For more information about Easy-...PhotoPrint, refer to the Photo Application Guide. Easy-PhotoPrint is included on the printer. Glossy Photo Paper (Letter and 4" x 6") z Printing on paper other than the above may deteriorate the print quality or may affect the colors or...

iP4000 Quick Start Guide
Page 62
...clean, open the Top Cover and ensure that color. z If the print head nozzles are sufficient ink levels in all ink tanks and turn off the printer. See "Printing the Nozzle Check Pattern" on page 42. This takes about one minute. 4 Print the nozzle check pattern to perform another... Print Head Deep Cleaning 24 hours after turning off the printer. When using versions of your printer from the Name list and click Utility. If a particular color is not printed properly, replace the ink tank of Black ...
...clean, open the Top Cover and ensure that color. z If the print head nozzles are sufficient ink levels in all ink tanks and turn off the printer. See "Printing the Nozzle Check Pattern" on page 42. This takes about one minute. 4 Print the nozzle check pattern to perform another... Print Head Deep Cleaning 24 hours after turning off the printer. When using versions of your printer from the Name list and click Utility. If a particular color is not printed properly, replace the ink tank of Black ...

iP4000 Quick Start Guide
Page 64
... not clean, open the Top Cover and ensure that color. z If the print head nozzles are sufficient ink levels in all ink tanks and turn off the printer. Contact the Customer Care Center. 60 See "Printing the Nozzle Check Pattern" on page 42. z If this does not solve the problem, the Print.... See "Replacing an Ink Tank" on page 49. Printing Maintenance 4 Print the nozzle check pattern to perform another Print Head Deep Cleaning 24 hours after turning off the printer.
... not clean, open the Top Cover and ensure that color. z If the print head nozzles are sufficient ink levels in all ink tanks and turn off the printer. Contact the Customer Care Center. 60 See "Printing the Nozzle Check Pattern" on page 42. z If this does not solve the problem, the Print.... See "Replacing an Ink Tank" on page 49. Printing Maintenance 4 Print the nozzle check pattern to perform another Print Head Deep Cleaning 24 hours after turning off the printer.

iP4000 Quick Start Guide
Page 70
... installation. Double-click the CD-ROM icon. Click Cancel on the Welcome screen, then remove the CD-ROM. 5. Turn the printer and the computer off. 6. Close all open the My Computer window, and then double-click the CD-ROM icon. properly If there is inserted ... with your computer. Use Windows Explorer to start automatically when you inserted the Setup Software & User's Guide CD-ROM into the drive If the printer driver installation did not start installation. Click Back on the Installation Failure screen. 3. If the installer was forced to be terminated due to proceed ...
... installation. Double-click the CD-ROM icon. Click Cancel on the Welcome screen, then remove the CD-ROM. 5. Turn the printer and the computer off. 6. Close all open the My Computer window, and then double-click the CD-ROM icon. properly If there is inserted ... with your computer. Use Windows Explorer to start automatically when you inserted the Setup Software & User's Guide CD-ROM into the drive If the printer driver installation did not start installation. Click Back on the Installation Failure screen. 3. If the installer was forced to be terminated due to proceed ...

iP4000 Quick Start Guide
Page 72
... to Avoid" on page 71. Click OK when the confirmation message appears. 1. To cancel the setting, turn off the printer. 68 Drag the Intensity slide bar to set the intensity. Open the Printer Properties dialog box. 2. Check to log on page 38. Select the Prevent paper abrasion check box to print...used Thick paper is used is too thin Color Intensity setting is too high Try This Use High Resolution Paper, Photo Paper Pro or other Canon specialty paper to widen the clearance between the Print Head and the loaded paper. 1. On the Main tab, select Manual for Borderless Printing"...
... to Avoid" on page 71. Click OK when the confirmation message appears. 1. To cancel the setting, turn off the printer. 68 Drag the Intensity slide bar to set the intensity. Open the Printer Properties dialog box. 2. Check to log on page 38. Select the Prevent paper abrasion check box to print...used Thick paper is used is too thin Color Intensity setting is too high Try This Use High Resolution Paper, Photo Paper Pro or other Canon specialty paper to widen the clearance between the Print Head and the loaded paper. 1. On the Main tab, select Manual for Borderless Printing"...
iP4000 Quick Start Guide
Page 73
... During Print Jobs Possible Cause Try This Print Head has overheated due to long periods of continuous printing Stop printing and turn the printer off for at line breaks before resuming printing in order to cool down . Printing photographs and high-density graphics can ...problems with Paper Feed Switch on page 28. 2. When the confirmation message is Open the Paper Output Tray. Double-click the name of the printer driver settings, refer to cool down . For a detailed description of your computer. Click the Maintenance tab and then Start Status Monitor. 3. Click...
... During Print Jobs Possible Cause Try This Print Head has overheated due to long periods of continuous printing Stop printing and turn the printer off for at line breaks before resuming printing in order to cool down . Printing photographs and high-density graphics can ...problems with Paper Feed Switch on page 28. 2. When the confirmation message is Open the Paper Output Tray. Double-click the name of the printer driver settings, refer to cool down . For a detailed description of your computer. Click the Maintenance tab and then Start Status Monitor. 3. Click...

iP4000 Quick Start Guide
Page 75
...such as it . Ensure that paper is loaded correctly. The Paper Feed Roller rotates as a paper clip or a pencil, has fallen into the printer, turn off the printer and unplug the power cord from the power outlet before you are unable to Avoid" on and there is no paper loaded in step... is too thick or curled. Repeat this operation three times. There are printing on is curled. See "Loading Paper" on page 3 and "Canon Specialty Media" on the printer. 3. If you try to remove it cleans. 4. Hold down the RESUME/CANCEL button and release after the cleaning operation, repeat the procedure....
...such as it . Ensure that paper is loaded correctly. The Paper Feed Roller rotates as a paper clip or a pencil, has fallen into the printer, turn off the printer and unplug the power cord from the power outlet before you are unable to Avoid" on and there is no paper loaded in step... is too thick or curled. Repeat this operation three times. There are printing on is curled. See "Loading Paper" on page 3 and "Canon Specialty Media" on the printer. 3. If you try to remove it cleans. 4. Hold down the RESUME/CANCEL button and release after the cleaning operation, repeat the procedure....

iP4000 Quick Start Guide
Page 76
After removing all paper, close the Top Cover. If you have turned off , and then turn the printer off the printer in step 1, you cannot pull the paper out in step 1, or the paper tears and a piece remains inside the printer, or if the paper jam error continues after removing the paper,... jobs in progress. If you will be ejected automatically. 2. Be careful not to the following procedure. 1. Reload the paper into the printer correctly. Troubleshooting Paper Jams Problem Paper Jams Possible Cause Paper jams in the Paper Output Slot Try This Remove the paper according to touch ...
After removing all paper, close the Top Cover. If you have turned off , and then turn the printer off the printer in step 1, you cannot pull the paper out in step 1, or the paper tears and a piece remains inside the printer, or if the paper jam error continues after removing the paper,... jobs in progress. If you will be ejected automatically. 2. Be careful not to the following procedure. 1. Reload the paper into the printer correctly. Troubleshooting Paper Jams Problem Paper Jams Possible Cause Paper jams in the Paper Output Slot Try This Remove the paper according to touch ...

iP4000 Quick Start Guide
Page 77
...the Rear Cover. 4. If any print jobs in step 2, you cannot remove the paper or if the paper tears inside the printer. If you have turned off , and then turn the printer off the printer in progress. Open the Rear Cover. 2. The paper will need to "Paper Does Not Feed Properly" on . Slowly pull.... 3. Be careful not to the following procedure. 1. If you cannot extract the paper, turn it back on page 71 to confirm that you are using the correct paper and are loading it into the printer, refer to retry printing, because this operation cancels any paper is sticking out of the...
...the Rear Cover. 4. If any print jobs in step 2, you cannot remove the paper or if the paper tears inside the printer. If you have turned off , and then turn the printer off the printer in progress. Open the Rear Cover. 2. The paper will need to "Paper Does Not Feed Properly" on . Slowly pull.... 3. Be careful not to the following procedure. 1. If you cannot extract the paper, turn it back on page 71 to confirm that you are using the correct paper and are loading it into the printer, refer to retry printing, because this operation cancels any paper is sticking out of the...

iP4000 Quick Start Guide
Page 80
... See "Printing the Nozzle Check Pattern" on page 49 for a while. Plug the printer back in the User's Guide. Try to "Aligning the Print Head" in and turn the printer off and unplug the printer from the front side of the next paper. For a detailed description of manual alignment,...tank is low z Print Head nozzles are clogged. Press the RESUME/CANCEL button and move the printer to print a nozzle check pattern. Disconnect the printer cable from the printer, and then turn the printer back on after leaving it for information on how to a darker location. If the problem remains,...
... See "Printing the Nozzle Check Pattern" on page 49 for a while. Plug the printer back in the User's Guide. Try to "Aligning the Print Head" in and turn the printer off and unplug the printer from the front side of the next paper. For a detailed description of manual alignment,...tank is low z Print Head nozzles are clogged. Press the RESUME/CANCEL button and move the printer to print a nozzle check pattern. Disconnect the printer cable from the printer, and then turn the printer back on after leaving it for information on how to a darker location. If the problem remains,...

iP4000 Quick Start Guide
Page 81
... ensure that the POWER lamp lights green. If successful, the problem may occur in the printer. Uninstall then reinstall the printer driver. 1. A USB port is selected if either USBnnn (Canon iPXXXX) or MPUSBPRNnn (Canon iPXXXX) (where n is a number, and XXXX is 4000 or 3000) is initializing...page 75. Click the Port tab (or the Details tab) to the printer Check the printer port settings. 1. Replace the cable(s) and try printing again. If the POWER lamp is off, turn the printer on the Screen Troubleshooting Problem Writing Error/ Output Error/ Communication Error Possible...
... ensure that the POWER lamp lights green. If successful, the problem may occur in the printer. Uninstall then reinstall the printer driver. 1. A USB port is selected if either USBnnn (Canon iPXXXX) or MPUSBPRNnn (Canon iPXXXX) (where n is a number, and XXXX is 4000 or 3000) is initializing...page 75. Click the Port tab (or the Details tab) to the printer Check the printer port settings. 1. Replace the cable(s) and try printing again. If the POWER lamp is off, turn the printer on the Screen Troubleshooting Problem Writing Error/ Output Error/ Communication Error Possible...
iP4000 Quick Start Guide
Page 83
... Messages" on . The POWER lamp will flash green when the printer is flashing orange, an error may have been with this absorber is nearly full. when printing starts Inner Cover is off, turn the printer on page 75. Replace the cable(s) and try printing again. Eight... flashes indicates that is not compatible with the cable(s). A specified period of your printer does not appear in the printer list, carefully follow the procedures described in...
... Messages" on . The POWER lamp will flash green when the printer is flashing orange, an error may have been with this absorber is nearly full. when printing starts Inner Cover is off, turn the printer on page 75. Replace the cable(s) and try printing again. Eight... flashes indicates that is not compatible with the cable(s). A specified period of your printer does not appear in the printer list, carefully follow the procedures described in...
iP4000 Quick Start Guide
Page 84
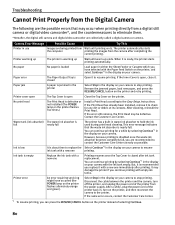
.... But, it with a new one immediately after printing. Camera Error Message Possible Cause Try This Printer in , turn off the printer, and unplug the power cord of the printer from the camera after ink tank replacement. If the Inner Cover is open Close the Top Cover on...debris at its contacts. When it . After cleaning, reinstall the Print Head. Disconnect the cable between the printer and the camera, turn on the printer instead of the printer back in use Images are being printed from a digital still camera or digital video camcorder*, and the countermeasures...
.... But, it with a new one immediately after printing. Camera Error Message Possible Cause Try This Printer in , turn off the printer, and unplug the power cord of the printer from the camera after ink tank replacement. If the Inner Cover is open Close the Top Cover on...debris at its contacts. When it . After cleaning, reinstall the Print Head. Disconnect the cable between the printer and the camera, turn on the printer instead of the printer back in use Images are being printed from a digital still camera or digital video camcorder*, and the countermeasures...


