
iP4000 Quick Start Guide
Page 2
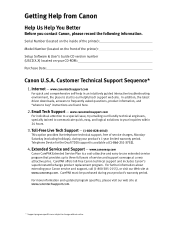
... guided interactive troubleshooting environment, the place to three full years of the printer): Setup Software & User's Guide CD version number (USCD X.X) located on your CD-ROM: Purchase Date: Canon U.S.A. www.canontechsupport.com For individual attention to a special issue, try ...buy" instructions are subject to your product's warranty period. Customer Technical Support Sequence* 1. Internet - CarePAK must be purchased during your Canon service and support, call (1-800-385-2155), or visit our Web site at www.canontechsupport.com. * Support program specifics are ...
... guided interactive troubleshooting environment, the place to three full years of the printer): Setup Software & User's Guide CD version number (USCD X.X) located on your CD-ROM: Purchase Date: Canon U.S.A. www.canontechsupport.com For individual attention to a special issue, try ...buy" instructions are subject to your product's warranty period. Customer Technical Support Sequence* 1. Internet - CarePAK must be purchased during your Canon service and support, call (1-800-385-2155), or visit our Web site at www.canontechsupport.com. * Support program specifics are ...
iP4000 Quick Start Guide
Page 4
... determined that it will be , representation or warranties concerning the products described. and other countries. z Microsoft® and Windows® are trademarks of Canon Information System Research Australia. Canon PIXMA iP4000/iP3000 Photo Printer Quick Start Guide. Disclaimer Canon U.S.A., Inc. All statements, technical information and recommendations in part, without notice. No representation is made regarding non...
... determined that it will be , representation or warranties concerning the products described. and other countries. z Microsoft® and Windows® are trademarks of Canon Information System Research Australia. Canon PIXMA iP4000/iP3000 Photo Printer Quick Start Guide. Disclaimer Canon U.S.A., Inc. All statements, technical information and recommendations in part, without notice. No representation is made regarding non...
iP4000 Quick Start Guide
Page 5
... Troubleshooting Cannot Install the Printer Driver 66 Print Quality is Poor or Contains Errors 67 Troubleshooting Printer Hardware 69 Paper Does ...Not Feed Properly 71 Paper Jams 72 Handling Error Messages 75 An Error Message Appears on the Printer ... Printing Photographs Directly from a Digital Camera 22 Accessing the Printer Driver 28 Adjusting the Print Quality for Photographs 29 Using ...the iP3000. 1 Contents Contents Basic Printing Turning on the Screen 77 Cannot Print Properly from the Digital Camera 80 Appendix Installing the Printer Driver...
... Troubleshooting Cannot Install the Printer Driver 66 Print Quality is Poor or Contains Errors 67 Troubleshooting Printer Hardware 69 Paper Does ...Not Feed Properly 71 Paper Jams 72 Handling Error Messages 75 An Error Message Appears on the Printer ... Printing Photographs Directly from a Digital Camera 22 Accessing the Printer Driver 28 Adjusting the Print Quality for Photographs 29 Using ...the iP3000. 1 Contents Contents Basic Printing Turning on the Screen 77 Cannot Print Properly from the Digital Camera 80 Appendix Installing the Printer Driver...
iP4000 Quick Start Guide
Page 6
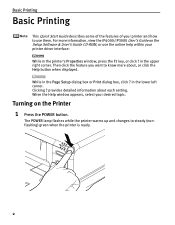
... Setup Software & User's Guide CD-ROM, or use them. The POWER lamp flashes while the printer warms up and changes to know more information, view the iP4000/iP3000 User's Guide on the Printer 1 Press the POWER button. Then click the feature you want to steady (nonflashing) green when ...the printer is ready. 2 provides detailed information about , or click the Help button when displayed. in...
... Setup Software & User's Guide CD-ROM, or use them. The POWER lamp flashes while the printer warms up and changes to know more information, view the iP4000/iP3000 User's Guide on the Printer 1 Press the POWER button. Then click the feature you want to steady (nonflashing) green when ...the printer is ready. 2 provides detailed information about , or click the Help button when displayed. in...
iP4000 Quick Start Guide
Page 7
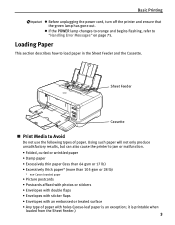
... • Excessively thin paper (less than 64 gsm or 17 lb) • Excessively thick paper* (more than 105 gsm or 28 lb) * non-Canon branded paper • Picture postcards • Postcards affixed with photos or stickers • Envelopes with double flaps • Envelopes with sticker flaps • Envelopes... to load paper in the Sheet Feeder and the Cassette. Using such paper will not only produce unsatisfactory results, but can also cause the printer to Avoid Do not use the following types of paper with holes (Loose-leaf paper is printable when loaded from the Sheet Feeder.) 3 ...
... • Excessively thin paper (less than 64 gsm or 17 lb) • Excessively thick paper* (more than 105 gsm or 28 lb) * non-Canon branded paper • Picture postcards • Postcards affixed with photos or stickers • Envelopes with double flaps • Envelopes with sticker flaps • Envelopes... to load paper in the Sheet Feeder and the Cassette. Using such paper will not only produce unsatisfactory results, but can also cause the printer to Avoid Do not use the following types of paper with holes (Loose-leaf paper is printable when loaded from the Sheet Feeder.) 3 ...

iP4000 Quick Start Guide
Page 8
...methods available: • Changing the paper source to feed different types/sizes of paper, the paper source automatically switches to install the printer in both the Sheet Feeder and Cassette. Basic Printing „ Using the Sheet Feeder and the Cassette You can use just the ...printer driver settings, refer to "Changing the Paper Source" in the Cassette allows you to "Changing the Paper Source" in the Sheet Feeder is easy, and is always fed from the Cassette for printing. This is useful for printing onto a large volume of paper you intend to the other one. See "Canon...
...methods available: • Changing the paper source to feed different types/sizes of paper, the paper source automatically switches to install the printer in both the Sheet Feeder and Cassette. Basic Printing „ Using the Sheet Feeder and the Cassette You can use just the ...printer driver settings, refer to "Changing the Paper Source" in the Cassette allows you to "Changing the Paper Source" in the Sheet Feeder is easy, and is always fed from the Cassette for printing. This is useful for printing onto a large volume of paper you intend to the other one. See "Canon...
iP4000 Quick Start Guide
Page 9
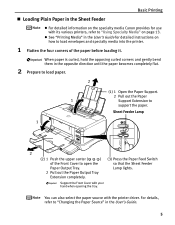
... gently bend them in the User's Guide. 5 Basic Printing „ Loading Plain Paper in the Sheet Feeder z For detailed information on the specialty media Canon provides for detailed instructions on page 13. Sheet Feeder Lamp 1 2 (2) 1 Push the upper center ( ) of the paper before loading it. You ...opening the tray. z See "Printing Media" in the User's Guide for use with its various printers, refer to "Using Specialty Media" on how to load envelopes and specialty media into the printer. 1 Flatten the four corners of the Front Cover to support the paper. For details, refer to...
... gently bend them in the User's Guide. 5 Basic Printing „ Loading Plain Paper in the Sheet Feeder z For detailed information on the specialty media Canon provides for detailed instructions on page 13. Sheet Feeder Lamp 1 2 (2) 1 Push the upper center ( ) of the paper before loading it. You ...opening the tray. z See "Printing Media" in the User's Guide for use with its various printers, refer to "Using Specialty Media" on how to load envelopes and specialty media into the printer. 1 Flatten the four corners of the Front Cover to support the paper. For details, refer to...
iP4000 Quick Start Guide
Page 11
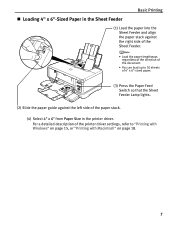
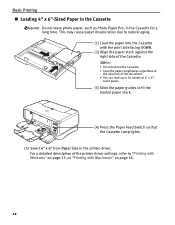
... of 4" x 6"-sized paper. (3) Press the Paper Feed Switch so that the Sheet Feeder Lamp lights. (2) Slide the paper guide against the left side of the printer driver settings, refer to "Printing with Windows" on page 15, or "Printing with Macintosh" on page 18. 7 Basic Printing „ Loading 4" x 6"-Sized Paper in the...
... of 4" x 6"-sized paper. (3) Press the Paper Feed Switch so that the Sheet Feeder Lamp lights. (2) Slide the paper guide against the left side of the printer driver settings, refer to "Printing with Windows" on page 15, or "Printing with Macintosh" on page 18. 7 Basic Printing „ Loading 4" x 6"-Sized Paper in the...
iP4000 Quick Start Guide
Page 12
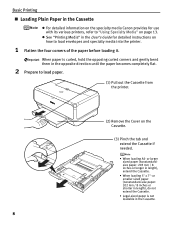
... gently bend them in the opposite direction until the paper becomes completely flat. 2 Prepare to load paper. (1) Pull out the Cassette from the printer. (2) Remove the Cover on the Cassette. (3) Pinch the tab and extend the Cassette if needed. • When loading A5- or larger ... x 7"- When paper is not loadable in the User's Guide for detailed instructions on how to "Using Specialty Media" on the specialty media Canon provides for use with its various printers, refer to load envelopes and specialty media into the printer. 1 Flatten the four corners of the paper before loading it.
... gently bend them in the opposite direction until the paper becomes completely flat. 2 Prepare to load paper. (1) Pull out the Cassette from the printer. (2) Remove the Cover on the Cassette. (3) Pinch the tab and extend the Cassette if needed. • When loading A5- or larger ... x 7"- When paper is not loadable in the User's Guide for detailed instructions on how to "Using Specialty Media" on the specialty media Canon provides for use with its various printers, refer to load envelopes and specialty media into the printer. 1 Flatten the four corners of the paper before loading it.
iP4000 Quick Start Guide
Page 14
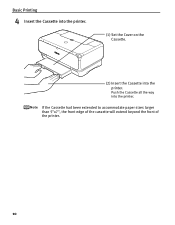
Push the Cassette all the way into the printer. If the Cassette had been extended to accommodate paper sizes larger than 5"x7", the front edge of the cassette will extend beyond the front of the printer. 10 Basic Printing 4 Insert the Cassette into the printer. (1) Set the Cover on the Cassette. (2) Insert the Cassette into the printer.
Push the Cassette all the way into the printer. If the Cassette had been extended to accommodate paper sizes larger than 5"x7", the front edge of the cassette will extend beyond the front of the printer. 10 Basic Printing 4 Insert the Cassette into the printer. (1) Set the Cover on the Cassette. (2) Insert the Cassette into the printer.
iP4000 Quick Start Guide
Page 15
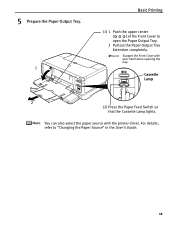
5 Prepare the Paper Output Tray. 1 Basic Printing (1) 1 Push the upper center ( ) of the Front Cover to "Changing the Paper Source" in the User's Guide. 11 Support the Front Cover with the printer driver. Cassette Lamp 2 (2) Press the Paper Feed Switch so that the Cassette Lamp lights. For details, refer to open the Paper Output Tray. 2 Pull out the Paper Output Tray Extension completely. You can also select the paper source with your hand when opening the tray.
5 Prepare the Paper Output Tray. 1 Basic Printing (1) 1 Push the upper center ( ) of the Front Cover to "Changing the Paper Source" in the User's Guide. 11 Support the Front Cover with the printer driver. Cassette Lamp 2 (2) Press the Paper Feed Switch so that the Cassette Lamp lights. For details, refer to open the Paper Output Tray. 2 Pull out the Paper Output Tray Extension completely. You can also select the paper source with your hand when opening the tray.
iP4000 Quick Start Guide
Page 16
... extend the Cassette. • Load the paper lengthways regardless of the direction of the document. • You can load up to 20 sheets of the printer driver settings, refer to fit the loaded paper stack. (4) Press the Paper Feed Switch so that the Cassette Lamp lights. (5) Select 4" x 6" from Paper Size in..." on page 18. 12 Basic Printing „ Loading 4" x 6"-Sized Paper in the Cassette Do not leave photo paper, such as Photo Paper Pro, in the printer driver.
... extend the Cassette. • Load the paper lengthways regardless of the direction of the document. • You can load up to 20 sheets of the printer driver settings, refer to fit the loaded paper stack. (4) Press the Paper Feed Switch so that the Cassette Lamp lights. (5) Select 4" x 6" from Paper Size in..." on page 18. 12 Basic Printing „ Loading 4" x 6"-Sized Paper in the Cassette Do not leave photo paper, such as Photo Paper Pro, in the printer driver.
iP4000 Quick Start Guide
Page 18
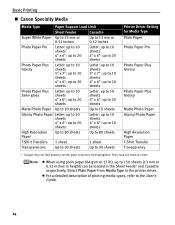
Basic Printing „ Canon Specialty Media Media Type Paper Support Load Limit Sheet Feeder Cassette Super White Paper Up to...: up to 10 sheets 4" x 6": up to 150 sheets (13 mm or 0.52 inches in height) can be loaded in the printer driver. z When using plain paper (64 gsm or 17 lb), up to 20 sheets High Resolution Paper Up to 80 sheets Up to... 80 sheets T-Shirt Transfers 1 sheet 1 sheet Transparencies Up to 30 sheets Up to 30 sheets Printer Driver Setting for Media Type Plain Paper Photo Paper Pro Photo Paper Plus Glossy Photo Paper Plus Glossy Matte Photo Paper ...
Basic Printing „ Canon Specialty Media Media Type Paper Support Load Limit Sheet Feeder Cassette Super White Paper Up to...: up to 10 sheets 4" x 6": up to 150 sheets (13 mm or 0.52 inches in height) can be loaded in the printer driver. z When using plain paper (64 gsm or 17 lb), up to 20 sheets High Resolution Paper Up to 80 sheets Up to... 80 sheets T-Shirt Transfers 1 sheet 1 sheet Transparencies Up to 30 sheets Up to 30 sheets Printer Driver Setting for Media Type Plain Paper Photo Paper Pro Photo Paper Plus Glossy Photo Paper Plus Glossy Matte Photo Paper ...
iP4000 Quick Start Guide
Page 19
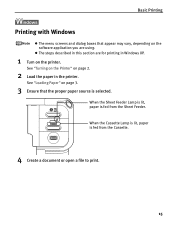
When the Sheet Feeder Lamp is lit, paper is fed from the Cassette. 4 Create a document or open a file to print. 15 See "Turning on the Printer" on page 3. 3 Ensure that appear may vary, depending on the printer. See "Loading Paper" on page 2. 2 Load the paper in Windows XP. 1 Turn on the software application you are using. Basic Printing Printing with Windows z The menu screens and dialog boxes that the proper paper source is selected. When the Cassette Lamp is lit, paper is fed from the Sheet Feeder. z The steps described in this section are for printing in the printer.
When the Sheet Feeder Lamp is lit, paper is fed from the Cassette. 4 Create a document or open a file to print. 15 See "Turning on the Printer" on page 3. 3 Ensure that appear may vary, depending on the printer. See "Loading Paper" on page 2. 2 Load the paper in Windows XP. 1 Turn on the software application you are using. Basic Printing Printing with Windows z The menu screens and dialog boxes that the proper paper source is selected. When the Cassette Lamp is lit, paper is fed from the Sheet Feeder. z The steps described in this section are for printing in the printer.
iP4000 Quick Start Guide
Page 20
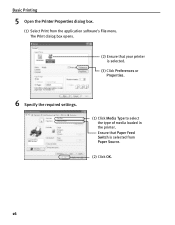
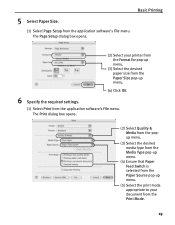
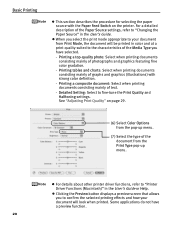
Ensure that your printer is selected from the application software's File menu. Basic Printing 5 Open the Printer Properties dialog box. (1) Select Print from Paper Source. (2) Click OK. 16 The Print dialog box opens. (2) Ensure that Paper Feed Switch is selected. (3) Click Preferences or Properties. 6 Specify the required settings. (1) Click Media Type to select the type of media loaded in the printer.
Ensure that your printer is selected from the application software's File menu. Basic Printing 5 Open the Printer Properties dialog box. (1) Select Print from Paper Source. (2) Click OK. 16 The Print dialog box opens. (2) Ensure that Paper Feed Switch is selected. (3) Click Preferences or Properties. 6 Specify the required settings. (1) Click Media Type to select the type of media loaded in the printer.
iP4000 Quick Start Guide
Page 21
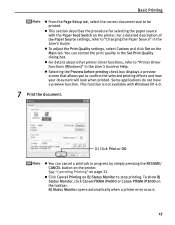
For a detailed description of the Paper Source settings, refer to "Printer Driver Functions (Windows)" in the User's Guide. z For details about other printer driver functions, refer to "Changing the Paper Source" in the User's Guide or Help. Some applications do not have a ...in progress by simply pressing the RESUME/ CANCEL button on the taskbar. To show BJ Status Monitor, click Canon PIXMA iP4000 or Canon PIXMA iP3000 on the printer. See "Canceling Printing" on the printer. You can cancel a print job in the Set Print Quality dialog box. z Selecting the Preview before ...
For a detailed description of the Paper Source settings, refer to "Printer Driver Functions (Windows)" in the User's Guide. z For details about other printer driver functions, refer to "Changing the Paper Source" in the User's Guide or Help. Some applications do not have a ...in progress by simply pressing the RESUME/ CANCEL button on the taskbar. To show BJ Status Monitor, click Canon PIXMA iP4000 or Canon PIXMA iP3000 on the printer. See "Canceling Printing" on the printer. You can cancel a print job in the Set Print Quality dialog box. z Selecting the Preview before ...
iP4000 Quick Start Guide
Page 22
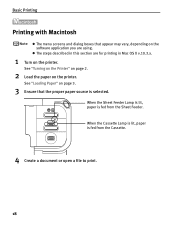
... Mac OS X v.10.3.x. 1 Turn on the software application you are using. See "Turning on the Printer" on page 2. 2 Load the paper on page 3. 3 Ensure that appear may vary, depending on the printer. See "Loading Paper" on the printer. When the Sheet Feeder Lamp is lit, paper is fed from the Sheet Feeder. When...
... Mac OS X v.10.3.x. 1 Turn on the software application you are using. See "Turning on the Printer" on page 2. 2 Load the paper on page 3. 3 Ensure that appear may vary, depending on the printer. See "Loading Paper" on the printer. When the Sheet Feeder Lamp is lit, paper is fed from the Sheet Feeder. When...
iP4000 Quick Start Guide
Page 23
The Page Setup dialog box opens. (2) Select your printer from the Format for pop-up menu. (3) Select the desired paper size from the Paper Size pop-up menu. (5) Select the print mode appropriate to ...
The Page Setup dialog box opens. (2) Select your printer from the Format for pop-up menu. (3) Select the desired paper size from the Paper Size pop-up menu. (5) Select the print mode appropriate to ...
iP4000 Quick Start Guide
Page 24
... section describes the procedure for selecting the paper source with strong color definition. - z For details about other printer driver functions, refer to "Printer Driver Functions (Macintosh)" in the User's Guide. See "Adjusting Print Quality" on the printer. Detailed Setting: Select to "Changing the Paper Source" in the User's Guide or Help. z When you...
... section describes the procedure for selecting the paper source with strong color definition. - z For details about other printer driver functions, refer to "Printer Driver Functions (Macintosh)" in the User's Guide. See "Adjusting Print Quality" on the printer. Detailed Setting: Select to "Changing the Paper Source" in the User's Guide or Help. z When you...

iP4000 Quick Start Guide
Page 25
... Printing You can cancel a print job in progress by simply pressing the RESUME/CANCEL button on the printer. Printing is canceled and paper is fed out. 21 See "Canceling Printing" on the printer. 1 Press the RESUME/CANCEL button while printing. (1) Press the RESUME/CANCEL button. To temporarily stop... a job in the list, click Stop Printing. To cancel a job in the Printer list displays a dialog that prompts you to confirm the status of your printer in progress, select the desired document, then click Delete. z Double-clicking the name of the print job(s)....
... Printing You can cancel a print job in progress by simply pressing the RESUME/CANCEL button on the printer. Printing is canceled and paper is fed out. 21 See "Canceling Printing" on the printer. 1 Press the RESUME/CANCEL button while printing. (1) Press the RESUME/CANCEL button. To temporarily stop... a job in the list, click Stop Printing. To cancel a job in the Printer list displays a dialog that prompts you to confirm the status of your printer in progress, select the desired document, then click Delete. z Double-clicking the name of the print job(s)....


