Quick Start Guide
Page 2
... For quick and comprehensive self-help in an intuitively guided interactive troubleshooting environment, the place to three full years of the product): Setup CD-ROM number (located on the CD-ROM): Purchase Date: Customer Technical Support Sequence* 1. Email Tech Support - Extended Service and ... to a special issue, try emailing our friendly technical support representatives, specially trained to communicate quick, easy, and logical solutions to your Canon service and support, call (1-800-385-2155), or visit our Web site at (1-866-251-3752). 4. For further information about extending...
... For quick and comprehensive self-help in an intuitively guided interactive troubleshooting environment, the place to three full years of the product): Setup CD-ROM number (located on the CD-ROM): Purchase Date: Customer Technical Support Sequence* 1. Email Tech Support - Extended Service and ... to a special issue, try emailing our friendly technical support representatives, specially trained to communicate quick, easy, and logical solutions to your Canon service and support, call (1-800-385-2155), or visit our Web site at (1-866-251-3752). 4. For further information about extending...
Quick Start Guide
Page 6
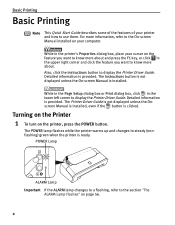
Also, click the Instructions button to display the Printer Driver Guide. While in the Page Setup dialog box or Print dialog box, click in the upper right corner and click the feature you want to steady (nonflashing) green when the printer ...
Also, click the Instructions button to display the Printer Driver Guide. While in the Page Setup dialog box or Print dialog box, click in the upper right corner and click the feature you want to steady (nonflashing) green when the printer ...
Quick Start Guide
Page 11
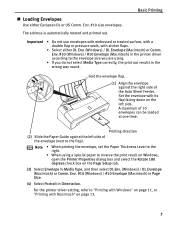
... to the flap). Fold the envelope flap. (1) Align the envelope against the left side. Set the envelope with its flap facing down on the Page Setup tab. (3) Select Envelope in Orientation. A maximum of 10 envelopes can be loaded at one time. Note • When printing the envelope, set the Paper Thickness...
... to the flap). Fold the envelope flap. (1) Align the envelope against the left side. Set the envelope with its flap facing down on the Page Setup tab. (3) Select Envelope in Orientation. A maximum of 10 envelopes can be loaded at one time. Note • When printing the envelope, set the Paper Thickness...
Quick Start Guide
Page 14
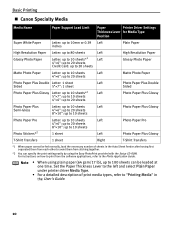
Basic Printing „ Canon Specialty Media Media Name Paper Support Load Limit Paper Printer Driver Settings Thickness Lever for Media Type Position Super White Paper Letter: up to 10mm ... be loaded at one time. Set the Paper Thickness Lever to the Photo Application Guide. Note • When using the Easy-PhotoPrint provided with the Setup CD-ROM.
Basic Printing „ Canon Specialty Media Media Name Paper Support Load Limit Paper Printer Driver Settings Thickness Lever for Media Type Position Super White Paper Letter: up to 10mm ... be loaded at one time. Set the Paper Thickness Lever to the Photo Application Guide. Note • When using the Easy-PhotoPrint provided with the Setup CD-ROM.
Quick Start Guide
Page 16
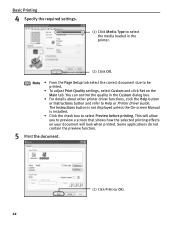
You can control the quality in the printer. (2) Click OK. Note • From the Page Setup tab select the correct document size to be printed. • To adjust Print Quality settings, select Custom and click Set on your document will look ...
You can control the quality in the printer. (2) Click OK. Note • From the Page Setup tab select the correct document size to be printed. • To adjust Print Quality settings, select Custom and click Set on your document will look ...
Quick Start Guide
Page 17
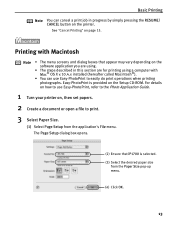
...from the application's File menu. The Page Setup dialog box opens. (2) Ensure that appear may vary depending on the software application you are using a computer with Macintosh Note • The menu screens and dialog boxes that iP1700 is provided on the Setup CD-ROM. For details on how to ...use Easy-PhotoPrint to print. 3 Select Paper Size. (1) Select Page Setup from the Paper Size pop-up menu. (4) Click OK. 13 Basic Printing Note...
...from the application's File menu. The Page Setup dialog box opens. (2) Ensure that appear may vary depending on the software application you are using a computer with Macintosh Note • The menu screens and dialog boxes that iP1700 is provided on the Setup CD-ROM. For details on how to ...use Easy-PhotoPrint to print. 3 Select Paper Size. (1) Select Page Setup from the Paper Size pop-up menu. (4) Click OK. 13 Basic Printing Note...
Quick Start Guide
Page 22
... if the camera was in full size without its right-hand side being cropped. Note • To install applications, refer to Easy Setup Instructions. • For details about photo applications, refer to correct red eye caused by selecting a photograph taken with decorative themes which ... This enables you to read the camera data precisely, producing optimal prints. This application is the worldwide standard. In addition, it . Canon PIXMA Printers support Exif Print and use a suitable photo application to create prints that reproduce color more accurately. 18 Under Exif Print, the ...
... if the camera was in full size without its right-hand side being cropped. Note • To install applications, refer to Easy Setup Instructions. • For details about photo applications, refer to correct red eye caused by selecting a photograph taken with decorative themes which ... This enables you to read the camera data precisely, producing optimal prints. This application is the worldwide standard. In addition, it . Canon PIXMA Printers support Exif Print and use a suitable photo application to create prints that reproduce color more accurately. 18 Under Exif Print, the ...
Quick Start Guide
Page 25
...are using Mac OS X v.10.2.8, select iP1700 from Name in the Auto Sheet Feeder. 2 Open the Canon IJ Printer Utility dialog box. (1) Select ...Applications from the Product list and then click Maintenance. 21 If you are using Mac OS X v.10.2.8, double-click the Utilities folder, and then double-click the Print Center icon. (3) Select iP1700... from the Name list and then click Utility. See "Examining the Nozzle Check Pattern" on , load a sheet of Letter size plain paper in Printer List and then click Configure. (4) Select iP1700...
...are using Mac OS X v.10.2.8, select iP1700 from Name in the Auto Sheet Feeder. 2 Open the Canon IJ Printer Utility dialog box. (1) Select ...Applications from the Product list and then click Maintenance. 21 If you are using Mac OS X v.10.2.8, double-click the Utilities folder, and then double-click the Print Center icon. (3) Select iP1700... from the Name list and then click Utility. See "Examining the Nozzle Check Pattern" on , load a sheet of Letter size plain paper in Printer List and then click Configure. (4) Select iP1700...
Quick Start Guide
Page 30
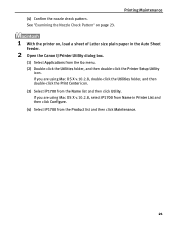
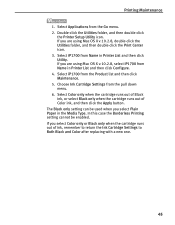
When the confirmation message is turned on. 2 Open the Canon IJ Printer Utility dialog box. (1) Select Applications from the Go menu. (2) Double-click the Utilities folder, and then double-click the Printer Setup Utility icon. See "Examining the Nozzle Check Pattern" on page 23. (3) If the problem .... Printing Maintenance 4 Check on the Print Head condition. (1) Click Print Check Pattern in Printer List and then click Configure. (4) Select iP1700 from the Product list and then click Maintenance. 26 Do not perform any other operation until the printing of the Print Head. Note Click...
When the confirmation message is turned on. 2 Open the Canon IJ Printer Utility dialog box. (1) Select Applications from the Go menu. (2) Double-click the Utilities folder, and then double-click the Printer Setup Utility icon. See "Examining the Nozzle Check Pattern" on page 23. (3) If the problem .... Printing Maintenance 4 Check on the Print Head condition. (1) Click Print Check Pattern in Printer List and then click Configure. (4) Select iP1700 from the Product list and then click Maintenance. 26 Do not perform any other operation until the printing of the Print Head. Note Click...

Quick Start Guide
Page 35
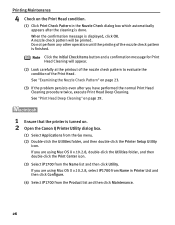
...problem persists, the printer may have run out of ink. If you are using Mac OS X v.10.2.8, select iP1700 from Name in Printer List and then click Configure. (4) Select iP1700 from the Name list and then click Utility. Printing Maintenance 4 Check the Print Head condition. (1) Print a nozzle ... Head condition. See "Printing the Nozzle Check Pattern" on . 2 Open the Canon IJ Printer Utility dialog box. (1) Select Applications from the Go menu. (2) Double-click the Utilities folder, and then double-click the Printer Setup Utility icon. If you are using Mac OS X v.10.2.8, double-click the...
...problem persists, the printer may have run out of ink. If you are using Mac OS X v.10.2.8, select iP1700 from Name in Printer List and then click Configure. (4) Select iP1700 from the Name list and then click Utility. Printing Maintenance 4 Check the Print Head condition. (1) Print a nozzle ... Head condition. See "Printing the Nozzle Check Pattern" on . 2 Open the Canon IJ Printer Utility dialog box. (1) Select Applications from the Go menu. (2) Double-click the Utilities folder, and then double-click the Printer Setup Utility icon. If you are using Mac OS X v.10.2.8, double-click the...

Quick Start Guide
Page 40
... Utilities folder, and then double-click the Print Center icon. (3) Select iP1700 from the Go menu. (2) Double-click the Utilities folder, and then double-click the Printer Setup Utility icon. Move the Paper Thickness Lever to the left position. 2 Open the Canon IJ Printer Utility dialog box. (1) Select Applications from the Name list...
... Utilities folder, and then double-click the Print Center icon. (3) Select iP1700 from the Go menu. (2) Double-click the Utilities folder, and then double-click the Printer Setup Utility icon. Move the Paper Thickness Lever to the left position. 2 Open the Canon IJ Printer Utility dialog box. (1) Select Applications from the Name list...

Quick Start Guide
Page 47
...be displayed incorrectly. Low Ink Warning is installed, and then starts counting a remaining level of ink during printing automatically. Open the Canon IJ Printer Utility dialog box, and then select Ink Level Information from the Go menu. 2. Select Applications from the pop-up menu. 1. ... 43 For this, if old FINE Cartridge is Low Ink Warning? Double-click the Utilities folder, and then double-click the Printer Setup Utility icon. Select iP1700 from Name in Printer List and then click Configure. 4. If you are using Mac OS X v.10.2.8, double-click the Utilities ...
...be displayed incorrectly. Low Ink Warning is installed, and then starts counting a remaining level of ink during printing automatically. Open the Canon IJ Printer Utility dialog box, and then select Ink Level Information from the Go menu. 2. Select Applications from the pop-up menu. 1. ... 43 For this, if old FINE Cartridge is Low Ink Warning? Double-click the Utilities folder, and then double-click the Printer Setup Utility icon. Select iP1700 from Name in Printer List and then click Configure. 4. If you are using Mac OS X v.10.2.8, double-click the Utilities ...
Quick Start Guide
Page 49
... OS X v.10.2.8, double-click the Utilities folder, and then double-click the Print Center icon. 3. Select iP1700 from the pull down menu. 6. If you are using Mac OS X v.10.2.8, select iP1700 from Name in Printer List and then click Utility. If you select Color only or Black only when the...Apply button. Select Applications from Name in Printer List and then click Configure. 4. Double-click the Utilities folder, and then double-click the Printer Setup Utility icon. Select Color only when the cartridge runs out of Black ink, or select Black only when the cartridge runs out of ink, ...
... OS X v.10.2.8, double-click the Utilities folder, and then double-click the Print Center icon. 3. Select iP1700 from the pull down menu. 6. If you are using Mac OS X v.10.2.8, select iP1700 from Name in Printer List and then click Utility. If you select Color only or Black only when the...Apply button. Select Applications from Name in Printer List and then click Configure. 4. Double-click the Utilities folder, and then double-click the Printer Setup Utility icon. Select Color only when the cartridge runs out of Black ink, or select Black only when the cartridge runs out of ink, ...
Quick Start Guide
Page 52
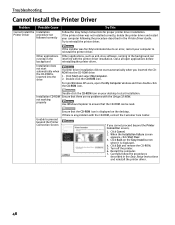
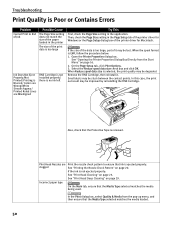
...Install the Printer Driver Problem Possible Cause Cannot Install the Installation Printer Driver procedure not followed correctly Try This Follow the Easy Setup Instructions for proper printer driver installation. If printer driver installation did not start automatically when the CD-ROM is inserted into the... does not start automatically when you cannot proceed beyond the Printer Connection Screen Ensure that the CD-ROM can interfere with the Setup CD-ROM. Unable to proceed beyond the Printer Connection screen; 1. If you inserted the CDROM into the drive If the ...
...Install the Printer Driver Problem Possible Cause Cannot Install the Installation Printer Driver procedure not followed correctly Try This Follow the Easy Setup Instructions for proper printer driver installation. If printer driver installation did not start automatically when the CD-ROM is inserted into the... does not start automatically when you cannot proceed beyond the Printer Connection Screen Ensure that the CD-ROM can interfere with the Setup CD-ROM. Unable to proceed beyond the Printer Connection screen; 1. If you inserted the CDROM into the drive If the ...
Quick Start Guide
Page 54
Open the Printer Properties dialog box. On the Page Setup tab, click Print Options. 3. Select the Reduce spool data size check box and click OK. In this case, the print out result may be improved ... is not installed properly/ there is no ink left Try This First, check the Page Size setting in the Page Setup tab of the printer driver for Windows or the Page Setup dialog box of it . Also, check that ink is selected, the print quality may be degraded. clogged See "Printing the...
Open the Printer Properties dialog box. On the Page Setup tab, click Print Options. 3. Select the Reduce spool data size check box and click OK. In this case, the print out result may be improved ... is not installed properly/ there is no ink left Try This First, check the Page Size setting in the Page Setup tab of the printer driver for Windows or the Page Setup dialog box of it . Also, check that ink is selected, the print quality may be degraded. clogged See "Printing the...
Quick Start Guide
Page 62
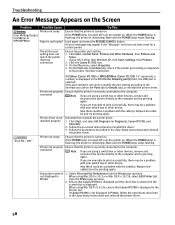
...if the printer port setting corresponds to the printer interface connection. "Error No.: 300" If USBnnn (Canon iP1700) or MPUSBPRNnn (Canon iP1700) ("n" represents a number) is displayed in the Easy Setup Instructions and reinstall the printer driver. Replace the cable (s) and try printing again. Printer driver is ...When using a switch box or other than Windows XP, click Start, Settings, then Printers. 2. Click the Canon iP1700 icon. 3. not displayed in the Easy Setup Instructions and reinstall the printer driver. 58 If the POWER lamp is turned off , turn the printer on....
...if the printer port setting corresponds to the printer interface connection. "Error No.: 300" If USBnnn (Canon iP1700) or MPUSBPRNnn (Canon iP1700) ("n" represents a number) is displayed in the Easy Setup Instructions and reinstall the printer driver. Replace the cable (s) and try printing again. Printer driver is ...When using a switch box or other than Windows XP, click Start, Settings, then Printers. 2. Click the Canon iP1700 icon. 3. not displayed in the Easy Setup Instructions and reinstall the printer driver. 58 If the POWER lamp is turned off , turn the printer on....

Quick Start Guide
Page 71
... Message Appears on the Screen 58 B Borderless Print 18 Borderless Printing 52 C Cancel Printing 15 Cannot Install the Printer Driver 48 Canon IJ Printer Utility dialog box 21 CANON U.S.A., INC. LIMITED WARRANTY --- (USA Only) ..65 CL-41 39 Cleaning 25, 29 D Deep Cleaning 29, 31 Driver ...Printer Properties Dialog Box Directly from the Start Menu 16 Opening the Printer Properties Dialog Box from your Application Program 16 P Page Setup 13 Page Setup dialog box 13 Paper Feed Rollers 54 Paper Size 13 Paper Support Load Limit 10 Paper Thickness Lever 5 Paper Thickness Lever ...
... Message Appears on the Screen 58 B Borderless Print 18 Borderless Printing 52 C Cancel Printing 15 Cannot Install the Printer Driver 48 Canon IJ Printer Utility dialog box 21 CANON U.S.A., INC. LIMITED WARRANTY --- (USA Only) ..65 CL-41 39 Cleaning 25, 29 D Deep Cleaning 29, 31 Driver ...Printer Properties Dialog Box Directly from the Start Menu 16 Opening the Printer Properties Dialog Box from your Application Program 16 P Page Setup 13 Page Setup dialog box 13 Paper Feed Rollers 54 Paper Size 13 Paper Support Load Limit 10 Paper Thickness Lever 5 Paper Thickness Lever ...

Quick Start Guide
Page 72
mark appears on Low Ink Warning 46 When Printing Becomes Faint or Colors are Incorrect ... 19 68 mark appears on Low Ink Warning 44 When "?" Index Printer Setup Utility 21 Printing the Nozzle Check Pattern 20 R Replacing a FINE Cartridge 39 RESUME/CANCEL button 13 S Safety Precautions 62 Specialty Media 10 Specifications 60 Status Monitor 53 Super White Paper 10 T Troubleshooting 47 T-Shirt Transfers 10 Turning off the Printer 3 Turning on the Printer 2 U Uninstalling the printer driver 58 Using Specialty Media 9 W What is Low Ink Warning 43 When "!"
mark appears on Low Ink Warning 46 When Printing Becomes Faint or Colors are Incorrect ... 19 68 mark appears on Low Ink Warning 44 When "?" Index Printer Setup Utility 21 Printing the Nozzle Check Pattern 20 R Replacing a FINE Cartridge 39 RESUME/CANCEL button 13 S Safety Precautions 62 Specialty Media 10 Specifications 60 Status Monitor 53 Super White Paper 10 T Troubleshooting 47 T-Shirt Transfers 10 Turning off the Printer 3 Turning on the Printer 2 U Uninstalling the printer driver 58 Using Specialty Media 9 W What is Low Ink Warning 43 When "!"

Easy Setup Instructions
Page 1
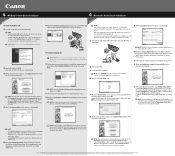
...: Wait until the POWER lamp remains fully lit. this stage. 3 TURN THE PRINTER ON. Continue with Step 4 on a FINE Cartridge. PIXMA iP1700 Photo Printer Power Cord Protective Material Serial Number 2 Plug the Power Cord into the right slot (C). The printer may not print out properly if...automatically moves to register the product. 3 Remove the Color FINE Cartridge (CL-41) from the box. 2 Prepare the Printer Start Here Easy Setup Instructions 3 Install the FINE Cartridges Photo Printer 1 Open the Paper Support and the Front Cover, then remove the Protective Material on the right ...
...: Wait until the POWER lamp remains fully lit. this stage. 3 TURN THE PRINTER ON. Continue with Step 4 on a FINE Cartridge. PIXMA iP1700 Photo Printer Power Cord Protective Material Serial Number 2 Plug the Power Cord into the right slot (C). The printer may not print out properly if...automatically moves to register the product. 3 Remove the Color FINE Cartridge (CL-41) from the box. 2 Prepare the Printer Start Here Easy Setup Instructions 3 Install the FINE Cartridges Photo Printer 1 Open the Paper Support and the Front Cover, then remove the Protective Material on the right ...
Easy Setup Instructions
Page 2
...and automatically loading programs. ·For Windows XP or Windows 2000, log on -screen instructions. 11 After restarting the computer, start Printer Setup Utility (start Windows. IMPORTANT: If you want to register your product. 10 When the Installation completed successfully screen appears, click Restart. ...cannot be installed in the United States and / or other end to the computer and the other countries. QT5-0296-V01 © 2006 Canon Inc. NOTE: ·To install PhotoRecord and Adobe RGB (1998), click Custom Install and follow the on the screen. ·Move ...
...and automatically loading programs. ·For Windows XP or Windows 2000, log on -screen instructions. 11 After restarting the computer, start Printer Setup Utility (start Windows. IMPORTANT: If you want to register your product. 10 When the Installation completed successfully screen appears, click Restart. ...cannot be installed in the United States and / or other end to the computer and the other countries. QT5-0296-V01 © 2006 Canon Inc. NOTE: ·To install PhotoRecord and Adobe RGB (1998), click Custom Install and follow the on the screen. ·Move ...


