iP1500 Quick Start Guide
Page 5
...Cleaning 34 Aligning the Print Head 37 Replacing an Ink Tank 41 Troubleshooting Cannot Install the Printer Driver 49 Print Quality is Poor or Contains Errors 50 Troubleshooting Printer Hardware 52 Paper Does Not Feed Properly 53 Handling Error Messages 54 An Error Message ...Appears on the Screen 55 Appendix Installing the Printer Driver when using Mac OS 9.x 57 User's Guide Table of Contents 59 Specifications 60 Safety Precautions 62 Regulatory Information 64 CANON ...
...Cleaning 34 Aligning the Print Head 37 Replacing an Ink Tank 41 Troubleshooting Cannot Install the Printer Driver 49 Print Quality is Poor or Contains Errors 50 Troubleshooting Printer Hardware 52 Paper Does Not Feed Properly 53 Handling Error Messages 54 An Error Message ...Appears on the Screen 55 Appendix Installing the Printer Driver when using Mac OS 9.x 57 User's Guide Table of Contents 59 Specifications 60 Safety Precautions 62 Regulatory Information 64 CANON ...
iP1500 Quick Start Guide
Page 6
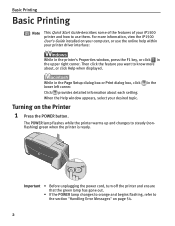
... 54. 2 Click provides detailed information about , or click Help when displayed. Important • Before unplugging the power cord, turn off the printer and ensure that the green lamp has gone out. • If the POWER lamp changes to orange and begins flashing, refer to steady (...Start Guide describes some of the features of your iP1500 printer and how to know more information, view the iP1500 User's Guide installed on the Printer 1 Press the POWER button. When the Help window appears, select your printer driver interface: While in the printer's Properties window, press the F1 key, or ...
... 54. 2 Click provides detailed information about , or click Help when displayed. Important • Before unplugging the power cord, turn off the printer and ensure that the green lamp has gone out. • If the POWER lamp changes to orange and begins flashing, refer to steady (...Start Guide describes some of the features of your iP1500 printer and how to know more information, view the iP1500 User's Guide installed on the Printer 1 Press the POWER button. When the Help window appears, select your printer driver interface: While in the printer's Properties window, press the F1 key, or ...

iP1500 Quick Start Guide
Page 9
... either DL Env. Set the envelope with its flap on page 11. 5 Fold the envelope flap. (1) Align the envelope against the left side. For the printer driver setting, refer to the envelope size you are using. Env. #10 According to "Printing with Windows" on page 9, "Printing with sticker flaps. • Select either...
... either DL Env. Set the envelope with its flap on page 11. 5 Fold the envelope flap. (1) Align the envelope against the left side. For the printer driver setting, refer to the envelope size you are using. Env. #10 According to "Printing with Windows" on page 9, "Printing with sticker flaps. • Select either...

iP1500 Quick Start Guide
Page 10
You can print on page 11. 6 Despite the direction of the photograph, load the paper in Page Size. For the printer driver setting, refer to "Printing with Windows" on page 9, "Printing with Macintosh" on the 4" x 6" size papers. (1) Align the paper stack against the left side of the stack of paper. (3) Select 4 x 6 in in the vertical direction. Basic Printing „ Loading the 4" x 6" size papers You can load a maximum of 20 papers in 4" x 6" size. (2) Pinch the Paper Guide and slide it against the right side of the Auto Sheet Feeder.
You can print on page 11. 6 Despite the direction of the photograph, load the paper in Page Size. For the printer driver setting, refer to "Printing with Windows" on page 9, "Printing with Macintosh" on the 4" x 6" size papers. (1) Align the paper stack against the left side of the stack of paper. (3) Select 4 x 6 in in the vertical direction. Basic Printing „ Loading the 4" x 6" size papers You can load a maximum of 20 papers in 4" x 6" size. (2) Pinch the Paper Guide and slide it against the right side of the Auto Sheet Feeder.

iP1500 Quick Start Guide
Page 12
... fed normally, load the necessary number of sheets in the Auto Sheet Feeder with them from sticking together. Basic Printing „ Canon Speciality Media Media Name Paper Support Load Limit Printer Driver Settings for Media Type Photo Paper Pro Letter: up to 10 sheets* Photo Paper Pro 4"×6": up to 20 sheets Photo...
... fed normally, load the necessary number of sheets in the Auto Sheet Feeder with them from sticking together. Basic Printing „ Canon Speciality Media Media Name Paper Support Load Limit Printer Driver Settings for Media Type Photo Paper Pro Letter: up to 10 sheets* Photo Paper Pro 4"×6": up to 20 sheets Photo...
iP1500 Quick Start Guide
Page 14
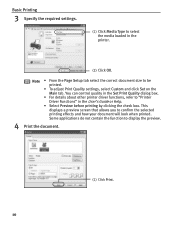
... document size to confirm the selected printing effects and how your document will look when printed. Some applications do not contain the function to "Printer Driver Functions" in the printer. (2) Click OK. Basic Printing 3 Specify the required settings. (1) Click Media Type to select the media loaded in the User's Guide or Help. &#...Select Preview before printing by clicking the check box. You can control quality in the Set Print Quality dialog box. • For details about other printer driver functions, refer to display the preview. 4 Print the document. (1) Click Print. 10
... document size to confirm the selected printing effects and how your document will look when printed. Some applications do not contain the function to "Printer Driver Functions" in the printer. (2) Click OK. Basic Printing 3 Specify the required settings. (1) Click Media Type to select the media loaded in the User's Guide or Help. &#...Select Preview before printing by clicking the check box. You can control quality in the Set Print Quality dialog box. • For details about other printer driver functions, refer to display the preview. 4 Print the document. (1) Click Print. 10

iP1500 Quick Start Guide
Page 16
..., select the desired document, then click Delete. See "Adjusting Print Quality" on page 15. • For details about other printer driver functions, refer to "Printer Driver Functions" in the User's Guide or Help. • Double-clicking the name of graphs and graphics (illustrations) with strong color... Media from the pop-up menu. (3) Select the Media Type from the pop-up menu. (4) Select the print mode appropriate to your printer in progress, click Pause. Printing tables and charts: Select when printing documents consisting mainly of your document from the Print Mode. (5) Click ...
..., select the desired document, then click Delete. See "Adjusting Print Quality" on page 15. • For details about other printer driver functions, refer to "Printer Driver Functions" in the User's Guide or Help. • Double-clicking the name of graphs and graphics (illustrations) with strong color... Media from the pop-up menu. (3) Select the Media Type from the pop-up menu. (4) Select the print mode appropriate to your printer in progress, click Pause. Printing tables and charts: Select when printing documents consisting mainly of your document from the Print Mode. (5) Click ...
iP1500 Quick Start Guide
Page 18
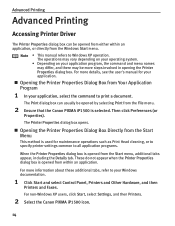
... These do not appear when the Printer Properties dialog box is selected. For more steps involved in opening the Printer Properties dialog box. For non-Windows XP users, click Start, select Settings, and then Printers. 2 Select the Canon PIXMA iP1500 icon. 14 Note • This.... 1 Click Start and select Control Panel, Printers and Other Hardware, and then Printers and Faxes. For more information about these additional tabs, refer to Windows XP operation. Advanced Printing Advanced Printing Accessing Printer Driver The Printer Properties dialog box can usually be opened by ...
... These do not appear when the Printer Properties dialog box is selected. For more steps involved in opening the Printer Properties dialog box. For non-Windows XP users, click Start, select Settings, and then Printers. 2 Select the Canon PIXMA iP1500 icon. 14 Note • This.... 1 Click Start and select Control Panel, Printers and Other Hardware, and then Printers and Faxes. For more information about these additional tabs, refer to Windows XP operation. Advanced Printing Advanced Printing Accessing Printer Driver The Printer Properties dialog box can usually be opened by ...
iP1500 Quick Start Guide
Page 19
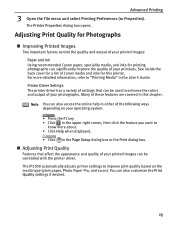
... Two important factors control the quality and output of your printed images: Paper and Ink Using recommended Canon paper, speciality media, and inks for printing photographs can be controlled with the printer driver. The iP1500 automatically adjusts printer settings to know more detailed information, refer to enhance the colors and output of your photographs. See...
... Two important factors control the quality and output of your printed images: Paper and Ink Using recommended Canon paper, speciality media, and inks for printing photographs can be controlled with the printer driver. The iP1500 automatically adjusts printer settings to know more detailed information, refer to enhance the colors and output of your photographs. See...

iP1500 Quick Start Guide
Page 24
Advanced Printing „ Saving and Recalling Driver Settings When you change printer driver settings for a specific print job, such as printing black and white photos, or printing documents with a special background, you can retrieve or delete the print .... (4) Enter a description on the registering profile. 4 Click OK. 5 Click OK on the Profiles tab. The Add to Profiles. See "Opening the Printer Properties Dialog Box from Profiles. This registers your printer driver print settings. For details, click Help and refer to the topic of profile for future use on page 14. 2 Click the...
Advanced Printing „ Saving and Recalling Driver Settings When you change printer driver settings for a specific print job, such as printing black and white photos, or printing documents with a special background, you can retrieve or delete the print .... (4) Enter a description on the registering profile. 4 Click OK. 5 Click OK on the Profiles tab. The Add to Profiles. See "Opening the Printer Properties Dialog Box from Profiles. This registers your printer driver print settings. For details, click Help and refer to the topic of profile for future use on page 14. 2 Click the...
iP1500 Quick Start Guide
Page 25
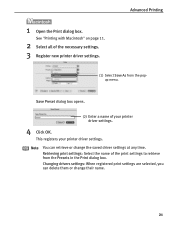
...the Presets in the Print dialog box. Retrieving print settings: Select the name of your printer driver settings. Note You can delete them or change the saved driver settings at any time. This registers your printer driver settings. 4 Click OK. Save Preset dialog box opens. (2) Enter a name of...the popup menu. See "Printing with Macintosh" on page 11. 2 Select all of the necessary settings. 3 Register new printer driver settings. Changing drivers settings: When registered print settings are selected, you can retrieve or change their name. 21 1 Open the Print dialog box.
...the Presets in the Print dialog box. Retrieving print settings: Select the name of your printer driver settings. Note You can delete them or change the saved driver settings at any time. This registers your printer driver settings. 4 Click OK. Save Preset dialog box opens. (2) Enter a name of...the popup menu. See "Printing with Macintosh" on page 11. 2 Select all of the necessary settings. 3 Register new printer driver settings. Changing drivers settings: When registered print settings are selected, you can retrieve or change their name. 21 1 Open the Print dialog box.
iP1500 Quick Start Guide
Page 32
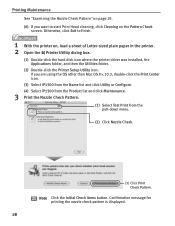
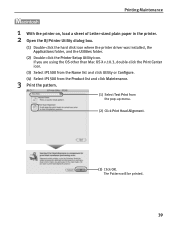
... you are using the OS other than Mac OS X v.10.3, double-click the Print Center icon. (3) Select iP1500 from the Name list and click Utility or Configure. (4) Select iP1500 from the Product list and click Maintenance. 3 Print the Nozzle Check Pattern. (1) Select Test Print from the pull...Click Print Check Pattern. If you want to finish. 1 With the printer on, load a sheet of Letter-sized plain paper in the printer. 2 Open the BJ Printer Utility dialog box. (1) Double-click the hard disk icon where the printer driver was installed, the Applications folder, and then the Utilities folder. (2) ...
... you are using the OS other than Mac OS X v.10.3, double-click the Print Center icon. (3) Select iP1500 from the Name list and click Utility or Configure. (4) Select iP1500 from the Product list and click Maintenance. 3 Print the Nozzle Check Pattern. (1) Select Test Print from the pull...Click Print Check Pattern. If you want to finish. 1 With the printer on, load a sheet of Letter-sized plain paper in the printer. 2 Open the BJ Printer Utility dialog box. (1) Double-click the hard disk icon where the printer driver was installed, the Applications folder, and then the Utilities folder. (2) ...
iP1500 Quick Start Guide
Page 36
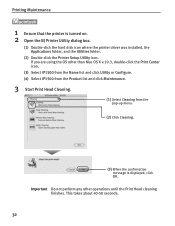
...iP1500 from the Product list and click Maintenance. 3 Start Print Head Cleaning. (1) Select Cleaning from the pop-up menu. (2) Click Cleaning. (3) When the confirmation message is turned on. 2 Open the BJ Printer Utility dialog box. (1) Double-click the hard disk icon where the printer driver... was installed, the Applications folder, and the Utilities folder. (2) Double-click the Printer Setup Utility icon.
...iP1500 from the Product list and click Maintenance. 3 Start Print Head Cleaning. (1) Select Cleaning from the pop-up menu. (2) Click Cleaning. (3) When the confirmation message is turned on. 2 Open the BJ Printer Utility dialog box. (1) Double-click the hard disk icon where the printer driver... was installed, the Applications folder, and the Utilities folder. (2) Double-click the Printer Setup Utility icon.
iP1500 Quick Start Guide
Page 39
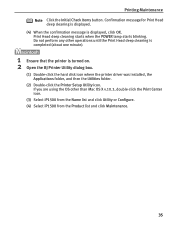
... not perform any other than Mac OS X v.10.3, double-click the Print Center icon. (3) Select iP1500 from the Name list and click Utility or Configure. (4) Select iP1500 from the Product list and click Maintenance. 35 Print Head deep cleaning starts when the POWER lamp starts ...When the confirmation message is turned on. 2 Open the BJ Printer Utility dialog box. (1) Double-click the hard disk icon where the printer driver was installed, the Applications folder, and then the Utilities folder. (2) Double-click the Printer Setup Utility icon. Printing Maintenance Note Click the Initial Check Items ...
... not perform any other than Mac OS X v.10.3, double-click the Print Center icon. (3) Select iP1500 from the Name list and click Utility or Configure. (4) Select iP1500 from the Product list and click Maintenance. 35 Print Head deep cleaning starts when the POWER lamp starts ...When the confirmation message is turned on. 2 Open the BJ Printer Utility dialog box. (1) Double-click the hard disk icon where the printer driver was installed, the Applications folder, and then the Utilities folder. (2) Double-click the Printer Setup Utility icon. Printing Maintenance Note Click the Initial Check Items ...
iP1500 Quick Start Guide
Page 43
... the hard disk icon where the printer driver was installed, the Applications folder, and the Utilities folder. (2) Double-click the Printer Setup Utility icon. If you are using the OS other than Mac OS X v.10.3, double-click the Print Center icon. (3) Select iP1500 from the Name list and click Utility... or Configure. (4) Select iP1500 from the Product list and click Maintenance. 3 ...
... the hard disk icon where the printer driver was installed, the Applications folder, and the Utilities folder. (2) Double-click the Printer Setup Utility icon. If you are using the OS other than Mac OS X v.10.3, double-click the Print Center icon. (3) Select iP1500 from the Name list and click Utility... or Configure. (4) Select iP1500 from the Product list and click Maintenance. 3 ...

iP1500 Quick Start Guide
Page 48
...click the Print Center icon. (3) Select iP1500 from the Name list and click Utility or Configure. (4) Select iP1500 from the Product list and click Maintenance. 44 Printing Maintenance Resetting the Ink Counter in Printer Properties dialog box 1 Open the Printer Properties dialog box and click the Maintenance ...tab. 2 Click Ink Counter Reset. 3 Select the newly installed ink tank, then click OK. 1 Open the BJ Printer Utility dialog box. (1) Double-click the hard disk icon where the printer driver ...
...click the Print Center icon. (3) Select iP1500 from the Name list and click Utility or Configure. (4) Select iP1500 from the Product list and click Maintenance. 44 Printing Maintenance Resetting the Ink Counter in Printer Properties dialog box 1 Open the Printer Properties dialog box and click the Maintenance ...tab. 2 Click Ink Counter Reset. 3 Select the newly installed ink tank, then click OK. 1 Open the BJ Printer Utility dialog box. (1) Double-click the hard disk icon where the printer driver ...
iP1500 Quick Start Guide
Page 52
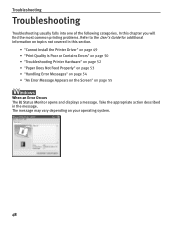
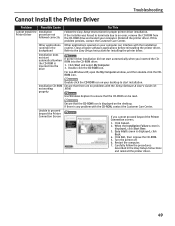
Take the appropriate action described in this section. • "Cannot Install the Printer Driver" on page 49 • "Print Quality is Poor or Contains Errors" on page 50 • "Troubleshooting Printer Hardware" on page 52 • "Paper Does Not Feed Properly" on page 53 • "Handling Error Messages" on page 54 • "An Error...
Take the appropriate action described in this section. • "Cannot Install the Printer Driver" on page 49 • "Print Quality is Poor or Contains Errors" on page 50 • "Troubleshooting Printer Hardware" on page 52 • "Paper Does Not Feed Properly" on page 53 • "Handling Error Messages" on page 54 • "An Error...
iP1500 Quick Start Guide
Page 53
... to an error, remove the CD-ROM from the CD-ROM drive and restart your desktop to the Easy Setup Instructions for proper printer driver installation. Other applications opened on your computer can be read. Refer to start installation. Click Start and select My Computer. 2. Installation... is displayed, click Back. 4. Easy Intall screen is any problem with the CD-ROM, contact the Customer Care Center. Reinstall the printer driver. If printer driver installation did not start automatically when the CD-ROM is inserted into the CD-ROM drive: 1. Unable to ensure that the CD-ROM...
... to an error, remove the CD-ROM from the CD-ROM drive and restart your desktop to the Easy Setup Instructions for proper printer driver installation. Other applications opened on your computer can be read. Refer to start installation. Click Start and select My Computer. 2. Installation... is displayed, click Back. 4. Easy Intall screen is any problem with the CD-ROM, contact the Customer Care Center. Reinstall the printer driver. If printer driver installation did not start automatically when the CD-ROM is inserted into the CD-ROM drive: 1. Unable to ensure that the CD-ROM...

iP1500 Quick Start Guide
Page 54
... ink (i.e. Color Intensity setting Reduce the Intensity setting in the Print Head and reseat them if necessary. Open the Printer Properties dialog box. 2. In the Print dialog box, select Color Option from the pop-up menu, and then click... Detailed Setting. 2. Glossy photo paper other than the Canon speciality media is Use High Resolution Paper or Photo Paper Pro to High for Windows or Fine for the Print Quality ... Head Nozzles clogged Check that the ink tanks are firmly seated in the printer driver and try printing again.
... ink (i.e. Color Intensity setting Reduce the Intensity setting in the Print Head and reseat them if necessary. Open the Printer Properties dialog box. 2. In the Print dialog box, select Color Option from the pop-up menu, and then click... Detailed Setting. 2. Glossy photo paper other than the Canon speciality media is Use High Resolution Paper or Photo Paper Pro to High for Windows or Fine for the Print Quality ... Head Nozzles clogged Check that the ink tanks are firmly seated in the printer driver and try printing again.
iP1500 Quick Start Guide
Page 59
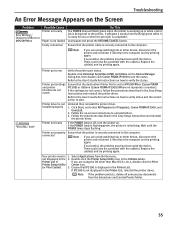
... If the POWER lamp is displayed in the Printer List, reinstall the printer driver. Ensure that the printer cable is being sent to the printer. Double-click Universal Serial Bus (USB) controllers on -screen instructions to uninstall driver. 3. Follow the on the Device Manager dialog box, then double-click Canon PIXMA iP1500 to see the status. If the POWER...
... If the POWER lamp is displayed in the Printer List, reinstall the printer driver. Ensure that the printer cable is being sent to the printer. Double-click Universal Serial Bus (USB) controllers on -screen instructions to uninstall driver. 3. Follow the on the Device Manager dialog box, then double-click Canon PIXMA iP1500 to see the status. If the POWER...


