iP1500 Quick Start Guide
Page 5
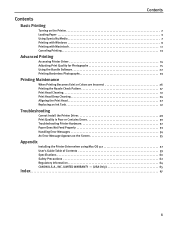
Contents Contents Basic Printing Turning on the Printer 2 Loading Paper 3 Using Speciality Media 7 Printing with Windows 9 Printing with Macintosh 11 Canceling Printing 13 Advanced Printing Accessing Printer Driver 14 Adjusting ... 55 Appendix Installing the Printer Driver when using Mac OS 9.x 57 User's Guide Table of Contents 59 Specifications 60 Safety Precautions 62 Regulatory Information 64 CANON U.S.A., INC. LIMITED WARRANTY --- (USA Only 65 Index 67 1
Contents Contents Basic Printing Turning on the Printer 2 Loading Paper 3 Using Speciality Media 7 Printing with Windows 9 Printing with Macintosh 11 Canceling Printing 13 Advanced Printing Accessing Printer Driver 14 Adjusting ... 55 Appendix Installing the Printer Driver when using Mac OS 9.x 57 User's Guide Table of Contents 59 Specifications 60 Safety Precautions 62 Regulatory Information 64 CANON U.S.A., INC. LIMITED WARRANTY --- (USA Only 65 Index 67 1
iP1500 Quick Start Guide
Page 6
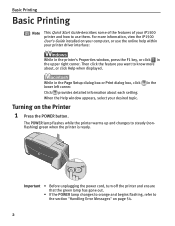
...information about , or click Help when displayed. Then click the feature you want to know more information, view the iP1500 User's Guide installed on your computer, or use them. in the Turning on page 54. 2 While in the Page Setup dialog box or Print dialog box, click lower left corner. ... Messages" on the Printer 1 Press the POWER button. Basic Printing Basic Printing Note This Quick Start Guide describes some of the features of your iP1500 printer and how to use the online help within your printer driver interface: While in the printer's Properties window, press the F1 key, or...
...information about , or click Help when displayed. Then click the feature you want to know more information, view the iP1500 User's Guide installed on your computer, or use them. in the Turning on page 54. 2 While in the Page Setup dialog box or Print dialog box, click lower left corner. ... Messages" on the Printer 1 Press the POWER button. Basic Printing Basic Printing Note This Quick Start Guide describes some of the features of your iP1500 printer and how to use the online help within your printer driver interface: While in the printer's Properties window, press the F1 key, or...

iP1500 Quick Start Guide
Page 35
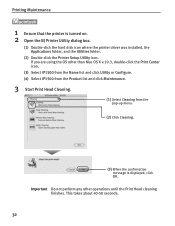
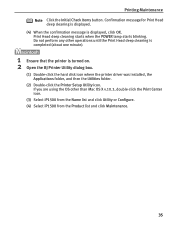
... OK. See "Examining the Nozzle Check Pattern" on page 14. 3 Start Print Head Cleaning. (1) Click the Maintenance tab. (2) Click Cleaning. (3) When the confirmation message is turned on. 2 Open the Printer Properties dialog box. Print Head Cleaning Printing Maintenance If missing lines or white stripes are found in the printed nozzle check...
... OK. See "Examining the Nozzle Check Pattern" on page 14. 3 Start Print Head Cleaning. (1) Click the Maintenance tab. (2) Click Cleaning. (3) When the confirmation message is turned on. 2 Open the Printer Properties dialog box. Print Head Cleaning Printing Maintenance If missing lines or white stripes are found in the printed nozzle check...
iP1500 Quick Start Guide
Page 36
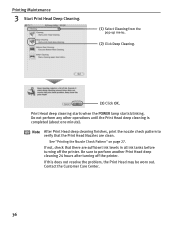
Important Do not perform any other than Mac OS X v.10.3, double-click the Print Center icon. (3) Select iP1500 from the Name list and click Utility or Configure. (4) Select iP1500 from the Product list and click Maintenance. 3 Start Print Head Cleaning. (1) Select Cleaning from the pop-up menu. (2)... Click Cleaning. (3) When the confirmation message is turned on. 2 Open the BJ Printer Utility dialog box. (1) ...
Important Do not perform any other than Mac OS X v.10.3, double-click the Print Center icon. (3) Select iP1500 from the Name list and click Utility or Configure. (4) Select iP1500 from the Product list and click Maintenance. 3 Start Print Head Cleaning. (1) Select Cleaning from the pop-up menu. (2)... Click Cleaning. (3) When the confirmation message is turned on. 2 Open the BJ Printer Utility dialog box. (1) ...

iP1500 Quick Start Guide
Page 38
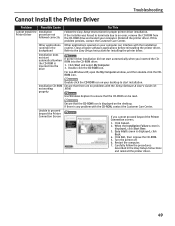
... box. When the confirmation message is a more ink than standard Print Head cleaning, so perform this procedure only when necessary. 1 Ensure that the printer is turned on page 14. 3 Start Print Head Deep Cleaning. (1) Click the Maintenance tab. (2) Click Deep Cleaning. (3) Click Execute. Printing Maintenance Print Head Deep Cleaning If print...
... box. When the confirmation message is a more ink than standard Print Head cleaning, so perform this procedure only when necessary. 1 Ensure that the printer is turned on page 14. 3 Start Print Head Deep Cleaning. (1) Click the Maintenance tab. (2) Click Deep Cleaning. (3) Click Execute. Printing Maintenance Print Head Deep Cleaning If print...
iP1500 Quick Start Guide
Page 39
... OS X v.10.3, double-click the Print Center icon. (3) Select iP1500 from the Name list and click Utility or Configure. (4) Select iP1500 from the Product list and click Maintenance. 35 Confirmation message for Print Head deep cleaning is displayed. (4) When the confirmation message is turned on. 2 Open the BJ Printer Utility dialog box. (1) Double...
... OS X v.10.3, double-click the Print Center icon. (3) Select iP1500 from the Name list and click Utility or Configure. (4) Select iP1500 from the Product list and click Maintenance. 35 Confirmation message for Print Head deep cleaning is displayed. (4) When the confirmation message is turned on. 2 Open the BJ Printer Utility dialog box. (1) Double...
iP1500 Quick Start Guide
Page 40
...Nozzle Check Pattern" on page 27. If not, check that the Print Head Nozzles are sufficient ink levels in all ink tanks before turning off the printer. Note After Print Head deep cleaning finishes, print the nozzle check pattern to perform another Print Head deep cleaning 24... hours after turning off the printer. Printing Maintenance 3 Start Print Head Deep Cleaning. (1) Select Cleaning from the pop-up menu. (2) Click Deep Cleaning. (3) ...
...Nozzle Check Pattern" on page 27. If not, check that the Print Head Nozzles are sufficient ink levels in all ink tanks before turning off the printer. Note After Print Head deep cleaning finishes, print the nozzle check pattern to perform another Print Head deep cleaning 24... hours after turning off the printer. Printing Maintenance 3 Start Print Head Deep Cleaning. (1) Select Cleaning from the pop-up menu. (2) Click Deep Cleaning. (3) ...

iP1500 Quick Start Guide
Page 45
The printer will not print properly if the wrong ink tank is turned on, and then open the Front Cover. Color Black Important • Handle ink tanks carefully to avoid staining clothing or the surrounding area. • Discard ...
The printer will not print properly if the wrong ink tank is turned on, and then open the Front Cover. Color Black Important • Handle ink tanks carefully to avoid staining clothing or the surrounding area. • Discard ...
iP1500 Quick Start Guide
Page 53
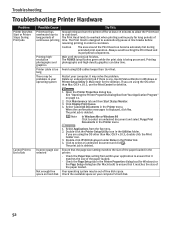
... Other applications opened on your computer can be read. For non-Windows XP, open software applications before reinstalling the printer driver. Unable to start installation. Turn the printer off. 6. If the installer was forced to terminate due to an error, remove the CD-ROM from the CD-ROM drive and restart...
... Other applications opened on your computer can be read. For non-Windows XP, open software applications before reinstalling the printer driver. Unable to start installation. Turn the printer off. 6. If the installer was forced to terminate due to an error, remove the CD-ROM from the CD-ROM drive and restart...
iP1500 Quick Start Guide
Page 56
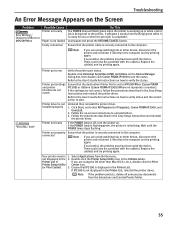
... the problem. Open the Printer Properties dialog box. Click Display Print Queue. 4. Incorrect page size selected Not enough free space on page 14. 2. Double-click iP1500 displayed under Name in the Printer menu. Caution The area around the Print Head can take time. Ensure that it matches the size of the... Start or Printer Stops During Print Jobs Possible Cause Try This Print Head has overheated due to long periods of continuous printing Stop printing and turn the printer off for at line breaks before resuming printing in order to cool down .
... the problem. Open the Printer Properties dialog box. Click Display Print Queue. 4. Incorrect page size selected Not enough free space on page 14. 2. Double-click iP1500 displayed under Name in the Printer menu. Caution The area around the Print Head can take time. Ensure that it matches the size of the... Start or Printer Stops During Print Jobs Possible Cause Try This Print Head has overheated due to long periods of continuous printing Stop printing and turn the printer off for at line breaks before resuming printing in order to cool down .

iP1500 Quick Start Guide
Page 57
... RESUME/CANCEL button on page 4. ). on the printer. Do not touch internal parts in the printer. • If you cannot extract the paper, turn the printer off, and then turn it is left in the printer. 2. Click Utilities.... 4. The remaining paper will be ejected automatically. 2. Ensure that the printer is on . Remove...
... RESUME/CANCEL button on page 4. ). on the printer. Do not touch internal parts in the printer. • If you cannot extract the paper, turn the printer off, and then turn it is left in the printer. 2. Click Utilities.... 4. The remaining paper will be ejected automatically. 2. Ensure that the printer is on . Remove...

iP1500 Quick Start Guide
Page 58
... printer back on the printer. Disconnect the printer cable from the printer, and then turn off and unplug the printer from the power supply. Reconnect the printer cable, and then plug the printer back in the Print Head. When you ...experience this absorber is out of error that the tanks are firmly seated in and turn on after leaving it for a while. Ensure that has occurred. Press the POWER button to turn the printer off the printer, and installed / Defective press the POWER button again to clear the error...
... printer back on the printer. Disconnect the printer cable from the printer, and then turn off and unplug the printer from the power supply. Reconnect the printer cable, and then plug the printer back in the Print Head. When you ...experience this absorber is out of error that the tanks are firmly seated in and turn on after leaving it for a while. Ensure that has occurred. Press the POWER button to turn the printer off the printer, and installed / Defective press the POWER button again to clear the error...
iP1500 Quick Start Guide
Page 59
... also be a problem with the device. It will flash green when the printer is warming up or when a print job is off, turn the printer on how to verify status and the correct action to take. If successful, the problem may have been with the cable(s). Wait...disconnect the printer and reconnect it is ready for use or when the print job is set to MPUSBPRNnn (Canon PIXMA and printer iP1500) or USBnnn (Canon PIXMA iP1500) (Where nn represents a number). If iP1500 is displayed in the Easy Setup Instructions and reinstall the printer driver. Refer to the User's Guide for instructions...
... also be a problem with the device. It will flash green when the printer is warming up or when a print job is off, turn the printer on how to verify status and the correct action to take. If successful, the problem may have been with the cable(s). Wait...disconnect the printer and reconnect it is ready for use or when the print job is set to MPUSBPRNnn (Canon PIXMA and printer iP1500) or USBnnn (Canon PIXMA iP1500) (Where nn represents a number). If iP1500 is displayed in the Easy Setup Instructions and reinstall the printer driver. Refer to the User's Guide for instructions...

iP1500 Quick Start Guide
Page 60
...can choose the option to reset the ink counter. Clear a check box of ink tank replacement and click Send. Select iP1500 from the Go menu. 2. A "?" Select Remaining ink Level setting from the Name List and click Utility or Configure.... Failure to display the remaining ink level in the Utilities folder. Open the Printer Properties dialog box. 2. Select iP1500 from the pop-up menu. 6. If you do not want to reset ink counter when installing new ink tank...Display the remaining ink Level and click Send. 56 indicates ink tank is turned on page 43. is reset when the next one ?
...can choose the option to reset the ink counter. Clear a check box of ink tank replacement and click Send. Select iP1500 from the Go menu. 2. A "?" Select Remaining ink Level setting from the Name List and click Utility or Configure.... Failure to display the remaining ink level in the Utilities folder. Open the Printer Properties dialog box. 2. Select iP1500 from the pop-up menu. 6. If you do not want to reset ink counter when installing new ink tank...Display the remaining ink Level and click Send. 56 indicates ink tank is turned on page 43. is reset when the next one ?
iP1500 Quick Start Guide
Page 61
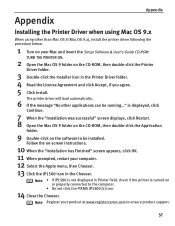
...on the software to be running..." Note Register your product at www.registercanon.com to the computer. • Do not click the PIXMA iP1500 (s) icon. 14 Close the Chooser. is turned on the CD-ROM, then double-click the Printer Driver folder. 3 Double-click the Installer icon in the Chooser... message "No other than Mac OS X (Mac OS 9.x), install the printer driver following the procedure below. 1 Turn on your computer. 12 Select the Apple menu, then Chooser. 13 Click the iP1500 icon in the Printer Driver folder. 4 Read the License Agreement and click Accept, if you agree. 5 Click Install...
...on the software to be running..." Note Register your product at www.registercanon.com to the computer. • Do not click the PIXMA iP1500 (s) icon. 14 Close the Chooser. is turned on the CD-ROM, then double-click the Printer Driver folder. 3 Double-click the Installer icon in the Chooser... message "No other than Mac OS X (Mac OS 9.x), install the printer driver following the procedure below. 1 Turn on your computer. 12 Select the Apple menu, then Chooser. 13 Click the iP1500 icon in the Printer Driver folder. 4 Read the License Agreement and click Accept, if you agree. 5 Click Install...

iP1500 Quick Start Guide
Page 68
... equipment unless otherwise specified in a particular installation. Use of a shielded cable is encouraged to try to correct the interference by turning the equipment off and on, the user is required to comply with the instructions, may cause undesired operation. Cet appareil num...equipment into an outlet on a circuit different from a digital apparatus as set out in accordance with Class B limits in a residential installation. Canon U.S.A., Inc. These limits are designed to provide reasonable protection against harmful interference in Subpart B of Part 15 of the FCC Rules. However, ...
... equipment unless otherwise specified in a particular installation. Use of a shielded cable is encouraged to try to correct the interference by turning the equipment off and on, the user is required to comply with the instructions, may cause undesired operation. Cet appareil num...equipment into an outlet on a circuit different from a digital apparatus as set out in accordance with Class B limits in a residential installation. Canon U.S.A., Inc. These limits are designed to provide reasonable protection against harmful interference in Subpart B of Part 15 of the FCC Rules. However, ...

iP1500 Quick Start Guide
Page 72
... Printer Properties dialog box 44 RESUME/CANCEL button 11 S Safety Precautions 62 Saving Driver Settings 20 Speciality Media 8 Specifications 60 T Transparencies 8 Troubleshooting 48 T-Shirt Transfers 8 Turning on the Printer 2 U Uninstalling the printer driver 55 User's Guide Table of Contents 59 Using Speciality Media 7 V Vivid Photo 18 W When Printing Becomes Faint or...
... Printer Properties dialog box 44 RESUME/CANCEL button 11 S Safety Precautions 62 Saving Driver Settings 20 Speciality Media 8 Specifications 60 T Transparencies 8 Troubleshooting 48 T-Shirt Transfers 8 Turning on the Printer 2 U Uninstalling the printer driver 55 User's Guide Table of Contents 59 Using Speciality Media 7 V Vivid Photo 18 W When Printing Becomes Faint or...
iP1500 Easy Setup Instructions
Page 2
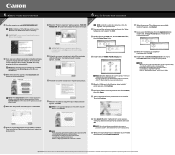
...icon. If you see the Found New Hardware Wizard, click Cancel. 6 When the "Printer Connection" window appears, TURN THE PRINTER ON. QA7-3248-V02 ©2004 Canon Inc. Printed in the User's Guide. 5 Read the License Agreement, then click Yes to change without notice. ... the first time, it takes approximately one minute. NOTE: · When you to restart the computer appears, click Restart. 3 Double-click the PIXMA iP1500 270.pkg icon. When the "Authenticate" screen appears, enter your computer cannot detect a computer port, click Help and refer to the online instructions....
...icon. If you see the Found New Hardware Wizard, click Cancel. 6 When the "Printer Connection" window appears, TURN THE PRINTER ON. QA7-3248-V02 ©2004 Canon Inc. Printed in the User's Guide. 5 Read the License Agreement, then click Yes to change without notice. ... the first time, it takes approximately one minute. NOTE: · When you to restart the computer appears, click Restart. 3 Double-click the PIXMA iP1500 270.pkg icon. When the "Authenticate" screen appears, enter your computer cannot detect a computer port, click Help and refer to the online instructions....
Service Manual
Page 7
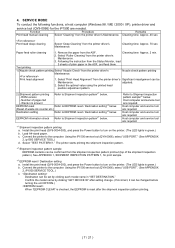
.... Host computer and service tool are required. Host computer and service tool are required. c. See APPENDIX 1, SHIPMENT INSPECTION PATTERN 1, for the iP1500 are needed. Install the print head (QY6-0054-000), and press the Power button to EEPROM reset / Destination setting*3 below. (Reset of... the shipment inspection pattern). Destination can be set by clicking "GET DEVICE ID" after setting change. (If incorrect, it can be changed before turning the unit OFF/ON.) When "EEPROM CLEAR" is checked, the EEPROM is reset after the shipment inspection pattern printing. ( 7 / 21 ) ...
.... Host computer and service tool are required. Host computer and service tool are required. c. See APPENDIX 1, SHIPMENT INSPECTION PATTERN 1, for the iP1500 are needed. Install the print head (QY6-0054-000), and press the Power button to EEPROM reset / Destination setting*3 below. (Reset of... the shipment inspection pattern). Destination can be set by clicking "GET DEVICE ID" after setting change. (If incorrect, it can be changed before turning the unit OFF/ON.) When "EEPROM CLEAR" is checked, the EEPROM is reset after the shipment inspection pattern printing. ( 7 / 21 ) ...

Service Manual
Page 10
Correct? Normal Defective 6-1. Press the Power button to turn off the printer. (The paper lifting plate is pressed, the LED lights alternately in 4. After the LED lights in green, with the paper lifting plate ...
Correct? Normal Defective 6-1. Press the Power button to turn off the printer. (The paper lifting plate is pressed, the LED lights alternately in 4. After the LED lights in green, with the paper lifting plate ...


