
iP1500 Quick Start Guide
Page 47
...both black and color ink tanks have not replaced the ink tank with a new one, click Cancel. 43 Printing Maintenance „ Resetting the Ink Counter When an ink tank is reset. 1 Check the message, and click Yes. When an ink tank has been replaced, follow the procedure below to select the ...replaced ink tank. If this happens, manually reset the ink counter in Printer Properties dialog box. 2 Select the replaced ink tank, and click OK. The low ink warning is only displayed properly ...
...both black and color ink tanks have not replaced the ink tank with a new one, click Cancel. 43 Printing Maintenance „ Resetting the Ink Counter When an ink tank is reset. 1 Check the message, and click Yes. When an ink tank has been replaced, follow the procedure below to select the ...replaced ink tank. If this happens, manually reset the ink counter in Printer Properties dialog box. 2 Select the replaced ink tank, and click OK. The low ink warning is only displayed properly ...

iP1500 Quick Start Guide
Page 48
... OS X v.10.3, double-click the Print Center icon. (3) Select iP1500 from the Name list and click Utility or Configure. (4) Select iP1500 from the Product list and click Maintenance. 44 Printing Maintenance Resetting the Ink Counter in Printer Properties dialog box 1 Open the Printer Properties... dialog box and click the Maintenance tab. 2 Click Ink Counter Reset. 3 Select the newly installed ink...
... OS X v.10.3, double-click the Print Center icon. (3) Select iP1500 from the Name list and click Utility or Configure. (4) Select iP1500 from the Product list and click Maintenance. 44 Printing Maintenance Resetting the Ink Counter in Printer Properties dialog box 1 Open the Printer Properties... dialog box and click the Maintenance tab. 2 Click Ink Counter Reset. 3 Select the newly installed ink...

iP1500 Quick Start Guide
Page 49
Printing Maintenance (1) Select Remaining ink level setting from the pop-up menu. (2) Click Ink Counter Reset. (3) Select the newly installed ink tank. (4) Click OK. 45 2 Reset the Ink Counter.
Printing Maintenance (1) Select Remaining ink level setting from the pop-up menu. (2) Click Ink Counter Reset. (3) Select the newly installed ink tank. (4) Click OK. 45 2 Reset the Ink Counter.

iP1500 Quick Start Guide
Page 50
...then select Ink Level Information from Your Application Program" on page 44. 46 Note How to Check Ink Level Open the Printer Properties dialog box. Reset the ink counter when installing a new ink tank. If the ink level becomes low, the low ink warning is displayed when printing is performed... ink becomes low. Low Ink Warning Display The '!' Printing Maintenance „ How Low Ink Warning Setting Works The low ink warning notifies you reset the ink counter, it will assume that the ink tank is full regardless of low ink levels during printing. Click Maintenance tab and then Start...
...then select Ink Level Information from Your Application Program" on page 44. 46 Note How to Check Ink Level Open the Printer Properties dialog box. Reset the ink counter when installing a new ink tank. If the ink level becomes low, the low ink warning is displayed when printing is performed... ink becomes low. Low Ink Warning Display The '!' Printing Maintenance „ How Low Ink Warning Setting Works The low ink warning notifies you reset the ink counter, it will assume that the ink tank is full regardless of low ink levels during printing. Click Maintenance tab and then Start...

iP1500 Quick Start Guide
Page 51
... to treat both counters separately. Refer to "Low Ink Warning Accompanied by Ink Tank Icon With '?'" on page 56. 47 Important If you did not reset the counter when you installed the current ink tanks, the low ink warning may not function correctly, until the next time you install a new ink... tank. Synchronization of the counter and the actual ink level will not work correctly unless you synchronize it is reset at the time a new ink tank is installed. • Do not reset the ink counter of an ink tank in use. Also, be adjusted when it with the actual ink level...
... to treat both counters separately. Refer to "Low Ink Warning Accompanied by Ink Tank Icon With '?'" on page 56. 47 Important If you did not reset the counter when you installed the current ink tanks, the low ink warning may not function correctly, until the next time you install a new ink... tank. Synchronization of the counter and the actual ink level will not work correctly unless you synchronize it is reset at the time a new ink tank is installed. • Do not reset the ink counter of an ink tank in use. Also, be adjusted when it with the actual ink level...

iP1500 Quick Start Guide
Page 60
...1. Failure to display the remaining ink level in the Ink Level Information, clear a check box of ink tank replacement and click Send. Select iP1500 from the Product list and click Maintenance. 5. Clear a check box of this confirmation message. message is displayed Low Ink Warning Accompanied by unchecking... the Display low Ink Warning check box. 1. Troubleshooting Problem Have you replaced ink tank with a new one is installed. See "Resetting the Ink Counter" on and open for a You can be sure to disable the diaplay of Display low ink warning off and click Send...
...1. Failure to display the remaining ink level in the Ink Level Information, clear a check box of ink tank replacement and click Send. Select iP1500 from the Product list and click Maintenance. 5. Clear a check box of this confirmation message. message is displayed Low Ink Warning Accompanied by unchecking... the Display low Ink Warning check box. 1. Troubleshooting Problem Have you replaced ink tank with a new one is installed. See "Resetting the Ink Counter" on and open for a You can be sure to disable the diaplay of Display low ink warning off and click Send...
iP1500 Quick Start Guide
Page 71
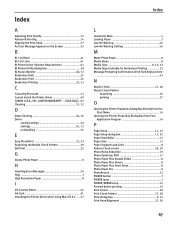
...BJ Status Monitor 48, 52 Borderless (full 25 Borderless Print 22 Borderless Printing 23, 51 C Canceling Print Jobs 11 Cannot Install the Printer Driver 49 CANON U.S.A., INC. LIMITED WARRANTY --- (USA Only) ..65 Cleaning 31, 32 D Deep Cleaning 34, 36 Driver saving settings 20 settings 10, 12 ... the Nozzle Check Pattern 29 Exif Print 22 G Glossy Photo Paper 8 H Handling Error Messages 54 Help 2 High Resolution Paper 8 I Ink Counter Reset 44 Ink tank 41 Installing the Printer Driver when using Mac OS 9.x .....57 Index L Load Limit Mark 4 Loading Paper 3 Low Ink Warning 46...
...BJ Status Monitor 48, 52 Borderless (full 25 Borderless Print 22 Borderless Printing 23, 51 C Canceling Print Jobs 11 Cannot Install the Printer Driver 49 CANON U.S.A., INC. LIMITED WARRANTY --- (USA Only) ..65 Cleaning 31, 32 D Deep Cleaning 34, 36 Driver saving settings 20 settings 10, 12 ... the Nozzle Check Pattern 29 Exif Print 22 G Glossy Photo Paper 8 H Handling Error Messages 54 Help 2 High Resolution Paper 8 I Ink Counter Reset 44 Ink tank 41 Installing the Printer Driver when using Mac OS 9.x .....57 Index L Load Limit Mark 4 Loading Paper 3 Low Ink Warning 46...

iP1500 Quick Start Guide
Page 72
... Printer Setup Utility 28 Printing Borderless Photographs 23 Printing the Nozzle Check Pattern 27 R Recalling Driver Settings 20 Replacing an Ink Tank 41 Resetting the Ink Counter 43 Resetting the Ink Counter in Printer Properties dialog box 44 RESUME/CANCEL button 11 S Safety Precautions 62 Saving Driver Settings 20 Speciality Media 8 Specifications...
... Printer Setup Utility 28 Printing Borderless Photographs 23 Printing the Nozzle Check Pattern 27 R Recalling Driver Settings 20 Replacing an Ink Tank 41 Resetting the Ink Counter 43 Resetting the Ink Counter in Printer Properties dialog box 44 RESUME/CANCEL button 11 S Safety Precautions 62 Saving Driver Settings 20 Speciality Media 8 Specifications...
Service Manual
Page 3
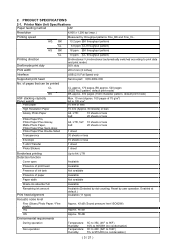
... condensation) 0C to 40C (32F to 104F) 5% to A4, LTR Available Available Not available Available Not available Available Available (Detected by dot counting. PRODUCT SPECIFICATIONS 2-1. Reset by throughput patterns Fine_BK and Fine_CL. HQ BK 13.2 ppm (BK throughput pattern) CL 6.8 ppm (CL throughput pattern) HS BK 18 ppm (BK throughput pattern...
... condensation) 0C to 40C (32F to 104F) 5% to A4, LTR Available Available Not available Available Not available Available Available (Detected by dot counting. PRODUCT SPECIFICATIONS 2-1. Reset by throughput patterns Fine_BK and Fine_CL. HQ BK 13.2 ppm (BK throughput pattern) CL 6.8 ppm (CL throughput pattern) HS BK 18 ppm (BK throughput pattern...
Service Manual
Page 7
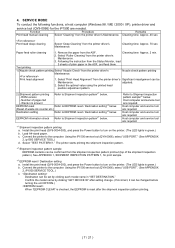
... Nozzle check pattern printing Select "Nozzle Check" from the printer driver's Maintenance. Print head alignment 1. Waste ink amount EEPROM reset Refer to EEPROM reset / Destination setting*3 below. (Reset of the shipment inspection pattern). Load A4-sized paper. c. SERVICE MODE To conduct the following functions, a host computer (... on the printer. (The LED lights in the ASF, and feed them. See APPENDIX 1, SHIPMENT INSPECTION PATTERN 1, for the iP1500 are required. Install the print head (QY6-0054-000), and press the Power button to turn on the printer. (The LED...
... Nozzle check pattern printing Select "Nozzle Check" from the printer driver's Maintenance. Print head alignment 1. Waste ink amount EEPROM reset Refer to EEPROM reset / Destination setting*3 below. (Reset of the shipment inspection pattern). Load A4-sized paper. c. SERVICE MODE To conduct the following functions, a host computer (... on the printer. (The LED lights in the ASF, and feed them. See APPENDIX 1, SHIPMENT INSPECTION PATTERN 1, for the iP1500 are required. Install the print head (QY6-0054-000), and press the Power button to turn on the printer. (The LED...

Service Manual
Page 10
...: Yes NG 2. Printer Main Unit Troubleshooting Flowchart (how to turn off the printer. (The paper lifting plate is soiled. Print the shipment inspection pattern, and reset the EEPROM, following the steps below. 1. No Connect to the default shipment conditions (with the Power button still pressed, press the Resume/Cancel button 2 times...
...: Yes NG 2. Printer Main Unit Troubleshooting Flowchart (how to turn off the printer. (The paper lifting plate is soiled. Print the shipment inspection pattern, and reset the EEPROM, following the steps below. 1. No Connect to the default shipment conditions (with the Power button still pressed, press the Resume/Cancel button 2 times...

Service Manual
Page 12
... Main waste ink absorber amount (128,400 mg at 95% full, 135,200 mg at full) 2. At main waste ink absorber replacement: In the iP1500 service tool CLEAR WASTE INK COUNTER section, click MAIN to reset the platen waste ink counter value. ( 12 / 21 ) At platen waste ink absorber replacement: In the... Ds values, as the error itself does not indicate which waste ink absorber is full. (See APPENDIX 2, iP1500 SERVICE TOOL, for the main waste ink absorber and the platen waste ink absorber can be reset separately. Ds: Platen waste ink absorber amount (7,220 mg at 95% full, 7,600 mg at full)...
... Main waste ink absorber amount (128,400 mg at 95% full, 135,200 mg at full) 2. At main waste ink absorber replacement: In the iP1500 service tool CLEAR WASTE INK COUNTER section, click MAIN to reset the platen waste ink counter value. ( 12 / 21 ) At platen waste ink absorber replacement: In the... Ds values, as the error itself does not indicate which waste ink absorber is full. (See APPENDIX 2, iP1500 SERVICE TOOL, for the main waste ink absorber and the platen waste ink absorber can be reset separately. Ds: Platen waste ink absorber amount (7,220 mg at 95% full, 7,600 mg at full)...

Service Manual
Page 17
... margin of error for remaining ink increases. When performing continuous BK solid printing -> With continuous printing, ink flow from the tank to reset the ink counter from the printer driver's Maintenance: 1. Note: Be sure to the ink chamber can be large in the following operations...Accuracy: The margin of error of error is likely to be interrupted, after replacing ink tanks. - Approx. 70 sec. ( 17 / 21 ) Reset procedure: Perform the following specific print patterns: When printing continuously using any one of the CMY colors of ink -> As the remaining ink level is...
... margin of error for remaining ink increases. When performing continuous BK solid printing -> With continuous printing, ink flow from the tank to reset the ink counter from the printer driver's Maintenance: 1. Note: Be sure to the ink chamber can be large in the following operations...Accuracy: The margin of error of error is likely to be interrupted, after replacing ink tanks. - Approx. 70 sec. ( 17 / 21 ) Reset procedure: Perform the following specific print patterns: When printing continuously using any one of the CMY colors of ink -> As the remaining ink level is...

Service Manual
Page 20
... after unzipping. 3. Click DEVICE ID (D), and confirm the model name indicated in the (E) area (iP_1500 for iP1500J, iP1500 for non-Japan models 2. The EEPROM will be reset. ( 20 / 21 ) Unzip iP1500tool_V100.EXE. (Double-click to APPENDIX 1, SHIPMENT INSPECTION PATTERN 1.) 1. Select TEST ...pattern printing. Select the connected USB port number from software download in SSIS.) 1. APPENDIX 2: iP1500 SERVICE TOOL Usage:Shipment inspection pattern printing/Destination setting in EEPROM/EEPROM reset Supported OS:Windows 98 / ME / 2000 / XP (J/E version) : QY9-0066 Distribution ...
... after unzipping. 3. Click DEVICE ID (D), and confirm the model name indicated in the (E) area (iP_1500 for iP1500J, iP1500 for non-Japan models 2. The EEPROM will be reset. ( 20 / 21 ) Unzip iP1500tool_V100.EXE. (Double-click to APPENDIX 1, SHIPMENT INSPECTION PATTERN 1.) 1. Select TEST ...pattern printing. Select the connected USB port number from software download in SSIS.) 1. APPENDIX 2: iP1500 SERVICE TOOL Usage:Shipment inspection pattern printing/Destination setting in EEPROM/EEPROM reset Supported OS:Windows 98 / ME / 2000 / XP (J/E version) : QY9-0066 Distribution ...

Service Manual
Page 21
If both the main and platen waste ink absorbers are replaced, reset both the main and platen waste ink counters. The EEP-ROM INFORMATION dialog box will be reset. The selected waste ink counter will open to display EEPROM information details. ( 21 / 21 ) Click EEP-ROM INFORMATION (H). PLATEN resets the platen waste ink counter. MAIN resets the main waste ink counter. In CLEAR WASTE INK COUNTER (G), select MAIN or PLATEN.
If both the main and platen waste ink absorbers are replaced, reset both the main and platen waste ink counters. The EEP-ROM INFORMATION dialog box will be reset. The selected waste ink counter will open to display EEPROM information details. ( 21 / 21 ) Click EEP-ROM INFORMATION (H). PLATEN resets the platen waste ink counter. MAIN resets the main waste ink counter. In CLEAR WASTE INK COUNTER (G), select MAIN or PLATEN.


