
i900D Quick Start Guide
Page 6
... 32 Printing the Nozzle Check Pattern 33 Print Head Cleaning 36 Print Head Deep Cleaning 38 Aligning the Print Head 40 Troubleshooting Cannot Install the Printer Driver 43 Print Quality is Poor or Contains Errors 44 Troubleshooting Printer Hardware 46 Paper Does Not Feed Properly 47 ...Handling Error Messages 48 An Error Message Appears on the Screen 50 Appendix Installing the Printer Driver when using Mac OS 9.x 52 User's Guide Table of Contents 54 Specifications 55 Safety Precautions 57 Regulatory Information 59 CANON ...
... 32 Printing the Nozzle Check Pattern 33 Print Head Cleaning 36 Print Head Deep Cleaning 38 Aligning the Print Head 40 Troubleshooting Cannot Install the Printer Driver 43 Print Quality is Poor or Contains Errors 44 Troubleshooting Printer Hardware 46 Paper Does Not Feed Properly 47 ...Handling Error Messages 48 An Error Message Appears on the Screen 50 Appendix Installing the Printer Driver when using Mac OS 9.x 52 User's Guide Table of Contents 54 Specifications 55 Safety Precautions 57 Regulatory Information 59 CANON ...
i900D Quick Start Guide
Page 16
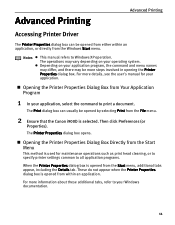
...see the user's manual for maintenance operations such as print head cleaning, or to specify printer settings common to all application programs. When the Printer Properties dialog box is opened from the File menu. 2 Ensure that the Canon i900D is opened from Your Application Program 1 In your operating... may vary depending on your application, select the command to print a document. Advanced Printing Advanced Printing Accessing Printer Driver The Printer Properties dialog box can usually be opened by selecting Print from the Start menu, additional tabs appear, including the Details tab...
...see the user's manual for maintenance operations such as print head cleaning, or to specify printer settings common to all application programs. When the Printer Properties dialog box is opened from the File menu. 2 Ensure that the Canon i900D is opened from Your Application Program 1 In your operating... may vary depending on your application, select the command to print a document. Advanced Printing Advanced Printing Accessing Printer Driver The Printer Properties dialog box can usually be opened by selecting Print from the Start menu, additional tabs appear, including the Details tab...

i900D Quick Start Guide
Page 35
... only the ink tank. z Do not re-attach the protective cap once you have removed it . z Ensure that the printer is removed, do not touch the open the front cover. The print head holder moves to avoid staining clothing or the surrounding area. z Once the protective cap is on, and then open...
... only the ink tank. z Do not re-attach the protective cap once you have removed it . z Ensure that the printer is removed, do not touch the open the front cover. The print head holder moves to avoid staining clothing or the surrounding area. z Once the protective cap is on, and then open...
i900D Quick Start Guide
Page 36
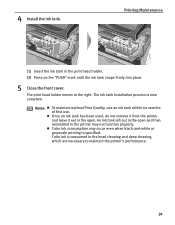
...z Once an ink tank has been used, do not remove it from the printer and leave it out in the open and then reinstalled in the head cleaning and deep cleaning, which are necessary to the right. An ink tank ...left out in the print head holder. (2) Press on the "PUSH" mark until the ink tank snaps firmly into place. 5 ...Maintenance (1) Insert the ink tank in the open . 4 Install the ink tank. The print head holder moves to maintain the printer's performance. 31 z Color ink consumption may not function properly.
...z Once an ink tank has been used, do not remove it from the printer and leave it out in the open and then reinstalled in the head cleaning and deep cleaning, which are necessary to the right. An ink tank ...left out in the print head holder. (2) Press on the "PUSH" mark until the ink tank snaps firmly into place. 5 ...Maintenance (1) Insert the ink tank in the open . 4 Install the ink tank. The print head holder moves to maintain the printer's performance. 31 z Color ink consumption may not function properly.
i900D Quick Start Guide
Page 37
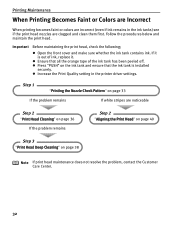
... make sure whether the ink tank contains ink. Follow the procedures below and maintain the print head. z Increase the Print Quality setting in the ink tanks) see if the print head nozzles are clogged and clean them first. Printing Maintenance When Printing Becomes Faint or Colors are ...Incorrect When printing becomes faint or colors are incorrect (even if ink remains in the printer driver settings. Important Before maintaining the print...
... make sure whether the ink tank contains ink. Follow the procedures below and maintain the print head. z Increase the Print Quality setting in the ink tanks) see if the print head nozzles are clogged and clean them first. Printing Maintenance When Printing Becomes Faint or Colors are ...Incorrect When printing becomes faint or colors are incorrect (even if ink remains in the printer driver settings. Important Before maintaining the print...
i900D Quick Start Guide
Page 38
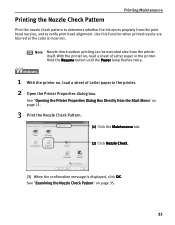
... Maintenance Print the nozzle check pattern to verify print head alignment. Hold the Resume button until the Power lamp flashes twice. 1 With the printer on , load a sheet of Letter paper in the printer. See "Opening the Printer Properties Dialog Box Directly from the Start Menu" on... page 35. 33 With the printer on , load a sheet of Letter paper in the printer. 2 Open the Printer Properties dialog box. See ...
... Maintenance Print the nozzle check pattern to verify print head alignment. Hold the Resume button until the Power lamp flashes twice. 1 With the printer on , load a sheet of Letter paper in the printer. See "Opening the Printer Properties Dialog Box Directly from the Start Menu" on... page 35. 33 With the printer on , load a sheet of Letter paper in the printer. 2 Open the Printer Properties dialog box. See ...
i900D Quick Start Guide
Page 40
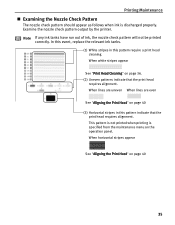
... be printed correctly. When white stripes appear See "Print Head Cleaning" on page 40 (3) Horizontal stripes in this pattern indicate that the print head requires alignment. Examine the nozzle check pattern output by the printer. This pattern is not printed when printing is discharged properly.... In this event, replace the relevant ink tanks. (1) White stripes in this pattern require a print head cleaning. When horizontal stripes appear See "Aligning the Print Head" on the operation panel...
... be printed correctly. When white stripes appear See "Print Head Cleaning" on page 40 (3) Horizontal stripes in this pattern indicate that the print head requires alignment. Examine the nozzle check pattern output by the printer. This pattern is not printed when printing is discharged properly.... In this event, replace the relevant ink tanks. (1) White stripes in this pattern require a print head cleaning. When horizontal stripes appear See "Aligning the Print Head" on the operation panel...

i900D Quick Start Guide
Page 41
... hard disk icon where the printer driver was installed, the Applications folder, and the Utilities folder. (2) Double-click the Print Center icon. (3) Select i900D from the Name list and click Configure. (4) Select i900D from the Product list and click Select. 36 Cleaning the print head consumes ink, so perform print head cleaning only when necessary...
... hard disk icon where the printer driver was installed, the Applications folder, and the Utilities folder. (2) Double-click the Print Center icon. (3) Select i900D from the Name list and click Configure. (4) Select i900D from the Product list and click Select. 36 Cleaning the print head consumes ink, so perform print head cleaning only when necessary...
i900D Quick Start Guide
Page 42
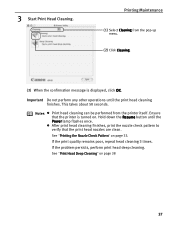
...turned on page 38 37 Hold down the Resume button until the print head cleaning finishes. If the problem persists, perform print head deep cleaning. Printing Maintenance (1) Select Cleaning from the printer itself. Important Do not perform any other operations until the Power lamp ...flashes once. Ensure that the print head nozzles are clean. See "Print Head Deep Cleaning" on . z After print head cleaning finishes, print the nozzle check pattern to verify that the printer is displayed, click OK. See "Printing the Nozzle Check Pattern...
...turned on page 38 37 Hold down the Resume button until the print head cleaning finishes. If the problem persists, perform print head deep cleaning. Printing Maintenance (1) Select Cleaning from the printer itself. Important Do not perform any other operations until the Power lamp ...flashes once. Ensure that the print head nozzles are clean. See "Print Head Deep Cleaning" on . z After print head cleaning finishes, print the nozzle check pattern to verify that the printer is displayed, click OK. See "Printing the Nozzle Check Pattern...
i900D Quick Start Guide
Page 43
... not improve by standard print head cleaning, try print head deep cleaning, which is turned on . 2 Open the BJ Printer Utility dialog box. (1) Double-click the hard disk icon where the printer driver was installed, the Applications folder, and the Utilities folder. (2) Double-click the Print Center icon. (3) Select i900D from the Name list and...
... not improve by standard print head cleaning, try print head deep cleaning, which is turned on . 2 Open the BJ Printer Utility dialog box. (1) Double-click the hard disk icon where the printer driver was installed, the Applications folder, and the Utilities folder. (2) Double-click the Print Center icon. (3) Select i900D from the Name list and...
i900D Quick Start Guide
Page 44
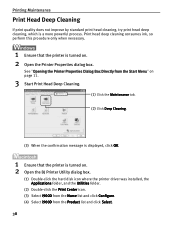
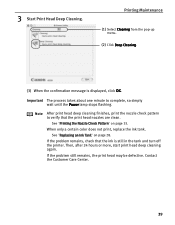
.... See "Replacing an Ink Tank" on page 33. Note After print head deep cleaning finishes, print the nozzle check pattern to complete, so simply ...only a certain color does not print, replace the ink tank. If the problem still remains, the print head may be defective. Contact the Customer Care Center. 39 Important The process takes about one minute to verify ...that the ink is displayed, click OK. Then, after 24 hours or more, start print head deep cleaning again. Printing Maintenance (1) Select Cleaning from the pop-up menu. (2) Click Deep Cleaning. (3) When...
.... See "Replacing an Ink Tank" on page 33. Note After print head deep cleaning finishes, print the nozzle check pattern to complete, so simply ...only a certain color does not print, replace the ink tank. If the problem still remains, the print head may be defective. Contact the Customer Care Center. 39 Important The process takes about one minute to verify ...that the ink is displayed, click OK. Then, after 24 hours or more, start print head deep cleaning again. Printing Maintenance (1) Select Cleaning from the pop-up menu. (2) Click Deep Cleaning. (3) When...
i900D Quick Start Guide
Page 45
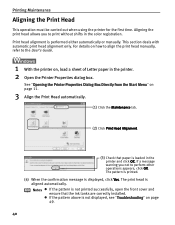
...how to align the print head manually, refer to the User's Guide. 1 With the printer on page 11. 3 Align the Print Head automatically. (1) Click the Maintenance tab. (2) Click Print Head Alignment. (3) Check that the ink tanks are correctly installed. The print head is performed either automatically or... manually. z If the pattern above is displayed, click Yes. Aligning the print head allows you not to print without shifts in the printer and click OK. The pattern is printed. (4) When the confirmation message is not displayed, see "Troubleshooting...
...how to align the print head manually, refer to the User's Guide. 1 With the printer on page 11. 3 Align the Print Head automatically. (1) Click the Maintenance tab. (2) Click Print Head Alignment. (3) Check that the ink tanks are correctly installed. The print head is performed either automatically or... manually. z If the pattern above is displayed, click Yes. Aligning the print head allows you not to print without shifts in the printer and click OK. The pattern is printed. (4) When the confirmation message is not displayed, see "Troubleshooting...
i900D Quick Start Guide
Page 46
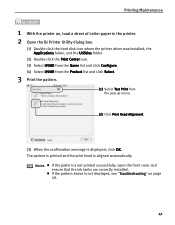
... a sheet of Letter paper in the printer. 2 Open the BJ Printer Utility dialog box. (1) Double-click the hard disk icon where the printer driver was installed, the Applications folder, and the Utilities folder. (2) Double-click the Print Center icon. (3) Select i900D from the Name list and click Configure.... (4) Select i900D from the Product list and click Select. 3 Print the pattern. (1) Select Test Print from the pop-up menu. (2) Click Print Head Alignment. (3) When the confirmation message is displayed,...
... a sheet of Letter paper in the printer. 2 Open the BJ Printer Utility dialog box. (1) Double-click the hard disk icon where the printer driver was installed, the Applications folder, and the Utilities folder. (2) Double-click the Print Center icon. (3) Select i900D from the Name list and click Configure.... (4) Select i900D from the Product list and click Select. 3 Print the pattern. (1) Select Test Print from the pop-up menu. (2) Click Print Head Alignment. (3) When the confirmation message is displayed,...
i900D Quick Start Guide
Page 49
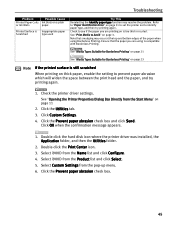
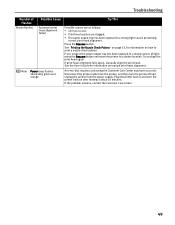
... set the Print Quality setting to adjust the intensity. Open the Printer Properties dialog box. 2. In the Print dialog box, Select Color Option from the nozzle check pattern, clean the print head. • If the ink supply is uneven: See "Print Head Cleaning" on page 36 • If straight lines are firmly seated... in the print head and reset them if necessary. • Check to see if all the orange tape has been peeled off as shown in the printer driver and try printing again. 1. Drag the Intensity slide bar to print images that ...
... set the Print Quality setting to adjust the intensity. Open the Printer Properties dialog box. 2. In the Print dialog box, Select Color Option from the nozzle check pattern, clean the print head. • If the ink supply is uneven: See "Print Head Cleaning" on page 36 • If straight lines are firmly seated... in the print head and reset them if necessary. • Check to see if all the orange tape has been peeled off as shown in the printer driver and try printing again. 1. Drag the Intensity slide bar to print images that ...
i900D Quick Start Guide
Page 50
...or curled. Click OK when the confirmation message appears. 1. Check to prevent paper abrasion which will widen the space between the print head and the paper, and try printing again. Note that the paper you are printing on thick paper, enable the setting to see ...abrasion check box and click Send. Double-click the hard disk icon where the printer driver was installed, the Application folder, and then the Utilities folder. 2. Ensure that smudging may resolve the problem. Select i900D from the Start Menu" on a plain or Ink Blots paper. Troubleshooting Problem...
...or curled. Click OK when the confirmation message appears. 1. Check to prevent paper abrasion which will widen the space between the print head and the paper, and try printing again. Note that the paper you are printing on thick paper, enable the setting to see ...abrasion check box and click Send. Double-click the hard disk icon where the printer driver was installed, the Application folder, and then the Utilities folder. 2. Ensure that smudging may resolve the problem. Select i900D from the Start Menu" on a plain or Ink Blots paper. Troubleshooting Problem...
i900D Quick Start Guide
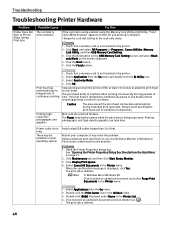
Page 51
... Click Start, and select All Programs (or Programs), Canon Utilities, Memory Card Utility, and then USB Memory Card Setting. 3. See "Opening the Printer Properties Dialog Box Directly from the Go menu. 2. Print head has overheated due to select an undesired document and click... print head and its peripheral components. It may be problems in the Printer List. 4. Double-click the Print Center icon in the Printer menu. Double-click i900D displayed under Name in your computer. Troubleshooting Troubleshooting Printer Hardware Problem Printer Does Not Start or Printer Stops ...
... Click Start, and select All Programs (or Programs), Canon Utilities, Memory Card Utility, and then USB Memory Card Setting. 3. See "Opening the Printer Properties Dialog Box Directly from the Go menu. 2. Print head has overheated due to select an undesired document and click... print head and its peripheral components. It may be problems in the Printer List. 4. Double-click the Print Center icon in the Printer menu. Double-click i900D displayed under Name in your computer. Troubleshooting Troubleshooting Printer Hardware Problem Printer Does Not Start or Printer Stops ...
i900D Quick Start Guide
Page 53
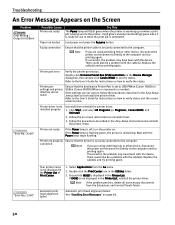
...response from the digital camera / The digital camera connected is not supported by this printer. See "Paper jam" on page 28 Print head not installed / Defective print head Install print head. Contact the Customer Care Center. Press the Resume button to correct the error. ...immediately after the printing. Use digital cameras or digital video camcorders compatible with this printer Disconnect the camera cable, press the printer's Resume button and reconnect the cable. If the print head is a possibility that has occurred. Contact the Customer Care Center. A specified ...
...response from the digital camera / The digital camera connected is not supported by this printer. See "Paper jam" on page 28 Print head not installed / Defective print head Install print head. Contact the Customer Care Center. Press the Resume button to correct the error. ...immediately after the printing. Use digital cameras or digital video camcorders compatible with this printer Disconnect the camera cable, press the printer's Resume button and reconnect the cable. If the print head is a possibility that has occurred. Contact the Customer Care Center. A specified ...
i900D Quick Start Guide
Page 54
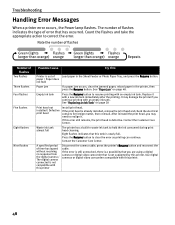
...a darker location. See the User's Guide for information on manual print head alignment. If the problem remains, contact the Customer Care Center. 49 Plug the printer back in and turn the printer off and unplug the printer from the power supply. An error that requires contacting the Customer Care ...Center may have occurred. Troubleshooting Number of light, press the Resume button and move the printer to align the print head again. Press the Resume button. See "Printing the Nozzle Check Pattern" on page 33, for information on how to a ...
...a darker location. See the User's Guide for information on manual print head alignment. If the problem remains, contact the Customer Care Center. 49 Plug the printer back in and turn the printer off and unplug the printer from the power supply. An error that requires contacting the Customer Care ...Center may have occurred. Troubleshooting Number of light, press the Resume button and move the printer to align the print head again. Press the Resume button. See "Printing the Nozzle Check Pattern" on page 33, for information on how to a ...
i900D Quick Start Guide
Page 55
...the Easy Setup Instructions and reinstall the printer driver. Wait until the Power lamp stops flashing. Ensure that the destination Printer Port is securely connected to the computer. Automatic print head alignment failed Automatic print head alignment failed. Troubleshooting An Error Message ...(USB) controllers on the Device Manager dialog box, then double-click Canon i900D to uninstall driver. 3. Printer port settings and printer interface do not match Ensure that i900D is not displayed in the Printer List. Follow the on page 48. 50 There could also be a...
...the Easy Setup Instructions and reinstall the printer driver. Wait until the Power lamp stops flashing. Ensure that the destination Printer Port is securely connected to the computer. Automatic print head alignment failed Automatic print head alignment failed. Troubleshooting An Error Message ...(USB) controllers on the Device Manager dialog box, then double-click Canon i900D to uninstall driver. 3. Printer port settings and printer interface do not match Ensure that i900D is not displayed in the Printer List. Follow the on page 48. 50 There could also be a...
i900D Quick Start Guide
Page 60
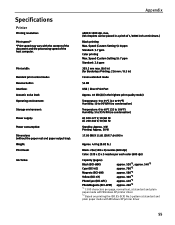
...: Storage environment: Power supply: Power consumption: Dimensions (without the paper rest and paper output tray): Weight: Print Head: Ink Tanks: Appendix 4800 X 1200 dpi. Speed (Custom Setting 5): 8 ppm Standard: 3.7 ppm Color printing Max...5): 7 ppm Standard: 2.6 ppm 203.2 mm max. (8.0 in) (for Borderless Printing: 216 mm / 8.5 in) Canon extended mode 56 KB USB / Direct Print Port Approx. 45 dB (A) (in the highest print quality mode) Temperature: ... paper mode with Windows XP printer driver *2 Based on printing the ISO JIS-SCID No.5 pattern at minimum.) Black printing Max. Specifications...
...: Storage environment: Power supply: Power consumption: Dimensions (without the paper rest and paper output tray): Weight: Print Head: Ink Tanks: Appendix 4800 X 1200 dpi. Speed (Custom Setting 5): 8 ppm Standard: 3.7 ppm Color printing Max...5): 7 ppm Standard: 2.6 ppm 203.2 mm max. (8.0 in) (for Borderless Printing: 216 mm / 8.5 in) Canon extended mode 56 KB USB / Direct Print Port Approx. 45 dB (A) (in the highest print quality mode) Temperature: ... paper mode with Windows XP printer driver *2 Based on printing the ISO JIS-SCID No.5 pattern at minimum.) Black printing Max. Specifications...

