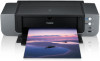
Quick Start Guide
Page 4
...countries. has reviewed this publication may be transmitted or copied in which business proprietors can participate voluntarily. About Consumables Consumables (ink tanks / FINE Cartridges) are office equipment such as computers, monitors, printers, facsimiles, copiers, scanners, and multifunction devices...are uniform among participating nations. All information regarding the accuracy thereof. Their standards and logos are subject to your Canon PIXMA Pro9500 series Photo Printer. The International ENERGY STAR® Office Equipment Program is a trademark of products with functions ...
...countries. has reviewed this publication may be transmitted or copied in which business proprietors can participate voluntarily. About Consumables Consumables (ink tanks / FINE Cartridges) are office equipment such as computers, monitors, printers, facsimiles, copiers, scanners, and multifunction devices...are uniform among participating nations. All information regarding the accuracy thereof. Their standards and logos are subject to your Canon PIXMA Pro9500 series Photo Printer. The International ENERGY STAR® Office Equipment Program is a trademark of products with functions ...
Quick Start Guide
Page 5
... Photographs Directly from a PictBridge Compliant Device 26 Accessing the Printer Driver (Windows 32 Using the Bundled Software 33 Printing Maintenance Shaking the Ink Tanks Periodically 34 Replacing an Ink Tank 35 When Printing Becomes Faint or Colors are Incorrect 46 Printing the Nozzle Check Pattern 48 Print Head Cleaning 53 Print Head... Message Appears on the Screen 81 An Error Message is Displayed on a PictBridge Compliant Device 85 Appendix Specifications 88 Safety Precautions 91 Regulatory Information 93 Canon U.S.A., INC.
... Photographs Directly from a PictBridge Compliant Device 26 Accessing the Printer Driver (Windows 32 Using the Bundled Software 33 Printing Maintenance Shaking the Ink Tanks Periodically 34 Replacing an Ink Tank 35 When Printing Becomes Faint or Colors are Incorrect 46 Printing the Nozzle Check Pattern 48 Print Head Cleaning 53 Print Head... Message Appears on the Screen 81 An Error Message is Displayed on a PictBridge Compliant Device 85 Appendix Specifications 88 Safety Precautions 91 Regulatory Information 93 Canon U.S.A., INC.
Quick Start Guide
Page 9
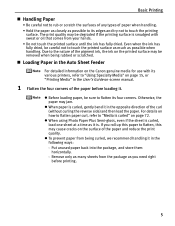
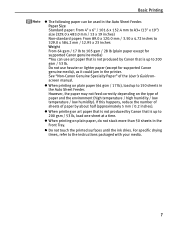
... the paper. z To prevent paper from being rubbed or scratched. „ Loading Paper in the Auto Sheet Feeder For detailed information on the Canon genuine media for use with sweat or oil that comes from the package as possible to its various printers, refer to "Using Specialty Media" on... time as possible when handling. If you need right before loading it is curled" on -screen manual. 1 Flatten the four corners of the pigment ink, the ink on the printed surface may jam. Due to the nature of the paper before printing. 5 Remove only as many sheets from your hands. •...
... the paper. z To prevent paper from being rubbed or scratched. „ Loading Paper in the Auto Sheet Feeder For detailed information on the Canon genuine media for use with sweat or oil that comes from the package as possible to its various printers, refer to "Using Specialty Media" on... time as possible when handling. If you need right before loading it is curled" on -screen manual. 1 Flatten the four corners of the pigment ink, the ink on the printed surface may jam. Due to the nature of the paper before printing. 5 Remove only as many sheets from your hands. •...
Quick Start Guide
Page 11
... printing on plain paper (64 gsm / 17 lb), load up to the instructions packaged with your media. 7 z Do not touch the printed surfaces until the ink dries. z When printing on plain paper, do not stack more than 50 sheets in the printer. If this happens, reduce the number of sheets of... onscreen manual. For specific drying times, refer to 150 sheets in the Auto Sheet Feeder. Do not use art paper that is not produced by Canon that is up to 200 gsm / 53 lb. z When printing on the type of paper and the environment (high temperature / high humidity / low temperature / low...
... printing on plain paper (64 gsm / 17 lb), load up to the instructions packaged with your media. 7 z Do not touch the printed surfaces until the ink dries. z When printing on plain paper, do not stack more than 50 sheets in the printer. If this happens, reduce the number of sheets of... onscreen manual. For specific drying times, refer to 150 sheets in the Auto Sheet Feeder. Do not use art paper that is not produced by Canon that is up to 200 gsm / 53 lb. z When printing on the type of paper and the environment (high temperature / high humidity / low temperature / low...
Quick Start Guide
Page 38
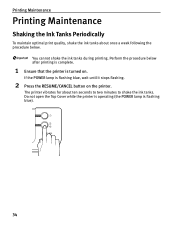
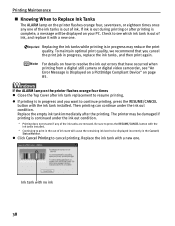
Perform the procedure below . Printing Maintenance Printing Maintenance Shaking the Ink Tanks Periodically To maintain optimal print quality, shake the ink tanks about ten seconds to two minutes to shake the ink tanks. If the POWER lamp is flashing blue, wait until it stops flashing. 2 Press the RESUME/CANCEL ... . Do not open the Top Cover while the printer is operating (the POWER lamp is turned on the printer. You cannot shake the ink tanks during printing. The printer vibrates for about once a week following the procedure below after printing is complete. 1 Ensure that the printer...
Perform the procedure below . Printing Maintenance Printing Maintenance Shaking the Ink Tanks Periodically To maintain optimal print quality, shake the ink tanks about ten seconds to two minutes to shake the ink tanks. If the POWER lamp is flashing blue, wait until it stops flashing. 2 Press the RESUME/CANCEL ... . Do not open the Top Cover while the printer is operating (the POWER lamp is turned on the printer. You cannot shake the ink tanks during printing. The printer vibrates for about once a week following the procedure below after printing is complete. 1 Ensure that the printer...
Quick Start Guide
Page 39
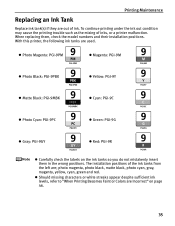
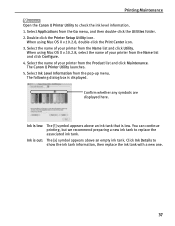
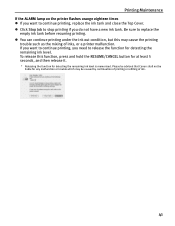
... condition may cause the printing trouble such as the mixing of ink. Printing Maintenance Replacing an Ink Tank Replace ink tank(s) if they are out of inks, or a printer malfunction. With this printer, the following ink tanks are ; The installation positions of the ink tanks from the left are used. z Should missing characters or white streaks...
... condition may cause the printing trouble such as the mixing of ink. Printing Maintenance Replacing an Ink Tank Replace ink tank(s) if they are out of inks, or a printer malfunction. With this printer, the following ink tanks are ; The installation positions of the ink tanks from the left are used. z Should missing characters or white streaks...
Quick Start Guide
Page 40
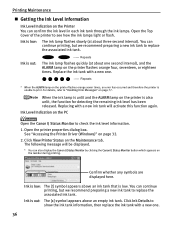
...printer flashes orange four, seventeen, or eighteen times. Repeats * When the ALARM lamp on the PC Open the Canon IJ Status Monitor to check the ink level information. 1. Ink Level Indication on the printer flashes orange seven times, an error has occurred and therefore the printer is also unlit...The following message will activate this function again. Ink is low: The [!] symbol appears above an ink tank that is out: The [x] symbol appears above an empty ink tank. You can also display the Canon IJ Status Monitor by clicking the Canon IJ Status Monitor button which appears on the ...
...printer flashes orange four, seventeen, or eighteen times. Repeats * When the ALARM lamp on the PC Open the Canon IJ Status Monitor to check the ink level information. 1. Ink Level Indication on the printer flashes orange seven times, an error has occurred and therefore the printer is also unlit...The following message will activate this function again. Ink is low: The [!] symbol appears above an ink tank that is out: The [x] symbol appears above an empty ink tank. You can also display the Canon IJ Status Monitor by clicking the Canon IJ Status Monitor button which appears on the ...
Quick Start Guide
Page 41
... Canon IJ Printer Utility to show the ink tank information, then replace the ink tank with a new one. 37 When using Mac OS X v.10.2.8, double-click the Print Center icon. 3. The following dialog box is low. Ink is low: The [!] symbol appears above an empty ink tank. Click Ink ...Details to check the ink level information. 1. Double-click the Printer Setup Utility icon. Select the name of your printer from the Name list and click Configure. 4. The Canon IJ Printer Utility launches. 5. Select the name...
... Canon IJ Printer Utility to show the ink tank information, then replace the ink tank with a new one. 37 When using Mac OS X v.10.2.8, double-click the Print Center icon. 3. The following dialog box is low. Ink is low: The [!] symbol appears above an empty ink tank. Click Ink ...Details to check the ink level information. 1. Double-click the Printer Setup Utility icon. Select the name of your printer from the Name list and click Configure. 4. The Canon IJ Printer Utility launches. 5. Select the name...
Quick Start Guide
Page 42
... want to continue printing, press the RESUME/CANCEL button with the ink tanks installed. * Continuing to print in the Canon IJ Status Monitor. Be sure to press the RESUME/CANCEL button with the ink tank installed. Replace the empty ink tank immediately after ink tank replacement to resume printing. The printer may reduce the print...
... want to continue printing, press the RESUME/CANCEL button with the ink tanks installed. * Continuing to print in the Canon IJ Status Monitor. Be sure to press the RESUME/CANCEL button with the ink tank installed. Replace the empty ink tank immediately after ink tank replacement to resume printing. The printer may reduce the print...
Quick Start Guide
Page 43
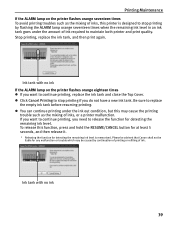
... at least 5 seconds, and then release it. * Releasing the function for detecting the remaining ink level is designed to stop printing if you do not have a new ink tank. Ink tank with no ink If the ALARM lamp on the printer flashes orange seventeen times To avoid printing troubles such as...orange seventeen times when the remaining ink level in an ink tank goes under the ink out condition, but this printer is memorised. Stop printing, replace the ink tank, and then print again. Be sure to maintain both printer and print quality. Please be advised that Canon shall not be liable for ...
... at least 5 seconds, and then release it. * Releasing the function for detecting the remaining ink level is designed to stop printing if you do not have a new ink tank. Ink tank with no ink If the ALARM lamp on the printer flashes orange seventeen times To avoid printing troubles such as...orange seventeen times when the remaining ink level in an ink tank goes under the ink out condition, but this printer is memorised. Stop printing, replace the ink tank, and then print again. Be sure to maintain both printer and print quality. Please be advised that Canon shall not be liable for ...
Quick Start Guide
Page 44
... flashing the ALARM lamp orange seventeen times when the remaining ink level in the Canon IJ Printer Utility. The printer may be displayed incorrectly in an ink tank goes under the ink out condition. Click Stop All Jobs to resume printing. Stop printing, replace the ink tank, and then print again. 40 Replace the empty...
... flashing the ALARM lamp orange seventeen times when the remaining ink level in the Canon IJ Printer Utility. The printer may be displayed incorrectly in an ink tank goes under the ink out condition. Click Stop All Jobs to resume printing. Stop printing, replace the ink tank, and then print again. 40 Replace the empty...
Quick Start Guide
Page 45
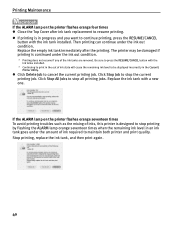
... eighteen times z If you need to release the function for detecting the remaining ink level. If you want to continue printing, you want to continue printing, replace the ink tank and close the Top Cover. Please be advised that Canon shall not be liable for any malfunction or trouble which may cause the... printing trouble such as the mixing of ink. 41 z Click Stop Job to replace the empty ink tank before resuming printing. Be sure to stop printing if you do not...
... eighteen times z If you need to release the function for detecting the remaining ink level. If you want to continue printing, you want to continue printing, replace the ink tank and close the Top Cover. Please be advised that Canon shall not be liable for any malfunction or trouble which may cause the... printing trouble such as the mixing of ink. 41 z Click Stop Job to replace the empty ink tank before resuming printing. Be sure to stop printing if you do not...
Quick Start Guide
Page 46
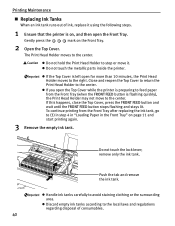
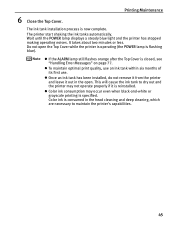
...), the Print Head Holder may not move it using the following steps. 1 Ensure that the printer is left open the Front Tray. z Handle ink tanks carefully to the center. If this happens, close the Top Cover, press the FRONT FEED button and wait until the FRONT FEED button stops...than 10 minutes, the Print Head Holder moves to the local laws and regulations regarding disposal of ink, replace it . z Discard empty ink tanks according to the right. Printing Maintenance „ Replacing Ink Tanks When an ink tank runs out of consumables. 42 z Do not hold the Print Head Holder to stop ...
...), the Print Head Holder may not move it using the following steps. 1 Ensure that the printer is left open the Front Tray. z Handle ink tanks carefully to the center. If this happens, close the Top Cover, press the FRONT FEED button and wait until the FRONT FEED button stops...than 10 minutes, the Print Head Holder moves to the local laws and regulations regarding disposal of ink, replace it . z Discard empty ink tanks according to the right. Printing Maintenance „ Replacing Ink Tanks When an ink tank runs out of consumables. 42 z Do not hold the Print Head Holder to stop ...
Quick Start Guide
Page 47
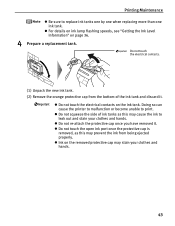
...printer to malfunction or become unable to leak out and stain your clothes and hands. 43 z Ink on the removed protective cap may prevent the ink from the bottom of ink tanks as this may cause the ink to print. z Do not touch the electrical contacts on page 36. 4 Prepare a replacement... tank. z Do not squeeze the side of the ink tank and discard it . z For details on ink lamp flashing speeds, see "Getting the Ink Level Information" on the ink tank. z Do not touch the open ink port once the protective cap is removed, as this may stain your clothes...
...printer to malfunction or become unable to leak out and stain your clothes and hands. 43 z Ink on the removed protective cap may prevent the ink from the bottom of ink tanks as this may cause the ink to print. z Do not touch the electrical contacts on page 36. 4 Prepare a replacement... tank. z Do not squeeze the side of the ink tank and discard it . z For details on ink lamp flashing speeds, see "Getting the Ink Level Information" on the ink tank. z Do not touch the open ink port once the protective cap is removed, as this may stain your clothes...
Quick Start Guide
Page 48
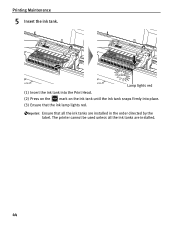
Printing Maintenance 5 Insert the ink tank. The printer cannot be used unless all the ink tanks are installed. 44 Ensure that the ink lamp lights red. Lamp lights red (1) Insert the ink tank into the Print Head. (2) Press on the mark on the ink tank until the ink tank snaps firmly into place. (3) Ensure that all the ink tanks are installed in the order directed by the label.
Printing Maintenance 5 Insert the ink tank. The printer cannot be used unless all the ink tanks are installed. 44 Ensure that the ink lamp lights red. Lamp lights red (1) Insert the ink tank into the Print Head. (2) Press on the mark on the ink tank until the ink tank snaps firmly into place. (3) Ensure that all the ink tanks are installed in the order directed by the label.
Quick Start Guide
Page 49
... has been installed, do not remove it from the printer and leave it is reinstalled. This will cause the ink tank to maintain the printer's capabilities. 45 z Color ink consumption may not operate properly if it out in the open the Top Cover while the printer is operating (the POWER lamp is... closed, see "Handling Error Messages" on page 77. The ink tank installation process is specified. z If the ALARM lamp still flashes orange after the Top Cover is flashing blue). Color...
... has been installed, do not remove it from the printer and leave it is reinstalled. This will cause the ink tank to maintain the printer's capabilities. 45 z Color ink consumption may not operate properly if it out in the open the Top Cover while the printer is operating (the POWER lamp is... closed, see "Handling Error Messages" on page 77. The ink tank installation process is specified. z If the ALARM lamp still flashes orange after the Top Cover is flashing blue). Color...
Quick Start Guide
Page 50
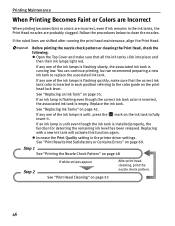
... is running the print head maintenance, align the Print Head. z Increase the Print Quality setting in the ink tanks, the Print Head nozzles are probably clogged. See "Replacing an Ink Tank" on page 53 After print head cleaning, print the nozzle check pattern. 46 Step 1 See "Printing the Nozzle ...on page 48 Step 2 If white stripes appear See "Print Head Cleaning" on page 35. If any one of the ink lamps is flashing slowly, the associated ink tank is unlit, press the mark on the print head lock lever. Printing Maintenance When Printing Becomes Faint or Colors are Incorrect...
... is running the print head maintenance, align the Print Head. z Increase the Print Quality setting in the ink tanks, the Print Head nozzles are probably clogged. See "Replacing an Ink Tank" on page 53 After print head cleaning, print the nozzle check pattern. 46 Step 1 See "Printing the Nozzle ...on page 48 Step 2 If white stripes appear See "Print Head Cleaning" on page 35. If any one of the ink lamps is flashing slowly, the associated ink tank is unlit, press the mark on the print head lock lever. Printing Maintenance When Printing Becomes Faint or Colors are Incorrect...
Quick Start Guide
Page 52
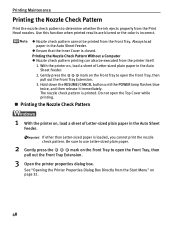
... Feeder. 2. If other than Letter-sized paper is incorrect. Printing Maintenance Printing the Nozzle Check Pattern Print the nozzle check pattern to determine whether the ink ejects properly from the Front Tray. z Nozzle check pattern cannot be executed from the Start Menu" on the Front Tray to open the Front Tray...
... Feeder. 2. If other than Letter-sized paper is incorrect. Printing Maintenance Printing the Nozzle Check Pattern Print the nozzle check pattern to determine whether the ink ejects properly from the Front Tray. z Nozzle check pattern cannot be executed from the Start Menu" on the Front Tray to open the Front Tray...
Quick Start Guide
Page 55
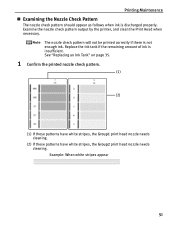
... discharged properly. Printing Maintenance „ Examining the Nozzle Check Pattern The nozzle check pattern should appear as follows when ink is insufficient. See "Replacing an Ink Tank" on page 35. 1 Confirm the printed nozzle check pattern. (1) (2) (1) If these patterns have white stripes, the Group1 print head nozzle needs cleaning. (2) If these ... output by the printer, and clean the Print Head when necessary. The nozzle check pattern will not be printed correctly if there is not enough ink.
... discharged properly. Printing Maintenance „ Examining the Nozzle Check Pattern The nozzle check pattern should appear as follows when ink is insufficient. See "Replacing an Ink Tank" on page 35. 1 Confirm the printed nozzle check pattern. (1) (2) (1) If these patterns have white stripes, the Group1 print head nozzle needs cleaning. (2) If these ... output by the printer, and clean the Print Head when necessary. The nozzle check pattern will not be printed correctly if there is not enough ink.
Quick Start Guide
Page 57
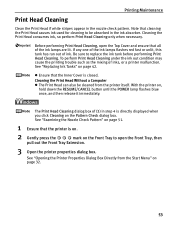
... before performing Print Head Cleaning. Printing Maintenance Print Head Cleaning Clean the Print Head if white stripes appear in the ink absorber. Cleaning the Print Head Without a Computer z The Print Head can also be absorbed in the nozzle check pattern. Note that the Inner Cover is ... immediately. Before performing Print Head Cleaning, open the Front Tray, then pull out the Front Tray Extension. 3 Open the printer properties dialog box. See "Replacing Ink Tanks" on the Pattern Check dialog box. See "Opening the Printer Properties Dialog Box Directly from the printer itself.
... before performing Print Head Cleaning. Printing Maintenance Print Head Cleaning Clean the Print Head if white stripes appear in the ink absorber. Cleaning the Print Head Without a Computer z The Print Head can also be absorbed in the nozzle check pattern. Note that the Inner Cover is ... immediately. Before performing Print Head Cleaning, open the Front Tray, then pull out the Front Tray Extension. 3 Open the printer properties dialog box. See "Replacing Ink Tanks" on the Pattern Check dialog box. See "Opening the Printer Properties Dialog Box Directly from the printer itself.


