Quick Start Guide
Page 2
...product): Model Number (located on the CD-ROM): Purchase Date: Customer Technical Support Sequence* 1. In addition, the latest driver downloads, answers to frequently asked questions, product information, and "where to buy" instructions are subject to change without notice.... service charges, MondaySaturday (excluding holidays), during your product's 1 year limited warranty period. CarePAK offers toll-free Canon technical support and includes Canon's superb InstantExchange product replacement program. Internet - www.canontechsupport.com For individual attention to a special issue, try...
...product): Model Number (located on the CD-ROM): Purchase Date: Customer Technical Support Sequence* 1. In addition, the latest driver downloads, answers to frequently asked questions, product information, and "where to buy" instructions are subject to change without notice.... service charges, MondaySaturday (excluding holidays), during your product's 1 year limited warranty period. CarePAK offers toll-free Canon technical support and includes Canon's superb InstantExchange product replacement program. Internet - www.canontechsupport.com For individual attention to a special issue, try...
Quick Start Guide
Page 5
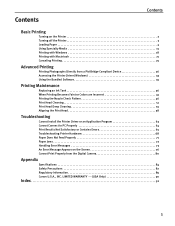
... 15 Printing with Windows 18 Printing with Macintosh 21 Canceling Printing 25 Advanced Printing Printing Photographs Directly from a PictBridge Compliant Device 26 Accessing the Printer Driver (Windows 33 Using the Bundled Software 35 Printing Maintenance Replacing an Ink Tank 36 When Printing Becomes Faint or Colors are Incorrect 45 Printing the... An Error Message Appears on the Screen 76 Cannot Print Properly from the Digital Camera 80 Appendix Specifications 84 Safety Precautions 87 Regulatory Information 89 Canon U.S.A., INC. LIMITED WARRANTY --- (USA Only 90 Index 92 1
... 15 Printing with Windows 18 Printing with Macintosh 21 Canceling Printing 25 Advanced Printing Printing Photographs Directly from a PictBridge Compliant Device 26 Accessing the Printer Driver (Windows 33 Using the Bundled Software 35 Printing Maintenance Replacing an Ink Tank 36 When Printing Becomes Faint or Colors are Incorrect 45 Printing the... An Error Message Appears on the Screen 76 Cannot Print Properly from the Digital Camera 80 Appendix Specifications 84 Safety Precautions 87 Regulatory Information 89 Canon U.S.A., INC. LIMITED WARRANTY --- (USA Only 90 Index 92 1
Quick Start Guide
Page 6
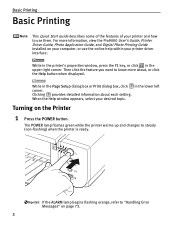
... the Page Setup dialog box or Print dialog box, click in the upper right corner. When the Help window appears, select your printer driver interface: While in the printer's properties window, press the F1 key, or click in the lower left corner. If the ALARM lamp ...up and changes to "Handling Error Messages" on page 73. 2 Then click the feature you want to know more information, view the Pro9000 User's Guide, Printer Driver Guide, Photo Application Guide, and Digital Photo Printing Guide installed on the Printer 1 Press the POWER button. Clicking provides detailed information about...
... the Page Setup dialog box or Print dialog box, click in the upper right corner. When the Help window appears, select your printer driver interface: While in the printer's properties window, press the F1 key, or click in the lower left corner. If the ALARM lamp ...up and changes to "Handling Error Messages" on page 73. 2 Then click the feature you want to know more information, view the Pro9000 User's Guide, Printer Driver Guide, Photo Application Guide, and Digital Photo Printing Guide installed on the Printer 1 Press the POWER button. Clicking provides detailed information about...
Quick Start Guide
Page 12
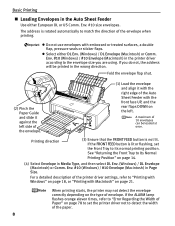
... Guide and slide it against the left . Printing direction (3) Ensure that the FRONT FEED button is lit or flashing, set the printer driver not to Its Normal Printing Position" on page 21. When printing starts, the printer may not detect the envelope correctly depending on the left...If the ALARM lamp flashes orange eleven times, refer to "Error Regarding the Width of the paper. 8 For a detailed description of the printer driver settings, refer to match the direction of 10 envelopes can be printed in the wrong direction. Basic Printing „ Loading Envelopes in Page Size....
... Guide and slide it against the left . Printing direction (3) Ensure that the FRONT FEED button is lit or flashing, set the printer driver not to Its Normal Printing Position" on page 21. When printing starts, the printer may not detect the envelope correctly depending on the left...If the ALARM lamp flashes orange eleven times, refer to "Error Regarding the Width of the paper. 8 For a detailed description of the printer driver settings, refer to match the direction of 10 envelopes can be printed in the wrong direction. Basic Printing „ Loading Envelopes in Page Size....

Quick Start Guide
Page 13
For a detailed description of the printer driver settings, refer to "Printing with Windows" on page 18, or "Printing with the print side facing UP. • Load the paper lengthways regardless of the ... the left side of the Auto Sheet Feeder with Macintosh" on page 21. Always load paper in the printer driver. If the FRONT FEED button is not lit. Portrait Landscape We recommend using Canon genuine photo media when printing photographs. Loading paper in landscape orientation can cause the paper to be jammed.
For a detailed description of the printer driver settings, refer to "Printing with Windows" on page 18, or "Printing with the print side facing UP. • Load the paper lengthways regardless of the ... the left side of the Auto Sheet Feeder with Macintosh" on page 21. Always load paper in the printer driver. If the FRONT FEED button is not lit. Portrait Landscape We recommend using Canon genuine photo media when printing photographs. Loading paper in landscape orientation can cause the paper to be jammed.
Quick Start Guide
Page 20
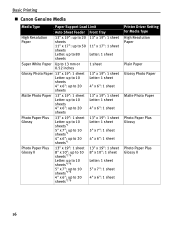
Basic Printing „ Canon Genuine Media Media Type Paper Support Load Limit Auto Sheet Feeder Front Tray High Resolution Paper 13" x 19": up to 20 sheets 11" x 17": up ... 10 sheets*1*6 Letter: up to 10 sheets*1*6 5" x 7": up to 10 sheets*1*6 4" x 6": up to 20 sheets*1*6 13" x 19": 1 sheet 8" x 10": 1 sheet Letter: 1 sheet 5" x 7": 1 sheet 4" x 6": 1 sheet Printer Driver Setting for Media Type High Resolution Paper Plain Paper Glossy Photo Paper Matte Photo Paper Photo Paper Plus Glossy Photo Paper Plus Glossy II 16
Basic Printing „ Canon Genuine Media Media Type Paper Support Load Limit Auto Sheet Feeder Front Tray High Resolution Paper 13" x 19": up to 20 sheets 11" x 17": up ... 10 sheets*1*6 Letter: up to 10 sheets*1*6 5" x 7": up to 10 sheets*1*6 4" x 6": up to 20 sheets*1*6 13" x 19": 1 sheet 8" x 10": 1 sheet Letter: 1 sheet 5" x 7": 1 sheet 4" x 6": 1 sheet Printer Driver Setting for Media Type High Resolution Paper Plain Paper Glossy Photo Paper Matte Photo Paper Photo Paper Plus Glossy Photo Paper Plus Glossy II 16
Quick Start Guide
Page 21
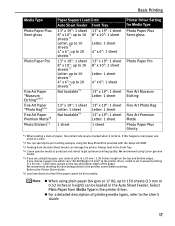
...35 mm / 1.38 inches margin on the top and bottom edges. We recommend using Canon genuine media. *5 If you are using this happens, load paper one sheet at a time. *2 You can be loaded in the printer driver. If you cannnot print in the preview screen before printing. We recommend checking the ...Auto Sheet Feeder. z For a detailed description of printing media types, refer to the Printer Driver Guide. *6 Load one sheet at a time if the paper cannot be marked when it is fed in the Front Tray. *4 Canon genuine media is set to 150 sheets (13 mm or 0.52 inches in height) can...
...35 mm / 1.38 inches margin on the top and bottom edges. We recommend using Canon genuine media. *5 If you are using this happens, load paper one sheet at a time. *2 You can be loaded in the printer driver. If you cannnot print in the preview screen before printing. We recommend checking the ...Auto Sheet Feeder. z For a detailed description of printing media types, refer to the Printer Driver Guide. *6 Load one sheet at a time if the paper cannot be marked when it is fed in the Front Tray. *4 Canon genuine media is set to 150 sheets (13 mm or 0.52 inches in height) can...
Quick Start Guide
Page 24
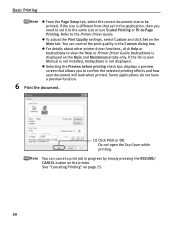
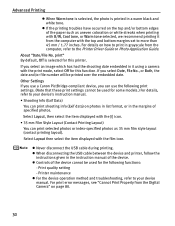
Basic Printing z From the Page Setup tab, select the correct document size to view the Help or Printer Driver Guide. z For details about other printer driver functions, click Help or Instructions to be printed. z Selecting the Preview before printing check box displays a preview screen that set it to the same size ... Print Quality settings, select Custom and click Set on page 25. 20 You can cancel a print job in the application, then you to the Printer Driver Guide.
Basic Printing z From the Page Setup tab, select the correct document size to view the Help or Printer Driver Guide. z For details about other printer driver functions, click Help or Instructions to be printed. z Selecting the Preview before printing check box displays a preview screen that set it to the same size ... Print Quality settings, select Custom and click Set on page 25. 20 You can cancel a print job in the application, then you to the Printer Driver Guide.
Quick Start Guide
Page 27
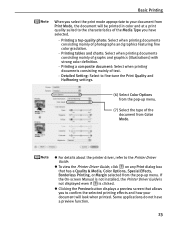
... Select to fine-tune the Print Quality and Halftoning settings. (6) Select Color Options from the pop-up menu. z To view the Printer Driver Guide, click on any Print dialog box that allows you to confirm the selected printing effects and how your document from Color Mode. Basic ...documents consisting mainly of the document from Print Mode, the document will look when printed. If the On-screen Manual is not installed, the Printer Driver Guide is not displayed even if is clicked. z Clicking the Preview button displays a preview screen that has a Quality & Media, Color Options,...
... Select to fine-tune the Print Quality and Halftoning settings. (6) Select Color Options from the pop-up menu. z To view the Printer Driver Guide, click on any Print dialog box that allows you to confirm the selected printing effects and how your document from Color Mode. Basic ...documents consisting mainly of the document from Print Mode, the document will look when printed. If the On-screen Manual is not installed, the Printer Driver Guide is not displayed even if is clicked. z Clicking the Preview button displays a preview screen that has a Quality & Media, Color Options,...
Quick Start Guide
Page 36
About "Date/File No. Other Settings If you use a Canon PictBridge-compliant device, you can use the following functions: - z When disconnecting the USB cable between the device and printer, follow the instructions given in the ... the item displayed with the print mode, select Off for this function. Printer maintenance z For the device operation method and troubleshooting, refer to the Printer Driver Guide or Photo Application Guide. Advanced Printing z When Warm tone is selected, the photo is selected for this printer. z If the printing troubles have occurred...
About "Date/File No. Other Settings If you use a Canon PictBridge-compliant device, you can use the following functions: - z When disconnecting the USB cable between the device and printer, follow the instructions given in the ... the item displayed with the print mode, select Off for this function. Printer maintenance z For the device operation method and troubleshooting, refer to the Printer Driver Guide or Photo Application Guide. Advanced Printing z When Warm tone is selected, the photo is selected for this printer. z If the printing troubles have occurred...
Quick Start Guide
Page 37
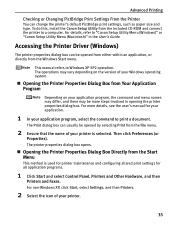
This manual refers to a computer. Then click Preferences (or Properties). Accessing the Printer Driver (Windows) The printer properties dialog box can be opened from either within an application, or directly from the Windows Start menu. For...132; Opening the Printer Properties Dialog Box from Your Application Program Depending on the version of your application program, select the command to "Canon Setup Utility Menu (Windows)" or "Canon Setup Utility Menu (Macintosh)" in opening the printer properties dialog box. For details, refer to print a document. The printer properties ...
This manual refers to a computer. Then click Preferences (or Properties). Accessing the Printer Driver (Windows) The printer properties dialog box can be opened from either within an application, or directly from the Windows Start menu. For...132; Opening the Printer Properties Dialog Box from Your Application Program Depending on the version of your application program, select the command to "Canon Setup Utility Menu (Windows)" or "Canon Setup Utility Menu (Macintosh)" in opening the printer properties dialog box. For details, refer to print a document. The printer properties ...
Quick Start Guide
Page 38
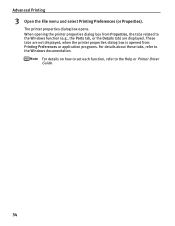
Advanced Printing 3 Open the File menu and select Printing Preferences (or Properties). When opening the printer properties dialog box from Printing Preferences or application programs. For details about these tabs, refer to the Windows documentation. These tabs are displayed. For details on how to set each function, refer to the Windows function (e.g., the Ports tab, or the Details tab) are not displayed, when the printer properties dialog box is opened from Properties, the tabs related to the Help or Printer Driver Guide. 34 The printer properties dialog box opens.
Advanced Printing 3 Open the File menu and select Printing Preferences (or Properties). When opening the printer properties dialog box from Printing Preferences or application programs. For details about these tabs, refer to the Windows documentation. These tabs are displayed. For details on how to set each function, refer to the Windows function (e.g., the Ports tab, or the Details tab) are not displayed, when the printer properties dialog box is opened from Properties, the tabs related to the Help or Printer Driver Guide. 34 The printer properties dialog box opens.
Quick Start Guide
Page 41
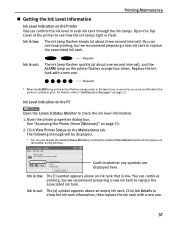
...132; Getting the Ink Level Information Ink Level Indication on the Printer You can also display the Canon IJ Status Monitor by clicking the Canon IJ Status Monitor button which appears on the taskbar during printing. Replace the ink tank with a... new one. 37 Ink Level Indication on the PC Open the Canon IJ Status Monitor to show the ink tank information, then replace the ink tank with a new one second interval... to check the ink level information. 1. Ink is low. See "Accessing the Printer Driver (Windows)" on the Maintenance tab.
...132; Getting the Ink Level Information Ink Level Indication on the Printer You can also display the Canon IJ Status Monitor by clicking the Canon IJ Status Monitor button which appears on the taskbar during printing. Replace the ink tank with a... new one. 37 Ink Level Indication on the PC Open the Canon IJ Status Monitor to show the ink tank information, then replace the ink tank with a new one second interval... to check the ink level information. 1. Ink is low. See "Accessing the Printer Driver (Windows)" on the Maintenance tab.
Quick Start Guide
Page 49
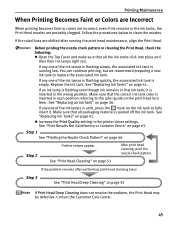
... is inserted in the wrong position. If any one of the ink lamps is flashing quickly, the associated ink tank is inserted in the printer driver settings. You can continue printing, but we recommend preparing a new ink tank to clean the nozzles. Contact the Customer Care Center. 45 See "Replacing Ink...
... is inserted in the wrong position. If any one of the ink lamps is flashing quickly, the associated ink tank is inserted in the printer driver settings. You can continue printing, but we recommend preparing a new ink tank to clean the nozzles. Contact the Customer Care Center. 45 See "Replacing Ink...
Quick Start Guide
Page 62
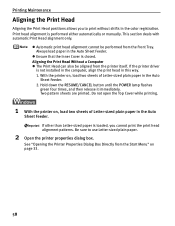
Aligning the Print Head Without a Computer z The Print Head can also be performed from the printer itself. If the printer driver is loaded, you to use Letter-sized plain paper. 2 Open the printer properties dialog box. Be sure to print without shifts in the Auto Sheet ...
Aligning the Print Head Without a Computer z The Print Head can also be performed from the printer itself. If the printer driver is loaded, you to use Letter-sized plain paper. 2 Open the printer properties dialog box. Be sure to print without shifts in the Auto Sheet ...
Quick Start Guide
Page 64
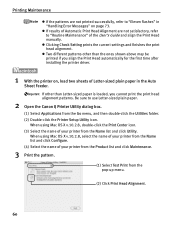
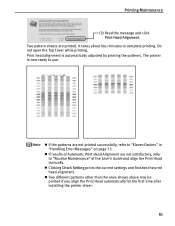
...print head alignment. If other than Letter-sized paper is loaded, you align the Print Head automatically for the first time after installing the printer driver. 1 With the printer on page 73. z Two different patterns other than the ones shown above may be printed if you cannot print ... Configure. (4) Select the name of your printer from the Name list and click Utility. Be sure to use Letter-sized plain paper. 2 Open the Canon IJ Printer Utility dialog box. (1) Select Applications from the pop-up menu. (2) Click Print Head Alignment. 60 Printing Maintenance z If the patterns are...
...print head alignment. If other than Letter-sized paper is loaded, you align the Print Head automatically for the first time after installing the printer driver. 1 With the printer on page 73. z Two different patterns other than the ones shown above may be printed if you cannot print ... Configure. (4) Select the name of your printer from the Name list and click Utility. Be sure to use Letter-sized plain paper. 2 Open the Canon IJ Printer Utility dialog box. (1) Select Applications from the pop-up menu. (2) Click Print Head Alignment. 60 Printing Maintenance z If the patterns are...
Quick Start Guide
Page 65
... patterns other than the ones shown above may be printed if you align the Print Head automatically for the first time after installing the printer driver. 61 The printer is automatically adjusted by printing the patterns. z If results of the User's Guide and align the Print Head manually. z Clicking Check Setting...
... patterns other than the ones shown above may be printed if you align the Print Head automatically for the first time after installing the printer driver. 61 The printer is automatically adjusted by printing the patterns. z If results of the User's Guide and align the Print Head manually. z Clicking Check Setting...
Quick Start Guide
Page 66
The message may vary depending on topics not covered in this section. z "Cannot Install the Printer Driver or an Application Program" on page 63 z "Cannot Connect to PC Properly" on page 64 z "Print Results Not Satisfactory or Contains Errors" on page 65 z "...
The message may vary depending on topics not covered in this section. z "Cannot Install the Printer Driver or an Application Program" on page 63 z "Cannot Connect to PC Properly" on page 64 z "Print Results Not Satisfactory or Contains Errors" on page 65 z "...
Quick Start Guide
Page 67
... the on your printer for more information. Contact the Customer Care Center. Carefully follow the procedures described in the Easy Setup Instructions and reinstall the driver. Click Start and select My Computer. 2. For non-Windows XP, open the My Computer window, and then double-click the CD-ROM icon.... may be installed. 63 Click Exit on the Installation Failure screen. 3. Remove the CD-ROM from the Go menu, and double-click the Canon Utilities folder, the Easy-PhotoPrint Pro folder and then the Plug-In Installer icon. 2. Click Start, and select All Programs (or Programs...
... the on your printer for more information. Contact the Customer Care Center. Carefully follow the procedures described in the Easy Setup Instructions and reinstall the driver. Click Start and select My Computer. 2. For non-Windows XP, open the My Computer window, and then double-click the CD-ROM icon.... may be installed. 63 Click Exit on the Installation Failure screen. 3. Remove the CD-ROM from the Go menu, and double-click the Canon Utilities folder, the Easy-PhotoPrint Pro folder and then the Plug-In Installer icon. 2. Click Start, and select All Programs (or Programs...
Quick Start Guide
Page 68
...compatible with USB 2.0. Be sure to use a certified USB 2.0 Hi-Speed cable. Obtain the latest version of the USB 2.0 Hi-Speed driver and install it on checking the above, contact the maker of the OS update program and install it on page 64. 64 You are recommended... to use the cable no longer than 3 meters. Try This If your PC environment supports USB 2.0 HiSpeed connection. z The USB 2.0 Hi-Speed driver operates properly. z Your PC supports the USB 2.0 Hi-Speed connection. Check the following to ensure that your environment is not fully compatible with USB ...
...compatible with USB 2.0. Be sure to use a certified USB 2.0 Hi-Speed cable. Obtain the latest version of the USB 2.0 Hi-Speed driver and install it on checking the above, contact the maker of the OS update program and install it on page 64. 64 You are recommended... to use the cable no longer than 3 meters. Try This If your PC environment supports USB 2.0 HiSpeed connection. z The USB 2.0 Hi-Speed driver operates properly. z Your PC supports the USB 2.0 Hi-Speed connection. Check the following to ensure that your environment is not fully compatible with USB ...


