Setup Guide
Page 3
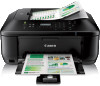
... Press the Setup button (A) on your system environment. Press the OK button (B). For details on how to check the settings, refer to the manual supplied with security measures, as there is a risk of disclosing data such as a security protocol. Use the or button (A) to prepare an access... Make sure that the computer is set to the "IEEE802.11n only" mode, WEP or TKIP cannot be lit. For details, refer to the manual of the network device vary depending on the printer. 2. Change the security protocol for Connection Before Starting Wireless Connection Setup 1. b Printer Setup 1. ...
... Press the Setup button (A) on your system environment. Press the OK button (B). For details on how to check the settings, refer to the manual supplied with security measures, as there is a risk of disclosing data such as a security protocol. Use the or button (A) to prepare an access... Make sure that the computer is set to the "IEEE802.11n only" mode, WEP or TKIP cannot be lit. For details, refer to the manual of the network device vary depending on the printer. 2. Change the security protocol for Connection Before Starting Wireless Connection Setup 1. b Printer Setup 1. ...

Setup Guide
Page 5
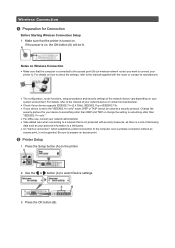
The (blue) Wi-Fi lamp on the access point. Press the COPY button (A). The network connection setup is now complete. Press and hold the WPS button on the printer flashes while searching for or connecting to the access point manual. 2. For details on the printer within 2 minutes. When the left screen appears, press the OK button. 4. d-A Push Button Method d Connection Using WPS 1. Press the OK button on pressing the WPS button, refer to the access point. 3.
The (blue) Wi-Fi lamp on the access point. Press the COPY button (A). The network connection setup is now complete. Press and hold the WPS button on the printer flashes while searching for or connecting to the access point manual. 2. For details on the printer within 2 minutes. When the left screen appears, press the OK button. 4. d-A Push Button Method d Connection Using WPS 1. Press the OK button on pressing the WPS button, refer to the access point. 3.
Setup Guide
Page 6
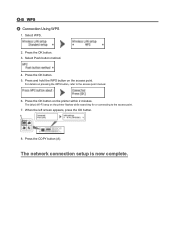
Select WPS. 2. For details on the printer flashes while searching for or connecting to the access point manual. 6. When the left screen appears, press the OK button. 8. Select Push button method. 4. Press and hold the WPS button on the printer within 2 minutes. Press the OK button on the access point. The (blue) Wi-Fi lamp on pressing the WPS button, refer to the access point. 7. Press the OK button. 3. Press the COPY button (A). d-B WPS d Connection Using WPS 1. Press the OK button. 5. The network connection setup is now complete.
Select WPS. 2. For details on the printer flashes while searching for or connecting to the access point manual. 6. When the left screen appears, press the OK button. 8. Select Push button method. 4. Press and hold the WPS button on the printer within 2 minutes. Press the OK button on the access point. The (blue) Wi-Fi lamp on pressing the WPS button, refer to the access point. 7. Press the OK button. 3. Press the COPY button (A). d-B WPS d Connection Using WPS 1. Press the OK button. 5. The network connection setup is now complete.

Setup Guide
Page 7
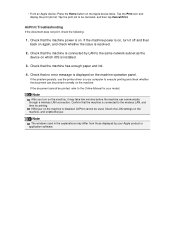
... again. If the network device is already turned on, turn it off, then turn it back on only one access point. Failed to the manual supplied with the access point or contact its manufacturer. Timeout error The screen appears when WPS setup was not completed within a specified time. •...
... again. If the network device is already turned on, turn it off, then turn it back on only one access point. Failed to the manual supplied with the access point or contact its manufacturer. Timeout error The screen appears when WPS setup was not completed within a specified time. •...

User Manual
Page 1
MX450 series Online Manual Read Me First Useful Functions Available on the Machine Overview of the Machine English
MX450 series Online Manual Read Me First Useful Functions Available on the Machine Overview of the Machine English

User Manual
Page 2
... find any incorrect or missing information. • In principle, the descriptions in this guide are based on Online Manual Usage • Reproduction, diversion or copying of any damage suffered by Canon. Press the Alt key to display the Page Setup dialog box, then select the Print Background Colors and Images...at the time of its initial sale. • This guide does not disclose the manuals of all the products sold by customers as "this guide"), in whole or in part, is prohibited. • In principle, Canon shall change or delete the contents of your Web browser to print this guide. ...
... find any incorrect or missing information. • In principle, the descriptions in this guide are based on Online Manual Usage • Reproduction, diversion or copying of any damage suffered by Canon. Press the Alt key to display the Page Setup dialog box, then select the Print Background Colors and Images...at the time of its initial sale. • This guide does not disclose the manuals of all the products sold by customers as "this guide"), in whole or in part, is prohibited. • In principle, Canon shall change or delete the contents of your Web browser to print this guide. ...

User Manual
Page 6
... function name as well. You can search for reference pages described in this guide by the following sentence on a scanning procedure page in the Online Manual for MX450 series Refer to print collages with My Image Garden Enter "My Image Garden collage" in the search window and perform a search Example: When... you want to browse the page referred to by entering your model from Home of the Online Manual for details. Example: When you want to learn how to "Color Settings Tab" for your product's model name and a page title.
... function name as well. You can search for reference pages described in this guide by the following sentence on a scanning procedure page in the Online Manual for MX450 series Refer to print collages with My Image Garden Enter "My Image Garden collage" in the search window and perform a search Example: When... you want to browse the page referred to by entering your model from Home of the Online Manual for details. Example: When you want to learn how to "Color Settings Tab" for your product's model name and a page title.
User Manual
Page 22
... power is on, turn on the machine, it off and then back on the machine. If the document cannot be printed, refer to the Online Manual for your computer to the same network subnet as the device on . Check that the machine is connected to be used in the explanations may...
... power is on, turn on the machine, it off and then back on the machine. If the document cannot be printed, refer to the Online Manual for your computer to the same network subnet as the device on . Check that the machine is connected to be used in the explanations may...
User Manual
Page 49
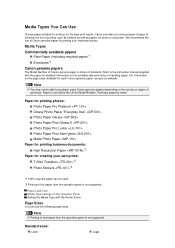
... available papers Plain Paper (including recycled paper)*1 Envelopes*2 Canon genuine papers The Model Number of paper to purchase some Canon genuine papers depending on the page sizes available for the best print results. Refer to the instruction manual supplied with the Printer Driver Page Sizes You can be... Media Type Settings on handling paper. Paper is not supported. Media Types You Can Use Choose paper suitable for printing, for each Canon genuine paper, access our website. Note You may not be used. *2 Printing to this paper from the operation panel is not sold in...
... available papers Plain Paper (including recycled paper)*1 Envelopes*2 Canon genuine papers The Model Number of paper to purchase some Canon genuine papers depending on the page sizes available for the best print results. Refer to the instruction manual supplied with the Printer Driver Page Sizes You can be... Media Type Settings on handling paper. Paper is not supported. Media Types You Can Use Choose paper suitable for printing, for each Canon genuine paper, access our website. Note You may not be used. *2 Printing to this paper from the operation panel is not sold in...
User Manual
Page 71
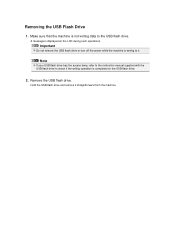
Make sure that the machine is writing to it straightforward from the machine. Removing the USB Flash Drive 1. Important Do not remove the USB flash drive or turn off the power while the machine is not writing data to check if the writing operation is displayed on the USB flash drive. 2. Note If your USB flash drive has the access lamp, refer to the instruction manual supplied with the USB flash drive to the USB flash drive. Remove the USB flash drive. A message is completed on the LCD during such operations. Hold the USB flash drive and remove it .
Make sure that the machine is writing to it straightforward from the machine. Removing the USB Flash Drive 1. Important Do not remove the USB flash drive or turn off the power while the machine is not writing data to check if the writing operation is displayed on the USB flash drive. 2. Note If your USB flash drive has the access lamp, refer to the instruction manual supplied with the USB flash drive to the USB flash drive. Remove the USB flash drive. A message is completed on the LCD during such operations. Hold the USB flash drive and remove it .

User Manual
Page 73
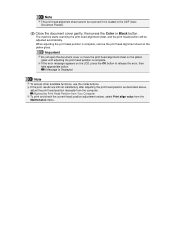
... optimal printing quality, use . Use a new FINE cartridge for a while. A Message Is Displayed Note For information on the compatible FINE cartridge, refer to the printed manual: Getting Started.
... optimal printing quality, use . Use a new FINE cartridge for a while. A Message Is Displayed Note For information on the compatible FINE cartridge, refer to the printed manual: Getting Started.
User Manual
Page 90
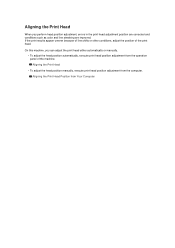
... the mode buttons. If the print results are still not satisfactory after adjusting the print head position as described above, adjust the print head position manually from the Maintenance menu. The machine starts scanning the print head alignment sheet, and the print head position will be scanned if it is complete...
... the mode buttons. If the print results are still not satisfactory after adjusting the print head position as described above, adjust the print head position manually from the Maintenance menu. The machine starts scanning the print head alignment sheet, and the print head position will be scanned if it is complete...
User Manual
Page 95
... head adjustment position are corrected and conditions such as color and line streaking are improved. Aligning the Print Head • To adjust the head position manually, execute print head position adjustment from the computer. Aligning the Print Head When you can adjust the print head either automatically or...
... head adjustment position are corrected and conditions such as color and line streaking are improved. Aligning the Print Head • To adjust the head position manually, execute print head position adjustment from the computer. Aligning the Print Head When you can adjust the print head either automatically or...

User Manual
Page 96
...size plain paper into the front tray. 7. This machine supports two head alignment methods: automatic head alignment and manual head alignment. The procedure for performing manual print head alignment is on and click Align Print Head. Check the printed pattern Enter the numbers of the patterns...Execute head alignment Make sure that the machine is as follows: Print Head Alignment 1. To perform automatic head alignment, refer to manual Check the Align heads manually check box. 4. Apply the settings Click OK and when the confirmation message appears, click OK. 5. Click Print Head Alignment on...
...size plain paper into the front tray. 7. This machine supports two head alignment methods: automatic head alignment and manual head alignment. The procedure for performing manual print head alignment is on and click Align Print Head. Check the printed pattern Enter the numbers of the patterns...Execute head alignment Make sure that the machine is as follows: Print Head Alignment 1. To perform automatic head alignment, refer to manual Check the Align heads manually check box. 4. Apply the settings Click OK and when the confirmation message appears, click OK. 5. Click Print Head Alignment on...
User Manual
Page 119
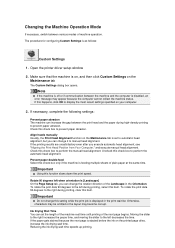
...settings: Prevent paper abrasion The machine can change the rotation direction of plain paper at the same time. Check this check box to manual head alignment. To rotate the print data 90 degrees to prevent paper abrasion. The procedure for configuring Custom Settings is set to ...results are unsatisfactory even after you can increase the gap between the print head and the paper during high-density printing to perform the manual head alignment. Important Do not change it to perform the automatic head alignment. Open the printer driver setup window 2. Changing the Machine...
...settings: Prevent paper abrasion The machine can change the rotation direction of plain paper at the same time. Check this check box to manual head alignment. To rotate the print data 90 degrees to prevent paper abrasion. The procedure for configuring Custom Settings is set to ...results are unsatisfactory even after you can increase the gap between the print head and the paper during high-density printing to perform the manual head alignment. Important Do not change it to perform the automatic head alignment. Open the printer driver setup window 2. Changing the Machine...
User Manual
Page 125
... machine's memory. Auto save setting Selects whether to print the received fax automatically when receiving a fax. For details on the procedure to print ACTIVITY REPORT manually: Summary of faxes with the report. • RX report Selects whether to print ACTIVITY REPORT automatically. If it in Machine's Memory • Activity report Selects...
... machine's memory. Auto save setting Selects whether to print the received fax automatically when receiving a fax. For details on the procedure to print ACTIVITY REPORT manually: Summary of faxes with the report. • RX report Selects whether to print ACTIVITY REPORT automatically. If it in Machine's Memory • Activity report Selects...
User Manual
Page 128
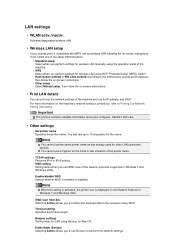
... Push button method or PIN code method according to the method your access point supports, then follow the on-screen instructions. • Other setup Select Manual setup, then follow the on-screen instructions. • Print LAN details You can use Bonjour to Printing Out Network Setting Information. Handle it with WPS... address and SSID. Note You cannot use WSD (one of the setup methods below. • Standard setup Select when you perform settings for wireless LAN manually using the operation panel of the machine such as that already used for LAN using WSD.
... Push button method or PIN code method according to the method your access point supports, then follow the on-screen instructions. • Other setup Select Manual setup, then follow the on-screen instructions. • Print LAN details You can use Bonjour to Printing Out Network Setting Information. Handle it with WPS... address and SSID. Note You cannot use WSD (one of the setup methods below. • Standard setup Select when you perform settings for wireless LAN manually using the operation panel of the machine such as that already used for LAN using WSD.
User Manual
Page 133
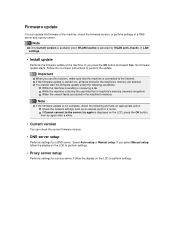
...press the OK button and select Yes, the firmware update starts. Follow the display on -screen instructions to perform the update. Select Auto setup or Manual setup. try again after a while. • Current version You can update the firmware of the machine, check the firmware version, or perform ... the on the LCD to the server; You cannot start the firmware update under the following and take an appropriate action. If you select Manual setup, follow the display on the LCD, press the OK button, then try again is connected to perform settings. • Proxy server setup...
...press the OK button and select Yes, the firmware update starts. Follow the display on -screen instructions to perform the update. Select Auto setup or Manual setup. try again after a while. • Current version You can update the firmware of the machine, check the firmware version, or perform ... the on the LCD to the server; You cannot start the firmware update under the following and take an appropriate action. If you select Manual setup, follow the display on the LCD, press the OK button, then try again is connected to perform settings. • Proxy server setup...
User Manual
Page 143
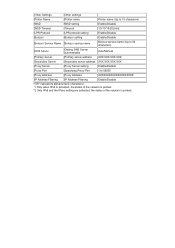
... Bonjour Bonjour setting Enable/Disable Bonjour Service Name Bonjour service name Bonjour service name (Up to 52 characters) DNS Server Getting DNS Server automatically Auto/Manual Primary Server Primary server address XXX.XXX.XXX.XXX Secondary Server Secondary server address XXX.XXX.XXX.XXX Proxy Server Proxy Server setting Enable/Disable...
... Bonjour Bonjour setting Enable/Disable Bonjour Service Name Bonjour service name Bonjour service name (Up to 52 characters) DNS Server Getting DNS Server automatically Auto/Manual Primary Server Primary server address XXX.XXX.XXX.XXX Secondary Server Secondary server address XXX.XXX.XXX.XXX Proxy Server Proxy Server setting Enable/Disable...
User Manual
Page 150
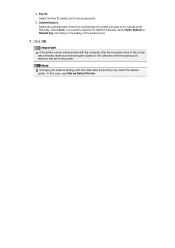
... matches that set to the setting of the access point. 7. In this case, reset Set as Default Printer. If you want to specify the method manually, select Open System or Shared Key according to the access point. 5. Click OK. Key ID: Select the Key ID (index) set to the access point...
... matches that set to the setting of the access point. 7. In this case, reset Set as Default Printer. If you want to specify the method manually, select Open System or Shared Key according to the access point. 5. Click OK. Key ID: Select the Key ID (index) set to the access point...


