User Manual
Page 22
... on the machine, and enable Bonjour. Check that the machine is connected by your Apple product or application software. If the problem persists, use the printer driver on the machine is resolved. 2. If Bonjour on your model. Note The windows used . Tap the print job to the wireless LAN, and then try...
... on the machine, and enable Bonjour. Check that the machine is connected by your Apple product or application software. If the problem persists, use the printer driver on the machine is resolved. 2. If Bonjour on your model. Note The windows used . Tap the print job to the wireless LAN, and then try...
User Manual
Page 45
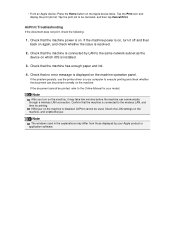
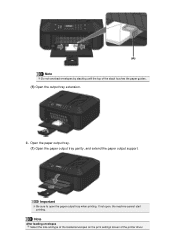
Important Be sure to open , the machine cannot start printing. Note After loading paper Select the size and type of the loaded paper on the print settings screen of the operation panel or printer driver. (5) Open the output tray extension. 3. Open the paper output tray. (1) Open the paper output tray gently, and extend the paper output support. If not open the paper output tray when printing.
Important Be sure to open , the machine cannot start printing. Note After loading paper Select the size and type of the loaded paper on the print settings screen of the operation panel or printer driver. (5) Open the output tray extension. 3. Open the paper output tray. (1) Open the paper output tray gently, and extend the paper output support. If not open the paper output tray when printing.
User Manual
Page 46
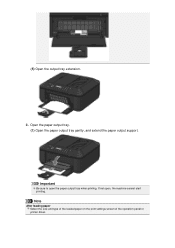
... supported. They could jam in the opposite direction. Important The envelopes may jam in the inserting direction flat and sharpen the crease. Envelopes with the printer driver properly. Envelopes whose gummed flaps are not aligned. The figures above show a side view of the leading edge of the envelopes to press the leading...
... supported. They could jam in the opposite direction. Important The envelopes may jam in the inserting direction flat and sharpen the crease. Envelopes with the printer driver properly. Envelopes whose gummed flaps are not aligned. The figures above show a side view of the leading edge of the envelopes to press the leading...
User Manual
Page 48
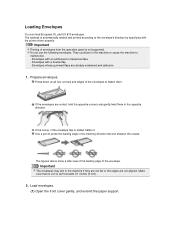
Important Be sure to open , the machine cannot start printing. If not open the paper output tray when printing. Open the paper output tray. (1) Open the paper output tray gently, and extend the paper output support. Note After loading envelopes Select the size and type of the loaded envelopes on the print settings screen of the stack touches the paper guides. (5) Open the output tray extension. 3. Note Do not overload envelopes by stacking until the top of the printer driver.
Important Be sure to open , the machine cannot start printing. If not open the paper output tray when printing. Open the paper output tray. (1) Open the paper output tray gently, and extend the paper output support. Note After loading envelopes Select the size and type of the loaded envelopes on the print settings screen of the stack touches the paper guides. (5) Open the output tray extension. 3. Note Do not overload envelopes by stacking until the top of the printer driver.
User Manual
Page 49
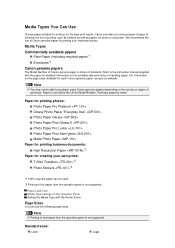
...Refer to enhance the fun of envelopes from the operation panel is not sold in brackets. Canon provides you various types of paper to the instruction manual supplied with the Printer Driver Page Sizes You can be able to this paper from the operation panel is shown in the... US by name. Media Types Commercially available papers Plain Paper (including recycled paper)*1 Envelopes*2 Canon genuine papers The Model Number of Canon genuine paper is not ...
...Refer to enhance the fun of envelopes from the operation panel is not sold in brackets. Canon provides you various types of paper to the instruction manual supplied with the Printer Driver Page Sizes You can be able to this paper from the operation panel is shown in the... US by name. Media Types Commercially available papers Plain Paper (including recycled paper)*1 Envelopes*2 Canon genuine papers The Model Number of Canon genuine paper is not ...
User Manual
Page 82
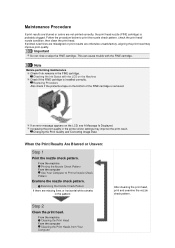
.... Examining the Nozzle Check Pattern If there are otherwise unsatisfactory, aligning the print head may improve the print result. Increasing the print quality in the printer driver settings may improve print quality. Step 2 Clean the print head. If an error message appears on the bottom of the FINE cartridge is probably clogged...
.... Examining the Nozzle Check Pattern If there are otherwise unsatisfactory, aligning the print head may improve the print result. Increasing the print quality in the printer driver settings may improve print quality. Step 2 Clean the print head. If an error message appears on the bottom of the FINE cartridge is probably clogged...

User Manual
Page 92
The procedure for cleaning the print head is enough ink. Important Cleaning consumes a small amount of ink. Open the printer driver setup window 2. Execute deep cleaning Make sure that the machine is to check before performing cleaning. 3. Check the results To check ... you need to be performed. To cancel the check process, click Cancel. Cleaning the print head frequently will rapidly deplete your printer's ink supply. Open the printer driver setup window 2. Execute cleaning Make sure that the machine is on and then click Execute. Perform deep cleaning when two Cleaning ...
The procedure for cleaning the print head is enough ink. Important Cleaning consumes a small amount of ink. Open the printer driver setup window 2. Execute deep cleaning Make sure that the machine is to check before performing cleaning. 3. Check the results To check ... you need to be performed. To cancel the check process, click Cancel. Cleaning the print head frequently will rapidly deplete your printer's ink supply. Open the printer driver setup window 2. Execute cleaning Make sure that the machine is on and then click Execute. Perform deep cleaning when two Cleaning ...

User Manual
Page 94
... Cleaning on and then click OK. The procedure for performing the feed roller cleaning is not fed properly. Paper feed roller cleaning starts. 5. Open the printer driver setup window 3. Execute paper feed roller cleaning Make sure that the machine is on the Maintenance tab The confirmation message appears. 4. Complete paper feed roller...
... Cleaning on and then click OK. The procedure for performing the feed roller cleaning is not fed properly. Paper feed roller cleaning starts. 5. Open the printer driver setup window 3. Execute paper feed roller cleaning Make sure that the machine is on the Maintenance tab The confirmation message appears. 4. Complete paper feed roller...

User Manual
Page 96
... heads manually check box. 4. The procedure for performing manual print head alignment is on the Maintenance tab The Custom Settings dialog box opens. 3. Open the printer driver setup window 2. Switch head alignment to "Aligning the Print Head" and then execute the function from Your Computer Print head alignment corrects the installation positions...
... heads manually check box. 4. The procedure for performing manual print head alignment is on the Maintenance tab The Custom Settings dialog box opens. 3. Open the printer driver setup window 2. Switch head alignment to "Aligning the Print Head" and then execute the function from Your Computer Print head alignment corrects the installation positions...

User Manual
Page 100
... the print result is smudged or if there are any unprinted sections, click Cleaning to print. Click OK when the confirmation message appears. Open the printer driver setup window 2. Click Initial Check Items to display the items that the machine is as follows: Nozzle Check 1. Printing of A4 size or Letter size...
... the print result is smudged or if there are any unprinted sections, click Cleaning to print. Click OK when the confirmation message appears. Open the printer driver setup window 2. Click Initial Check Items to display the items that the machine is as follows: Nozzle Check 1. Printing of A4 size or Letter size...
User Manual
Page 101
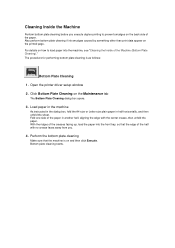
For details on how to prevent smudges on and then click Execute. Open the printer driver setup window 2. Perform the bottom plate cleaning Make sure that the edge of the Machine (Bottom Plate Cleaning)." Load paper in the machine As instructed ...
For details on how to prevent smudges on and then click Execute. Open the printer driver setup window 2. Perform the bottom plate cleaning Make sure that the edge of the Machine (Bottom Plate Cleaning)." Load paper in the machine As instructed ...

User Manual
Page 113
... option if you are different. 3. on the Page Setup tab The Print Options dialog box opens. Note When you use the XPS printer driver, the functions available to you encounter print failures such as follows: 1. The procedure for print data that is sent from an application ..., and then click OK. Click Print Options... Change the individual settings If necessary, change the detailed print driver settings for changing the print options is displayed again. Open the printer driver setup window 2. Changing the Print Options You can change the setting of an image data being cut off...
... option if you are different. 3. on the Page Setup tab The Print Options dialog box opens. Note When you use the XPS printer driver, the functions available to you encounter print failures such as follows: 1. The procedure for print data that is sent from an application ..., and then click OK. Click Print Options... Change the individual settings If necessary, change the detailed print driver settings for changing the print options is displayed again. Open the printer driver setup window 2. Changing the Print Options You can change the setting of an image data being cut off...

User Manual
Page 114
... Commonly Used Settings on the Main and Page Setup tabs. 3. Click Save... If necessary, click Options..., set the items, and then click OK. Open the printer driver setup window 2. Set the necessary items From Commonly Used Settings on the Quick Setup tab, select the printing profile to the Quick Setup tab. The...
... Commonly Used Settings on the Main and Page Setup tabs. 3. Click Save... If necessary, click Options..., set the items, and then click OK. Open the printer driver setup window 2. Set the necessary items From Commonly Used Settings on the Quick Setup tab, select the printing profile to the Quick Setup tab. The...
User Manual
Page 115
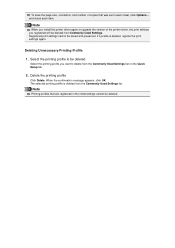
... 1. The selected printing profile is deleted, register the print settings again. To save the page size, orientation, and number of the printer driver, the print settings you registered will be saved and preserved. Select the printing profile to delete from the Commonly Used Settings list on... Used Settings. Note Printing profiles that was set in the initial settings cannot be deleted Select the printing profile you install the printer driver again or upgrade the version of copies that are registered in each sheet, click Options..., and check each item. When the confirmation...
... 1. The selected printing profile is deleted, register the print settings again. To save the page size, orientation, and number of the printer driver, the print settings you registered will be saved and preserved. Select the printing profile to delete from the Commonly Used Settings list on... Used Settings. Note Printing profiles that was set in the initial settings cannot be deleted Select the printing profile you install the printer driver again or upgrade the version of copies that are registered in each sheet, click Options..., and check each item. When the confirmation...
User Manual
Page 116
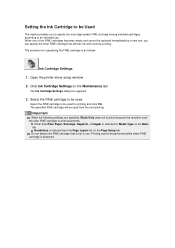
... click OK. Other than Plain Paper, Envelope, Hagaki A, or Hagaki is selected for specifying the FINE cartridge is as follows: Ink Cartridge Settings 1. Open the printer driver setup window 2. The procedure for Media Type on the Main tab Borderless is selected from the next printing. When one of the FINE cartridges becomes...
... click OK. Other than Plain Paper, Envelope, Hagaki A, or Hagaki is selected for specifying the FINE cartridge is as follows: Ink Cartridge Settings 1. Open the printer driver setup window 2. The procedure for Media Type on the Main tab Borderless is selected from the next printing. When one of the FINE cartridges becomes...
User Manual
Page 117
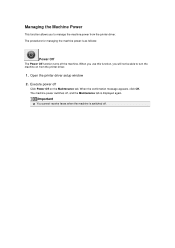
Open the printer driver setup window 2. The machine power switches off, and the Maintenance tab is switched off. When the confirmation message appears, click OK. When you use this ... again. Execute power off the machine. Managing the Machine Power This function allows you will not be able to manage the machine power from the printer driver. 1. The procedure for managing the machine power is as follows: Power Off The Power Off function turns off Click Power Off on from the...
Open the printer driver setup window 2. The machine power switches off, and the Maintenance tab is switched off. When the confirmation message appears, click OK. When you use this ... again. Execute power off the machine. Managing the Machine Power This function allows you will not be able to manage the machine power from the printer driver. 1. The procedure for managing the machine power is as follows: Power Off The Power Off function turns off Click Power Off on from the...

User Manual
Page 118
Reducing the Machine Noise The silent function allows you to reduce the operating noise of normal operating noise. Open the printer driver setup window 2. Set the quiet mode If necessary, specify one of the following items: Do not use quiet mode Select this option when ... 3. Click Quiet Settings on and click OK. Use quiet mode during a specified period of the machine, the printer driver, or ScanGear (scanner driver). Important You can set to reduce the operating noise of the printer at night, etc. The settings are set the quiet mode from the computer. 4. Select when you wish to...
Reducing the Machine Noise The silent function allows you to reduce the operating noise of normal operating noise. Open the printer driver setup window 2. Set the quiet mode If necessary, specify one of the following items: Do not use quiet mode Select this option when ... 3. Click Quiet Settings on and click OK. Use quiet mode during a specified period of the machine, the printer driver, or ScanGear (scanner driver). Important You can set to reduce the operating noise of the printer at night, etc. The settings are set the quiet mode from the computer. 4. Select when you wish to...
User Manual
Page 119
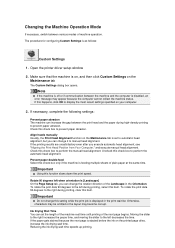
... specified on the Maintenance tab is displayed in the Orientation. Ink Drying Wait Time You can change the rotation direction of machine operation. Open the printer driver setup window 2. Important Using this check box only if the machine is as follows: Custom Settings 1.
... specified on the Maintenance tab is displayed in the Orientation. Ink Drying Wait Time You can change the rotation direction of machine operation. Open the printer driver setup window 2. Important Using this check box only if the machine is as follows: Custom Settings 1.

User Manual
Page 135
... to set the quiet mode from the operation panel of the machine or printing and scanning from the operation panel of the machine, the printer driver, or ScanGear (scanner driver). Activate this function on the machine if you can set the quiet mode, the mode is applied when you use the Numeric buttons...
... to set the quiet mode from the operation panel of the machine or printing and scanning from the operation panel of the machine, the printer driver, or ScanGear (scanner driver). Activate this function on the machine if you can set the quiet mode, the mode is applied when you use the Numeric buttons...
User Manual
Page 161
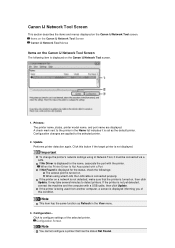
... button if the target printer is not displayed. When the Printer Driver Is Not Associated with a Port If Not Found is displayed on the Canon IJ Network Tool screen. Click to the printer in the Name list indicates it must be connected via a LAN. Items on the Canon IJ Network Tool Screen Canon IJ Network Tool Menus...
... button if the target printer is not displayed. When the Printer Driver Is Not Associated with a Port If Not Found is displayed on the Canon IJ Network Tool screen. Click to the printer in the Name list indicates it must be connected via a LAN. Items on the Canon IJ Network Tool Screen Canon IJ Network Tool Menus...


