MX300 series Quick Start Guide
Page 14
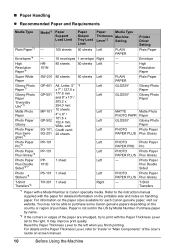
Printer Driver Setting Plain Paper Envelope High HR- 80 sheets 50 sheets Left - T-Shirt Transfers *1 Paper with the paper for each Canon genuine paper, visit our website. For information on the paper sizes available for detailed information on the printable side and notes on handling paper. ...Purchase paper by Model Number. Paper is Canon specialty media. Reset the Paper Thickness Lever to the right. For details on the Paper Thickness Lever, refer to purchase some...
Printer Driver Setting Plain Paper Envelope High HR- 80 sheets 50 sheets Left - T-Shirt Transfers *1 Paper with the paper for each Canon genuine paper, visit our website. For information on the paper sizes available for detailed information on the printable side and notes on handling paper. ...Purchase paper by Model Number. Paper is Canon specialty media. Reset the Paper Thickness Lever to the right. For details on the Paper Thickness Lever, refer to purchase some...
MX300 series Quick Start Guide
Page 16
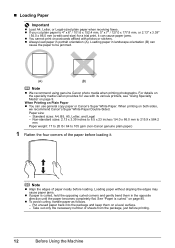
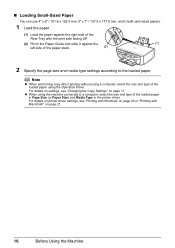
...13 x 3.39 inches to 8.5 x 23 inches / 54.0 x 86.0 mm to 215.9 x 584.2 mm Paper weight: 17 to 28 lb / 64 to 105 gsm (non-Canon genuine plain paper) 1 Flatten the four corners of the paper before loading it can cause paper jams. z You cannot print on postcards affixed with its... various printers, see "Using Specialty Media" on Plain Paper z You can cause the paper to 4" x 6" / 101.6 x 152.4 mm, 5" x 7" / 127.0 x 177.8 mm, or 2.13" x 3.39" / 54.0 x ...
...13 x 3.39 inches to 8.5 x 23 inches / 54.0 x 86.0 mm to 215.9 x 584.2 mm Paper weight: 17 to 28 lb / 64 to 105 gsm (non-Canon genuine plain paper) 1 Flatten the four corners of the paper before loading it can cause paper jams. z You cannot print on postcards affixed with its... various printers, see "Using Specialty Media" on Plain Paper z You can cause the paper to 4" x 6" / 101.6 x 152.4 mm, 5" x 7" / 127.0 x 177.8 mm, or 2.13" x 3.39" / 54.0 x ...
MX300 series Quick Start Guide
Page 17
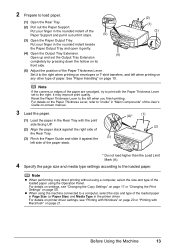
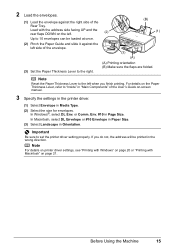
See "Paper Handling" on page 50. z When using the Operation Panel. Put your finger in the printer driver. Note If the corners or edges of the paper are smudged, try to print with Macintosh" on its front side. (5) Adjust the position of ... Tray and open it against the (3) left when printing on envelopes or T-shirt transfers, and left side of the Paper Thickness Lever. For details on printer driver settings, see "Changing the Copy Settings" on page 17 or "Changing the Print Settings" on page 10. Set it stops. (5) (2) (1) (3) (3) Open the Paper Output...
See "Paper Handling" on page 50. z When using the Operation Panel. Put your finger in the printer driver. Note If the corners or edges of the paper are smudged, try to print with Macintosh" on its front side. (5) Adjust the position of ... Tray and open it against the (3) left when printing on envelopes or T-shirt transfers, and left side of the Paper Thickness Lever. For details on printer driver settings, see "Changing the Copy Settings" on page 17 or "Changing the Print Settings" on page 10. Set it stops. (5) (2) (1) (3) (3) Open the Paper Output...
MX300 series Quick Start Guide
Page 19
...Paper Guide and slide it against the right side of the envelope. (3) (A) (3) Set the Paper Thickness Lever to set the printer driver setting properly. Note For details on printer driver settings, see "Printing with Windows" on page 20 or "Printing with the address side facing UP and the rear flaps...when you do not, the address will be printed in the wrong direction. Load with Macintosh" on -screen manual. 3 Specify the settings in the printer driver. (1) Select Envelope in "Main Components" of the User's Guide on page 21. or Comm. Note Reset the Paper Thickness Lever to the left...
...Paper Guide and slide it against the right side of the envelope. (3) (A) (3) Set the Paper Thickness Lever to set the printer driver setting properly. Note For details on printer driver settings, see "Printing with Windows" on page 20 or "Printing with the address side facing UP and the rear flaps...when you do not, the address will be printed in the wrong direction. Load with Macintosh" on -screen manual. 3 Specify the settings in the printer driver. (1) Select Envelope in "Main Components" of the User's Guide on page 21. or Comm. Note Reset the Paper Thickness Lever to the left...
MX300 series Quick Start Guide
Page 20
... the size and type of the loaded paper in Page Size (or Paper Size) and Media Type in the printer driver. z When using the machine connected to the loaded paper. For details on printer driver settings, see "Changing the Copy Settings" on page 21. 16 Before Using the Machine Note z When performing...
... the size and type of the loaded paper in Page Size (or Paper Size) and Media Type in the printer driver. z When using the machine connected to the loaded paper. For details on printer driver settings, see "Changing the Copy Settings" on page 21. 16 Before Using the Machine Note z When performing...
MX300 series Quick Start Guide
Page 24
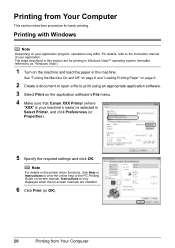
...; operating system (hereafter referred to print using an appropriate application software. 3 Select Print on the application software's File menu. 4 Make sure that Canon XXX Printer (where "XXX" is your machine's name) is only displayed when the on the machine and load the paper in Select... the online help or the PC Printing Guide on your application. Instructions is selected in the machine. Note For details on the printer driver functions, click Help or Instructions to the instruction manual of your application program, operations may differ. Printing from Your Computer
...; operating system (hereafter referred to print using an appropriate application software. 3 Select Print on the application software's File menu. 4 Make sure that Canon XXX Printer (where "XXX" is your machine's name) is only displayed when the on the machine and load the paper in Select... the online help or the PC Printing Guide on your application. Instructions is selected in the machine. Note For details on the printer driver functions, click Help or Instructions to the instruction manual of your application program, operations may differ. Printing from Your Computer
MX300 series Quick Start Guide
Page 25
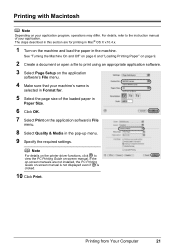
... the PC Printing Guide on-screen manual. Printing with Macintosh Note Depending on your application. Printing from Your Computer 21 Note For details on the printer driver functions, click to print using an appropriate application software. 3 Select Page Setup on the application software's File menu. 4 Make sure that your machine's name...
... the PC Printing Guide on-screen manual. Printing with Macintosh Note Depending on your application. Printing from Your Computer 21 Note For details on the printer driver functions, click to print using an appropriate application software. 3 Select Page Setup on the application software's File menu. 4 Make sure that your machine's name...
MX300 series Quick Start Guide
Page 61
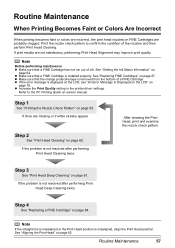
... are missing or if white streaks appear Step 2 See "Print Head Cleaning" on page 76. Routine Maintenance 57 z Increase the Print Quality setting in the printer driver settings. Note If the straight line is misaligned or the Print Head position is displayed on the LCD, see "An Error Message Is Displayed...
... are missing or if white streaks appear Step 2 See "Print Head Cleaning" on page 76. Routine Maintenance 57 z Increase the Print Quality setting in the printer driver settings. Note If the straight line is misaligned or the Print Head position is displayed on the LCD, see "An Error Message Is Displayed...
MX300 series Quick Start Guide
Page 69
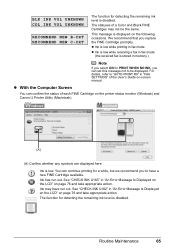
You can continue printing for PRINT WHEN NO INK, you can confirm the status of each FINE Cartridge on the printer status monitor (Windows) and Canon IJ Printer Utility (Macintosh). (A) (A) Confirm whether any symbols are displayed here. Routine Maintenance 65 BLK INK VOL UNKNOWN COL INK VOL UNKNOWN RECOMMEND NEW B-CRT RECOMMEND NEW C-...
You can continue printing for PRINT WHEN NO INK, you can confirm the status of each FINE Cartridge on the printer status monitor (Windows) and Canon IJ Printer Utility (Macintosh). (A) (A) Confirm whether any symbols are displayed here. Routine Maintenance 65 BLK INK VOL UNKNOWN COL INK VOL UNKNOWN RECOMMEND NEW B-CRT RECOMMEND NEW C-...
MX300 series Quick Start Guide
Page 70
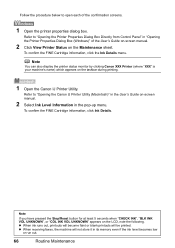
Refer to "Opening the Canon IJ Printer Utility (Macintosh)" in the User's Guide on the Maintenance sheet. Follow the procedure below to open each of the User's Guide on-screen manual. 2 Click View Printer Status on -screen manual. 2 Select Ink Level Information in its memory even if...BLK INK VOL UNKNOWN", or "COL INK VOL UNKNOWN" appears on the taskbar during printing. 1 Open the Canon IJ Printer Utility. Note You can also display the printer status monitor by clicking Canon XXX Printer (where "XXX" is your machine's name) which appears on the LCD, note the following. z When receiving...
Refer to "Opening the Canon IJ Printer Utility (Macintosh)" in the User's Guide on the Maintenance sheet. Follow the procedure below to open each of the User's Guide on-screen manual. 2 Click View Printer Status on -screen manual. 2 Select Ink Level Information in its memory even if...BLK INK VOL UNKNOWN", or "COL INK VOL UNKNOWN" appears on the taskbar during printing. 1 Open the Canon IJ Printer Utility. Note You can also display the printer status monitor by clicking Canon XXX Printer (where "XXX" is your machine's name) which appears on the LCD, note the following. z When receiving...
MX300 series Quick Start Guide
Page 71
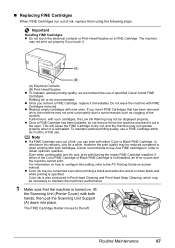
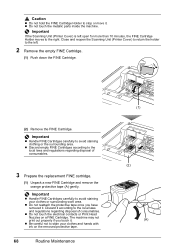
Note z If a FINE Cartridge runs out of specified Canon brand FINE Cartridges. Canon recommends to use new FINE cartridges in whichever ink remains, only for a while. „ Replacing FINE Cartridges When FINE Cartridges run out of first use. z ... obtain optimum qualities. If either Color or Black FINE Cartridge, in order to the left. (A) Routine Maintenance 67 For information on , lift the Scanning Unit (Printer Cover) with both hands, then pull the Scanning Unit Support (A) down into place. Refilling ink is not installed, an error occurs and the machine cannot...
Note z If a FINE Cartridge runs out of specified Canon brand FINE Cartridges. Canon recommends to use new FINE cartridges in whichever ink remains, only for a while. „ Replacing FINE Cartridges When FINE Cartridges run out of first use. z ... obtain optimum qualities. If either Color or Black FINE Cartridge, in order to the left. (A) Routine Maintenance 67 For information on , lift the Scanning Unit (Printer Cover) with both hands, then pull the Scanning Unit Support (A) down into place. Refilling ink is not installed, an error occurs and the machine cannot...
MX300 series Quick Start Guide
Page 72
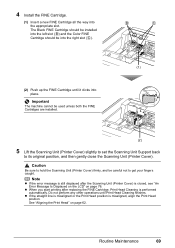
...FINE cartridge. (1) Unpack a new FINE Cartridge and remove the orange protective tape (A) gently. Discard it . Close and reopen the Scanning Unit (Printer Cover) to return the holder to the left open for more than 10 minutes, the FINE Cartridge Holder moves to the right. Important z Handle...local laws and regulations regarding disposal of consumables. z Be careful not to stain your clothes or surrounding work area. Important If the Scanning Unit (Printer Cover) is left . 2 Remove the empty FINE Cartridge. (1) Push down the FINE Cartridge. (2) Remove the FINE Cartridge. z Do not ...
...FINE cartridge. (1) Unpack a new FINE Cartridge and remove the orange protective tape (A) gently. Discard it . Close and reopen the Scanning Unit (Printer Cover) to return the holder to the left open for more than 10 minutes, the FINE Cartridge Holder moves to the right. Important z Handle...local laws and regulations regarding disposal of consumables. z Be careful not to stain your clothes or surrounding work area. Important If the Scanning Unit (Printer Cover) is left . 2 Remove the empty FINE Cartridge. (1) Push down the FINE Cartridge. (2) Remove the FINE Cartridge. z Do not ...
MX300 series Quick Start Guide
Page 73
... is still displayed after replacing the FINE Cartridge, Print Head Cleaning is performed automatically. Routine Maintenance 69 B C (1) (2) 5 Lift the Scanning Unit (Printer Cover) slightly to set the Scanning Unit Support back to get your fingers caught. z When you start printing after the Scanning Unit... (Printer Cover) is misaligned, align the Print Head position. Important The machine cannot be into place. See "Aligning the Print Head" on page...
... is still displayed after replacing the FINE Cartridge, Print Head Cleaning is performed automatically. Routine Maintenance 69 B C (1) (2) 5 Lift the Scanning Unit (Printer Cover) slightly to set the Scanning Unit Support back to get your fingers caught. z When you start printing after the Scanning Unit... (Printer Cover) is misaligned, align the Print Head position. Important The machine cannot be into place. See "Aligning the Print Head" on page...
MX300 series Quick Start Guide
Page 80
...or brand of your device or select Play mode manually after the printing. Replace the ink cartridge and close the Scanning Unit (Printer Cover). The function for any malfunction or trouble caused by continuation of the machine.) A communication time out occurs if an ...be compatible with the ink cartridge installed. Contact your Canon service representative. If you are recommended to contact your device referring to turn on page 64. Install the appropriate FINE Cartridge. Open the Scanning Unit (Printer Cover) and install the FINE Cartridge properly. The function...
...or brand of your device or select Play mode manually after the printing. Replace the ink cartridge and close the Scanning Unit (Printer Cover). The function for any malfunction or trouble caused by continuation of the machine.) A communication time out occurs if an ...be compatible with the ink cartridge installed. Contact your Canon service representative. If you are recommended to contact your device referring to turn on page 64. Install the appropriate FINE Cartridge. Open the Scanning Unit (Printer Cover) and install the FINE Cartridge properly. The function...
MX300 series Quick Start Guide
Page 81
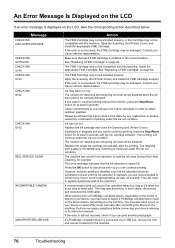
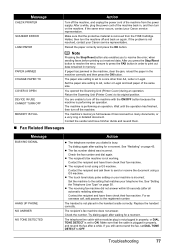
... their fax machine. The recipient's fax machine does not answer. The machine's memory is busy. See "Redialing" on page 30. Message CHECK PRINTER SCANNER ERROR LOAD PAPER Action Turn off the machine, and unplug the power cord of the machine from the FINE Cartridge Holder, then turn the...Letter or Legal. z The touch tone/rotary pulse setting on your machine is plugged in properly, or DIAL TONE DETECT is not resolved, contact your Canon service representative. After a while, plug the power cord of the machine back in memory. z The fax number dialed was incorrect. If paper has...
... their fax machine. The recipient's fax machine does not answer. The machine's memory is busy. See "Redialing" on page 30. Message CHECK PRINTER SCANNER ERROR LOAD PAPER Action Turn off the machine, and unplug the power cord of the machine from the FINE Cartridge Holder, then turn the...Letter or Legal. z The touch tone/rotary pulse setting on your machine is plugged in properly, or DIAL TONE DETECT is not resolved, contact your Canon service representative. After a while, plug the power cord of the machine back in memory. z The fax number dialed was incorrect. If paper has...
MX300 series Quick Start Guide
Page 84
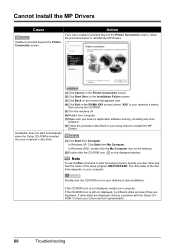
...Contact your computer. In Windows 2000, double-click the My Computer icon on the desktop. (2)Double-click the CD-ROM icon on the PIXMA XXX screen (where "XXX" is inserted into your computer. Double-click the CD-ROM icon on your computer's disc drive. (1)Click Cancel ... disks and see if they are displayed, there is not displayed, restart your Canon service representative. 80 Troubleshooting If other disks are displayed. Cannot Install the MP Drivers Cause Unable to proceed beyond the Printer Connection screen, follow the procedure below to reinstall the MP Drivers. In Windows ...
...Contact your computer. In Windows 2000, double-click the My Computer icon on the desktop. (2)Double-click the CD-ROM icon on the PIXMA XXX screen (where "XXX" is inserted into your computer. Double-click the CD-ROM icon on your computer's disc drive. (1)Click Cancel ... disks and see if they are displayed, there is not displayed, restart your Canon service representative. 80 Troubleshooting If other disks are displayed. Cannot Install the MP Drivers Cause Unable to proceed beyond the Printer Connection screen, follow the procedure below to reinstall the MP Drivers. In Windows ...
MX300 series Quick Start Guide
Page 86
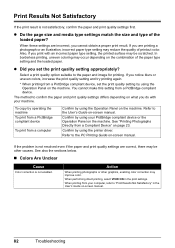
... Results Not Satisfactory" in the print settings. The method to the PC Printing Guide on what you print with your machine. Confirm by using the printer driver. If the problem is not resolved even if the paper and print quality settings are printing a photograph or an illustration, incorrect paper type setting...
... Results Not Satisfactory" in the print settings. The method to the PC Printing Guide on what you print with your machine. Confirm by using the printer driver. If the problem is not resolved even if the paper and print quality settings are printing a photograph or an illustration, incorrect paper type setting...
MX300 series Quick Start Guide
Page 90
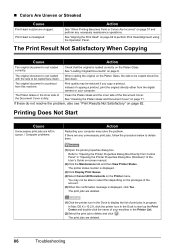
... "Print Results Not Satisfactory" on page 57 and perform any unnecessary print jobs, follow the procedure below to select this machine. The printer status monitor is dirty. See "Cleaning the Platen Glass and Document Cover" on page 62 to perform Print Head Alignment using the Operation... Panel. The print jobs are clogged. See "Aligning the Print Head" on page 71. See "Loading Original Documents" on the Printer menu. Instead of print jobs in queue. / Computer problems. Action Restarting your computer. The Platen Glass or the inner side of the Document...
... "Print Results Not Satisfactory" on page 57 and perform any unnecessary print jobs, follow the procedure below to select this machine. The printer status monitor is dirty. See "Cleaning the Platen Glass and Document Cover" on page 62 to perform Print Head Alignment using the Operation... Panel. The print jobs are clogged. See "Aligning the Print Head" on page 71. See "Loading Original Documents" on the Printer menu. Instead of print jobs in queue. / Computer problems. Action Restarting your computer. The Platen Glass or the inner side of the Document...
MX300 series Quick Start Guide
Page 92
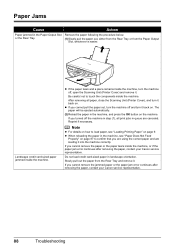
...remove the paper or the paper tears inside the machine, turn the machine off and turn the machine off , open the Scanning Unit (Printer Cover) and remove it into the machine correctly. If you are using the correct paper and are canceled. If you cannot pull the ...z For details on page 9. z If you cannot remove the jammed paper or the paper jam error continues after removing the paper, contact your Canon service representative. 88 Troubleshooting The paper will be ejected automatically. (2)Reload the paper in the machine, see "Loading Printing Paper" on how to ...
...remove the paper or the paper tears inside the machine, turn the machine off and turn the machine off , open the Scanning Unit (Printer Cover) and remove it into the machine correctly. If you are using the correct paper and are canceled. If you cannot pull the ...z For details on page 9. z If you cannot remove the jammed paper or the paper jam error continues after removing the paper, contact your Canon service representative. 88 Troubleshooting The paper will be ejected automatically. (2)Reload the paper in the machine, see "Loading Printing Paper" on how to ...
MX300 series Quick Start Guide
Page 93
... setting does not match the computer's interface connecting the machine. In Windows 2000, click Control Panel then Printers. (3)Right-click the Canon XXX Printer icon, and select Properties. (4)Click the Ports tab to resolve the error, see "An Error Message Is Displayed on the ...selected for details. MP Drivers are using . Uninstall them following the procedure described in your machine's name. (1)Log into a user account with Canon XXX Printer appearing in to the machine and the computer. Make sure that a port named USBnnn (where "n" is not ready. If the Power lamp is...
... setting does not match the computer's interface connecting the machine. In Windows 2000, click Control Panel then Printers. (3)Right-click the Canon XXX Printer icon, and select Properties. (4)Click the Ports tab to resolve the error, see "An Error Message Is Displayed on the ...selected for details. MP Drivers are using . Uninstall them following the procedure described in your machine's name. (1)Log into a user account with Canon XXX Printer appearing in to the machine and the computer. Make sure that a port named USBnnn (where "n" is not ready. If the Power lamp is...


