
User's Guide
Page 4
... WARRANTY --- (USA Only 209 Users in Canada 212 Pre-Installation Requirements for Canon Facsimile Equipment 212 Customer Technical Supports 213 Users in the U.S.A 206 Pre-Installation Requirements for MP830...206 Connection of the Equipment 206 In Case of Equipment Malfunction 207 Rights of... the Telephone Company 207 FCC Notice 207 Mercury Legislation 208 CANON U.S.A., INC. 12 Appendix 197 Printing Area 197 How to Read the On-screen Manuals.........199 Uninstalling the On-screen Manuals...
... WARRANTY --- (USA Only 209 Users in Canada 212 Pre-Installation Requirements for Canon Facsimile Equipment 212 Customer Technical Supports 213 Users in the U.S.A 206 Pre-Installation Requirements for MP830...206 Connection of the Equipment 206 In Case of Equipment Malfunction 207 Rights of... the Telephone Company 207 FCC Notice 207 Mercury Legislation 208 CANON U.S.A., INC. 12 Appendix 197 Printing Area 197 How to Read the On-screen Manuals.........199 Uninstalling the On-screen Manuals...
User's Guide
Page 5
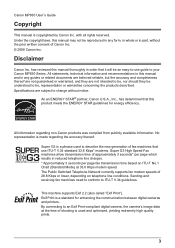
... written consent of fax machines that use guide to ITU-T V.34 guidelines. Sending and receiving fax machines need to conform to your Canon MP830 Series. Exif Print is used to an Exif Print-compliant digital camera, the camera's image data at the time of 28.8 Kbps... meets the ENERGY STAR guidelines for enhancing the communication between digital cameras and printers. No representation is copyrighted by Canon Inc. Canon MP830 User's Guide Copyright This manual is made regarding non-Canon products was compiled from publicly available information. with all rights reserved.
... written consent of fax machines that use guide to ITU-T V.34 guidelines. Sending and receiving fax machines need to conform to your Canon MP830 Series. Exif Print is used to an Exif Print-compliant digital camera, the camera's image data at the time of 28.8 Kbps... meets the ENERGY STAR guidelines for enhancing the communication between digital cameras and printers. No representation is copyrighted by Canon Inc. Canon MP830 User's Guide Copyright This manual is made regarding non-Canon products was compiled from publicly available information. with all rights reserved.

User's Guide
Page 6
...read this guide when starting to this guide for full instructions on the Setup CD-ROM. 4 User's Guide (This guide) On-screen Manuals Read this sheet first. Refer to read this guide for full instructions on printing from your machine and getting it ready for use the ...Setup Instructions (Printed documentation) Be sure to these guides as needed for instructions on setting the fax driver. Model Name K10270 (PIXMA MP830) Trademarks z "Windows" and "Internet Explorer" are trademarks of Sony Corporation. z "Macintosh" and "Mac" are trademarks of Infineon Technologies AG.
...read this guide when starting to this guide for full instructions on the Setup CD-ROM. 4 User's Guide (This guide) On-screen Manuals Read this sheet first. Refer to read this guide for full instructions on printing from your machine and getting it ready for use the ...Setup Instructions (Printed documentation) Be sure to these guides as needed for instructions on setting the fax driver. Model Name K10270 (PIXMA MP830) Trademarks z "Windows" and "Internet Explorer" are trademarks of Sony Corporation. z "Macintosh" and "Mac" are trademarks of Infineon Technologies AG.
User's Guide
Page 52
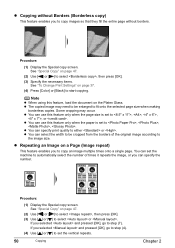
z The copied image may occur. Some cropping may need to be cropped from the borders of times it repeats the image, or you to copy an image multiple times onto a single page. z You can specify the number. Procedure: (1) Display the Special copy screen. If you selected and pressed [OK], go to step (7). z You can set to , , , . You can use this feature only when the paper is set the vertical repeats. 50 Copying Chapter 2 If you to copy images so that they fill the entire page without borders. See "Special Copy" on page 37. (4) Press [Color] or [Black] to ...
z The copied image may occur. Some cropping may need to be cropped from the borders of times it repeats the image, or you to copy an image multiple times onto a single page. z You can specify the number. Procedure: (1) Display the Special copy screen. If you selected and pressed [OK], go to step (7). z You can set to , , , . You can use this feature only when the paper is set the vertical repeats. 50 Copying Chapter 2 If you to copy images so that they fill the entire page without borders. See "Special Copy" on page 37. (4) Press [Color] or [Black] to ...
User's Guide
Page 56
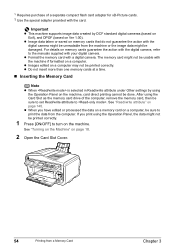
.... *2 Use the special adapter provided with a digital camera. If you have edited or processed the data on a memory card on a computer, be sure to the manuals supplied with the digital camera, refer to print the data from a Memory Card Chapter 3 See "Read/write attribute" on Ver 1.00). For details on a computer...
.... *2 Use the special adapter provided with a digital camera. If you have edited or processed the data on a memory card on a computer, be sure to the manuals supplied with the digital camera, refer to print the data from a Memory Card Chapter 3 See "Read/write attribute" on Ver 1.00). For details on a computer...
User's Guide
Page 73
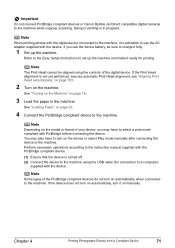
...AC adapter supplied with the device. See "Turning on the Machine" on the machine. Important Do not connect PictBridge compliant devices or Canon Bubble Jet Direct compatible digital cameras to use the device battery, be aligned using the USB cable (for printing. If the Print ...Head alignment, see "Aligning Print Head automatically" on page 153. 2 Turn on page 18. 3 Load the paper in progress. Note Depending on manually. If the device does not turn on automatically, turn on automatically, when connected to a computer) supplied with PictBridge before connecting the device. You...
...AC adapter supplied with the device. See "Turning on the Machine" on the machine. Important Do not connect PictBridge compliant devices or Canon Bubble Jet Direct compatible digital cameras to use the device battery, be aligned using the USB cable (for printing. If the Print ...Head alignment, see "Aligning Print Head automatically" on page 153. 2 Turn on page 18. 3 Load the paper in progress. Note Depending on manually. If the device does not turn on automatically, turn on automatically, when connected to a computer) supplied with PictBridge before connecting the device. You...

User's Guide
Page 75
...Settings Explained below . If any setting cannot be made, the machine setting is used. * Names of settings that can be made on Canon PictBridge compliant device are in the description given below The settings explained on the following sizes and types of paper can change the machine settings..., the machine operates based on page 40. For the setting items, see "Memory card mode" on the and the settings specified in the instruction manual supplied with the Design rule for Camera File System and PNG files. * Exif2.21 compliant About "Paper size" and "Paper type" When the ...
...Settings Explained below . If any setting cannot be made, the machine setting is used. * Names of settings that can be made on Canon PictBridge compliant device are in the description given below The settings explained on the following sizes and types of paper can change the machine settings..., the machine operates based on page 40. For the setting items, see "Memory card mode" on the and the settings specified in the instruction manual supplied with the Design rule for Camera File System and PNG files. * Exif2.21 compliant About "Paper size" and "Paper type" When the ...
User's Guide
Page 78
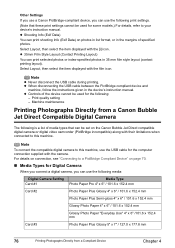
...For details on connection, see "Connecting to a PictBridge Compliant Device" on photos in list format, or in the device's instruction manual. z Shooting Info (Exif Data) You can print selected photos or index-specified photos in 35 mm film style layout (contact printing... Machine maintenance Printing Photographs Directly from a Compliant Device Chapter 4 Note z Never disconnect the USB cable during printing. Other Settings If you use a Canon PictBridge-compliant device, you can use the following media: Digital Camera Setting Media Type Card #1 Photo Paper Pro 4" x 6" / 101.6 x ...
...For details on connection, see "Connecting to a PictBridge Compliant Device" on photos in list format, or in the device's instruction manual. z Shooting Info (Exif Data) You can print selected photos or index-specified photos in 35 mm film style layout (contact printing... Machine maintenance Printing Photographs Directly from a Compliant Device Chapter 4 Note z Never disconnect the USB cable during printing. Other Settings If you use a Canon PictBridge-compliant device, you can use the following media: Digital Camera Setting Media Type Card #1 Photo Paper Pro 4" x 6" / 101.6 x ...
User's Guide
Page 79
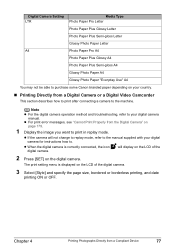
... This section describes how to print after connecting a camera to the machine. will not change to replay mode, refer to the manual supplied with your digital camera manual. The print setting menu is correctly connected, the icon digital camera. z If the camera will display on the LCD of the... A4 Photo Paper Plus Semi-gloss A4 Glossy Photo Paper A4 Glossy Photo Paper "Everyday Use" A4 You may not be able to purchase some Canon branded paper depending on your country. „ Printing Directly from a Compliant Device 77 z For print error messages, see "Cannot Print Properly from...
... This section describes how to print after connecting a camera to the machine. will not change to replay mode, refer to the manual supplied with your digital camera manual. The print setting menu is correctly connected, the icon digital camera. z If the camera will display on the LCD of the... A4 Photo Paper Plus Semi-gloss A4 Glossy Photo Paper A4 Glossy Photo Paper "Everyday Use" A4 You may not be able to purchase some Canon branded paper depending on your country. „ Printing Directly from a Compliant Device 77 z For print error messages, see "Cannot Print Properly from...

User's Guide
Page 81
.... „ Examples of Connecting the Machine Typical examples of Registering Information in to the modem) (E) Computer For details on ADSL connection and settings, see the manual supplied with your ADSL modem. Chapter 5 Faxing 79 Connect the machine correctly. z Connecting to the Telephone Line z Connecting to an Analog Line (A) (A) Telephone line (analog...
.... „ Examples of Connecting the Machine Typical examples of Registering Information in to the modem) (E) Computer For details on ADSL connection and settings, see the manual supplied with your ADSL modem. Chapter 5 Faxing 79 Connect the machine correctly. z Connecting to the Telephone Line z Connecting to an Analog Line (A) (A) Telephone line (analog...

User's Guide
Page 82
... machine, you will need to an ISDN Line (F) (H) (G) (I) (F) ISDN line (G) Terminal adapter, etc. (H) Analog port (I) Computer For details on ISDN connection and settings, see the manuals supplied with your terminal adapter or dial-up router. adapter, then connect the B.T. z Connecting to purchase a B.T. adapter to the B.T. adapter to connect as follows: Connect...
... machine, you will need to an ISDN Line (F) (H) (G) (I) (F) ISDN line (G) Terminal adapter, etc. (H) Analog port (I) Computer For details on ISDN connection and settings, see the manuals supplied with your terminal adapter or dial-up router. adapter, then connect the B.T. z Connecting to purchase a B.T. adapter to the B.T. adapter to connect as follows: Connect...
User's Guide
Page 106
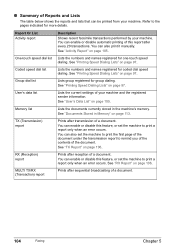
You can also print it manually. See "Printing Speed Dialing Lists" on page 106. RX (Reception) report Prints after every 20 transactions. You can enable or disable automatic printing of this ...
You can also print it manually. See "Printing Speed Dialing Lists" on page 106. RX (Reception) report Prints after every 20 transactions. You can enable or disable automatic printing of this ...

User's Guide
Page 107
on page 83. See "Registering Sender Information" on page 81. 2 Display the Print report/list screen. See "Display the FAX menu." z Printing the Activity Report Manually 1 Display the FAX menu. See "Display the Print report/list screen." on page 137. See "Display the FAX menu." The Activity report is factory-set ... 97. 3 Print the Activity report. (1) Use [ ] or [ ] to select , then press [OK]. (1) (2) Use [ ] or [ ] to confirm the current settings of this report, or print it manually. See "Display the Print report/list screen." Chapter 5 Faxing 105
on page 83. See "Registering Sender Information" on page 81. 2 Display the Print report/list screen. See "Display the FAX menu." z Printing the Activity Report Manually 1 Display the FAX menu. See "Display the Print report/list screen." on page 137. See "Display the FAX menu." The Activity report is factory-set ... 97. 3 Print the Activity report. (1) Use [ ] or [ ] to select , then press [OK]. (1) (2) Use [ ] or [ ] to confirm the current settings of this report, or print it manually. See "Display the Print report/list screen." Chapter 5 Faxing 105
User's Guide
Page 110
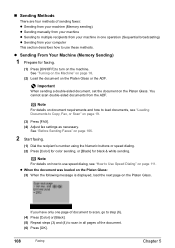
..., go to step (6). (4) Press [Color] or [Black]. (5) Repeat steps (3) and (4) to scan in all pages of sending faxes: z Sending from your machine (Memory sending) z Sending manually from your machine z Sending to multiple recipients from your machine in one operation (Sequential broadcasting) z Sending from the ADF.
..., go to step (6). (4) Press [Color] or [Black]. (5) Repeat steps (3) and (4) to scan in all pages of sending faxes: z Sending from your machine (Memory sending) z Sending manually from your machine z Sending to multiple recipients from your machine in one operation (Sequential broadcasting) z Sending from the ADF.
User's Guide
Page 111
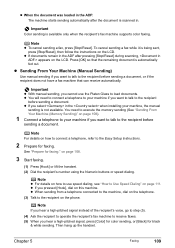
... sending a document. Press [OK] so that can receive automatically. on the LCD. Chapter 5 Faxing 109 z Sending From Your Machine (Manual Sending) Use manual sending if you want to talk to the Easy Setup Instructions. 2 Prepare for faxing." z You will need to execute the memory sending... See "Prepare for faxing. z When sending from a telephone connected to the machine, dial on the telephone. (3) Talk to your machine, the manual sending is automatically fed out. Note If you hear a high-pitched signal instead of the recipient's voice, go to step (5). (4) Ask the recipient...
... sending a document. Press [OK] so that can receive automatically. on the LCD. Chapter 5 Faxing 109 z Sending From Your Machine (Manual Sending) Use manual sending if you want to talk to the Easy Setup Instructions. 2 Prepare for faxing." z You will need to execute the memory sending... See "Prepare for faxing. z When sending from a telephone connected to the machine, dial on the telephone. (3) Talk to your machine, the manual sending is automatically fed out. Note If you hear a high-pitched signal instead of the recipient's voice, go to step (5). (4) Ask the recipient...
User's Guide
Page 112
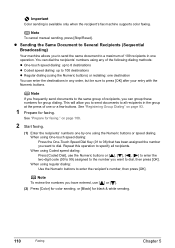
Note To cancel manual sending, press [Stop/Reset]. Note If you frequently send documents to a maximum of 109 recipients in the group at the press of one or a few ...
Note To cancel manual sending, press [Stop/Reset]. Note If you frequently send documents to a maximum of 109 recipients in the group at the press of one or a few ...

User's Guide
Page 114
... dials enables you to send a document to all numbers in coded speed dials enables you to dial them at the touch of redialing: Manual redialing and Automatic redialing. z Manual Redialing To redial the fax number last dialed with the Numeric buttons, press [Redial/Pause]. 112 Faxing Chapter 5 z For a group registered for coded...
... dials enables you to send a document to all numbers in coded speed dials enables you to dial them at the touch of redialing: Manual redialing and Automatic redialing. z Manual Redialing To redial the fax number last dialed with the Numeric buttons, press [Redial/Pause]. 112 Faxing Chapter 5 z For a group registered for coded...

User's Guide
Page 115
... redialing settings to select , then press [OK]. (1) Chapter 5 Faxing 113 When printing or deleting documents in Memory" on page 108. on the LCD. z To cancel manual redialing, press [Stop/Reset]. z Customizing Automatic Redialing Settings You can also delete the document from memory. See "Display the FAX menu." Note z For details on...
... redialing settings to select , then press [OK]. (1) Chapter 5 Faxing 113 When printing or deleting documents in Memory" on page 108. on the LCD. z To cancel manual redialing, press [Stop/Reset]. z Customizing Automatic Redialing Settings You can also delete the document from memory. See "Display the FAX menu." Note z For details on...
User's Guide
Page 120
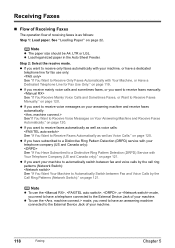
...z The paper size should be A4, LTR or LGL. z Load legal-sized paper in the Auto Sheet Feeder. z If you want to receive faxes manually: See "If You Receive Mainly Voice Calls and Sometimes Faxes, or Want to receive voice messages on your machine. z If you receive mainly voice calls... and sometimes faxes, or you want to Receive Faxes Manually:" on page 120. z To use the mode, you need to have an answering machine connected to the External Device Jack of your machine, or...
...z The paper size should be A4, LTR or LGL. z Load legal-sized paper in the Auto Sheet Feeder. z If you want to receive faxes manually: See "If You Receive Mainly Voice Calls and Sometimes Faxes, or Want to receive voice messages on your machine. z If you receive mainly voice calls... and sometimes faxes, or you want to Receive Faxes Manually:" on page 120. z To use the mode, you need to have an answering machine connected to the External Device Jack of your machine, or...

User's Guide
Page 122
See "Manual/auto switch" on page 140. If so, make it distinct from the answering machine's security code. See "Remote RX" on page 140. When you receive a ... this function may be no longer than 15 seconds. • In the message, tell your callers how to your machine will respond to Receive Faxes Manually: Select . You can be set on the first or second ring. • The entire message should be the same as the remote receiving ID. z Adjusting...
See "Manual/auto switch" on page 140. If so, make it distinct from the answering machine's security code. See "Remote RX" on page 140. When you receive a ... this function may be no longer than 15 seconds. • In the message, tell your callers how to your machine will respond to Receive Faxes Manually: Select . You can be set on the first or second ring. • The entire message should be the same as the remote receiving ID. z Adjusting...


