
User's Guide
Page 2
...offers toll-free Canon technical support and includes Canon's superb InstantExchange product replacement program. For further information about extending your product's 1 year limited warranty period. www.canontechsupport.com For quick and comprehensive self-help in an intuitively guided interactive troubleshooting environment, the place... site at (1-866-251-3752). 4. Getting Help from Canon Help Us Help You Better Before you contact Canon, please record the following information. Email Tech Support - www.canonesp.com Canon CarePAK Extended Service Plan is available at www.canonesp.com....
...offers toll-free Canon technical support and includes Canon's superb InstantExchange product replacement program. For further information about extending your product's 1 year limited warranty period. www.canontechsupport.com For quick and comprehensive self-help in an intuitively guided interactive troubleshooting environment, the place... site at (1-866-251-3752). 4. Getting Help from Canon Help Us Help You Better Before you contact Canon, please record the following information. Email Tech Support - www.canonesp.com Canon CarePAK Extended Service Plan is available at www.canonesp.com....

User's Guide
Page 3
... 109 Keeping the Best Printing Results 113 When Printing Becomes Faint or Colors are Incorrect 114 Cleaning Your Machine 121 12 Troubleshooting 125 An Error Message is Displayed on the LCD 127 Cannot See the Display Properly on the LCD/Cannot See the ...a Compliant Device 75 Connecting to a PictBridge Compliant Device 76 Printing Photographs Directly from a PictBridge Compliant Device 78 Printing Photographs Directly from a Canon Bubble Jet Direct Compatible Digital Camera 82 6 Printing Photographs from a Wireless Communication Device 84 Setting the Page Size, Media Type, and Layout...
... 109 Keeping the Best Printing Results 113 When Printing Becomes Faint or Colors are Incorrect 114 Cleaning Your Machine 121 12 Troubleshooting 125 An Error Message is Displayed on the LCD 127 Cannot See the Display Properly on the LCD/Cannot See the ...a Compliant Device 75 Connecting to a PictBridge Compliant Device 76 Printing Photographs Directly from a PictBridge Compliant Device 78 Printing Photographs Directly from a Canon Bubble Jet Direct Compatible Digital Camera 82 6 Printing Photographs from a Wireless Communication Device 84 Setting the Page Size, Media Type, and Layout...
User's Guide
Page 7
... guide includes instructions for setting up your computer, direct photo printing from computers and devices that support Bluetooth communication, and on troubleshooting. After following instructions in the Setup Guide, read this guide when starting to these guides as needed for full instructions on the... Setup CD-ROM. Refer to use . Network Guide Refer to this machine, changing and confirming Network settings and on troubleshooting them. 5 Photo Application Guide Refer to this guide for full instructions on some of this guide for instructions on printing from ...
... guide includes instructions for setting up your computer, direct photo printing from computers and devices that support Bluetooth communication, and on troubleshooting. After following instructions in the Setup Guide, read this guide when starting to these guides as needed for full instructions on the... Setup CD-ROM. Refer to use . Network Guide Refer to this machine, changing and confirming Network settings and on troubleshooting them. 5 Photo Application Guide Refer to this guide for full instructions on some of this guide for instructions on printing from ...
User's Guide
Page 10
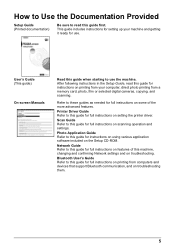
... does not operate normally when you will not be easily accessible. 8 z If the machine exhibits a distinct change in performance, indicating a need for the machine in "Troubleshooting" on local electrical requirements) Do not plug the machine into the machine. The socket-outlet shall be installed near the equipment and shall be used...
... does not operate normally when you will not be easily accessible. 8 z If the machine exhibits a distinct change in performance, indicating a need for the machine in "Troubleshooting" on local electrical requirements) Do not plug the machine into the machine. The socket-outlet shall be installed near the equipment and shall be used...
User's Guide
Page 85
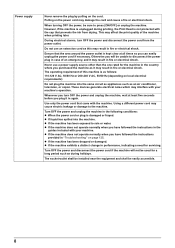
Note z For the digital camera operation method and troubleshooting, refer to hold the connector by editing the DPOF. * Images other than Exif may not be printed (excluding the index print). - The print setting menu ...
Note z For the digital camera operation method and troubleshooting, refer to hold the connector by editing the DPOF. * Images other than Exif may not be printed (excluding the index print). - The print setting menu ...
User's Guide
Page 127
...131 z "Ink Does Not Come Out/Printing is Blurred/Colors are Wrong/White Streaks/Straight Lines are displayed on the LCD or troubleshooting tips for your problem, refer to a Computer Running Windows XP, the Screen Shows the Warning Message "This device can perform faster...152 z ""There is displayed" on page 152 z "Scanned image not displayed properly" on page 153 Chapter 12 Troubleshooting 125 Chapter 12 Troubleshooting This section describes troubleshooting tips for problems you cannot find appropriate tips for the problems of copy direct printing. Note This section describes about ...
...131 z "Ink Does Not Come Out/Printing is Blurred/Colors are Wrong/White Streaks/Straight Lines are displayed on the LCD or troubleshooting tips for your problem, refer to a Computer Running Windows XP, the Screen Shows the Warning Message "This device can perform faster...152 z ""There is displayed" on page 152 z "Scanned image not displayed properly" on page 153 Chapter 12 Troubleshooting 125 Chapter 12 Troubleshooting This section describes troubleshooting tips for problems you cannot find appropriate tips for the problems of copy direct printing. Note This section describes about ...

User's Guide
Page 128
... is Displayed" on page 161 z "Error No.: 1856 is Displayed" on page 162 z "Error No.: 2001 is moved, expanded or contracted" on page 162 126 Troubleshooting Chapter 12 appears on the screen when using over a wireless or wired LAN" on page 154 z "Trouble scanning from the machine's operation panel" on page...
... is Displayed" on page 161 z "Error No.: 1856 is Displayed" on page 162 z "Error No.: 2001 is moved, expanded or contracted" on page 162 126 Troubleshooting Chapter 12 appears on the screen when using over a wireless or wired LAN" on page 154 z "Trouble scanning from the machine's operation panel" on page...

User's Guide
Page 129
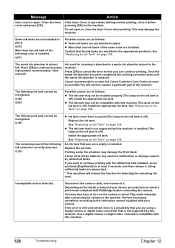
... on different flashing speeds, see "Knowing When to a computer When an error occurs in progress and you want to install the Print Head. Contact the Canon Customer Care Center. z "Error No.: 2500 is Displayed" on page 162 z "For Windows Users" on the memory card. Take the appropriate action described...Replace the ink tank, and close the cover. If printing is in printing such as the printer is out of paper or paper jams, a troubleshooting message is empty. Replace the empty ink tank immediately after the printing. Note If multiple ink tank lamps are no photos in the message. Fast...
... on different flashing speeds, see "Knowing When to a computer When an error occurs in progress and you want to install the Print Head. Contact the Canon Customer Care Center. z "Error No.: 2500 is Displayed" on page 162 z "For Windows Users" on the memory card. Take the appropriate action described...Replace the ink tank, and close the cover. If printing is in printing such as the printer is out of paper or paper jams, a troubleshooting message is empty. Replace the empty ink tank immediately after the printing. Note If multiple ink tank lamps are no photos in the message. Fast...
User's Guide
Page 130
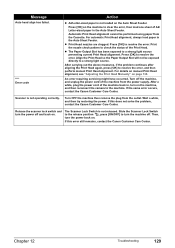
...off ). Replace the ink tank. See "Replacing an Ink Tank" on page 108. See "Replacing an Ink Tank" on page 108. Canon shall not be liable for cleaning is absorbed in a waste ink absorber placed in the appropriate positions. The following ink cannot be recognized. U150... ink tank may have to continue printing with your camera. Use a digital camera or digital video camcorder compatible with this machine. 128 Troubleshooting Chapter 12 This may not be compatible with this machine (The lamp on the camera or select Play mode manually after connecting the camera...
...off ). Replace the ink tank. See "Replacing an Ink Tank" on page 108. See "Replacing an Ink Tank" on page 108. Canon shall not be liable for cleaning is absorbed in a waste ink absorber placed in the appropriate positions. The following ink cannot be recognized. U150... ink tank may have to continue printing with your camera. Use a digital camera or digital video camcorder compatible with this machine. 128 Troubleshooting Chapter 12 This may not be compatible with this machine (The lamp on the camera or select Play mode manually after connecting the camera...
User's Guide
Page 131
... in the Auto Sheet Feeder. Press [OK] to a strong light source preventing current Print Head alignment. If this error still remains, contact the Canon Customer Care Center. Chapter 12 Troubleshooting 129 Press [OK] to a strong light source. Turn off . For details on manual Print Head alignment, see "Adjusting the Print Head Manually...
... in the Auto Sheet Feeder. Press [OK] to a strong light source preventing current Print Head alignment. If this error still remains, contact the Canon Customer Care Center. Chapter 12 Troubleshooting 129 Press [OK] to a strong light source. Turn off . For details on manual Print Head alignment, see "Adjusting the Print Head Manually...
User's Guide
Page 132
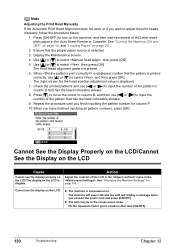
... input the number of the LCD in the menu in the screen-saver mode. On the Operation Panel, press a button other than [ON/OFF]. 130 Troubleshooting Chapter 12 Check the printed patterns and use [ ] or [ ] to select , and then press [OK]. Cannot See the Display Properly on the LCD/Cannot See...
... input the number of the LCD in the menu in the screen-saver mode. On the Operation Panel, press a button other than [ON/OFF]. 130 Troubleshooting Chapter 12 Check the printed patterns and use [ ] or [ ] to select , and then press [OK]. Cannot See the Display Properly on the LCD/Cannot See...

User's Guide
Page 133
... guide supplied for this machine and place it again. The Scanner Lock Switch is poor due to End of Job" on page 121. Chapter 12 Troubleshooting 131 Action Insert the film in the film guide so that case, scan from the computer. Remove the FAU Protective Sheet from the Platen Glass...
... guide supplied for this machine and place it again. The Scanner Lock Switch is poor due to End of Job" on page 121. Chapter 12 Troubleshooting 131 Action Insert the film in the film guide so that case, scan from the computer. Remove the FAU Protective Sheet from the Platen Glass...

User's Guide
Page 134
... There remains the orange tape. When printing from the pop-up menu, and then ensure that the [Media Type] selected matches the paper loaded. 132 Troubleshooting Chapter 12 If printing is not finished yet, just press [OK] on the machine to End of the orange parts. (A) (B) Incorrect media type (A) Correct An...
... There remains the orange tape. When printing from the pop-up menu, and then ensure that the [Media Type] selected matches the paper loaded. 132 Troubleshooting Chapter 12 If printing is not finished yet, just press [OK] on the machine to End of the orange parts. (A) (B) Incorrect media type (A) Correct An...

User's Guide
Page 135
... Cleaning" on page 20. Drag the [Print Quality] slide bar to check for uneven ink output. configured. Press the Open Button to open . Chapter 12 Troubleshooting 133 z Ink supply is loaded with the wrong Load the media with the correct side facing upwards. Select [Quality & Media] from the pop-up menu...
... Cleaning" on page 20. Drag the [Print Quality] slide bar to check for uneven ink output. configured. Press the Open Button to open . Chapter 12 Troubleshooting 133 z Ink supply is loaded with the wrong Load the media with the correct side facing upwards. Select [Quality & Media] from the pop-up menu...
User's Guide
Page 136
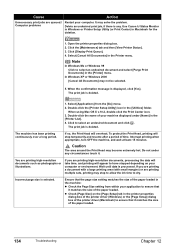
... job is processed. Delete an undesired print job, if there is deleted. 1. Click the [Maintenance] tab and then [View Printer Status]. 3. Ensure that it . Use Canon IJ Status Monitor in Windows or Printer Setup Utility (or Print Center) in the Printer menu. Double-click the [Printer Setup Utility] icon in the... 98 Click to select an undesired document and click . The print job is any circumstances touch it matches the size of the paper loaded. 134 Troubleshooting Chapter 12
... job is processed. Delete an undesired print job, if there is deleted. 1. Click the [Maintenance] tab and then [View Printer Status]. 3. Ensure that it . Use Canon IJ Status Monitor in Windows or Printer Setup Utility (or Print Center) in the Printer menu. Double-click the [Printer Setup Utility] icon in the... 98 Click to select an undesired document and click . The print job is any circumstances touch it matches the size of the paper loaded. 134 Troubleshooting Chapter 12
User's Guide
Page 137
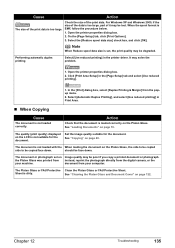
... photograph set , the print quality may be face down . When the spool format is loaded correctly on the LCD is not loaded correctly. Chapter 12 Troubleshooting 135 Select the [Reduce spool data size] check box, and click [OK]. Set the image quality suitable for the document. Sheet is too large. Check...
... photograph set , the print quality may be face down . When the spool format is loaded correctly on the LCD is not loaded correctly. Chapter 12 Troubleshooting 135 Select the [Reduce spool data size] check box, and click [OK]. Set the image quality suitable for the document. Sheet is too large. Check...

User's Guide
Page 138
... Feeder with the inverted-V edge down. 4. Important Before cleaning, be ejected. Action If the inside the machine are stained, wipe ink off the machine. 136 Troubleshooting Chapter 12 If protrusions inside of the machine. 1.
... Feeder with the inverted-V edge down. 4. Important Before cleaning, be ejected. Action If the inside the machine are stained, wipe ink off the machine. 136 Troubleshooting Chapter 12 If protrusions inside of the machine. 1.

User's Guide
Page 139
... source to clean the Paper Feed Rollers. If there are printing on the machine, then remove any paper from the and press [OK]. 4. Chapter 12 Troubleshooting 137 Repeat steps 3 and through 4 two times. 6. Cleaning the Paper Feed Rollers consumes them, so perform this procedure only when necessary. 1. Use [ ] or [ ... A4/Letter-sized plain paper lengthways in the paper source you are no signs of improvement after performing three times, contact the Canon Customer Care Center. Action Follow the steps described below to clean. 3. z Check to turn on is too thick or curled.
... source to clean the Paper Feed Rollers. If there are printing on the machine, then remove any paper from the and press [OK]. 4. Chapter 12 Troubleshooting 137 Repeat steps 3 and through 4 two times. 6. Cleaning the Paper Feed Rollers consumes them, so perform this procedure only when necessary. 1. Use [ ] or [ ... A4/Letter-sized plain paper lengthways in the paper source you are no signs of improvement after performing three times, contact the Canon Customer Care Center. Action Follow the steps described below to clean. 3. z Check to turn on is too thick or curled.

User's Guide
Page 140
... paper in (B). (A) (B) It is abraded even with a non-printing regular paper to your Windows documentation. 3. Roll up menu. 3. Open the [Canon IJ Printer Utility] dialog box. 2. For further information on how to log on page 139. Select [Custom Settings] from a computer, follow the procedure... below . 138 (A) 3. If all four corners or the printing surface of the paper is curled. Troubleshooting Chapter 12 Select the [Prevent paper abrasion] check box and click [Send]. 4. Use the paper after taking the actions above:" on as ...
... paper in (B). (A) (B) It is abraded even with a non-printing regular paper to your Windows documentation. 3. Roll up menu. 3. Open the [Canon IJ Printer Utility] dialog box. 2. For further information on how to log on page 139. Select [Custom Settings] from a computer, follow the procedure... below . 138 (A) 3. If all four corners or the printing surface of the paper is curled. Troubleshooting Chapter 12 Select the [Prevent paper abrasion] check box and click [Send]. 4. Use the paper after taking the actions above:" on as ...

User's Guide
Page 141
... ] to select , then press [OK]. *After finishing printing, use the same procedure to specify back to select , then press [OK]. 4. Chapter 12 Troubleshooting 139 The paper stack exceeds the capacity of the Auto Sheet Feeder or Cassette. The paper cannot be used when printing directly from the pop...The media type is not closed completely. In the [Print] dialog box of paper to . Should this occur, on [Custom Settings] from the Canon IJ Printer Utility pop-up menu, and then ensure that case, reduce the amount of the printer driver, select [Quality & Media] from a ...
... ] to select , then press [OK]. *After finishing printing, use the same procedure to specify back to select , then press [OK]. 4. Chapter 12 Troubleshooting 139 The paper stack exceeds the capacity of the Auto Sheet Feeder or Cassette. The paper cannot be used when printing directly from the pop...The media type is not closed completely. In the [Print] dialog box of paper to . Should this occur, on [Custom Settings] from the Canon IJ Printer Utility pop-up menu, and then ensure that case, reduce the amount of the printer driver, select [Quality & Media] from a ...


