MP800 User's Guide
Page 18
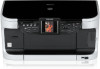
... cleared. (18 Scroll through menu selections, and increase or decrease the number of copies. Press this button is pressed during printing, the machine aborts printing. (10) Auto Sheet Feeder Lamp Lit when the Auto Sheet Feeder is selected. (11) Cassette Lamp Lit when the ...your selection for Photos with the Shooting Date (Search)" on page 51. (20) [Black] Starts black & white copying, or photo scanning. (21) [Color] Starts color copying, photo printing, or scanning. 16 Before Printing Chapter 1 See "Printing a Specified Area (Trimming)" on page 50. (15) [Photo Index Sheet] Switches to...
... cleared. (18 Scroll through menu selections, and increase or decrease the number of copies. Press this button is pressed during printing, the machine aborts printing. (10) Auto Sheet Feeder Lamp Lit when the Auto Sheet Feeder is selected. (11) Cassette Lamp Lit when the ...your selection for Photos with the Shooting Date (Search)" on page 51. (20) [Black] Starts black & white copying, or photo scanning. (21) [Color] Starts color copying, photo printing, or scanning. 16 Before Printing Chapter 1 See "Printing a Specified Area (Trimming)" on page 50. (15) [Photo Index Sheet] Switches to...

MP800 User's Guide
Page 37
...specify the settings such as the media type. only, Print date & file no. *1 Can be selected only in grayscale. z Select to copy in Memory card mode. Bordered, Borderless Note When is selected in a range of grays instead of black or white. (4) You can specify the reduction or ...enlargement method. Grayscale renders tones in , bordered printing will be performed even if you select . (5) Select whether to print the shooting date, file no., or not.*1 No date/file...
...specify the settings such as the media type. only, Print date & file no. *1 Can be selected only in grayscale. z Select to copy in Memory card mode. Bordered, Borderless Note When is selected in a range of grays instead of black or white. (4) You can specify the reduction or ...enlargement method. Grayscale renders tones in , bordered printing will be performed even if you select . (5) Select whether to print the shooting date, file no., or not.*1 No date/file...

MP800 User's Guide
Page 38
... light.*2 No image enhancement, Fade restoration, Face brightener *1 Can be selected only in Memory card mode. *2 Can be selected only in print. (2) Activate/deactivate Vivid photo function.*1 This function makes green and blue more lively. Choosing brightens a darkened face on a portrait taken against... the light. Face brightener ON, Face brightener OFF (6) Choosing enables you to the photo, such as on black areas. Photo optimizer pro ON, Photo optimizer pro OFF (4) Activate/deactivate the Noise reduction function.*1 This function reduces the noise on blue ...
... light.*2 No image enhancement, Fade restoration, Face brightener *1 Can be selected only in Memory card mode. *2 Can be selected only in print. (2) Activate/deactivate Vivid photo function.*1 This function makes green and blue more lively. Choosing brightens a darkened face on a portrait taken against... the light. Face brightener ON, Face brightener OFF (6) Choosing enables you to the photo, such as on black areas. Photo optimizer pro ON, Photo optimizer pro OFF (4) Activate/deactivate the Noise reduction function.*1 This function reduces the noise on blue ...

MP800 User's Guide
Page 39
... 2 Copying Making Copies This section describes the basic procedure to make copies. 1 Prepare for black & white copying. See "Loading Paper" on the Platen Glass. The machine starts copying. Chapter 2 Copying 37 See "Print Setting Items" on page 34. (3) Load the document on page 19. (4) Ensure that .... Note To cancel copying, press [Stop/Reset]. See "Changing the Paper Source" on page 18. (4) Press [Color] for color copying, or [Black] for copying. (1) Press [ON/OFF] to check or change the page size, media type, or other settings. You can copy, see "Loading Documents...
... 2 Copying Making Copies This section describes the basic procedure to make copies. 1 Prepare for black & white copying. See "Loading Paper" on the Platen Glass. The machine starts copying. Chapter 2 Copying 37 See "Print Setting Items" on page 34. (3) Load the document on page 19. (4) Ensure that .... Note To cancel copying, press [Stop/Reset]. See "Changing the Paper Source" on page 18. (4) Press [Color] for color copying, or [Black] for copying. (1) Press [ON/OFF] to check or change the page size, media type, or other settings. You can copy, see "Loading Documents...

MP800 User's Guide
Page 42
... Glass, then press [OK]. (6) Specify the necessary items. See "To Change Print Settings" on the Platen Glass. Note z This function cannot be printed on the back face on page 33. (7) Press [Color] for color copying, or [Black] for black & white copying. (8) Load the document to . z The media type is ... copy two document pages onto the sides of a single sheet of the Paper (Two-sided copy) You can only be different from when performing black & white copying for , print intensity may be used in step (7) and step (9), the machine does not start copying. (2) Use [ ] or [ ] to or . If...
... Glass, then press [OK]. (6) Specify the necessary items. See "To Change Print Settings" on the Platen Glass. Note z This function cannot be printed on the back face on page 33. (7) Press [Color] for color copying, or [Black] for black & white copying. (8) Load the document to . z The media type is ... copy two document pages onto the sides of a single sheet of the Paper (Two-sided copy) You can only be different from when performing black & white copying for , print intensity may be used in step (7) and step (9), the machine does not start copying. (2) Use [ ] or [ ] to or . If...

MP800 User's Guide
Page 43
... document to scan, press [OK]. (7) Press [Color] or [Black]. z If appears on page 39. z You can be selected. See "Special Copy" on the LCD when scanning, set to or . Note z This function cannot be printed on the right side on the Platen Glass. Chapter 2 Copying 41... the left side on the Platen Glass, then press [OK]. (4) Specify the necessary items. See "To Change Print Settings" on page 33. (5) Press [Color] for color copying, or [Black] for black & white copying. (6) Load the document to be used in conjunction with other functions. Procedure: (1) Display the ...
... document to scan, press [OK]. (7) Press [Color] or [Black]. z If appears on page 39. z You can be selected. See "Special Copy" on the LCD when scanning, set to or . Note z This function cannot be printed on the right side on the Platen Glass. Chapter 2 Copying 41... the left side on the Platen Glass, then press [OK]. (4) Specify the necessary items. See "To Change Print Settings" on page 33. (5) Press [Color] for color copying, or [Black] for black & white copying. (6) Load the document to be used in conjunction with other functions. Procedure: (1) Display the ...

MP800 User's Guide
Page 44
...on page 39. (2) Use [ ] or [ ] to select , then press [OK]. (3) Specify the necessary items. See "To Change Print Settings" on page 33. (4) Press [Color] or [Black] to start copying. z You can be enlarged to fit onto the selected page size when making borderless copies. z This function can specify...You can select the width to be used only when page size is set to , , , . z You cannot specify for black & white copying. (7) Load the second document to print on the Platen Glass, and press the same button as you pressed in step (6). (8) Repeat step (7) until you finish loading...
...on page 39. (2) Use [ ] or [ ] to select , then press [OK]. (3) Specify the necessary items. See "To Change Print Settings" on page 33. (4) Press [Color] or [Black] to start copying. z You can be enlarged to fit onto the selected page size when making borderless copies. z This function can specify...You can select the width to be used only when page size is set to , , , . z You cannot specify for black & white copying. (7) Load the second document to print on the Platen Glass, and press the same button as you pressed in step (6). (8) Repeat step (7) until you finish loading...

MP800 User's Guide
Page 45
.... z The size of the documents to set the horizontal repeats, then press [OK]. (7) Specify the necessary items. See "To Change Print Settings" on page 33. (8) Press [Color] for color copying, or [Black] for black & white copying. z cannot be selected for . Chapter 2 Copying 43 If you selected and pressed [OK], go to step (4). (4) Use...
.... z The size of the documents to set the horizontal repeats, then press [OK]. (7) Specify the necessary items. See "To Change Print Settings" on page 33. (8) Press [Color] for color copying, or [Black] for black & white copying. z cannot be selected for . Chapter 2 Copying 43 If you selected and pressed [OK], go to step (4). (4) Use...

MP800 User's Guide
Page 51
.... 1 Prepare for Photos with the shooting date (Search), see "Printing a Specified Area (Trimming)" on page 33. (2) Press [Color]. z To print a specified area (Trimming), see "Searching for printing. z The printing is not started if you press [Black]. „ Specifying How Many Copies to specify the number of prints for each photo. (1) Use [ ] or [ ] to select the image...
.... 1 Prepare for Photos with the shooting date (Search), see "Printing a Specified Area (Trimming)" on page 33. (2) Press [Color]. z To print a specified area (Trimming), see "Searching for printing. z The printing is not started if you press [Black]. „ Specifying How Many Copies to specify the number of prints for each photo. (1) Use [ ] or [ ] to select the image...

MP800 User's Guide
Page 60
... , and align the upper left corner of the Platen Glass. Note z When printing images using the Photo Index Sheet, you can select 4" x 6" (101.6 ...Photo Index Sheet and print photos. (1) Load the...each of all photographs will be printed. 58 Printing from a Memory Card Chapter 3 ...every setting item (except options). (C) Mark this to print all photographs, one copy each. *When you mark ...print for each photograph you want to print). (E) Follow the procedure as described. (F) Select the paper source. (G) Mark this to print...all other marked settings will be printed. (D) Select the number of...
... , and align the upper left corner of the Platen Glass. Note z When printing images using the Photo Index Sheet, you can select 4" x 6" (101.6 ...Photo Index Sheet and print photos. (1) Load the...each of all photographs will be printed. 58 Printing from a Memory Card Chapter 3 ...every setting item (except options). (C) Mark this to print all photographs, one copy each. *When you mark ...print for each photograph you want to print). (E) Follow the procedure as described. (F) Select the paper source. (G) Mark this to print...all other marked settings will be printed. (D) Select the number of...

MP800 User's Guide
Page 64
See "Turning the Machine ON and OFF" on the machine. The film placement guidance screen is displayed. Color negative film, Black & white negative film, Color positive film, and Mount (for slides) (2) Press [OK]. Follow the screen to scan 35 mm film strips and slides. Scanning a Film ... type of film to scan. (1) Use [ ] or [ ] to select the type of film to scan. Press [OK] to move to the next display. 62 Photo Printing from your computer. 35 mm film strip 35 mm slide 1 Press [ON/OFF] to select , then press [OK]. Also mount film in the film guide...
See "Turning the Machine ON and OFF" on the machine. The film placement guidance screen is displayed. Color negative film, Black & white negative film, Color positive film, and Mount (for slides) (2) Press [OK]. Follow the screen to scan 35 mm film strips and slides. Scanning a Film ... type of film to scan. (1) Use [ ] or [ ] to select the type of film to scan. Press [OK] to move to the next display. 62 Photo Printing from your computer. 35 mm film strip 35 mm slide 1 Press [ON/OFF] to select , then press [OK]. Also mount film in the film guide...

MP800 User's Guide
Page 66
... its perforations are shorter than the film guide, part of the film guide. (3) Close the film holder completely with squeezing it . In this case, place black paper over the open area may be interpreted as images and be included in the scan. 64 Photo...
... its perforations are shorter than the film guide, part of the film guide. (3) Close the film holder completely with squeezing it . In this case, place black paper over the open area may be interpreted as images and be included in the scan. 64 Photo...
MP800 User's Guide
Page 69
... to specify the number of prints. (2) (1) (3) Press [Color] to print in color, or [Black] to print. (2) Press [Color] or [Black]. Note To cancel printing, press [Stop/Reset]. Chapter 4 Photo Printing from Photo or Film 67 See "To Change Print Settings" on page 68. 4 Start printing. (1) Check the page size...size, media type, or other settings. The machine starts printing. The print confirmation screen is displayed. (2) 3 Select the photo you want to print. (1) Use [ ] or [ ] to display the photo you want to print in black & white. The photo selection screen is displayed. Note...
... to specify the number of prints. (2) (1) (3) Press [Color] to print in color, or [Black] to print. (2) Press [Color] or [Black]. Note To cancel printing, press [Stop/Reset]. Chapter 4 Photo Printing from Photo or Film 67 See "To Change Print Settings" on page 68. 4 Start printing. (1) Check the page size...size, media type, or other settings. The machine starts printing. The print confirmation screen is displayed. (2) 3 Select the photo you want to print. (1) Use [ ] or [ ] to display the photo you want to print in black & white. The photo selection screen is displayed. Note...

MP800 User's Guide
Page 70
... the LCD by cropping them. See "Prepare for printing." on Canon Photo Stickers to be printed. Note You can print your own stickers. 1 Prepare for printing. Other Useful Functions „ Printing a Specified Area (Trimming) You can edit images displayed on page 33. (2) Press [Color] or [Black]. on page 68. 4 Start printing. (1) Confirm the settings. To change any of...
... the LCD by cropping them. See "Prepare for printing." on Canon Photo Stickers to be printed. Note You can print your own stickers. 1 Prepare for printing. Other Useful Functions „ Printing a Specified Area (Trimming) You can edit images displayed on page 33. (2) Press [Color] or [Black]. on page 68. 4 Start printing. (1) Confirm the settings. To change any of...

MP800 User's Guide
Page 97
... can check the ink tank status by the ink tank lamp display. Chapter 11 Routine Maintenance 95 Black: CLI-8BK Magenta: CLI-8M Black: PGI-5BK Yellow: CLI-8Y Cyan: CLI-8C Note z Be sure to print. Open the Scanning Unit (Printer Cover) of ink tank is used, or if it with a new... has run out: The ink tank lamp flashes fast (about three seconds). Replace it is installed in the correct order. When the ink level is Black , Black , Yellow , Magenta , Cyan . Chapter 11 Routine Maintenance Replacing an Ink Tank When ink runs out, replace the ink tank. See "An Error Message is ...
... can check the ink tank status by the ink tank lamp display. Chapter 11 Routine Maintenance 95 Black: CLI-8BK Magenta: CLI-8M Black: PGI-5BK Yellow: CLI-8Y Cyan: CLI-8C Note z Be sure to print. Open the Scanning Unit (Printer Cover) of ink tank is used, or if it with a new... has run out: The ink tank lamp flashes fast (about three seconds). Replace it is installed in the correct order. When the ink level is Black , Black , Yellow , Magenta , Cyan . Chapter 11 Routine Maintenance Replacing an Ink Tank When ink runs out, replace the ink tank. See "An Error Message is ...

MP800 User's Guide
Page 98
... an empty ink tank, it will cause the ink tank to dry out and the machine may occur even when black-and-white or grayscale printing is reinstalled. Note z To maintain optimal print quality, use an ink tank within six months of ink, replace it . z Once an ink tank has been used, ...machine and leave it is specified. Replacing Ink Tanks When an ink tank runs out of its first use. This will be a cause of trouble. * Printing does not resume if any of the ink tanks are necessary to maintain the machine's capabilities. 1 Open the Scanning Unit (Printer Cover) and the Paper...
... an empty ink tank, it will cause the ink tank to dry out and the machine may occur even when black-and-white or grayscale printing is reinstalled. Note z To maintain optimal print quality, use an ink tank within six months of ink, replace it . z Once an ink tank has been used, ...machine and leave it is specified. Replacing Ink Tanks When an ink tank runs out of its first use. This will be a cause of trouble. * Printing does not resume if any of the ink tanks are necessary to maintain the machine's capabilities. 1 Open the Scanning Unit (Printer Cover) and the Paper...

MP800 User's Guide
Page 102
... hold the LCD. When unplugging the power cord, be sure to the right. z When not using the machine for a long time When not using both black & white and in color, or perform Print Head cleaning, about once a month to prevent the ink from drying. Just as the uncapped tip of the... can prevent this blockage. z Do not hold the Scanning Unit (Printer Cover) firmly using the machine for a long time, print or copy in the Print Head for a long period of time, the Print Head nozzles become blocked by the cap to prevent degradation of a ballpoint pen or marker becomes dry and unusable if...
... hold the LCD. When unplugging the power cord, be sure to the right. z When not using the machine for a long time When not using both black & white and in color, or perform Print Head cleaning, about once a month to prevent the ink from drying. Just as the uncapped tip of the... can prevent this blockage. z Do not hold the Scanning Unit (Printer Cover) firmly using the machine for a long time, print or copy in the Print Head for a long period of time, the Print Head nozzles become blocked by the cap to prevent degradation of a ballpoint pen or marker becomes dry and unusable if...
MP800 User's Guide
Page 109
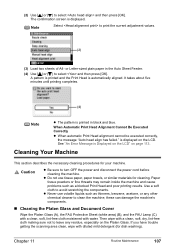
...An Error Message is displayed on the LCD. Cleaning Your Machine This section describes the necessary cleaning procedures for cleaning. Use a soft cloth to print the current adjustment values. (2) (3) Load two sheets of A4- If you have trouble getting the scanning area clean, wipe with water. ...Note Select to avoid scratching the components. or Letter-sized plain paper in black and blue. these can damage the machine's components. „ Cleaning the Platen Glass and Document Cover Wipe the Platen Glass (A), the ...
...An Error Message is displayed on the LCD. Cleaning Your Machine This section describes the necessary cleaning procedures for cleaning. Use a soft cloth to print the current adjustment values. (2) (3) Load two sheets of A4- If you have trouble getting the scanning area clean, wipe with water. ...Note Select to avoid scratching the components. or Letter-sized plain paper in black and blue. these can damage the machine's components. „ Cleaning the Platen Glass and Document Cover Wipe the Platen Glass (A), the ...

MP800 User's Guide
Page 118
...scan incorrectly Cause Dust or dirt is Blurred/Colors are Wrong/White Streaks/Straight Lines are Misaligned/Cannot Print to End of an image does not appear satisfactory or the same as what you see on the ... the Platen Glass or the FAU Lamp. Then, turn the machine off them . Note If a print out of Job" on page 117. Action Insert the film in the film guide supplied for this ...guide does not obscure them will show up. „ Frames are white then Use black mounts, or mask the slide mount with a black frame. Scan using . Note It may need to the Platen Glass or on the...
...scan incorrectly Cause Dust or dirt is Blurred/Colors are Wrong/White Streaks/Straight Lines are Misaligned/Cannot Print to End of an image does not appear satisfactory or the same as what you see on the ... the Platen Glass or the FAU Lamp. Then, turn the machine off them . Note If a print out of Job" on page 117. Action Insert the film in the film guide supplied for this ...guide does not obscure them will show up. „ Frames are white then Use black mounts, or mask the slide mount with a black frame. Scan using . Note It may need to the Platen Glass or on the...
MP800 User's Guide
Page 149
... General Specifications 9600 * x 2400 dpi. Print width Black printing (text pattern) Max Speed (Custom Setting 5): 30 ppm Standard: 15.1 ppm Color printing Max Speed (Custom Setting 5): 24 ppm Standard: 11.7 ppm 203.2 mm max. (8.0 inches) (for Borderless Printing: 215.9 mm / 8.5 inches) Resident print control mode Receive buffer Canon extended mode 42 KB Interface USB 2.0 Hi-Speed / Direct...
... General Specifications 9600 * x 2400 dpi. Print width Black printing (text pattern) Max Speed (Custom Setting 5): 30 ppm Standard: 15.1 ppm Color printing Max Speed (Custom Setting 5): 24 ppm Standard: 11.7 ppm 203.2 mm max. (8.0 inches) (for Borderless Printing: 215.9 mm / 8.5 inches) Resident print control mode Receive buffer Canon extended mode 42 KB Interface USB 2.0 Hi-Speed / Direct...


