MP800 User's Guide
Page 18
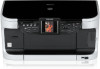
...or setting item. Restores the machine to configure the page size, media type, and image correction settings. (9) [Stop/Reset] Cancels operations. See "Printing by Using the Photo Index Sheet" on page 56. (16) [Back] Allows you to return to the previous screen. (17) [OK]... menus. (8) [Settings] Use to normal operation after a printing error was resolved, or if paper jams are displayed on page 51. (20) [Black] Starts black & white copying, or photo scanning. (21) [Color] Starts color copying, photo printing, or scanning. 16 Before Printing Chapter 1 You can use these buttons when and < >...
...or setting item. Restores the machine to configure the page size, media type, and image correction settings. (9) [Stop/Reset] Cancels operations. See "Printing by Using the Photo Index Sheet" on page 56. (16) [Back] Allows you to return to the previous screen. (17) [OK]... menus. (8) [Settings] Use to normal operation after a printing error was resolved, or if paper jams are displayed on page 51. (20) [Black] Starts black & white copying, or photo scanning. (21) [Color] Starts color copying, photo printing, or scanning. 16 Before Printing Chapter 1 You can use these buttons when and < >...

MP800 User's Guide
Page 37
... a range of grays instead of these are not available depending on the Platen Glass. Standard, High (4) Select bordered or borderless print. Chapter 1 Before Printing 35 Tab 1 You can specify the reduction or enlargement method. Auto intensity ON, Auto intensity OFF z Memory card and Photo/film..., Photo Paper Pro, Photo Plus Glossy, Matte Photo Paper, Glossy Photo Paper (3) Select the print quality. only, Print date & file no . Note z can be selected only in Memory card mode. Note Some of black or white. (4) You can specify the settings such as the media type.
... a range of grays instead of these are not available depending on the Platen Glass. Standard, High (4) Select bordered or borderless print. Chapter 1 Before Printing 35 Tab 1 You can specify the reduction or enlargement method. Auto intensity ON, Auto intensity OFF z Memory card and Photo/film..., Photo Paper Pro, Photo Plus Glossy, Matte Photo Paper, Glossy Photo Paper (3) Select the print quality. only, Print date & file no . Note z can be selected only in Memory card mode. Note Some of black or white. (4) You can specify the settings such as the media type.

MP800 User's Guide
Page 38
...Noise reduction ON, Noise reduction OFF (5) Activate/deactivate Face brightener function.*1 This function brightens a darkened face on black areas. Photo optimizer pro ON, Photo optimizer pro OFF (4) Activate/deactivate the Noise reduction function.*1 This function reduces... the noise on a portrait taken against the light. Tab 2 Allows you to correct and smooth the jagged contours for printing.*1 Image optimizer ON, Image optimizer OFF (7) Adjust brightness.*1 Brightness +2, Brightness +1, Brightness standard, Brightness -1, Brightness -2 (8) Adjust contrast.*1 ...
...Noise reduction ON, Noise reduction OFF (5) Activate/deactivate Face brightener function.*1 This function brightens a darkened face on black areas. Photo optimizer pro ON, Photo optimizer pro OFF (4) Activate/deactivate the Noise reduction function.*1 This function reduces... the noise on a portrait taken against the light. Tab 2 Allows you to correct and smooth the jagged contours for printing.*1 Image optimizer ON, Image optimizer OFF (7) Adjust brightness.*1 Brightness +2, Brightness +1, Brightness standard, Brightness -1, Brightness -2 (8) Adjust contrast.*1 ...

MP800 User's Guide
Page 39
... Glass. Note Press [Settings] to turn on page 18. (4) Press [Color] for color copying, or [Black] for copying. (1) Press [ON/OFF] to check or change the page size, media type, or other settings. See "To Change Print Settings" on page 33. (2) Use [ ] or [ ] to specify the number of documents which you can...
... Glass. Note Press [Settings] to turn on page 18. (4) Press [Color] for color copying, or [Black] for copying. (1) Press [ON/OFF] to check or change the page size, media type, or other settings. See "To Change Print Settings" on page 33. (2) Use [ ] or [ ] to specify the number of documents which you can...

MP800 User's Guide
Page 42
...media type is set to be different from when performing black & white copying for black & white copying. (8) Load the document to or . Be sure to press the same button as you perform black & white copying for , print intensity may be printed on the back face on -screen instructions to load the... document to scan, press [OK]. (9) Press [Color] or [Black]. z If you pressed in conjunction with under or other copy...
...media type is set to be different from when performing black & white copying for black & white copying. (8) Load the document to or . Be sure to press the same button as you perform black & white copying for , print intensity may be printed on the back face on -screen instructions to load the... document to scan, press [OK]. (9) Press [Color] or [Black]. z If you pressed in conjunction with under or other copy...

MP800 User's Guide
Page 43
.... Four types layouts can use this feature only when the page size is set the print quality to and try copying again. See "Special Copy" on page 33. (5) Press [Color] for color copying, or [Black] for black & white copying. (6) Load the document to be selected. If you have only one... document to be printed on the left side on the Platen Glass, then press [OK]. (4) Specify the necessary items. See ...
.... Four types layouts can use this feature only when the page size is set the print quality to and try copying again. See "Special Copy" on page 33. (5) Press [Color] for color copying, or [Black] for black & white copying. (6) Load the document to be selected. If you have only one... document to be printed on the left side on the Platen Glass, then press [OK]. (4) Specify the necessary items. See ...

MP800 User's Guide
Page 44
...Copy" on page 39. (2) Use [ ] or [ ] to select , then press [OK]. (3) Specify the necessary items. See "To Change Print Settings" on page 33. (4) Press [Color] or [Black] to copy images so that they fill the entire page without Borders (Borderless copy) This feature enables you have only one, two... the necessary items. See "To Change Print Settings" on page 33. (6) Press [Color] for color copying, or [Black] for this feature only when the paper is set the print quality to scan, press [OK] after loading the last document. z This function can specify print quality to , , , . Note ...
...Copy" on page 39. (2) Use [ ] or [ ] to select , then press [OK]. (3) Specify the necessary items. See "To Change Print Settings" on page 33. (4) Press [Color] or [Black] to copy images so that they fill the entire page without Borders (Borderless copy) This feature enables you have only one, two... the necessary items. See "To Change Print Settings" on page 33. (6) Press [Color] for color copying, or [Black] for this feature only when the paper is set the print quality to scan, press [OK] after loading the last document. z This function can specify print quality to , , , . Note ...

MP800 User's Guide
Page 45
...Image repeat) This feature enables you can specify the number. See "Special Copy" on page 33. (8) Press [Color] for color copying, or [Black] for . If you selected and pressed [OK], go to automatically select the number of the page size or smaller. You can set the horizontal ...repeats, then press [OK]. (7) Specify the necessary items. See "To Change Print Settings" on page 39. (2) Use [ ] or [ ] to select , then press [OK]. (3) Use [ ] or [ ] to copy an image multiple times onto a ...
...Image repeat) This feature enables you can specify the number. See "Special Copy" on page 33. (8) Press [Color] for color copying, or [Black] for . If you selected and pressed [OK], go to automatically select the number of the page size or smaller. You can set the horizontal ...repeats, then press [OK]. (7) Specify the necessary items. See "To Change Print Settings" on page 39. (2) Use [ ] or [ ] to select , then press [OK]. (3) Use [ ] or [ ] to copy an image multiple times onto a ...

MP800 User's Guide
Page 51
...can specify the number of prints for printing. z To print a specified area (Trimming), see "Searching for printing." To change any of each photo will be made for each photo. 1 Prepare for each photo. (1) Use [ ] or [ ] to select the image you press [Black]. „ Specifying How ...Many Copies to specify the number of prints. (2) (3) Repeat from a Memory Card 49 Note z To cancel printing, press [Stop/Reset]. The machine starts printing. The photo selection screen is displayed.
...can specify the number of prints for printing. z To print a specified area (Trimming), see "Searching for printing." To change any of each photo will be made for each photo. 1 Prepare for each photo. (1) Use [ ] or [ ] to select the image you press [Black]. „ Specifying How ...Many Copies to specify the number of prints. (2) (3) Repeat from a Memory Card 49 Note z To cancel printing, press [Stop/Reset]. The machine starts printing. The photo selection screen is displayed.

MP800 User's Guide
Page 60
... Load the paper you selected for the Photo Index Sheet. The Photo Index Sheet is more than one copy each of all photographs will be printed. (D) Select the number of copies (fill in the appropriate circles ( ) with the arrow mark (alignment mark) at the upper left corner... of the sheet precisely with a dark pencil or a black ink pen to select the photos to print and their print options. z Good z Bad (A) (B) (C) (A) Check mark (B) Line only (C) Too light Important z Be sure to fill a circle for...
... Load the paper you selected for the Photo Index Sheet. The Photo Index Sheet is more than one copy each of all photographs will be printed. (D) Select the number of copies (fill in the appropriate circles ( ) with the arrow mark (alignment mark) at the upper left corner... of the sheet precisely with a dark pencil or a black ink pen to select the photos to print and their print options. z Good z Bad (A) (B) (C) (A) Check mark (B) Line only (C) Too light Important z Be sure to fill a circle for...

MP800 User's Guide
Page 64
Press [OK] to move to the next display. 62 Photo Printing from your computer. 35 mm film strip 35 mm slide 1 Press [ON/OFF] to turn on page 17. 2 Select the type of film to scan ... guidance screen is displayed. See "Turning the Machine ON and OFF" on the machine. Follow the screen to select , then press [OK]. Color negative film, Black & white negative film, Color positive film, and Mount (for slides) (2) Press [OK]. The procedure to set the film is displayed. (2) 3 Select the type of film...
Press [OK] to move to the next display. 62 Photo Printing from your computer. 35 mm film strip 35 mm slide 1 Press [ON/OFF] to turn on page 17. 2 Select the type of film to scan ... guidance screen is displayed. See "Turning the Machine ON and OFF" on the machine. Follow the screen to select , then press [OK]. Color negative film, Black & white negative film, Color positive film, and Mount (for slides) (2) Press [OK]. The procedure to set the film is displayed. (2) 3 Select the type of film...

MP800 User's Guide
Page 66
Note z When placing film strips that its outer edges fit into the slots in the scan. 64 Photo Printing from left sides of the Platen Glass. z Labels attached to areas of an image near the open area to right and with the tip of ... without images may appear pale. Note z Ensure that between the frames aligns with the white line mark of the film guide. In this case, place black paper over the open area may be interpreted as images and be included in the film guide when closing the film holder.
Note z When placing film strips that its outer edges fit into the slots in the scan. 64 Photo Printing from left sides of the Platen Glass. z Labels attached to areas of an image near the open area to right and with the tip of ... without images may appear pale. Note z Ensure that between the frames aligns with the white line mark of the film guide. In this case, place black paper over the open area may be interpreted as images and be included in the film guide when closing the film holder.
MP800 User's Guide
Page 69
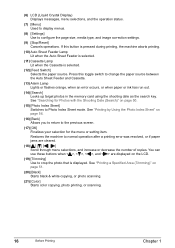
... , then press [OK]. Note You can do... z To print a specified area (Trimming), see "Printing a Specified Area (Trimming)" on page 33. (2) Use [ ] or [ ] to specify the number of prints. (2) (1) (3) Press [Color] to print in color, or [Black] to check or change the page size, media type, or ...other settings. See "To Change Print Settings" on page 68. 4 Start printing. (1) Check the page size and media type. The photo selection...
... , then press [OK]. Note You can do... z To print a specified area (Trimming), see "Printing a Specified Area (Trimming)" on page 33. (2) Use [ ] or [ ] to specify the number of prints. (2) (1) (3) Press [Color] to print in color, or [Black] to check or change the page size, media type, or ...other settings. See "To Change Print Settings" on page 68. 4 Start printing. (1) Check the page size and media type. The photo selection...

MP800 User's Guide
Page 70
... Area (Trimming)" on page 33. (2) Press [Color] or [Black]. The print confirmation screen is displayed. 3 Specify the number of prints for each photo. (4) Press [OK]. Note You can print your favorite photo on Canon Photo Stickers to create your own stickers. 1 Prepare for printing. z To print a specified area (Trimming), see "Printing a Specified Area (Trimming)" on page 51. „...
... Area (Trimming)" on page 33. (2) Press [Color] or [Black]. The print confirmation screen is displayed. 3 Specify the number of prints for each photo. (4) Press [OK]. Note You can print your favorite photo on Canon Photo Stickers to create your own stickers. 1 Prepare for printing. z To print a specified area (Trimming), see "Printing a Specified Area (Trimming)" on page 51. „...

MP800 User's Guide
Page 97
... Magenta: CLI-8M Black: PGI-5BK Yellow: CLI-8Y Cyan: CLI-8C Note z Be sure to print. Prepare a new ink tank. ...Repeats When ink has run out: ...uses the following ink tanks. When the ink level is Black , Black , Yellow , Magenta , Cyan . z Should missing characters or white streaks appear despite sufficient ink levels, see "When Printing Becomes Faint or Colors are Incorrect" on page 113....Information You can check the ink tank status by the ink tank lamp display. The machine will not print if the wrong type of the machine and check the ink tank lamp. Chapter 11 Routine Maintenance ...
... Magenta: CLI-8M Black: PGI-5BK Yellow: CLI-8Y Cyan: CLI-8C Note z Be sure to print. Prepare a new ink tank. ...Repeats When ink has run out: ...uses the following ink tanks. When the ink level is Black , Black , Yellow , Magenta , Cyan . z Should missing characters or white streaks appear despite sufficient ink levels, see "When Printing Becomes Faint or Colors are Incorrect" on page 113....Information You can check the ink tank status by the ink tank lamp display. The machine will not print if the wrong type of the machine and check the ink tank lamp. Chapter 11 Routine Maintenance ...

MP800 User's Guide
Page 98
...the Paper Output Tray. (1) Make sure the machine is turned on the LCD when you continue printing with an empty ink tank. z To continue printing, select and then press [OK]. z Color ink consumption may not operate properly if it will... z Press [OK] to press [OK] with a new ink tank. This will be a cause of trouble. * Printing does not resume if any of its first use an ink tank within six months of the ink tanks are necessary to .... z Press [Stop/Reset] to dry out and the machine may occur even when black-and-white or grayscale printing is displayed.
...the Paper Output Tray. (1) Make sure the machine is turned on the LCD when you continue printing with an empty ink tank. z To continue printing, select and then press [OK]. z Color ink consumption may not operate properly if it will... z Press [OK] to press [OK] with a new ink tank. This will be a cause of trouble. * Printing does not resume if any of its first use an ink tank within six months of the ink tanks are necessary to .... z Press [Stop/Reset] to dry out and the machine may occur even when black-and-white or grayscale printing is displayed.

MP800 User's Guide
Page 102
...the Scanning Unit (Printer Cover). Caution z Be sure to get your fingers caught. z When you press [ON/OFF], the Print Head is protected by dried ink. Keeping the Best Printing Results z When unplugging the power cord When unplugging the power cord, be careful not to hold the LCD. z When not using... the machine for a long time When not using both black & white and in the wrong positions. The Print Head Holder moves to press [ON/OFF] first. Open the Scanning Unit (Printer Cover) and make sure that all the ink ...
...the Scanning Unit (Printer Cover). Caution z Be sure to get your fingers caught. z When you press [ON/OFF], the Print Head is protected by dried ink. Keeping the Best Printing Results z When unplugging the power cord When unplugging the power cord, be careful not to hold the LCD. z When not using... the machine for a long time When not using both black & white and in the wrong positions. The Print Head Holder moves to press [ON/OFF] first. Open the Scanning Unit (Printer Cover) and make sure that all the ink ...
MP800 User's Guide
Page 109
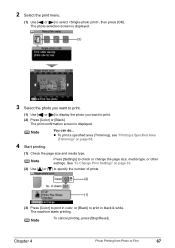
... (3) Load two sheets of A4- Cleaning Your Machine This section describes the necessary cleaning procedures for dish washing). A pattern is printed and the Print Head is Displayed on the LCD" on page 113. See "An Error Message is automatically aligned. Use a soft cloth to select...then press [OK]. or Letter-sized plain paper in black and blue. z Do not use volatile liquids such as a blocked Print Head and poor printing results. When Automatic Print Head Alignment Cannot Be Executed Correctly z When automatic Print Head alignment cannot be executed correctly, the message "Auto...
... (3) Load two sheets of A4- Cleaning Your Machine This section describes the necessary cleaning procedures for dish washing). A pattern is printed and the Print Head is Displayed on the LCD" on page 113. See "An Error Message is automatically aligned. Use a soft cloth to select...then press [OK]. or Letter-sized plain paper in black and blue. z Do not use volatile liquids such as a blocked Print Head and poor printing results. When Automatic Print Head Alignment Cannot Be Executed Correctly z When automatic Print Head alignment cannot be executed correctly, the message "Auto...

MP800 User's Guide
Page 118
...condition is Blurred/Colors are Wrong/White Streaks/Straight Lines are white then Use black mounts, or mask the slide mount with a black frame. Action Reposition the film in the correct position on the film. Note If a print out of position. light reflected off . Action Insert the film in the ...the computer. Note It may have not removed the FAU Protective Sheet. Close the Document Cover properly. For details, refer to change the print settings, or the machine itself may not be improved even if repositioning the film depending on the Platen Glass. The Scanner Lock Switch is...
...condition is Blurred/Colors are Wrong/White Streaks/Straight Lines are white then Use black mounts, or mask the slide mount with a black frame. Action Reposition the film in the correct position on the film. Note If a print out of position. light reflected off . Action Insert the film in the ...the computer. Note It may have not removed the FAU Protective Sheet. Close the Document Cover properly. For details, refer to change the print settings, or the machine itself may not be improved even if repositioning the film depending on the Platen Glass. The Scanner Lock Switch is...
MP800 User's Guide
Page 149
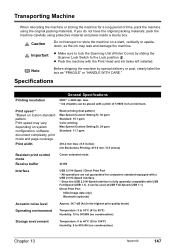
... protective material and place inside a sturdy box. Print width Black printing (text pattern) Max Speed (Custom Setting 5): 30 ppm Standard: 15.1 ppm Color printing Max Speed (Custom Setting 5): 24 ppm Standard: 11.7 ppm 203.2 mm max. (8.0 inches) (for Borderless Printing: 215.9 mm / 8.5 inches) Resident print control mode Receive buffer Canon extended mode 42 KB Interface USB 2.0 Hi...
... protective material and place inside a sturdy box. Print width Black printing (text pattern) Max Speed (Custom Setting 5): 30 ppm Standard: 15.1 ppm Color printing Max Speed (Custom Setting 5): 24 ppm Standard: 11.7 ppm 203.2 mm max. (8.0 inches) (for Borderless Printing: 215.9 mm / 8.5 inches) Resident print control mode Receive buffer Canon extended mode 42 KB Interface USB 2.0 Hi...


