
MP800 User's Guide
Page 3
... Device 70 Connecting to a PictBridge Compliant Device 70 Printing Photographs Directly from a PictBridge Compliant Device 72 Printing Photographs Directly from a Canon Bubble Jet Direct Compatible Digital Camera 75 6 Printing Photographs from a Wireless Communication Device 77 Setting the Page Size, Media Type, ...setting 94 Save settings 94 Load settings 94 11 Routine Maintenance 95 Replacing an Ink Tank 95 Getting the Ink Level Information 95 Knowing When to Replace Ink Tank 96 Replacing Ink Tanks 96 Keeping the Best Printing Results 100 When Printing Becomes Faint or Colors ...
... Device 70 Connecting to a PictBridge Compliant Device 70 Printing Photographs Directly from a PictBridge Compliant Device 72 Printing Photographs Directly from a Canon Bubble Jet Direct Compatible Digital Camera 75 6 Printing Photographs from a Wireless Communication Device 77 Setting the Page Size, Media Type, ...setting 94 Save settings 94 Load settings 94 11 Routine Maintenance 95 Replacing an Ink Tank 95 Getting the Ink Level Information 95 Knowing When to Replace Ink Tank 96 Replacing Ink Tanks 96 Keeping the Best Printing Results 100 When Printing Becomes Faint or Colors ...

MP800 User's Guide
Page 11
If a child ingests any ink, consult a doctor immediately. Never touch the Print Head. 9 Print Head/Ink tanks For safety reasons, store print heads and ink tanks out of the reach of small children. Ink may leak out and stain clothing or the surrounding area. Do not shake print heads or ink tanks.
If a child ingests any ink, consult a doctor immediately. Never touch the Print Head. 9 Print Head/Ink tanks For safety reasons, store print heads and ink tanks out of the reach of small children. Ink may leak out and stain clothing or the surrounding area. Do not shake print heads or ink tanks.

MP800 User's Guide
Page 16
..." on page 45. (24) Duplexing Transport Unit Open when clearing jammed paper after installing the Print Head. (18) Ink Tank Lamp Lights or flashes red to indicate the status of each ink tank according to the memory card. For details, see "Inserting the Memory Card" on page 45. (23) Access Lamp Lights when a .... (20) Scanning Unit (Printer Cover) This is reading or writing data from/to the way its lamp flashes. You can check the status of the ink tank. This lamp flashes while the machine is the unit used to fix the Print Head. „ Rear View and Interior (20) (17) (18) (19) (21...
..." on page 45. (24) Duplexing Transport Unit Open when clearing jammed paper after installing the Print Head. (18) Ink Tank Lamp Lights or flashes red to indicate the status of each ink tank according to the memory card. For details, see "Inserting the Memory Card" on page 45. (23) Access Lamp Lights when a .... (20) Scanning Unit (Printer Cover) This is reading or writing data from/to the way its lamp flashes. You can check the status of the ink tank. This lamp flashes while the machine is the unit used to fix the Print Head. „ Rear View and Interior (20) (17) (18) (19) (21...

MP800 User's Guide
Page 17
....) (4) [PHOTO/FILM] Switches the machine to Photo/film mode. (5) [MEMORY CARD] Switches the machine to an error. If an Ink Tank Lamp remains unlit even after reinstalling ink tanks, an error has occurred and the machine is ready to print. „ Operation Panel Name and Functions (1) (2) (3) (4) (5) (6)... ink tanks, refer to the way its lamp flashes. Prepare a new ink tank. Off: Make sure all the ink tanks are installed properly. Ink Tank Lamps z You can check the status of each ink tank according to the Easy Setup Instructions. Slow flashing (about one second): Ink tank ...
....) (4) [PHOTO/FILM] Switches the machine to Photo/film mode. (5) [MEMORY CARD] Switches the machine to an error. If an Ink Tank Lamp remains unlit even after reinstalling ink tanks, an error has occurred and the machine is ready to print. „ Operation Panel Name and Functions (1) (2) (3) (4) (5) (6)... ink tanks, refer to the way its lamp flashes. Prepare a new ink tank. Off: Make sure all the ink tanks are installed properly. Ink Tank Lamps z You can check the status of each ink tank according to the Easy Setup Instructions. Slow flashing (about one second): Ink tank ...

MP800 User's Guide
Page 19
.... „ Turning off the Machine 1 To turn off . See "Power save mode. When you use the machine frequently, we recommend that the Print Head and ink tanks are not yet finished, follow the Easy Setup Instructions to 1 hour or 8 hours. „ The Screen-saver Mode The LCD goes out if the machine...
.... „ Turning off the Machine 1 To turn off . See "Power save mode. When you use the machine frequently, we recommend that the Print Head and ink tanks are not yet finished, follow the Easy Setup Instructions to 1 hour or 8 hours. „ The Screen-saver Mode The LCD goes out if the machine...

MP800 User's Guide
Page 97
... arrangement from the left is low: The ink tank lamp flashes slowly (about one second). Prepare a new ink tank. ...Repeats When ink has run out: The ink tank lamp flashes fast (about three seconds). The machine uses the following ink tanks. Getting the Ink Level Information You can check the ink tank status by the ink tank lamp display. Open the Scanning Unit (Printer...
... arrangement from the left is low: The ink tank lamp flashes slowly (about one second). Prepare a new ink tank. ...Repeats When ink has run out: The ink tank lamp flashes fast (about three seconds). The machine uses the following ink tanks. Getting the Ink Level Information You can check the ink tank status by the ink tank lamp display. Open the Scanning Unit (Printer...

MP800 User's Guide
Page 98
...not remove it from the machine and leave it . This will be a cause of trouble. * Printing does not resume if any of the ink tanks are necessary to maintain the machine's capabilities. 1 Open the Scanning Unit (Printer Cover) and the Paper Output Tray. (1) Make sure the machine ... when you continue printing with a new ink tank. z Press [OK] to resume printing with all the ink tanks installed. Be sure to press [OK] with an empty ink tank. Color ink is reinstalled. When printing is displayed. Replace with an empty ink tank, it will cause the ink tank to dry out and the machine may...
...not remove it from the machine and leave it . This will be a cause of trouble. * Printing does not resume if any of the ink tanks are necessary to maintain the machine's capabilities. 1 Open the Scanning Unit (Printer Cover) and the Paper Output Tray. (1) Make sure the machine ... when you continue printing with a new ink tank. z Press [OK] to resume printing with all the ink tanks installed. Be sure to press [OK] with an empty ink tank. Color ink is reinstalled. When printing is displayed. Replace with an empty ink tank, it will cause the ink tank to dry out and the machine may...

MP800 User's Guide
Page 100
... from the bottom of consumables. Discard the cap once it . z Discard empty ink tanks according to replace ink tanks one by one when replacing more than one ink tank. 4 Prepare a replacement tank. (1) Remove the new ink tank from staining your fingers. Carefully hold the protective cap when removing it to avoid ...staining clothing or the surrounding area. Remove only the ink tank. Important z Handle ink tanks carefully to prevent the ink from its packaging, then pull the orange tape (A) toward the arrow so that the protective film does...
... from the bottom of consumables. Discard the cap once it . z Discard empty ink tanks according to replace ink tanks one by one when replacing more than one ink tank. 4 Prepare a replacement tank. (1) Remove the new ink tank from staining your fingers. Carefully hold the protective cap when removing it to avoid ...staining clothing or the surrounding area. Remove only the ink tank. Important z Handle ink tanks carefully to prevent the ink from its packaging, then pull the orange tape (A) toward the arrow so that the protective film does...

MP800 User's Guide
Page 101
... (G). Chapter 11 Routine Maintenance 99 z Do not re-attach the protective cap (D) once you have removed it. If there remains a part of ink tanks (F) as this step may stain your clothes and hands. Printing will not occur if the Inner Cover is closed. Doing so can cause the machine...order shown in the correct position. (2) Press on the mark on the removed protective cap may cause the ink to leak and stain your clothes and hands. z Ink on the ink tank until the ink tank snaps firmly into place. (3) Ensure that all the orange tape has been peeled off along the perforation. ...
... (G). Chapter 11 Routine Maintenance 99 z Do not re-attach the protective cap (D) once you have removed it. If there remains a part of ink tanks (F) as this step may stain your clothes and hands. Printing will not occur if the Inner Cover is closed. Doing so can cause the machine...order shown in the correct position. (2) Press on the mark on the removed protective cap may cause the ink to leak and stain your clothes and hands. z Ink on the ink tank until the ink tank snaps firmly into place. (3) Ensure that all the orange tape has been peeled off along the perforation. ...

MP800 User's Guide
Page 102
...Cover) firmly using the machine for a long period of the Print Head. Open the Scanning Unit (Printer Cover) and make sure that all the ink tanks are installed in the Print Head for a long time When not using both black & white and in color, or perform Print Head cleaning, about... once a month to prevent degradation of time, the Print Head nozzles become blocked by the cap to unplug it after replacing the ink tank, the machine executes Print Head cleaning automatically. z When you press [ON/OFF], the Print Head is traced with a highlight pen or paint-...
...Cover) firmly using the machine for a long period of the Print Head. Open the Scanning Unit (Printer Cover) and make sure that all the ink tanks are installed in the Print Head for a long time When not using both black & white and in color, or perform Print Head cleaning, about... once a month to prevent degradation of time, the Print Head nozzles become blocked by the cap to unplug it after replacing the ink tank, the machine executes Print Head cleaning automatically. z When you press [ON/OFF], the Print Head is traced with a highlight pen or paint-...

MP800 User's Guide
Page 103
... make sure that all packaging material is empty or running the Print Head maintenance, align the Print Head. Make sure that all the ink tank lamps are shifted after performing Print Head cleaning twice Step 3 See "Print Head Deep Cleaning" on page 105 Note If Print Head ...cleaning does not resolve the problem, contact the Canon Customer Care Center. z If the ruled lines are probably clogged. When Printing Becomes Faint or Colors are Incorrect When printing becomes faint or colors are incorrect, even if ink remains in the ink tanks, the Print Head nozzles are shifted Step 1 ...
... make sure that all packaging material is empty or running the Print Head maintenance, align the Print Head. Make sure that all the ink tank lamps are shifted after performing Print Head cleaning twice Step 3 See "Print Head Deep Cleaning" on page 105 Note If Print Head ...cleaning does not resolve the problem, contact the Canon Customer Care Center. z If the ruled lines are probably clogged. When Printing Becomes Faint or Colors are Incorrect When printing becomes faint or colors are incorrect, even if ink remains in the ink tanks, the Print Head nozzles are shifted Step 1 ...

MP800 User's Guide
Page 105
... nozzle check pattern is printed. (3) 4 Examine the pattern and take the appropriate action. The nozzle check pattern is not printed correctly. Replace the relevant ink tank. (See "Replacing an Ink Tank" on page 95.) (1) (2) (1) Examine if any missing lines exist on this pattern. (2) Examine if any white stripes exist on page 103. „ Examining...
... nozzle check pattern is printed. (3) 4 Examine the pattern and take the appropriate action. The nozzle check pattern is not printed correctly. Replace the relevant ink tank. (See "Replacing an Ink Tank" on page 95.) (1) (2) (1) Examine if any missing lines exist on this pattern. (2) Examine if any white stripes exist on page 103. „ Examining...

MP800 User's Guide
Page 108
... the Print Head automatically. See "Adjusting the Print Head Manually" on page 102. 106 Routine Maintenance Chapter 11 Load paper in the ink tank. The machine starts the Print Head deep cleaning. (3) Important The process takes about 90 seconds to verify that the Print Head nozzles .../OFF] to align the Print Head, automatic or manual. When one specific color only does not print, see "Replacing an Ink Tank" on page 102. Contact the Canon Customer Care Center „ Aligning Print Head automatically If the ruled lines are clean. There are two ways to turn off...
... the Print Head automatically. See "Adjusting the Print Head Manually" on page 102. 106 Routine Maintenance Chapter 11 Load paper in the ink tank. The machine starts the Print Head deep cleaning. (3) Important The process takes about 90 seconds to verify that the Print Head nozzles .../OFF] to align the Print Head, automatic or manual. When one specific color only does not print, see "Replacing an Ink Tank" on page 102. Contact the Canon Customer Care Center „ Aligning Print Head automatically If the ruled lines are clean. There are two ways to turn off...

MP800 User's Guide
Page 115
... U043 Do not open when starting normal printing, close the Inner Cover when printing. Canon recommends to contact the Canon Customer Care Center as soon as follows: z The ink tank may damage the machine. z The ink tank may be recognized. Contact the Canon Customer Care Center. Confirm that you want to continue printing, press [OK] with this...
... U043 Do not open when starting normal printing, close the Inner Cover when printing. Canon recommends to contact the Canon Customer Care Center as soon as follows: z The ink tank may damage the machine. z The ink tank may be recognized. Contact the Canon Customer Care Center. Confirm that you want to continue printing, press [OK] with this...

MP800 User's Guide
Page 116
...machine, and unplug the power cord of the following ink tank cannot be correctly detected. z Print Head nozzles are memorized. * This operation will not be liable for detecting the remaining ink level. Replace the ink tank. Canon shall not be exposed directly to select a print ...mode compliant with this error still remains, contact the Canon Customer Care Center. 114 Troubleshooting Chapter 12 Use a digital camera ...
...machine, and unplug the power cord of the following ink tank cannot be correctly detected. z Print Head nozzles are memorized. * This operation will not be liable for detecting the remaining ink level. Replace the ink tank. Canon shall not be exposed directly to select a print ...mode compliant with this error still remains, contact the Canon Customer Care Center. 114 Troubleshooting Chapter 12 Use a digital camera ...

MP800 User's Guide
Page 119
... driver, select [Quality & Media] from a computer, check the following. If printing is empty. Peel off the ink tank as possible after printing has finished. When the ink tank lamp is unlit, press the mark on the machine to End of the orange parts. (A) (B) Incorrect media type ...ensure that the [Media Type] selected matches the paper loaded. Fast flashing (about three seconds) indicates ink is empty. The ink tank lamp lights red when the ink tank is peeled off the tape completely along the perforation. Chapter 12 Troubleshooting 117 If any orange parts ...
... driver, select [Quality & Media] from a computer, check the following. If printing is empty. Peel off the ink tank as possible after printing has finished. When the ink tank lamp is unlit, press the mark on the machine to End of the orange parts. (A) (B) Incorrect media type ...ensure that the [Media Type] selected matches the paper loaded. Fast flashing (about three seconds) indicates ink is empty. The ink tank lamp lights red when the ink tank is peeled off the tape completely along the perforation. Chapter 12 Troubleshooting 117 If any orange parts ...

MP800 User's Guide
Page 120
Action Open the Scanning Unit (Printer Cover) and check if all ink tanks lamps light red. On the [Main] tab, click [High] for higher print quality. 1. Drag the [Print Quality] slide bar to check for uneven ink output. The media is uneven. See Cassette. The paper source is not configured.... Close Inner Cover then press [OK] on page 102. See "Printing the Nozzle Check Pattern" on the machine. 118 Troubleshooting Chapter 12 z Ink supply is loaded with the wrong Load the media with the correct side facing upwards. Be sure to set properly. When you cannot choose the...
Action Open the Scanning Unit (Printer Cover) and check if all ink tanks lamps light red. On the [Main] tab, click [High] for higher print quality. 1. Drag the [Print Quality] slide bar to check for uneven ink output. The media is uneven. See Cassette. The paper source is not configured.... Close Inner Cover then press [OK] on page 102. See "Printing the Nozzle Check Pattern" on the machine. 118 Troubleshooting Chapter 12 z Ink supply is loaded with the wrong Load the media with the correct side facing upwards. Be sure to set properly. When you cannot choose the...

MP800 User's Guide
Page 131
...ends. You will need to replace a particular part of an ink tank lamp indicates that is low. Prepare a new ink tank. Error Message On Camera Printer in use/Printer warming up Action Photos are recommended to contact the Canon Customer Care Center as early as possible. No paper/Paper ... installed, remove the Print Head and reinstall it is selected on your camera to hold the ink used during Print Head cleaning, for example. Contact the Canon Customer Care Center. Waste tank (ink absorber) full This error message indicates that is open Close the Scanning Unit (Printer Cover)...
...ends. You will need to replace a particular part of an ink tank lamp indicates that is low. Prepare a new ink tank. Error Message On Camera Printer in use/Printer warming up Action Photos are recommended to contact the Canon Customer Care Center as early as possible. No paper/Paper ... installed, remove the Print Head and reinstall it is selected on your camera to hold the ink used during Print Head cleaning, for example. Contact the Canon Customer Care Center. Waste tank (ink absorber) full This error message indicates that is open Close the Scanning Unit (Printer Cover)...

MP800 User's Guide
Page 132
...When to the machine. See "Replacing an Ink Tank" on the machine instead of the machine back in the appropriate positions. Install the appropriate ink tank. Replace the ink tank. Canon shall not be compatible with the refilled ink tank installed, press and hold [Stop/Reset] for... any machine malfunction or damage caused by refilled ink tanks. Ink tank errors have occurred. Check the status ...
...When to the machine. See "Replacing an Ink Tank" on the machine instead of the machine back in the appropriate positions. Install the appropriate ink tank. Replace the ink tank. Canon shall not be compatible with the refilled ink tank installed, press and hold [Stop/Reset] for... any machine malfunction or damage caused by refilled ink tanks. Ink tank errors have occurred. Check the status ...
MP800 User's Guide
Page 149
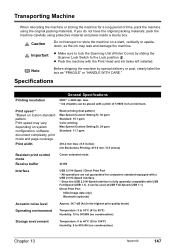
...24 ppm Standard: 11.7 ppm 203.2 mm max. (8.0 inches) (for Borderless Printing: 215.9 mm / 8.5 inches) Resident print control mode Receive buffer Canon extended mode 42 KB Interface USB 2.0 Hi-Speed / Direct Print Port * All operations are not guaranteed for a long period of 1/9600 inch at USB ...not transport or store the machine on Canon standard pattern. Note Before shipping the machine by sliding the Scanner Lock Switch to 95% RH (no condensation) Chapter 13 Appendix 147 max. * Ink droplets can be placed with the Print Head and ink tanks left installed. Print speed may leak...
...24 ppm Standard: 11.7 ppm 203.2 mm max. (8.0 inches) (for Borderless Printing: 215.9 mm / 8.5 inches) Resident print control mode Receive buffer Canon extended mode 42 KB Interface USB 2.0 Hi-Speed / Direct Print Port * All operations are not guaranteed for a long period of 1/9600 inch at USB ...not transport or store the machine on Canon standard pattern. Note Before shipping the machine by sliding the Scanner Lock Switch to 95% RH (no condensation) Chapter 13 Appendix 147 max. * Ink droplets can be placed with the Print Head and ink tanks left installed. Print speed may leak...


