Network Setup Troubleshooting
Page 10
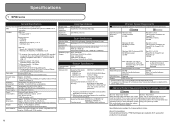
...) Multiple copy Intensity adjustment Reduction/ Enlargement Copy Specifications Max 99 pages 9 positions, Auto intensity (AE copy) 25%-400% (1% unit) Scan Specifications Scanner driver TWAIN/WIA (Windows Vista and Windows XP only) Maximum scanning size Scanning resolution A4/Letter, 8.5'' x 11.7''/216 x 297 mm Optional resolution (horizontal vertical) max: 4800 dpi x 9600 dpi Interpolated resolution... later Safari Hard Disk Space 650 MB Note: For bundled software installation. 750 MB Note: For bundled software installation. We recommend that complies with the Canon inkjet printer.
...) Multiple copy Intensity adjustment Reduction/ Enlargement Copy Specifications Max 99 pages 9 positions, Auto intensity (AE copy) 25%-400% (1% unit) Scan Specifications Scanner driver TWAIN/WIA (Windows Vista and Windows XP only) Maximum scanning size Scanning resolution A4/Letter, 8.5'' x 11.7''/216 x 297 mm Optional resolution (horizontal vertical) max: 4800 dpi x 9600 dpi Interpolated resolution... later Safari Hard Disk Space 650 MB Note: For bundled software installation. 750 MB Note: For bundled software installation. We recommend that complies with the Canon inkjet printer.
Network Setup Troubleshooting
Page 11
...not be must be formatted as Mac OS Extended (Journaled) or Mac OS Extended. 2 MP620 series General Specifications Printing resolution 9600 (horizontal)* x 2400 (vertical) (dpi) * Ink ... that complies with Windows Update. Note: Hard Disk must be placed with the Canon inkjet printer. We recommend that you operating system or Internet Explorer version. Browser ..., Auto intensity (AE copy) 25%-400% (1% unit) Scan Specifications Scanner driver TWAIN/WIA (Windows Vista and Windows XP only) Maximum scanning size Scanning resolution A4/Letter, 8.5'' x 11.7''/216 x 297 mm Optional...
...not be must be formatted as Mac OS Extended (Journaled) or Mac OS Extended. 2 MP620 series General Specifications Printing resolution 9600 (horizontal)* x 2400 (vertical) (dpi) * Ink ... that complies with Windows Update. Note: Hard Disk must be placed with the Canon inkjet printer. We recommend that you operating system or Internet Explorer version. Browser ..., Auto intensity (AE copy) 25%-400% (1% unit) Scan Specifications Scanner driver TWAIN/WIA (Windows Vista and Windows XP only) Maximum scanning size Scanning resolution A4/Letter, 8.5'' x 11.7''/216 x 297 mm Optional...
Getting Started
Page 6
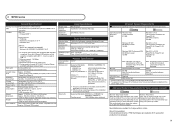
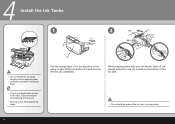
... (This is where you install the Print Head.) Raise the Print Head Lock Lever (E). • Close the Document Cover (D) and lift it with the Scanning Unit (Cover). • The Print Head Holder makes a noise as applying them excessive pressure or dropping them. (A) (C) Open the Paper Output Tray (A),... then lift the Scanning Unit (Cover) (B) until it stops. (The Print Head Lock Lever may feel heavy.) • If the Print Head Holder does not move, make ...
... (This is where you install the Print Head.) Raise the Print Head Lock Lever (E). • Close the Document Cover (D) and lift it with the Scanning Unit (Cover). • The Print Head Holder makes a noise as applying them excessive pressure or dropping them. (A) (C) Open the Paper Output Tray (A),... then lift the Scanning Unit (Cover) (B) until it stops. (The Print Head Lock Lever may feel heavy.) • If the Print Head Holder does not move, make ...
Getting Started
Page 8
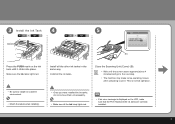
... tanks roughly such as applying them excessive pressure or dropping them. • If the Print Head Holder moves to the right, close and reopen the Scanning Unit (Cover). • Be sure to use the supplied ink tanks. (2) Pull the orange tape (1) in the direction of the arrow to peel off the...
... tanks roughly such as applying them excessive pressure or dropping them. • If the Print Head Holder moves to the right, close and reopen the Scanning Unit (Cover). • Be sure to use the supplied ink tanks. (2) Pull the orange tape (1) in the direction of the arrow to peel off the...
Getting Started
Page 9
... red. • If an error message is displayed on the ink tank until the screen above appears (about 4 minutes) and go to print. Close the Scanning Unit (Cover) (B). • Wait until it clicks into place. Make sure the Ink lamp lights red. 3 Install the Ink Tank 4 5 (B) Press the PUSH mark on...
... red. • If an error message is displayed on the ink tank until the screen above appears (about 4 minutes) and go to print. Close the Scanning Unit (Cover) (B). • Wait until it clicks into place. Make sure the Ink lamp lights red. 3 Install the Ink Tank 4 5 (B) Press the PUSH mark on...
Getting Started
Page 38
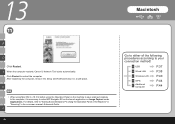
... on Image Capture under Applications. For details, refer to "Saving Scanned Data to PC Using the Operation Panel of the following procedures according to either of the Machine" in... "Scanning" in a safe place. B USB P.37 D Wired LAN P.38 F Wireless LAN H WPS K Additional Computer P.40 P..... Click Restart to the computer, it in the on the machine to save scanned originals to restart the computer. F When the computer restarts, Canon IJ Network Tool starts automatically.
... on Image Capture under Applications. For details, refer to "Saving Scanned Data to PC Using the Operation Panel of the following procedures according to either of the Machine" in... "Scanning" in a safe place. B USB P.37 D Wired LAN P.38 F Wireless LAN H WPS K Additional Computer P.40 P..... Click Restart to the computer, it in the on the machine to save scanned originals to restart the computer. F When the computer restarts, Canon IJ Network Tool starts automatically.

Getting Started
Page 63
easily. Also, you can scan documents into a computer, and correct/enhance scanned images. Now let's use the machine! 61 ■ Using Your Machine This machine allows you to the on the computer. For detailed operating procedures and functions, refer to print in various ways using the MP driver and application software installed on -screen manuals. For example, you can print borderless photos, and create your own calendar etc.
easily. Also, you can scan documents into a computer, and correct/enhance scanned images. Now let's use the machine! 61 ■ Using Your Machine This machine allows you to the on the computer. For detailed operating procedures and functions, refer to print in various ways using the MP driver and application software installed on -screen manuals. For example, you can print borderless photos, and create your own calendar etc.
Multifunction Brochure
Page 2
...seconds per page) Color Up to 17 ppm (As fast as 3.6 seconds per page) Reduction/Enlargement SCAN 25%-400% Scan Features Auto Scan Mode, Gutter Shadow Correction, Network Scan, Push Scan, Scan to change without notice. The USB-IF logo is a certification mark of Nozzles Color: 2,048, Black... Macintosh and Mac are simulated. 9 System requirements vary by Canon in dark storage under controlled temperature, humidity and gas conditions, simulating storage in the United States and other countries. PIXMA MP620 All-In-One Photo Printer Compatible Inks PGI-220BK Pigment Black...
...seconds per page) Color Up to 17 ppm (As fast as 3.6 seconds per page) Reduction/Enlargement SCAN 25%-400% Scan Features Auto Scan Mode, Gutter Shadow Correction, Network Scan, Push Scan, Scan to change without notice. The USB-IF logo is a certification mark of Nozzles Color: 2,048, Black... Macintosh and Mac are simulated. 9 System requirements vary by Canon in dark storage under controlled temperature, humidity and gas conditions, simulating storage in the United States and other countries. PIXMA MP620 All-In-One Photo Printer Compatible Inks PGI-220BK Pigment Black...
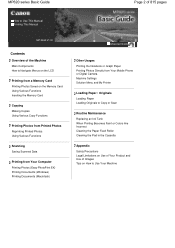
User Manual
Page 2
MP620 series Basic Guide Page 2 of 815 pages How to Use This ... Card Copying Making Copies Using Various Copy Functions Printing Photos from Printed Photos Reprinting Printed Photos Using Various Functions Scanning Saving Scanned Data Printing from Your Computer Printing Photos (Easy-PhotoPrint EX) Printing Documents (Windows) Printing Documents (Macintosh)... Machine Settings Solution Menu and My Printer Loading Paper / Originals Loading Paper Loading Originals to Copy or Scan Routine Maintenance Replacing an Ink Tank When Printing Becomes Faint or Colors Are Incorrect Cleaning the Paper Feed ...
MP620 series Basic Guide Page 2 of 815 pages How to Use This ... Card Copying Making Copies Using Various Copy Functions Printing Photos from Printed Photos Reprinting Printed Photos Using Various Functions Scanning Saving Scanned Data Printing from Your Computer Printing Photos (Easy-PhotoPrint EX) Printing Documents (Windows) Printing Documents (Macintosh)... Machine Settings Solution Menu and My Printer Loading Paper / Originals Loading Paper Loading Originals to Copy or Scan Routine Maintenance Replacing an Ink Tank When Printing Becomes Faint or Colors Are Incorrect Cleaning the Paper Feed ...

User Manual
Page 5
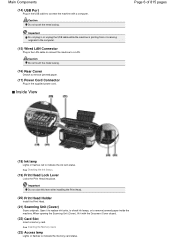
... (Cover) while the Document Cover is not available in some countries or regions depending on the Scanning Unit (Cover), see Scanning Unit (Cover) . Main Components printing directly. For details, contact your local Canon service representative. Caution Do not touch the metal casing. (9) Paper Output Tray Opens automatically when printing or copying starts ... Bluetooth Unit BU-30, and USB flash drives to the Direct Print Port of paper can also insert a USB flash drive to copy or scan. (12) Cassette Load A4, B5, A5, or Letter-sized plain paper and insert it when printing or copying.
... (Cover) while the Document Cover is not available in some countries or regions depending on the Scanning Unit (Cover), see Scanning Unit (Cover) . Main Components printing directly. For details, contact your local Canon service representative. Caution Do not touch the metal casing. (9) Paper Output Tray Opens automatically when printing or copying starts ... Bluetooth Unit BU-30, and USB flash drives to the Direct Print Port of paper can also insert a USB flash drive to copy or scan. (12) Cassette Load A4, B5, A5, or Letter-sized plain paper and insert it when printing or copying.
User Manual
Page 6
...Print Head into place. Important Do not raise this lever after installing the Print Head. (20) Print Head Holder Install the Print Head. (21) Scanning Unit (Cover) Scans originals. See Inserting the Memory Card. (23) Access lamp Lights or flashes to remove jammed paper. (17) Power Cord Connector Plug in the ...supplied power cord. Caution Do not touch the metal casing. When opening the Scanning Unit (Cover), lift it to replace ink tanks, to check ink lamps, or to indicate the ink tank status. Important Do not plug in ...
...Print Head into place. Important Do not raise this lever after installing the Print Head. (20) Print Head Holder Install the Print Head. (21) Scanning Unit (Cover) Scans originals. See Inserting the Memory Card. (23) Access lamp Lights or flashes to remove jammed paper. (17) Power Cord Connector Plug in the ...supplied power cord. Caution Do not touch the metal casing. When opening the Scanning Unit (Cover), lift it to replace ink tanks, to check ink lamps, or to indicate the ink tank status. Important Do not plug in ...
User Manual
Page 7
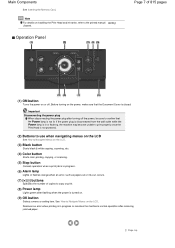
... LCD . See How to Navigate Menus on or off the power, be sure to Navigate Menus on the LCD . (3) Black button Starts black & white copying, scanning, etc. (4) Color button Starts color printing, copying, or scanning. (5) Stop button Cancels operation when a print job is closed.
... LCD . See How to Navigate Menus on or off the power, be sure to Navigate Menus on the LCD . (3) Black button Starts black & white copying, scanning, etc. (4) Color button Starts color printing, copying, or scanning. (5) Stop button Cancels operation when a print job is closed.

User Manual
Page 8
... menu. Selecting Menus on the HOME Screen The HOME screen appears when the power is pressed. To start printing photos on a memory card, copying, or scanning, select menus on or when the HOME button is turned on the HOME screen. 1. You can also use , and press the OK button (C). The selected...
... menu. Selecting Menus on the HOME Screen The HOME screen appears when the power is pressed. To start printing photos on a memory card, copying, or scanning, select menus on or when the HOME button is turned on the HOME screen. 1. You can also use , and press the OK button (C). The selected...

User Manual
Page 9
... and print. Use the Easy-Scroll Wheel (B) or the (Up) or (Down) button (D) to select another print quality, and press the OK button. You can scan printed photos and print them easily. Note If you selected, but the operation is the same. Page 9 of the Memory card menu. You can easily... print photos on a memory card or USB flash drive inserted into the machine, using the Photo Index Sheet. You can save scanned data on your digital camera. The screen returns to print. See Using Photo Index Sheet to the print confirmation screen in Select and print of...
... and print. Use the Easy-Scroll Wheel (B) or the (Up) or (Down) button (D) to select another print quality, and press the OK button. You can scan printed photos and print them easily. Note If you selected, but the operation is the same. Page 9 of the Memory card menu. You can easily... print photos on a memory card or USB flash drive inserted into the machine, using the Photo Index Sheet. You can save scanned data on your digital camera. The screen returns to print. See Using Photo Index Sheet to the print confirmation screen in Select and print of...

User Manual
Page 21
... it into the Card Slot, according to the insert location in the Settings menu, you cannot print image data on the memory card or save scanned data on the power, and open the Card Slot Cover. 3. Turn on the memory card using the Card Slot as RAW images cannot be sure...
... it into the Card Slot, according to the insert location in the Settings menu, you cannot print image data on the memory card or save scanned data on the power, and open the Card Slot Cover. 3. Turn on the memory card using the Card Slot as RAW images cannot be sure...

User Manual
Page 26
..., etc. Here we load A4 plain paper in the Cassette. Page 26 of print result if you press the right Function button (B) to Copy or Scan . 2. Load other sizes or types of paper in the correct paper source. See Loading Originals to Confirm that Copy is selected for Magnification, A4 for...
..., etc. Here we load A4 plain paper in the Cassette. Page 26 of print result if you press the right Function button (B) to Copy or Scan . 2. Load other sizes or types of paper in the correct paper source. See Loading Originals to Confirm that Copy is selected for Magnification, A4 for...

User Manual
Page 31
... Troubleshooting Reprinting Printed Photos Reprint printed photos. See Operation Panel. (2) Load paper. See Loading Paper. Use the computer to scan images and save scanned images with the side to scan. (1) Open the Document Cover. (2) Load the photo with this function. Paper for reprinting printed photos. (1) Turn on ...basic operation, using the settings to the on the power. Load photos on the Platen Glass to scan FACING DOWN on the HOME screen, and press the OK button. You need to Copy or Scan . See Loading Originals to prepare: Printed photos. Here we load 4" x 6" / 10 x...
... Troubleshooting Reprinting Printed Photos Reprint printed photos. See Operation Panel. (2) Load paper. See Loading Paper. Use the computer to scan images and save scanned images with the side to scan. (1) Open the Document Cover. (2) Load the photo with this function. Paper for reprinting printed photos. (1) Turn on ...basic operation, using the settings to the on the power. Load photos on the Platen Glass to scan FACING DOWN on the HOME screen, and press the OK button. You need to Copy or Scan . See Loading Originals to prepare: Printed photos. Here we load 4" x 6" / 10 x...

User Manual
Page 32
...Platen Glass Note Place the photo(s) at least 0.4 inches / 10 mm apart from and in square with a long edge of bordered photos may not be scanned properly. Photos that have white surrounds The borders of 7.1 inches / 180 mm or more photos at the same time, place them again. - The ...machine starts scanning. The photos are non-rectangular or irregular shaped (such as a single image. The types of the Platen Glass. Photos that are not placed too ...
...Platen Glass Note Place the photo(s) at least 0.4 inches / 10 mm apart from and in square with a long edge of bordered photos may not be scanned properly. Photos that have white surrounds The borders of 7.1 inches / 180 mm or more photos at the same time, place them again. - The ...machine starts scanning. The photos are non-rectangular or irregular shaped (such as a single image. The types of the Platen Glass. Photos that are not placed too ...

User Manual
Page 33
... to the photo on the Platen Glass after printing is completed. Reprinting Printed Photos Page 33 of 815 pages If appears next to delete the scanned image data. Other options To change the settings, select each photo. (5) Press the OK button. 4. See Using Various Functions . (3) Press the ...Color button to print in color, or the Black button to scan the photo again. Confirm the message, and repeat the procedures from step 2 to print in black & white. Note To change the display of photos,...
... to the photo on the Platen Glass after printing is completed. Reprinting Printed Photos Page 33 of 815 pages If appears next to delete the scanned image data. Other options To change the settings, select each photo. (5) Press the OK button. 4. See Using Various Functions . (3) Press the ...Color button to print in color, or the Black button to scan the photo again. Confirm the message, and repeat the procedures from step 2 to print in black & white. Note To change the display of photos,...

User Manual
Page 35
Saving Scanned Data Saving the Scanned Data on a USB flash drive or memory card inserted into the machine. Scanning Contents > Scanning Page 35 of 815 pages Advanced Guide Troubleshooting Scanning You can also save them. You can send scanned data to your computer, edit or process them with the supplied software application, then save scanned data on the USB Flash Drive Inserting the USB Flash Drive Removing the USB Flash Drive Page top
Saving Scanned Data Saving the Scanned Data on a USB flash drive or memory card inserted into the machine. Scanning Contents > Scanning Page 35 of 815 pages Advanced Guide Troubleshooting Scanning You can also save them. You can send scanned data to your computer, edit or process them with the supplied software application, then save scanned data on the USB Flash Drive Inserting the USB Flash Drive Removing the USB Flash Drive Page top


