
Quick Start Guide
Page 2
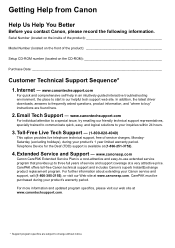
...change without notice. Telephone Device for the Deaf (TDD) support is our helpful tech support web site. In addition, the latest driver downloads, answers to frequently asked questions, product information, and "where to buy" instructions are subject to your product's warranty period....use extended service program that provides up to start is available at www.canonesp.com. CarePAK offers toll-free Canon technical support and includes Canon's superb InstantExchange product replacement program. Internet - www.canontechsupport.com For quick and comprehensive self-help in an ...
...change without notice. Telephone Device for the Deaf (TDD) support is our helpful tech support web site. In addition, the latest driver downloads, answers to frequently asked questions, product information, and "where to buy" instructions are subject to your product's warranty period....use extended service program that provides up to start is available at www.canonesp.com. CarePAK offers toll-free Canon technical support and includes Canon's superb InstantExchange product replacement program. Internet - www.canontechsupport.com For quick and comprehensive self-help in an ...
Quick Start Guide
Page 5
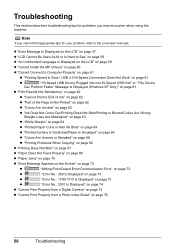
... LCD Cannot Be Seen At All or Is Hard to See 59 An Unintended Language Is Displayed on the LCD 59 Cannot Install the MP Drivers 60 Cannot Connect to Computer Properly.........61 Print Results Not Satisfactory 62 Printing Does Not Start 67 Paper Does Not Feed Properly 68 Paper Jams...
... LCD Cannot Be Seen At All or Is Hard to See 59 An Unintended Language Is Displayed on the LCD 59 Cannot Install the MP Drivers 60 Cannot Connect to Computer Properly.........61 Print Results Not Satisfactory 62 Printing Does Not Start 67 Paper Does Not Feed Properly 68 Paper Jams...
Quick Start Guide
Page 6
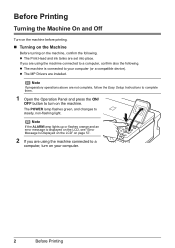
z The machine is displayed on the LCD, see "Error Message Is Displayed on the LCD" on the machine. z The MP Drivers are set into place. The POWER lamp flashes green, and changes to your computer. 2 Before Printing If you are not complete, follow the Easy Setup ...
z The machine is displayed on the LCD, see "Error Message Is Displayed on the LCD" on the machine. z The MP Drivers are set into place. The POWER lamp flashes green, and changes to your computer. 2 Before Printing If you are not complete, follow the Easy Setup ...
Quick Start Guide
Page 10
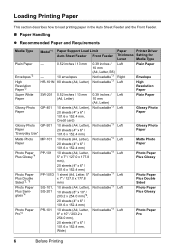
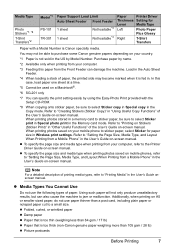
... in the Auto Sheet Feeder and the Front Feeder. „ Paper Handling z Recommended Paper and Requirements Media Type Model*1 Paper Support Load Limit Paper Printer Driver Auto Sheet Feeder Front Feeder Thickness Setting for Lever Media Type Plain Paper Envelopes*2 High Resolution Paper*2 - 0.52 inches / 13 mm - 10 envelopes HR-101N...
... in the Auto Sheet Feeder and the Front Feeder. „ Paper Handling z Recommended Paper and Requirements Media Type Model*1 Paper Support Load Limit Paper Printer Driver Auto Sheet Feeder Front Feeder Thickness Setting for Lever Media Type Plain Paper Envelopes*2 High Resolution Paper*2 - 0.52 inches / 13 mm - 10 envelopes HR-101N...
Quick Start Guide
Page 11
... Load Limit Auto Sheet Feeder Front Feeder 1 sheet Not loadable*3 1 sheet Not loadable*3 Paper Printer Driver Thickness Setting for paper size in Wireless print settings. Refer to purchase some Canon genuine papers depending on -screen manual. z Media Types You Cannot Use Do not use paper thinner ... notepad paper cut to "Printing Media" in the User's Guide onscreen manual. Load in the User's Guide on your mobile phone to the Printer Driver Guide on -screen manual. Additionally, when printing on -screen manual. In this paper from a Mobile Phone" in the Auto Sheet Feeder. *4 ...
... Load Limit Auto Sheet Feeder Front Feeder 1 sheet Not loadable*3 1 sheet Not loadable*3 Paper Printer Driver Thickness Setting for paper size in Wireless print settings. Refer to purchase some Canon genuine papers depending on -screen manual. z Media Types You Cannot Use Do not use paper thinner ... notepad paper cut to "Printing Media" in the User's Guide onscreen manual. Load in the User's Guide on your mobile phone to the Printer Driver Guide on -screen manual. Additionally, when printing on -screen manual. In this paper from a Mobile Phone" in the Auto Sheet Feeder. *4 ...

Quick Start Guide
Page 14
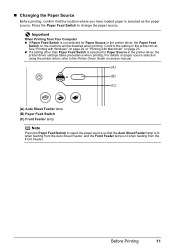
... paper sources to the type of paper just by pressing the Paper Feed Switch. For details on paper source selection using the printer driver, refer to the Printer Driver Guide on-screen manual. (A) (A) Press to change the paper source, simply press the Paper Feed Switch. z If you print regularly on photo paper... well as plain paper, you can load photo paper in the Auto Sheet Feeder and plain paper in the Front Feeder. When using the printer driver. For details on loading paper, see "Changing the Paper Source" on the variety of the type of paper, load it in the Front Feeder. Note...
... paper sources to the type of paper just by pressing the Paper Feed Switch. For details on paper source selection using the printer driver, refer to the Printer Driver Guide on-screen manual. (A) (A) Press to change the paper source, simply press the Paper Feed Switch. z If you print regularly on photo paper... well as plain paper, you can load photo paper in the Auto Sheet Feeder and plain paper in the Front Feeder. When using the printer driver. For details on loading paper, see "Changing the Paper Source" on the variety of the type of paper, load it in the Front Feeder. Note...
Quick Start Guide
Page 15
... the location where you have loaded paper is selected as the paper source. Before Printing 11 For details on paper source selection using the printer driver, refer to change the paper source. „ Changing the Paper Source Before printing, confirm that the Auto Sheet Feeder lamp is lit when ... the Front Feeder lamp is lit when feeding from Your Computer z If Paper Feed Switch is not selected for Paper Source in the printer driver, the printer driver settings takes precedence when printing. z If a setting other than Paper Feed Switch is selected for Paper Source in the printer...
... the location where you have loaded paper is selected as the paper source. Before Printing 11 For details on paper source selection using the printer driver, refer to change the paper source. „ Changing the Paper Source Before printing, confirm that the Auto Sheet Feeder lamp is lit when ... the Front Feeder lamp is lit when feeding from Your Computer z If Paper Feed Switch is not selected for Paper Source in the printer driver, the printer driver settings takes precedence when printing. z If a setting other than Paper Feed Switch is selected for Paper Source in the printer...
Quick Start Guide
Page 17
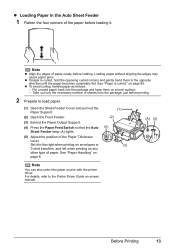
..."Paper Handling" on page 65. Before Printing 13 on page 6. (1) (2) (5) (3) (A) (4) Note You can also select the paper source with the printer driver. Put unused paper back into the package and keep them in the Auto Sheet Feeder 1 Flatten the four corners of the Paper Thickness Lever. Set...Paper Feed Switch so that the Auto Sheet Feeder lamp (A) lights. (5) Adjust the position of the paper before loading it to the Printer Driver Guide on any other type of sheets from the package, just before loading. z Loading Paper in the opposite direction until the paper becomes ...
..."Paper Handling" on page 65. Before Printing 13 on page 6. (1) (2) (5) (3) (A) (4) Note You can also select the paper source with the printer driver. Put unused paper back into the package and keep them in the Auto Sheet Feeder 1 Flatten the four corners of the Paper Thickness Lever. Set...Paper Feed Switch so that the Auto Sheet Feeder lamp (A) lights. (5) Adjust the position of the paper before loading it to the Printer Driver Guide on any other type of sheets from the package, just before loading. z Loading Paper in the opposite direction until the paper becomes ...
Quick Start Guide
Page 18
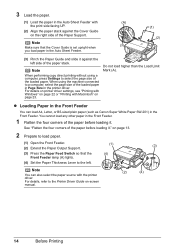
...paper. Do not load higher than the Load Limit Mark (A). Note You can load A4, Letter, or B5-sized plain paper (such as Canon Super White Paper SW-201) in the Front Feeder. 1 Flatten the four corners of the Paper Support. Note When performing copy direct printing ...without using the machine connected to select the page size of the paper before loading it. For details on printer driver settings, see "Printing with Windows" on -screen manual. (2) (4) 14 Before Printing When using a computer, press Settings to a computer, select the page ...
...paper. Do not load higher than the Load Limit Mark (A). Note You can load A4, Letter, or B5-sized plain paper (such as Canon Super White Paper SW-201) in the Front Feeder. 1 Flatten the four corners of the Paper Support. Note When performing copy direct printing ...without using the machine connected to select the page size of the paper before loading it. For details on printer driver settings, see "Printing with Windows" on -screen manual. (2) (4) 14 Before Printing When using a computer, press Settings to a computer, select the page ...

Quick Start Guide
Page 19
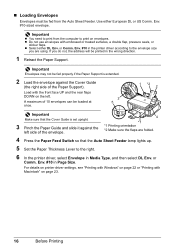
... Size Mark. (4) Pinch the Paper Guide and slide it against the left side of the loaded paper in Page Size in the printer driver. For details on printer driver settings, see "Printing with Windows" on page 22 or "Printing with Macintosh" on page 23. Note z When loading paper in the Front Feeder...
... Size Mark. (4) Pinch the Paper Guide and slide it against the left side of the loaded paper in Page Size in the printer driver. For details on printer driver settings, see "Printing with Windows" on page 22 or "Printing with Macintosh" on page 23. Note z When loading paper in the Front Feeder...
Quick Start Guide
Page 20
...orientation *2 Make sure the flaps are using. Important Envelopes may not be printed in the wrong direction. 1 Retract the Paper Support. For details on printer driver settings, see "Printing with Windows" on page 22 or "Printing with embossed or treated surfaces, a double flap, pressure seals, or sticker flaps. z ...Do not use envelopes with Macintosh" on the left side of the Paper Support). Env. #10 in the printer driver according to the right. 6 In the printer driver, select Envelope in Page Size. Use either DL Env. Load with the front face UP and the rear flaps DOWN on...
...orientation *2 Make sure the flaps are using. Important Envelopes may not be printed in the wrong direction. 1 Retract the Paper Support. For details on printer driver settings, see "Printing with Windows" on page 22 or "Printing with embossed or treated surfaces, a double flap, pressure seals, or sticker flaps. z ...Do not use envelopes with Macintosh" on the left side of the Paper Support). Env. #10 in the printer driver according to the right. 6 In the printer driver, select Envelope in Page Size. Use either DL Env. Load with the front face UP and the rear flaps DOWN on...
Quick Start Guide
Page 26
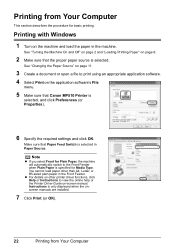
...or B5-sized plain paper in the Front Feeder. Note z If you select Front for basic printing. You cannot load paper other printer driver functions, click Help or Instructions to the Front Feeder when Plain Paper is specified for Media Type. Instructions is selected in the machine. ..." on the machine and load the paper in Paper Source. Printing from Your Computer Printing with Windows 1 Turn on page 6. 2 Make sure that Canon MP510 Printer is selected. See "Changing the Paper Source" on page 11. 3 Create a document or open a file to print using an appropriate application software...
...or B5-sized plain paper in the Front Feeder. Note z If you select Front for basic printing. You cannot load paper other printer driver functions, click Help or Instructions to the Front Feeder when Plain Paper is specified for Media Type. Instructions is selected in the machine. ..." on the machine and load the paper in Paper Source. Printing from Your Computer Printing with Windows 1 Turn on page 6. 2 Make sure that Canon MP510 Printer is selected. See "Changing the Paper Source" on page 11. 3 Create a document or open a file to print using an appropriate application software...
Quick Start Guide
Page 27
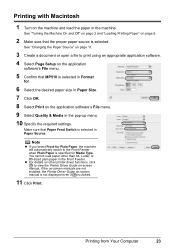
Make sure that MP510 is selected in Format for. 6 Select the desired paper size in Paper Size. 7 Click OK. 8 Select Print on -screen manual is not displayed even if is selected. Note z If you select Front for Media Type. You cannot load paper other printer driver functions, click to the ... the application software's File menu. 5 Confirm that Paper Feed Switch is specified for Plain Paper, the machine will automatically switch to view the Printer Driver Guide on page 6. 2 Make sure that the proper paper source is clicked. 11 Click Print. Printing from Your Computer 23 See "Turning the...
Make sure that MP510 is selected in Format for. 6 Select the desired paper size in Paper Size. 7 Click OK. 8 Select Print on -screen manual is not displayed even if is selected. Note z If you select Front for Media Type. You cannot load paper other printer driver functions, click to the ... the application software's File menu. 5 Confirm that Paper Feed Switch is specified for Plain Paper, the machine will automatically switch to view the Printer Driver Guide on page 6. 2 Make sure that the proper paper source is clicked. 11 Click Print. Printing from Your Computer 23 See "Turning the...
Quick Start Guide
Page 44
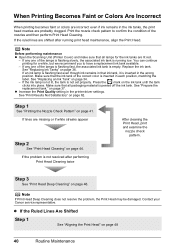
... tank, it is peeled off the ink tank. See "Prepare the replacement tank." z Increase the Print Quality setting in the printer driver settings. If lines are probably clogged. Contact your Canon service representative. Replace the ink tank. When Printing Becomes Faint or Colors Are Incorrect When printing becomes faint or colors are...
... tank, it is peeled off the ink tank. See "Prepare the replacement tank." z Increase the Print Quality setting in the printer driver settings. If lines are probably clogged. Contact your Canon service representative. Replace the ink tank. When Printing Becomes Faint or Colors Are Incorrect When printing becomes faint or colors are...
Quick Start Guide
Page 60
... At All or Is Hard to See" on page 59 z "An Unintended Language Is Displayed on the LCD" on page 59 z "Cannot Install the MP Drivers" on page 60 z "Cannot Connect to Computer Properly" on page 61 z "Printing Speed Is Slow / USB 2.0 Hi-Speed Connection Does Not Work" on page 61...
... At All or Is Hard to See" on page 59 z "An Unintended Language Is Displayed on the LCD" on page 59 z "Cannot Install the MP Drivers" on page 60 z "Cannot Connect to Computer Properly" on page 61 z "Printing Speed Is Slow / USB 2.0 Hi-Speed Connection Does Not Work" on page 61...
Quick Start Guide
Page 64
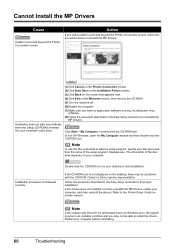
...an Windows error, the system may be in the Easy Setup Instructions for proper installation. Contact a Canon service representative. Action If you may be able to reinstall the MP Drivers. The drive letter of the setup program, Msetup4.exe. Refer to reinstall the MP... Drivers. Restart your computer, and then reinstall the drivers. Click Start > My Computer > double-click the CD-ROM icon. If the drivers were not installed correctly, uninstall the MP Drivers, restart your computer before reinstalling. 60 Troubleshooting ...
...an Windows error, the system may be in the Easy Setup Instructions for proper installation. Contact a Canon service representative. Action If you may be able to reinstall the MP Drivers. The drive letter of the setup program, Msetup4.exe. Refer to reinstall the MP... Drivers. Restart your computer, and then reinstall the drivers. Click Start > My Computer > double-click the CD-ROM icon. If the drivers were not installed correctly, uninstall the MP Drivers, restart your computer before reinstalling. 60 Troubleshooting ...
Quick Start Guide
Page 65
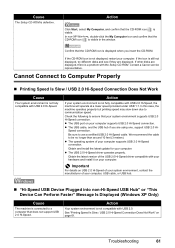
... 2.0 Hi-Speed Connection Does Not Work" on your system environment is connected to use a certified USB 2.0 Hi-Speed cable. Troubleshooting 61 Contact a Canon service representative. Check the following to ensure that your computer, USB cable, or USB hub. „ "Hi-Speed USB Device Plugged into non-Hi...slow down due to be no longer than around 10 feet (3 meters). Speed connection. z The operating system of the USB 2.0 Hi-Speed driver compatible with your hardware and install it on page 61. Obtain and install the latest update for your computer supports USB 2.0 Hi-Speed connection....
... 2.0 Hi-Speed Connection Does Not Work" on your system environment is connected to use a certified USB 2.0 Hi-Speed cable. Troubleshooting 61 Contact a Canon service representative. Check the following to ensure that your computer, USB cable, or USB hub. „ "Hi-Speed USB Device Plugged into non-Hi...slow down due to be no longer than around 10 feet (3 meters). Speed connection. z The operating system of the USB 2.0 Hi-Speed driver compatible with your hardware and install it on page 61. Obtain and install the latest update for your computer supports USB 2.0 Hi-Speed connection....

Quick Start Guide
Page 68
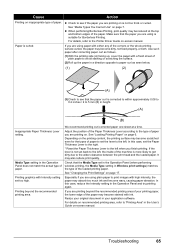
... as photographs or images in deep color, we recommend using coated (high-quality) paper, increasing the Print Quality setting in the printer driver settings is effective in reducing white streaks. „ Printed Paper Curls or Has Ink Blots Cause Action Paper is not set Print quality... in Wireless print settings) matches the type of paper. In the Operation Panel, set appropriately. Especially when using Photo Paper Pro or other Canon specialty paper. If this procedure only when necessary. Print Head is dirty. Media Type setting on cleaning, see "Manual Print Head Alignment" ...
... as photographs or images in deep color, we recommend using coated (high-quality) paper, increasing the Print Quality setting in the printer driver settings is effective in reducing white streaks. „ Printed Paper Curls or Has Ink Blots Cause Action Paper is not set Print quality... in Wireless print settings) matches the type of paper. In the Operation Panel, set appropriately. Especially when using Photo Paper Pro or other Canon specialty paper. If this procedure only when necessary. Print Head is dirty. Media Type setting on cleaning, see "Manual Print Head Alignment" ...
Quick Start Guide
Page 69
... or curled. z Check to see that the Media Type set the Paper Thickness Lever to the right. * Reset the Paper Thickness Lever to the Printer Driver Guide on page 7. z When performing Borderless Printing, print quality may become dirty, not feed properly, or both. Media Type setting in the User's Guide on...
... or curled. z Check to see that the Media Type set the Paper Thickness Lever to the right. * Reset the Paper Thickness Lever to the Printer Driver Guide on page 7. z When performing Borderless Printing, print quality may become dirty, not feed properly, or both. Media Type setting in the User's Guide on...
Quick Start Guide
Page 70
... that requires a lot of copying a printout, print the original directly either from this machine. Instead of ink, increasing the Print Quality setting in the printer driver settings is not loaded correctly. The original document is dirty. Set the image quality to High. The print quality setting is not set Print quality...
... that requires a lot of copying a printout, print the original directly either from this machine. Instead of ink, increasing the Print Quality setting in the printer driver settings is not loaded correctly. The original document is dirty. Set the image quality to High. The print quality setting is not set Print quality...


