
Quick Start Guide
Page 4
...Photo Film Co., Ltd. has reviewed this manual and in -One. All statements, technical information and recommendations in this manual thoroughly in order that promotes energy saving through the use guide to your Canon PIXMA MP510 Photo All-in any guides or related documents ...to -use of computer and other office equipment. Canon PIXMA MP510 Photo All-in the United States and other countries. with functions that this manual may not be , representation or warranties concerning the products described. Disclaimer Canon U.S.A., Inc. Specifications are office equipment such as computers...
...Photo Film Co., Ltd. has reviewed this manual and in -One. All statements, technical information and recommendations in this manual thoroughly in order that promotes energy saving through the use guide to your Canon PIXMA MP510 Photo All-in any guides or related documents ...to -use of computer and other office equipment. Canon PIXMA MP510 Photo All-in the United States and other countries. with functions that this manual may not be , representation or warranties concerning the products described. Disclaimer Canon U.S.A., Inc. Specifications are office equipment such as computers...
Quick Start Guide
Page 5
... on the Screen ........72 Cannot Print Properly from a Digital Camera 74 Cannot Print Properly from a Photo Index Sheet 76 Appendix 77 Reading the On-screen Manuals 77 Specifications 78 Menu Items 81 Safety Precautions 83 Legal Limitations on Use of Your Product and Use of Images 86 Users in the U.S.A 87...
... on the Screen ........72 Cannot Print Properly from a Digital Camera 74 Cannot Print Properly from a Photo Index Sheet 76 Appendix 77 Reading the On-screen Manuals 77 Specifications 78 Menu Items 81 Safety Precautions 83 Legal Limitations on Use of Your Product and Use of Images 86 Users in the U.S.A 87...
Quick Start Guide
Page 11
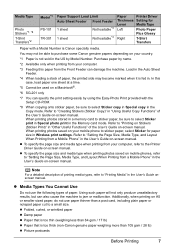
In this paper from your computer, refer to purchase some Canon genuine papers depending on your country. *1 Paper is fed in Wireless print settings. Refer to "Printing on -screen manual. Note For a detailed description of printing media types, refer to "Printing Media" in "Other Useful... sheet at a time. *5 Cannot be used on -screen manual. Load in the Auto Sheet Feeder. *4 When loading a stack of the User's Guide on -screen manual. z Folded, curled, or wrinkled paper z Damp paper z Paper that is Canon specialty media. Media Type Photo Stickers*7, *8 T-Shirt Transfers*2 ...
In this paper from your computer, refer to purchase some Canon genuine papers depending on your country. *1 Paper is fed in Wireless print settings. Refer to "Printing on -screen manual. Note For a detailed description of printing media types, refer to "Printing Media" in "Other Useful... sheet at a time. *5 Cannot be used on -screen manual. Load in the Auto Sheet Feeder. *4 When loading a stack of the User's Guide on -screen manual. z Folded, curled, or wrinkled paper z Damp paper z Paper that is Canon specialty media. Media Type Photo Stickers*7, *8 T-Shirt Transfers*2 ...

Quick Start Guide
Page 14
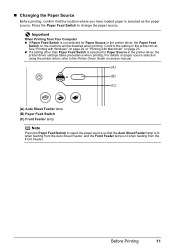
... paper as much as plain paper, you can also select the paper source using the printer driver, refer to the Printer Driver Guide on-screen manual. (A) (A) Press to change the paper source, simply press the Paper Feed Switch. For details on loading paper, see "Changing the Paper Source" on plain paper...
... paper as much as plain paper, you can also select the paper source using the printer driver, refer to the Printer Driver Guide on-screen manual. (A) (A) Press to change the paper source, simply press the Paper Feed Switch. For details on loading paper, see "Changing the Paper Source" on plain paper...
Quick Start Guide
Page 15
..., refer to the Printer Driver Guide on page 23. Before Printing 11 See "Printing with Windows" on page 22 or "Printing with Macintosh" on -screen manual. (A) (B) (C) (A) Auto Sheet Feeder lamp (B) Paper Feed Switch (C) Front Feeder lamp Note Press the Paper Feed Switch to change the paper source. „ Changing the Paper...
..., refer to the Printer Driver Guide on page 23. Before Printing 11 See "Printing with Windows" on page 22 or "Printing with Macintosh" on -screen manual. (A) (B) (C) (A) Auto Sheet Feeder lamp (B) Paper Feed Switch (C) Front Feeder lamp Note Press the Paper Feed Switch to change the paper source. „ Changing the Paper...
Quick Start Guide
Page 16
..." x 3.39" (Credit Card-sized) paper z Load paper only in portrait orientation (A). Refer to "Printing Media" in the User's Guide on-screen manual. 12 Before Printing „ Loading Paper Important z If you load at this maximum capacity depending on the type of paper or environmental conditions (either very... 152.4 mm, 5" x 7" / 127.0 x 177.8 mm, or 2.13" x 3.39" / 54.0 x 86.0 mm (credit card-size) for use general copy paper or Canon's Super White Paper. z You can cause the paper to be possible at a time to 110 sheets of 5" x 7" paper. z Do not stack more than 50 sheets...
..." x 3.39" (Credit Card-sized) paper z Load paper only in portrait orientation (A). Refer to "Printing Media" in the User's Guide on-screen manual. 12 Before Printing „ Loading Paper Important z If you load at this maximum capacity depending on the type of paper or environmental conditions (either very... 152.4 mm, 5" x 7" / 127.0 x 177.8 mm, or 2.13" x 3.39" / 54.0 x 86.0 mm (credit card-size) for use general copy paper or Canon's Super White Paper. z You can cause the paper to be possible at a time to 110 sheets of 5" x 7" paper. z Do not stack more than 50 sheets...
Quick Start Guide
Page 17
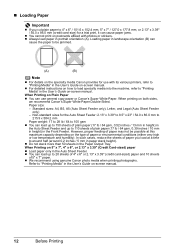
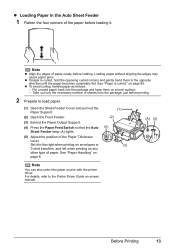
... neatly before loading. z To avoid curling, handle paper as follows. - See "Paper is curled, hold the opposing curled corners and gently bend them on -screen manual. Note z Align the edges of the paper before loading it to load paper. (1) Open the Sheet Feeder Cover and pull out the Paper Support. (2) Open...
... neatly before loading. z To avoid curling, handle paper as follows. - See "Paper is curled, hold the opposing curled corners and gently bend them on -screen manual. Note z Align the edges of the paper before loading it to load paper. (1) Open the Sheet Feeder Cover and pull out the Paper Support. (2) Open...
Quick Start Guide
Page 18
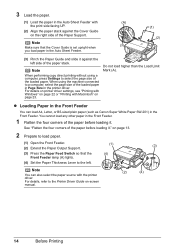
... the paper before loading it . z Loading Paper in the Front Feeder You can also select the paper source with Macintosh" on page 23. on -screen manual. (2) (4) 14 Before Printing See "Flatten the four corners of the loaded paper in Page Size in the Auto Sheet Feeder. (1) (2) (3) Pinch the Paper ...against the Cover Guide on the right side of the loaded paper. Note You can load A4, Letter, or B5-sized plain paper (such as Canon Super White Paper SW-201) in the Front Feeder. 1 Flatten the four corners of the paper stack. For details on printer driver settings, see ...
... the paper before loading it . z Loading Paper in the Front Feeder You can also select the paper source with Macintosh" on page 23. on -screen manual. (2) (4) 14 Before Printing See "Flatten the four corners of the loaded paper in Page Size in the Auto Sheet Feeder. (1) (2) (3) Pinch the Paper ...against the Cover Guide on the right side of the loaded paper. Note You can load A4, Letter, or B5-sized plain paper (such as Canon Super White Paper SW-201) in the Front Feeder. 1 Flatten the four corners of the paper stack. For details on printer driver settings, see ...
Quick Start Guide
Page 26
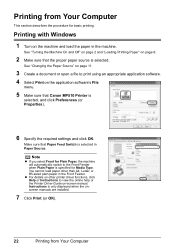
...appropriate application software. 4 Select Print on the application software's File menu. 5 Make sure that Canon MP510 Printer is specified for Media Type. Note z If you select Front for basic printing. z For details on -screen manual. See "Turning the Machine On and Off" on page 2 and "Loading Printing Paper" ...on the machine and load the paper in the machine. Make sure that the proper paper source is only displayed when the onscreen manuals are installed. 7 Click Print (or OK). 22 Printing from Your Computer This section describes the procedure for Plain Paper, the machine ...
...appropriate application software. 4 Select Print on the application software's File menu. 5 Make sure that Canon MP510 Printer is specified for Media Type. Note z If you select Front for basic printing. z For details on -screen manual. See "Turning the Machine On and Off" on page 2 and "Loading Printing Paper" ...on the machine and load the paper in the machine. Make sure that the proper paper source is only displayed when the onscreen manuals are installed. 7 Click Print (or OK). 22 Printing from Your Computer This section describes the procedure for Plain Paper, the machine ...
Quick Start Guide
Page 27
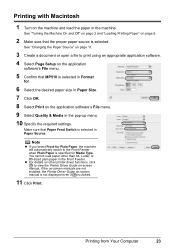
... Switch is selected in Paper Source. You cannot load paper other printer driver functions, click to view the Printer Driver Guide on-screen manual. Printing from Your Computer 23 Note z If you select Front for Plain Paper, the machine will automatically switch to print using an... appropriate application software. 4 Select Page Setup on the application software's File menu. 5 Confirm that MP510 is specified for . 6 Select the desired paper size in Paper Size. 7 Click OK. 8 Select Print on the application software's File menu. 9 ...
... Switch is selected in Paper Source. You cannot load paper other printer driver functions, click to view the Printer Driver Guide on-screen manual. Printing from Your Computer 23 Note z If you select Front for Plain Paper, the machine will automatically switch to print using an... appropriate application software. 4 Select Page Setup on the application software's File menu. 5 Confirm that MP510 is specified for . 6 Select the desired paper size in Paper Size. 7 Click OK. 8 Select Print on the application software's File menu. 9 ...
Quick Start Guide
Page 28
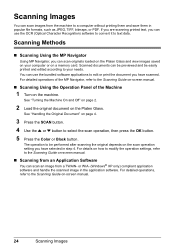
... original depends on the scan operation setting you can use the OCR (Optical Character Recognition) software to convert it to the Scanning Guide on-screen manual. „ Scanning Using the Operation Panel of the MP Navigator, refer to text data. See "Handling the Original Document" on page 4. 3 ... of the Machine 1 Turn on the machine. See "Turning the Machine On and Off" on page 2. 2 Load the original document on -screen manual. 24 Scanning Images Scanning Methods „ Scanning Using the MP Navigator Using MP Navigator, you have selected in step 4. For details on how to modify...
... original depends on the scan operation setting you can use the OCR (Optical Character Recognition) software to convert it to the Scanning Guide on-screen manual. „ Scanning Using the Operation Panel of the MP Navigator, refer to text data. See "Handling the Original Document" on page 4. 3 ... of the Machine 1 Turn on the machine. See "Turning the Machine On and Off" on page 2. 2 Load the original document on -screen manual. 24 Scanning Images Scanning Methods „ Scanning Using the MP Navigator Using MP Navigator, you have selected in step 4. For details on how to modify...

Quick Start Guide
Page 29
...size, media type, image quality, magnification The settings you can select from 4" x 6" / 101.6 x 152.4 mm photos or graphics using Canon sticker paper. Using Other Copy Functions Reduced/Enlarged Copy Reduces or enlarges copies. Sticker Copy Makes stickers from the machine's pre-defined settings or specify... the number manually. Copying 25 Copying Making Copies This section describes the basic procedure to increase it. 4 Load the original on the Platen ...
...size, media type, image quality, magnification The settings you can select from 4" x 6" / 101.6 x 152.4 mm photos or graphics using Canon sticker paper. Using Other Copy Functions Reduced/Enlarged Copy Reduces or enlarges copies. Sticker Copy Makes stickers from the machine's pre-defined settings or specify... the number manually. Copying 25 Copying Making Copies This section describes the basic procedure to increase it. 4 Load the original on the Platen ...
Quick Start Guide
Page 34
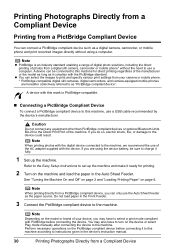
... a computer. See "Turning the Machine On and Off" on page 2 and "Loading Printing Paper" on the device or select Play mode manually after connecting the device to the machine. You may have to turn on page 6. z You can select the images to print and specify various... hereafter collectively referred to the device could result. Note When printing directly from a Compliant Device Do not load paper in the device's instruction manual. 30 Printing Photographs Directly from a PictBridge compliant device, you do so, electric shock, fire, or damage to as the paper source. ...
... a computer. See "Turning the Machine On and Off" on page 2 and "Loading Printing Paper" on the device or select Play mode manually after connecting the device to the machine. You may have to turn on page 6. z You can select the images to print and specify various... hereafter collectively referred to the device could result. Note When printing directly from a Compliant Device Do not load paper in the device's instruction manual. 30 Printing Photographs Directly from a PictBridge compliant device, you do so, electric shock, fire, or damage to as the paper source. ...

Quick Start Guide
Page 35
...device, the Page size and the Media type settings specified in the Memory card mode of the machine are given according to those used in Canon-brand PictBridge compliant devices. will appear on the LCD of the device when the machine is correctly connected. (2) Note If does not appear,... printing. In this case, the Default setting explained below may be set to Default (the setting to follow the instructions given in the instruction manual of your device. Setting item names may not be sure to follow that of the machine) on a PictBridge compliant device connected to the machine...
...device, the Page size and the Media type settings specified in the Memory card mode of the machine are given according to those used in Canon-brand PictBridge compliant devices. will appear on the LCD of the device when the machine is correctly connected. (2) Note If does not appear,... printing. In this case, the Default setting explained below may be set to Default (the setting to follow the instructions given in the instruction manual of your device. Setting item names may not be sure to follow that of the machine) on a PictBridge compliant device connected to the machine...

Quick Start Guide
Page 36
... stickers is set to Default (the setting to follow that correspond to 16-up . * If there are using a Canon-brand PictBridge compatible device, additional options of VIVID, NR, VIVID+NR, or Face may display the Layout option 2-up,... printing on sticker paper, select 10x15 cm/4" x 6" in Paper size. *2 Can be selected only on certain Canon-brand PictBridge compatible devices. *3 Plain Paper can print in the Memory card mode of printing paper can be available,... the PictBridge compliant device that of the machine) on -screen manual. In this setting, refer to print photo stickers.
... stickers is set to Default (the setting to follow that correspond to 16-up . * If there are using a Canon-brand PictBridge compatible device, additional options of VIVID, NR, VIVID+NR, or Face may display the Layout option 2-up,... printing on sticker paper, select 10x15 cm/4" x 6" in Paper size. *2 Can be selected only on certain Canon-brand PictBridge compatible devices. *3 Plain Paper can print in the Memory card mode of printing paper can be available,... the PictBridge compliant device that of the machine) on -screen manual. In this setting, refer to print photo stickers.
Quick Start Guide
Page 37
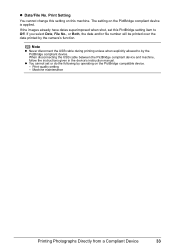
... z You cannot set this machine. When disconnecting the USB cable between the PictBridge compliant device and machine, follow the instructions given in the device's instruction manual. z Date/File No.
... z You cannot set this machine. When disconnecting the USB cable between the PictBridge compliant device and machine, follow the instructions given in the device's instruction manual. z Date/File No.
Quick Start Guide
Page 53
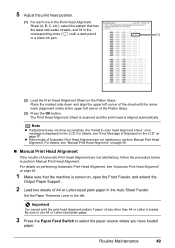
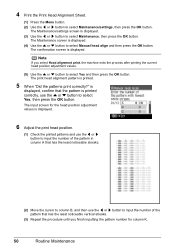
...adjustment was not done successfully, the "Failed to select the paper source where you have loaded paper. Set the Paper Thickness Lever to perform Manual Print Head Alignment. Routine Maintenance 49 For details, see "Automatic Print Head Alignment" on page 48. 1 Make sure that has the least... noticeable streaks, and fill in the Auto Sheet Feeder. For details on performing Automatic Print Head Alignment, see "Manual Print Head Alignment" on page 57. error message is turned on the LCD. Important You cannot print the print head alignment pattern if...
...adjustment was not done successfully, the "Failed to select the paper source where you have loaded paper. Set the Paper Thickness Lever to perform Manual Print Head Alignment. Routine Maintenance 49 For details, see "Automatic Print Head Alignment" on page 48. 1 Make sure that has the least... noticeable streaks, and fill in the Auto Sheet Feeder. For details on performing Automatic Print Head Alignment, see "Manual Print Head Alignment" on page 57. error message is turned on the LCD. Important You cannot print the print head alignment pattern if...
Quick Start Guide
Page 54
... is displayed. (4) Use the { or } button to select Maintenance, then press the OK button. The Maintenance screen is displayed. (3) Use the [ or ] button to select Manual head align and then press the OK button. The confirmation screen is printed. 5 When "Did the patterns print correctly?"
... is displayed. (4) Use the { or } button to select Maintenance, then press the OK button. The Maintenance screen is displayed. (3) Use the [ or ] button to select Manual head align and then press the OK button. The confirmation screen is printed. 5 When "Did the patterns print correctly?"

Quick Start Guide
Page 58
... so that the machine is turned on the right and left . Align the protrusions at the right edge of the paper feed roller as you manually rotate the roller. Important Press firmly on the lever to reattach the Rear Cover. If the inside of the machine. 3 Hold the Rear Cover Lever... and then press to the right and pull to remove the Rear Cover. 4 Manually rotate the paper feed roller toward you and apply a cotton swab or the like to wipe off . Remove ejected paper. Note z If the dirt is...
... so that the machine is turned on the right and left . Align the protrusions at the right edge of the paper feed roller as you manually rotate the roller. Important Press firmly on the lever to reattach the Rear Cover. If the inside of the machine. 3 Hold the Rear Cover Lever... and then press to the right and pull to remove the Rear Cover. 4 Manually rotate the paper feed roller toward you and apply a cotton swab or the like to wipe off . Remove ejected paper. Note z If the dirt is...
Quick Start Guide
Page 60
... No.: 2001 Is Displayed" on page 74 z "Cannot Print Properly from a Digital Camera" on page 74 z "Cannot Print Properly from a Photo Index Sheet" on -screen manuals. z "Error Message Is Displayed on the LCD" on page 57 z "LCD Cannot Be Seen At All or Is Hard to See" on page 59 z "An...
... No.: 2001 Is Displayed" on page 74 z "Cannot Print Properly from a Digital Camera" on page 74 z "Cannot Print Properly from a Photo Index Sheet" on -screen manuals. z "Error Message Is Displayed on the LCD" on page 57 z "LCD Cannot Be Seen At All or Is Hard to See" on page 59 z "An...


